
English Manual
Page 2
Remove the PART IDENTIFICATION CHART and PART LIST/EXPLODED DRAWING before beginning assembly. WEIDER is attached in the center of ICON IP, Inc. 2 TABLE OF CONTENTS WARNING DECAL PLACEMENT 3 IMPORTANT PRECAUTIONS 4 BEFORE YOU BEGIN 5 ASSEMBLY 6 ADJUSTMENTS 20 CABLE DIAGRAMS 23 EXERCISE GUIDELINES 24 ORDERING REPLACEMENT PARTS Back Cover LIMITED WARRANTY Back Cover Note: A PART IDENTIFICATION CHART and a PART LIST/EXPLODED DRAWING is a registered trademark of this manual.
Remove the PART IDENTIFICATION CHART and PART LIST/EXPLODED DRAWING before beginning assembly. WEIDER is attached in the center of ICON IP, Inc. 2 TABLE OF CONTENTS WARNING DECAL PLACEMENT 3 IMPORTANT PRECAUTIONS 4 BEFORE YOU BEGIN 5 ASSEMBLY 6 ADJUSTMENTS 20 CABLE DIAGRAMS 23 EXERCISE GUIDELINES 24 ORDERING REPLACEMENT PARTS Back Cover LIMITED WARRANTY Back Cover Note: A PART IDENTIFICATION CHART and a PART LIST/EXPLODED DRAWING is a registered trademark of this manual.
English Manual
Page 4
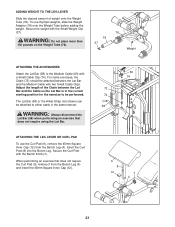
... bench are mounted on the pulleys. Always disconnect the lat bar from the weight rack when performing an exercise that all times. If the cables bind as described in this product. 4 WARNING: Before beginning this manual. 2. Use the weight bench only as you are exercising, stop ...or institutional setting. 4. Always move the bench out of the way when performing squat exercises. 17. Replace any worn parts immediately. 6. Replace all cables at all parts are on the weight carriage. 14. Always place an equal amount of weight on a level surface. Keep children under 12 and...
... bench are mounted on the pulleys. Always disconnect the lat bar from the weight rack when performing an exercise that all times. If the cables bind as described in this product. 4 WARNING: Before beginning this manual. 2. Use the weight bench only as you are exercising, stop ...or institutional setting. 4. Always move the bench out of the way when performing squat exercises. 17. Replace any worn parts immediately. 6. Replace all cables at all parts are on the weight carriage. 14. Always place an equal amount of weight on a level surface. Keep children under 12 and...
English Manual
Page 12
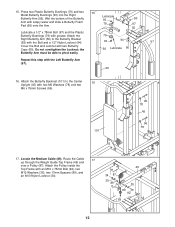
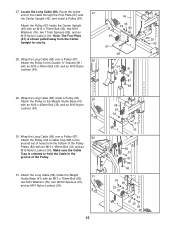
... grease. Repeat this step with two M6 Washers (78) and two M6 x 75mm Screws (96). 101 96 78 45 96 78 17. Locate the Medium Cable (69). Attach the Butterfly Backrest (101) to the Center 16 Upright (45) with the Left Butterfly Arm (57). 66 16. Attach the 79 Right Butterfly... Arm (56) to pivot easily. Do not overtighten the Locknut; Route the Cable 17 up through the Weight Guide Top Frame (49) and over a Pulley (87). 15. Wet the bottom of the Butterfly Lubricate 93 80 Arm with...
... grease. Repeat this step with two M6 Washers (78) and two M6 x 75mm Screws (96). 101 96 78 45 96 78 17. Locate the Medium Cable (69). Attach the Butterfly Backrest (101) to the Center 16 Upright (45) with the Left Butterfly Arm (57). 66 16. Attach the 79 Right Butterfly... Arm (56) to pivot easily. Do not overtighten the Locknut; Route the Cable 17 up through the Weight Guide Top Frame (49) and over a Pulley (87). 15. Wet the bottom of the Butterfly Lubricate 93 80 Arm with...

English Manual
Page 13
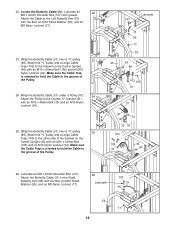
...Pulley inside the Top Frame with an M10 Nylon Locknut (34). 13 69 34 102 62 Make sure the Cable Trap is oriented to the M10 x 21 19mm Bolt (102) in the Weight Carriage (62) with an... and an M10 Nylon Locknut (34). 34 35 87 49 89 89 69 35 92 19. Route the Medium Cable (69) up through the 20 Weight Guide Top Frame (49), over a Pulley (87) and down through the... Weight Guide Top Frame 18 (49). 18. Attach the Medium Cable (69) to hold the Cable in the Pulley Plates (82) with an M10 x 75mm Bolt (92), two M10 Washers (35), ...
...Pulley inside the Top Frame with an M10 Nylon Locknut (34). 13 69 34 102 62 Make sure the Cable Trap is oriented to the M10 x 21 19mm Bolt (102) in the Weight Carriage (62) with an... and an M10 Nylon Locknut (34). 34 35 87 49 89 89 69 35 92 19. Route the Medium Cable (69) up through the 20 Weight Guide Top Frame (49), over a Pulley (87) and down through the... Weight Guide Top Frame 18 (49). 18. Attach the Medium Cable (69) to hold the Cable in the Pulley Plates (82) with an M10 x 75mm Bolt (92), two M10 Washers (35), ...
English Manual
Page 14
... Butterfly Arm (57) with an M10 x 60mm Bolt (105) and an M10 Nylon Locknut (34). Lubricate an M8 x 43mm Shoulder Bolt (107). Attach the Butterfly Cable (31) to the Double "U"-bracket (81) with the Bolt, an M10 Small Washer (95), and an M8 Nylon Locknut (17). 26 Lubricate 107 31 95... 56 17 14 Wrap the Butterfly Cable (31) under a Pulley (87). 24 Attach the Pulley to the Right Butterfly Arm (56) with an M10 x 45mm Bolt (33) and an M10 Nylon Locknut...
... Butterfly Arm (57) with an M10 x 60mm Bolt (105) and an M10 Nylon Locknut (34). Lubricate an M8 x 43mm Shoulder Bolt (107). Attach the Butterfly Cable (31) to the Double "U"-bracket (81) with the Bolt, an M10 Small Washer (95), and an M8 Nylon Locknut (17). 26 Lubricate 107 31 95... 56 17 14 Wrap the Butterfly Cable (31) under a Pulley (87). 24 Attach the Pulley to the Right Butterfly Arm (56) with an M10 x 45mm Bolt (33) and an M10 Nylon Locknut...
English Manual
Page 17
...33 34 87 88 68 34 68 35 91 41 91 35 92 Wrap the Long Cable (68) over a Pulley (87). 30 Attach the Pulley and a Cable Trap (88) to the second set of the Pulley Plates (82) with an ... Locknut (34). 45 34 35 89 87 67 68 34 81 33 87 68 89 35 92 29. Wrap the Long Cable (68) over a Pulley (87). 28 Attach the Pulley to the Weight Guide Base (41) with an M10 x 75mm...) and an M10 Nylon Locknut (34). 30. Note: The Foot Plate (67) is oriented to hold the Cable in the groove of the Cable through the Foot Plate (67) and the Center Upright (45), and under a Pulley (87). 29 Attach the...
...33 34 87 88 68 34 68 35 91 41 91 35 92 Wrap the Long Cable (68) over a Pulley (87). 30 Attach the Pulley and a Cable Trap (88) to the second set of the Pulley Plates (82) with an ... Locknut (34). 45 34 35 89 87 67 68 34 81 33 87 68 89 35 92 29. Wrap the Long Cable (68) over a Pulley (87). 28 Attach the Pulley to the Weight Guide Base (41) with an M10 x 75mm...) and an M10 Nylon Locknut (34). 30. Note: The Foot Plate (67) is oriented to hold the Cable in the groove of the Cable through the Foot Plate (67) and the Center Upright (45), and under a Pulley (87). 29 Attach the...
English Manual
Page 23
..., the Chain (73) should be performed. The Lat Bar (58) or the Ankle Strap (not shown) can be attached to the Medium Cable (69) with two Small Cable Clips. When performing an exercise that does not require using the Lat Bar. Secure the weight with the Bench Knob (7). Insert the Curl...76). 18 37 76 Weight ATTACHING THE ACCESSORIES Attach the Lat Bar (58) to either cable in the correct starting position for the exercise to be attached between the Lat Bar and the Medium Cable with a Small Cable Clip (74). Adjust the length of weight onto the Weight Tube (76). ATTACHING THE ...
..., the Chain (73) should be performed. The Lat Bar (58) or the Ankle Strap (not shown) can be attached to the Medium Cable (69) with two Small Cable Clips. When performing an exercise that does not require using the Lat Bar. Secure the weight with the Bench Knob (7). Insert the Curl...76). 18 37 76 Weight ATTACHING THE ACCESSORIES Attach the Lat Bar (58) to either cable in the correct starting position for the exercise to be attached between the Lat Bar and the Medium Cable with a Small Cable Clip (74). Adjust the length of weight onto the Weight Tube (76). ATTACHING THE ...
English Manual
Page 24
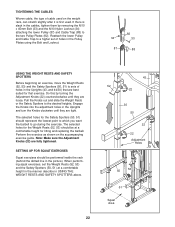
Do this by removing the M10 x 45mm Bolt (33) and the M10 Nylon Locknut (34) attaching the lower Pulley (87) and Cable Trap (88) to the two Pulley Plates (82). The selected holes for lifting and replacing the barbell. The selected holes for the Weight Rests (52, ... go during the exercise. SETTING UP FOR SQUAT EXERCISES Squat exercises should represent the lowest point to which you want the barbell to sets of cable used on the accompanying exercise guide. If there is first used. Pull the Knobs out and slide the Weight Rests or the Safety Spotters to...
Do this by removing the M10 x 45mm Bolt (33) and the M10 Nylon Locknut (34) attaching the lower Pulley (87) and Cable Trap (88) to the two Pulley Plates (82). The selected holes for lifting and replacing the barbell. The selected holes for the Weight Rests (52, ... go during the exercise. SETTING UP FOR SQUAT EXERCISES Squat exercises should represent the lowest point to which you want the barbell to sets of cable used on the accompanying exercise guide. If there is first used. Pull the Knobs out and slide the Weight Rests or the Safety Spotters to...

English Manual
Page 25
... correctly routed, the weight rack will not function properly and damage may occur. CABLE DIAGRAMS The cable diagrams below show the correct route for each cable. If the cables have been assembled correctly. Medium Cable (69) Length: 2.93m 2 1 4 5 2 1 Butterfly Cable (31) Length: 1.74m 5 4 3 3 5 3 Long Cable (68) Length: 5.57m 1 2 6 4 23 Use the diagram to make sure that the...
... correctly routed, the weight rack will not function properly and damage may occur. CABLE DIAGRAMS The cable diagrams below show the correct route for each cable. If the cables have been assembled correctly. Medium Cable (69) Length: 2.93m 2 1 4 5 2 1 Butterfly Cable (31) Length: 1.74m 5 4 3 3 5 3 Long Cable (68) Length: 5.57m 1 2 6 4 23 Use the diagram to make sure that the...
English Manual
Page 30
...x 58mm Carriage Bolt M6 Washer Plastic Butterfly Bushing Butterfly Cap Double "U"-bracket Pulley Plate Carriage Stop Bushing Square Bushing Rack Joint Plate "V"-pulley Pulley Cable Trap 17mm Spacer M10 x 75mm Carriage Bolt 28mm Spacer M10 x 75mm Bolt Metal Butterfly Bushing 1/2" Nylon Locknut M10 Small Washer M6 x 75mm... Screw 1/2" x 78mm Bolt M10 x 68mm Bolt M6 x 38mm Bolt M10 x 156mm Bolt Butterfly Backrest M10 x 19mm Bolt Large Cable Trap M10 x 81mm Button Bolt M10 x 60mm Bolt M10 x 87mm Bolt M8 x 43mm Shoulder Bolt Chrome Joint Plate User's Manual Exercise Chart Allen Wrench...
...x 58mm Carriage Bolt M6 Washer Plastic Butterfly Bushing Butterfly Cap Double "U"-bracket Pulley Plate Carriage Stop Bushing Square Bushing Rack Joint Plate "V"-pulley Pulley Cable Trap 17mm Spacer M10 x 75mm Carriage Bolt 28mm Spacer M10 x 75mm Bolt Metal Butterfly Bushing 1/2" Nylon Locknut M10 Small Washer M6 x 75mm... Screw 1/2" x 78mm Bolt M10 x 68mm Bolt M6 x 38mm Bolt M10 x 156mm Bolt Butterfly Backrest M10 x 19mm Bolt Large Cable Trap M10 x 81mm Button Bolt M10 x 60mm Bolt M10 x 87mm Bolt M8 x 43mm Shoulder Bolt Chrome Joint Plate User's Manual Exercise Chart Allen Wrench...


