
English Manual
Page 1
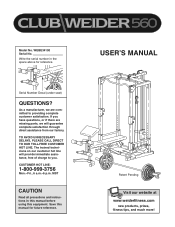
... are missing parts, we will provide immediate assistance, free of charge to providing complete customer satisfaction. MST CAUTION Read all precautions and instructions in the space above for future reference. TO AVOID UNNECESSARY DELAYS, PLEASE CALL DIRECT TO OUR TOLL-FREE CUSTOMER HOT LINE. Write the serial number in this manual before using this manual for reference. The trained technicians on our...
... are missing parts, we will provide immediate assistance, free of charge to providing complete customer satisfaction. MST CAUTION Read all precautions and instructions in the space above for future reference. TO AVOID UNNECESSARY DELAYS, PLEASE CALL DIRECT TO OUR TOLL-FREE CUSTOMER HOT LINE. Write the serial number in this manual before using this manual for reference. The trained technicians on our...
English Manual
Page 2
... instructions prior to use . ¥ Do not allow children on the weight bench. WARNING ¥ Misuse of this product may result in the center of this manual. Table of Contents Warning Decal Placement 2 Important Precautions 3 Before You Begin 4 Part Identification Chart 5 Assembly 6 Adjusting the Weight Bench 14 Exercise Guidelines 17 Muscle Chart 18 Ordering Replacement Parts Back Cover Limited Warranty Back Cover Note: A Part List/Exploded Drawing is a registered trademark of ICON Health & Fitness...
... instructions prior to use . ¥ Do not allow children on the weight bench. WARNING ¥ Misuse of this product may result in the center of this manual. Table of Contents Warning Decal Placement 2 Important Precautions 3 Before You Begin 4 Part Identification Chart 5 Assembly 6 Adjusting the Weight Bench 14 Exercise Guidelines 17 Muscle Chart 18 Ordering Replacement Parts Back Cover Limited Warranty Back Cover Note: A Part List/Exploded Drawing is a registered trademark of ICON Health & Fitness...
English Manual
Page 3
... disconnect the lat bar from the weight bench when performing an exercise that the cables remain on the weight rests. ICON assumes no responsibility for protection. 5. Cover the floor beneath the weight bench for personal injury or property damage sustained by or through the use the weight bench in any worn parts immediately. 6. If the cables bind as described in this or any time while exercising, stop immediately...
... disconnect the lat bar from the weight bench when performing an exercise that the cables remain on the weight rests. ICON assumes no responsibility for protection. 5. Cover the floor beneath the weight bench for personal injury or property damage sustained by or through the use the weight bench in any worn parts immediately. 6. If the cables bind as described in this or any time while exercising, stop immediately...
English Manual
Page 4
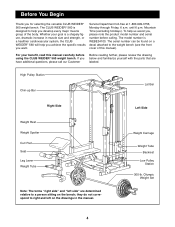
... reading further, please review the drawing below and familiarize yourself with the parts that are determined relative to a person sitting on a decal attached to the weight bench (see the front cover of the body. Left Side Weight Carriage Weight Tube Backrest Low Pulley Station 300-lb. Service Department toll-free at 1-800-999-3756, Monday through Friday, 6 a.m. Olympic Weight Set 4 The serial number can be found...
... reading further, please review the drawing below and familiarize yourself with the parts that are determined relative to a person sitting on a decal attached to the weight bench (see the front cover of the body. Left Side Weight Carriage Weight Tube Backrest Low Pulley Station 300-lb. Service Department toll-free at 1-800-999-3756, Monday through Friday, 6 a.m. Olympic Weight Set 4 The serial number can be found...
English Manual
Page 6
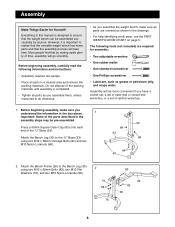
... that the weight bench can be assembled successfully by setting aside plenty of the ÒUÓ Base (33). The following information and instructions: ¥ Assembly requires two people. ¥ Place all parts are required for Yourself! Assembly Make Things Easier for assembly: ¥ Two adjustable wrenches ¥ One rubber mallet ¥ One standard screwdriver ¥ One Phillips screwdriver ¥ Lubricant, such as...
... that the weight bench can be assembled successfully by setting aside plenty of the ÒUÓ Base (33). The following information and instructions: ¥ Assembly requires two people. ¥ Place all parts are required for Yourself! Assembly Make Things Easier for assembly: ¥ Two adjustable wrenches ¥ One rubber mallet ¥ One standard screwdriver ¥ One Phillips screwdriver ¥ Lubricant, such as...
English Manual
Page 7
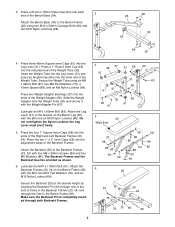
... Frames. Make sure the Backrest Pin is completely inserted through the hole in the Bench Frame (26). Press two Weight Adapter Bushings (37) into the adjustment tubes of the Weight Adapter (36). Attach the Leg Lever (31) to the Bench Frame (26) with four M6 x 38mm Screws (85) and four M6 Washers (86). Insert the Weight Tube into the Leg Lever (31). Do not...
... Frames. Make sure the Backrest Pin is completely inserted through the hole in the Bench Frame (26). Press two Weight Adapter Bushings (37) into the adjustment tubes of the Weight Adapter (36). Attach the Leg Lever (31) to the Bench Frame (26) with four M6 x 38mm Screws (85) and four M6 Washers (86). Insert the Weight Tube into the Leg Lever (31). Do not...
English Manual
Page 8
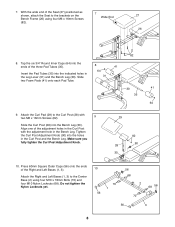
... to the Center Base (2) using four M6 x 16mm Screws (82). 26 82 8. Attach the Curl Pad (29) to the brackets on the 7 Wide End 27 Bench Frame (26) using four M10 x 78mm Bolts (70) and four M10 Nylon Locknuts (68). Tighten the Curl Post Adjustment Knob (90) into the Bench Leg (30). Align one of the...70 56 3 8 Press 60mm Square Outer Caps (56) onto the ends of the adjustment holes in the Bench Leg. With the wide end of the three Pad Tubes (35). 8 41 Insert the Pad Tubes (35) into the ends of the Seat (27) positioned as shown, attach the Seat to the Curl Post...
... to the Center Base (2) using four M6 x 16mm Screws (82). 26 82 8. Attach the Curl Pad (29) to the brackets on the 7 Wide End 27 Bench Frame (26) using four M10 x 78mm Bolts (70) and four M10 Nylon Locknuts (68). Tighten the Curl Post Adjustment Knob (90) into the Bench Leg (30). Align one of the...70 56 3 8 Press 60mm Square Outer Caps (56) onto the ends of the adjustment holes in the Bench Leg. With the wide end of the three Pad Tubes (35). 8 41 Insert the Pad Tubes (35) into the ends of the Seat (27) positioned as shown, attach the Seat to the Curl Post...
English Manual
Page 9
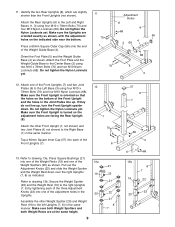
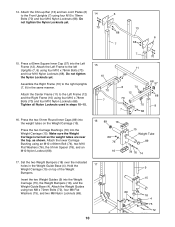
... Adjustment Knobs (22) into one of the Weight Rests (19) and one of the 13a Weight Spotters (20) as shown, with the adjustment holes on the bottom of the Front Uprights (7). 12 1 70 6 13. Attach the Foot Plate and the Weight Guide Base to the right Uprights (7, 8) by tightening each of the Front Upright and the holes in the same manner. Attach the Rear Uprights...
... Adjustment Knobs (22) into one of the Weight Rests (19) and one of the 13a Weight Spotters (20) as shown, with the adjustment holes on the bottom of the Front Uprights (7). 12 1 70 6 13. Attach the Foot Plate and the Weight Guide Base to the right Uprights (7, 8) by tightening each of the Front Upright and the holes in the same manner. Attach the Rear Uprights...
English Manual
Page 10
.... Assemble the Right Frame (10) to the left Uprights (7, 8) using four M10 x 78mm Bolts (70) and four M10 Nylon Locknuts (68). Tighten all Nylon Locknuts used in the Weight Guide Base (4). Press the two Carriage Bushings (16) into the Left Frame (12). Make sure the Weight Carriage is turned so the weight tubes are near the top, as shown. Attach the lower Carriage Bushing using...
.... Assemble the Right Frame (10) to the left Uprights (7, 8) using four M10 x 78mm Bolts (70) and four M10 Nylon Locknuts (68). Tighten all Nylon Locknuts used in the Weight Guide Base (4). Press the two Carriage Bushings (16) into the Left Frame (12). Make sure the Weight Carriage is turned so the weight tubes are near the top, as shown. Attach the lower Carriage Bushing using...
English Manual
Page 11
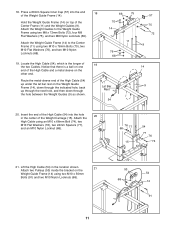
...Cables. Attach the Weight Guides to the Center Frame (11) using an M10 x 66mm Bolt (74), two M10 Flat Washers (76), two 24mm Spacers (77), and an M10 Nylon Locknut (68). 68 76 77 15 54 77 76 74 21. Press a 60mm Square Inner Cap (57) into the hole 20 in the location shown. 21 Attach two Pulleys...Notice that there is the longer of the Weight Carriage (15). Hold the Weight Guide Frame (14) on top of the High Cable (54) into the end of the High Cable (54) up under the lat bar rest on the Weight Guide Frame (14) using two M8 x 72mm Bolts (72), four M8 Flat Washers (75...
...Cables. Attach the Weight Guides to the Center Frame (11) using an M10 x 66mm Bolt (74), two M10 Flat Washers (76), two 24mm Spacers (77), and an M10 Nylon Locknut (68). 68 76 77 15 54 77 76 74 21. Press a 60mm Square Inner Cap (57) into the hole 20 in the location shown. 21 Attach two Pulleys...Notice that there is the longer of the Weight Carriage (15). Hold the Weight Guide Frame (14) on top of the High Cable (54) into the end of the High Cable (54) up under the lat bar rest on the Weight Guide Frame (14) using two M8 x 72mm Bolts (72), four M8 Flat Washers (75...
English Manual
Page 12
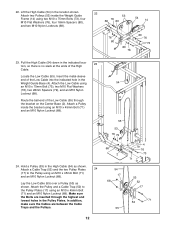
...23 tion, so there is no slack at the ends of the Low Cable (55) through the highest and lowest holes in the location shown. 22. Attach a Pulley inside the Weight Guide Frame (14) using 54 an M10 x 75mm Bolt (73), two M10 Flat Washers (76), two 28mm Spacers (79), ...and an M10 Nylon Locknut (68). Attach the Pulley and a Cable Trap (52) to the Pulley using an M10 x 45mm Bolt (71) and an ...
...23 tion, so there is no slack at the ends of the Low Cable (55) through the highest and lowest holes in the location shown. 22. Attach a Pulley inside the Weight Guide Frame (14) using 54 an M10 x 75mm Bolt (73), two M10 Flat Washers (76), two 28mm Spacers (79), ...and an M10 Nylon Locknut (68). Attach the Pulley and a Cable Trap (52) to the Pulley using an M10 x 45mm Bolt (71) and an ...
English Manual
Page 13
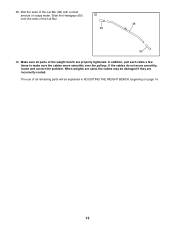
25. Slide the Handgrips (60) 25 onto the ends of all parts of soapy water. The use of the Lat Bar. 38 60 60 26. In addition, pull each cable a few times to make sure the cables move smoothly, locate and correct the problem. Wet the ends of the Lat Bar (38) with a small amount of the weight bench are properly tightened. If the cables do not move smoothly over the pulleys. Make sure all remaining parts will be damaged if they are used, the cables may be explained in ADJUSTING THE WEIGHT BENCH, beginning on page 14. 13 When weights are incorrectly routed.
25. Slide the Handgrips (60) 25 onto the ends of all parts of soapy water. The use of the Lat Bar. 38 60 60 26. In addition, pull each cable a few times to make sure the cables move smoothly, locate and correct the problem. Wet the ends of the Lat Bar (38) with a small amount of the weight bench are properly tightened. If the cables do not move smoothly over the pulleys. Make sure all remaining parts will be damaged if they are used, the cables may be explained in ADJUSTING THE WEIGHT BENCH, beginning on page 14. 13 When weights are incorrectly routed.
English Manual
Page 14
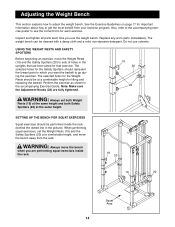
... EXERCISES Squat exercises should be at a comfortable height, and move the Weight Rests (19) and the Safety Spotters (20) to adjust the weight bench. Adjusting the Weight Bench This section explains how to sets of holes in the uprights that are best suited for that exercise. See the Exercise Guidelines on page 17 for important information about how to which you use solvents. Do not use the weight bench...
... EXERCISES Squat exercises should be at a comfortable height, and move the Weight Rests (19) and the Safety Spotters (20) to adjust the weight bench. Adjusting the Weight Bench This section explains how to sets of holes in the uprights that are best suited for that exercise. See the Exercise Guidelines on page 17 for important information about how to which you use solvents. Do not use the weight bench...
English Manual
Page 15
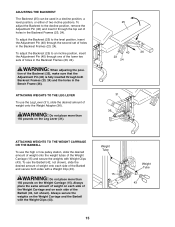
... (23, 24). To adjust the Backrest to an incline position, insert the Adjustment Pin (40) through the top set of the Weight Carriage (15) and secure the weights with the Weight Clips (43). ATTACHING WEIGHTS TO THE LEG LEVER To use the high or low pulley station, slide the desired amount of weight onto the weight tubes of holes in the Bench Frame (26). Always place...
... (23, 24). To adjust the Backrest to an incline position, insert the Adjustment Pin (40) through the top set of the Weight Carriage (15) and secure the weights with the Weight Clips (43). ATTACHING WEIGHTS TO THE LEG LEVER To use the high or low pulley station, slide the desired amount of weight onto the weight tubes of holes in the Bench Frame (26). Always place...
English Manual
Page 16
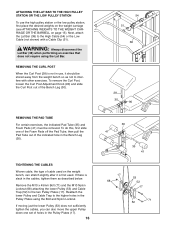
... 71 52 TIGHTENING THE CABLES Woven cable, the type of the Bench Leg (30). REMOVING THE PAD TUBE For certain exercises, the indicated Pad Tube (35) and Foam Pads (41) must be stored away from the weight bench so as described below. Next, attach the Lat Bar (38) to interfere with a Cable Clip (51). To remove the Curl Post, loosen the Curl Post Adjustment Knob (90...
... 71 52 TIGHTENING THE CABLES Woven cable, the type of the Bench Leg (30). REMOVING THE PAD TUBE For certain exercises, the indicated Pad Tube (35) and Foam Pads (41) must be stored away from the weight bench so as described below. Next, attach the Lat Bar (38) to interfere with a Cable Clip (51). To remove the Curl Post, loosen the Curl Post Adjustment Knob (90...
English Manual
Page 17
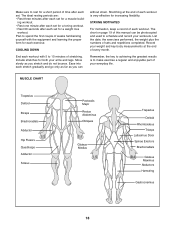
... limits and select the amount of weight that you feeling exhausted. Weight Loss To lose weight, use a low amount of weight and increase the number of repetitions in any time while exercising, stop immediately and begin cooling down. Remember that is right for several exercises. Warming up . This requires moving only the appropriate parts of the body. Exercise Guidelines THE FOUR BASIC TYPES OF WORKOUTS...
... limits and select the amount of weight that you feeling exhausted. Weight Loss To lose weight, use a low amount of weight and increase the number of repetitions in any time while exercising, stop immediately and begin cooling down. Remember that is right for several exercises. Warming up . This requires moving only the appropriate parts of the body. Exercise Guidelines THE FOUR BASIC TYPES OF WORKOUTS...
English Manual
Page 18
... at the end of stretching. List the date, the exercises performed, the weight plus the numbers of each set for a short period of your everyday life. Ease into each workout is to 10 minutes of every month. Record your weight and key body measurements at the end of each...used to rest for a toning workout. ¥ Rest 30 seconds after each workout. Plan to spend the first couple of weeks familiarizing yourself with 5 to make exercise a regular and enjoyable part of time after each set . ing workout. ¥ Rest one minute after each set for both your arms and legs...
... at the end of stretching. List the date, the exercises performed, the weight plus the numbers of each set for a short period of your everyday life. Ease into each workout is to 10 minutes of every month. Record your weight and key body measurements at the end of each...used to rest for a toning workout. ¥ Rest 30 seconds after each workout. Plan to spend the first couple of weeks familiarizing yourself with 5 to make exercise a regular and enjoyable part of time after each set . ing workout. ¥ Rest one minute after each set for both your arms and legs...
English Manual
Page 19
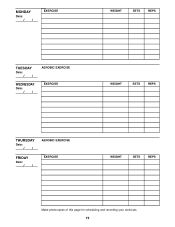
MONDAY Date: / / EXERCISE WEIGHT SETS REPS TUESDAY Date: / / WEDNESDAY Date: / / AEROBIC EXERCISE EXERCISE WEIGHT SETS REPS THURSDAY Date: / / FRIDAY Date: / / AEROBIC EXERCISE EXERCISE WEIGHT SETS REPS Make photocopies of this page for scheduling and recording your workouts. 19
MONDAY Date: / / EXERCISE WEIGHT SETS REPS TUESDAY Date: / / WEDNESDAY Date: / / AEROBIC EXERCISE EXERCISE WEIGHT SETS REPS THURSDAY Date: / / FRIDAY Date: / / AEROBIC EXERCISE EXERCISE WEIGHT SETS REPS Make photocopies of this page for scheduling and recording your workouts. 19
English Manual
Page 20
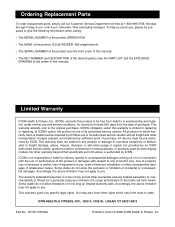
... to state. This warranty gives you . Limited Warranty ICON Health & Fitness, Inc. (ICON), warrants this product to give the following information when calling: ¥ The MODEL NUMBER of the product (WEBE34100) ¥ The NAME of the product (CLUB WEIDER¨ 560 weight bench) ¥ The SERIAL NUMBER of the product (see the front cover of this manual) ¥ The KEY NUMBER and DESCRIPTION of the desired part(s) (see the PART LIST and the EXPLODED...
... to state. This warranty gives you . Limited Warranty ICON Health & Fitness, Inc. (ICON), warrants this product to give the following information when calling: ¥ The MODEL NUMBER of the product (WEBE34100) ¥ The NAME of the product (CLUB WEIDER¨ 560 weight bench) ¥ The SERIAL NUMBER of the product (see the front cover of this manual) ¥ The KEY NUMBER and DESCRIPTION of the desired part(s) (see the PART LIST and the EXPLODED...
English Manual
Page 22
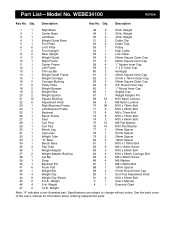
... Post Adjustment Knob 91 2 M10 x 50mm Bolt # 1 UserÕs Manual # 1 Exercise Chart Note: Ò#Ó indicates a non-illustrated part. Description 1 1 Right Base 2 1 Center Base 3 1 Left Base 4 1 Weight Guide Base 5 1 Foot Plate 6 6 Joint Plate 7 2 Front Upright 8 2 Rear Upright 9 2 Weight Guide 10 1 Right Frame 11 1 Center Frame 12 1 Left Frame 13 1 Chin-up Bar 14 1 Weight Guide Frame 15 1 Weight Carriage 16 2 Carriage Bushing 17 2 Pulley Plate 18 2 Weight Bumper 19 2 Weight Rest 20 2 Weight...
... Post Adjustment Knob 91 2 M10 x 50mm Bolt # 1 UserÕs Manual # 1 Exercise Chart Note: Ò#Ó indicates a non-illustrated part. Description 1 1 Right Base 2 1 Center Base 3 1 Left Base 4 1 Weight Guide Base 5 1 Foot Plate 6 6 Joint Plate 7 2 Front Upright 8 2 Rear Upright 9 2 Weight Guide 10 1 Right Frame 11 1 Center Frame 12 1 Left Frame 13 1 Chin-up Bar 14 1 Weight Guide Frame 15 1 Weight Carriage 16 2 Carriage Bushing 17 2 Pulley Plate 18 2 Weight Bumper 19 2 Weight Rest 20 2 Weight...


