
Uk Manual
Page 2
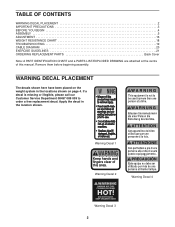
Apply the decal in the locations shown on the weight system in the location shown. WARNING DECAL PLACEMENT The decals shown here have been placed on page 4. Warning Decal 2 Warning Decal 4 Warning Decal 3 2 ...Department 08457 089 009 to order a free replacement decal. TABLE OF CONTENTS WARNING DECAL PLACEMENT 2 IMPORTANT PRECAUTIONS 3 BEFORE YOU BEGIN 4 ASSEMBLY 5 ADJUSTMENT 16 WEIGHT RESISTANCE CHART 18 TROUBLESHOOTING 19 CABLE DIAGRAM 20 EXERCISE GUIDELINES 21 ORDERING REPLACEMENT PARTS Back Cover Note: A PART IDENTIFICATION CHART and a PARTS LIST/EXPLODED DRAWING...
Apply the decal in the locations shown on the weight system in the location shown. WARNING DECAL PLACEMENT The decals shown here have been placed on page 4. Warning Decal 2 Warning Decal 4 Warning Decal 3 2 ...Department 08457 089 009 to order a free replacement decal. TABLE OF CONTENTS WARNING DECAL PLACEMENT 2 IMPORTANT PRECAUTIONS 3 BEFORE YOU BEGIN 4 ASSEMBLY 5 ADJUSTMENT 16 WEIGHT RESISTANCE CHART 18 TROUBLESHOOTING 19 CABLE DIAGRAM 20 EXERCISE GUIDELINES 21 ORDERING REPLACEMENT PARTS Back Cover Note: A PART IDENTIFICATION CHART and a PARTS LIST/EXPLODED DRAWING...
Uk Manual
Page 3
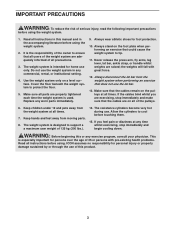
.... Keep children under 12 and pets away from moving parts. 8. Allow the cylinders to protect the floor. 5. The weight system is designed to support a a maximum user weight of 35 or persons with great force. 12. If you are exercising, stop immediately and begin cooling down. WARNING: Before...for persons over the age of 135 kg (300 lbs.). 14. IMPORTANT PRECAUTIONS WARNING: To reduce the risk of all precautions. 3. The weight system is especially important for home use . Always stand on the foot plate when performing an exercise that the cables remain on the pulleys...
.... Keep children under 12 and pets away from moving parts. 8. Allow the cylinders to protect the floor. 5. The weight system is designed to support a a maximum user weight of 35 or persons with great force. 12. If you are exercising, stop immediately and begin cooling down. WARNING: Before...for persons over the age of 135 kg (300 lbs.). 14. IMPORTANT PRECAUTIONS WARNING: To reduce the risk of all precautions. 3. The weight system is especially important for home use . Always stand on the foot plate when performing an exercise that the cables remain on the pulleys...
Uk Manual
Page 4
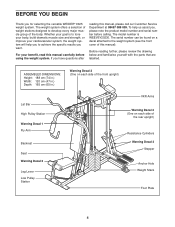
.... The model number is to achieve the specific results you want. If you , please note the product model number and serial number before using the weight system. ASSEMBLED DIMENSIONS: Height: 188 cm (74 in.) Width: 120 cm (47 in.) Depth: 165 cm (65 in.) Warning Decal 2 (One on each side... the parts that are labelled. The serial number can be found on each side of the body. To help you for selecting the versatile WEIDER® 9025 weight system. BEFORE YOU BEGIN Thank you to tone your body, build dramatic muscle size and strength, or improve your goal is WEEVSY20230.
.... The model number is to achieve the specific results you want. If you , please note the product model number and serial number before using the weight system. ASSEMBLED DIMENSIONS: Height: 188 cm (74 in.) Width: 120 cm (47 in.) Depth: 165 cm (65 in.) Warning Decal 2 (One on each side... the parts that are labelled. The serial number can be found on each side of the body. To help you for selecting the versatile WEIDER® 9025 weight system. BEFORE YOU BEGIN Thank you to tone your body, build dramatic muscle size and strength, or improve your goal is WEEVSY20230.
Uk Manual
Page 5
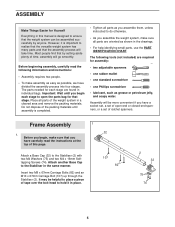
...the Stabiliser (2) with two M4 Washers (75) and two M4 x 16mm Selftapping Screws (74). Attach a Base Cap (32) to realise that the versatile weight system has many parts and that by anyone. Insert two M8 x 67mm Carriage Bolts (82) and an M10 x 67mm Carriage Bolt (107) up through ..., use the PART IDENTIFICATION CHART. It may be helpful to place a piece of the packing materials until you begin , make sure that the weight system can be more convenient if you have carefully read the following tools (not included) are found in individual bags. Important: Wait until assembly ...
...the Stabiliser (2) with two M4 Washers (75) and two M4 x 16mm Selftapping Screws (74). Attach a Base Cap (32) to realise that the versatile weight system has many parts and that by anyone. Insert two M8 x 67mm Carriage Bolts (82) and an M10 x 67mm Carriage Bolt (107) up through ..., use the PART IDENTIFICATION CHART. It may be helpful to place a piece of the packing materials until you begin , make sure that the weight system can be more convenient if you have carefully read the following tools (not included) are found in individual bags. Important: Wait until assembly ...

Uk Manual
Page 7
...(6). Lubricate the indicated holes in the pin grooves on the top. Press two 50mm Square Inner Caps (31) into the stack of the Top Weight. Do not tighten the Locknuts yet. Attach the Top Frame (6) to the Top Frame (6) with an M10 x 153mm Bolt (91), two ... holes are on the bottom of Weights (16) as shown. Attach the Weight Guides (5) to the Front and Rear Uprights (4, 3) with grease. Slide the Top Weight onto the Weight Guides (5). Insert two Weight Guides (5) into the Weight Tube (18). Slide the nine Weights (16) onto the Weight Guides. Holes 5 Lubricate Pin 16...
...(6). Lubricate the indicated holes in the pin grooves on the top. Press two 50mm Square Inner Caps (31) into the stack of the Top Weight. Do not tighten the Locknuts yet. Attach the Top Frame (6) to the Top Frame (6) with an M10 x 153mm Bolt (91), two ... holes are on the bottom of Weights (16) as shown. Attach the Weight Guides (5) to the Front and Rear Uprights (4, 3) with grease. Slide the Top Weight onto the Weight Guides (5). Insert two Weight Guides (5) into the Weight Tube (18). Slide the nine Weights (16) onto the Weight Guides. Holes 5 Lubricate Pin 16...
Uk Manual
Page 12
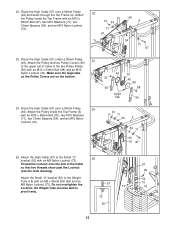
... two Pulley Plates (50) with an M10 x 53mm Bolt (88) and an M10 Nylon Locknut (72). Do not overtighten the Locknut; the Weight Tube must be able to the Weight Tube (18) with an M8 Nylon Locknut (73). 22. Make sure the large tabs on the Pulley Covers are on the bottom...
... two Pulley Plates (50) with an M10 x 53mm Bolt (88) and an M10 Nylon Locknut (72). Do not overtighten the Locknut; the Weight Tube must be able to the Weight Tube (18) with an M8 Nylon Locknut (73). 22. Make sure the large tabs on the Pulley Covers are on the bottom...
Uk Manual
Page 15
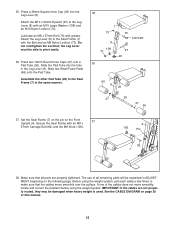
... Leg Lever (8) with the Bolt and an M8 Nylon Locknut (73). Press two 19mm Round Inner Caps (27) into the Leg Lever (8). Before using the weight system. If one of the cables does not move smoothly over the pulleys. Secure the Seat Frame with grease. Attach the M10 x 63mm Eyebolt (97... the Seat Frame (7) on the pin on the following page. Make sure that the cables move smoothly, locate and correct the problem before using the weight system, pull each cable a few times to make sure that all remaining parts will be damaged when heavy...
... Leg Lever (8) with the Bolt and an M8 Nylon Locknut (73). Press two 19mm Round Inner Caps (27) into the Leg Lever (8). Before using the weight system. If one of the cables does not move smoothly over the pulleys. Secure the Seat Frame with grease. Attach the M10 x 63mm Eyebolt (97... the Seat Frame (7) on the pin on the following page. Make sure that the cables move smoothly, locate and correct the problem before using the weight system, pull each cable a few times to make sure that all remaining parts will be damaged when heavy...

Uk Manual
Page 16
... sure that the Lat Bar is in the correct starting position for the exercise to be performed. Make sure to insert the Weight Pin until the bent end of the Weight Pin is performed, the effectiveness of the exercise will vary from 12.5 pounds to 125 pounds, in increments of 12.5 16... pounds. Refer to 20 the WEIGHT RESISTANCE CHART on page 18 to find the actual amount of resistance at each sta- Note: 1 kg = 2,2 pounds. The Handle (not shown) can be changed...
... sure that the Lat Bar is in the correct starting position for the exercise to be performed. Make sure to insert the Weight Pin until the bent end of the Weight Pin is performed, the effectiveness of the exercise will vary from 12.5 pounds to 125 pounds, in increments of 12.5 16... pounds. Refer to 20 the WEIGHT RESISTANCE CHART on page 18 to find the actual amount of resistance at each sta- Note: 1 kg = 2,2 pounds. The Handle (not shown) can be changed...

Uk Manual
Page 17
... the M10 x 63mm Eyebolt (97) with an M8 x 67mm Carriage Bolt (82) and the M8 Knob (106). Next attach the Low Cable (56) to the weight system (see ATTACHING THE LEG LEVER, below). CHANGING THE STEPPING RESISTANCE To change the stepping resistance, lift the Right and Left Pedals (14, 15) off...
... the M10 x 63mm Eyebolt (97) with an M8 x 67mm Carriage Bolt (82) and the M8 Knob (106). Next attach the Low Cable (56) to the weight system (see ATTACHING THE LEG LEVER, below). CHANGING THE STEPPING RESISTANCE To change the stepping resistance, lift the Right and Left Pedals (14, 15) off...

Uk Manual
Page 18
... the butterfly arm station is for each butterfly arm. The other numbers refer to the 6 lb. Note: The actual resistance at each exercise station. top weight. WEIGHT Top 1 2 3 4 5 6 7 8 9 HIGH PULLEY PRESS ARM (lbs.) (lbs.) 13 25 31 44 47 67 64 81 77 101 87 118 106 ... 120 117 137 134 153 Note: 1 kg = 2,2 pounds. 18 "Top" refers to the 12.5 lb. weight plates. WEIGHT RESISTANCE CHART The chart below shows the approximate weight resistance at each station may vary due to differences in individual weight plates as well as friction between the cables, pulleys, and...
... the butterfly arm station is for each butterfly arm. The other numbers refer to the 6 lb. Note: The actual resistance at each exercise station. top weight. WEIGHT Top 1 2 3 4 5 6 7 8 9 HIGH PULLEY PRESS ARM (lbs.) (lbs.) 13 25 31 44 47 67 64 81 77 101 87 118 106 ... 120 117 137 134 153 Note: 1 kg = 2,2 pounds. 18 "Top" refers to the 12.5 lb. weight plates. WEIGHT RESISTANCE CHART The chart below shows the approximate weight resistance at each station may vary due to differences in individual weight plates as well as friction between the cables, pulleys, and...
Uk Manual
Page 19
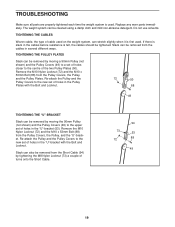
... set of holes closer to the upper set of holes in several different ways. TROUBLESHOOTING Make sure all parts are properly tightened each time the weight system is used . TIGHTENING THE CABLES Woven cable, the type of holes in the "U"-bracket with the Bolt and Locknut. 72 50 88...M10 x 53mm Bolt (88) from the cables in the "U"-bracket (53). TIGHTENING THE PULLEY PLATES Slack can be tightened. Do not use solvents. The weight system can stretch slightly when it is felt, the cables should be removed from the Pulley Covers, the Pulley, and the Pulley Plates. Slack can...
... set of holes closer to the upper set of holes in several different ways. TROUBLESHOOTING Make sure all parts are properly tightened each time the weight system is used . TIGHTENING THE CABLES Woven cable, the type of holes in the "U"-bracket with the Bolt and Locknut. 72 50 88...M10 x 53mm Bolt (88) from the cables in the "U"-bracket (53). TIGHTENING THE PULLEY PLATES Slack can be tightened. Do not use solvents. The weight system can stretch slightly when it is felt, the cables should be removed from the Pulley Covers, the Pulley, and the Pulley Plates. Slack can...

Uk Manual
Page 20
The numbers show the correct route for each cable. Make sure that the cables and the cable traps have not been correctly routed, the weight system will not function properly and damage may occur. If the cables have been assembled correctly. CABLE DIAGRAM The cable diagram below shows the proper ...
The numbers show the correct route for each cable. Make sure that the cables and the cable traps have not been correctly routed, the weight system will not function properly and damage may occur. If the cables have been assembled correctly. CABLE DIAGRAM The cable diagram below shows the proper ...
Uk Manual
Page 21
.... Select a moderate amount of resistance and increase the number of repetitions in each repetition should last about half as long as possible without pausing. WEIGHT LOSS To lose weight, use a low amount of resistance and increase the number of repetitions in each set . Determining the exact length of time for several exercises...
.... Select a moderate amount of resistance and increase the number of repetitions in each repetition should last about half as long as possible without pausing. WEIGHT LOSS To lose weight, use a low amount of resistance and increase the number of repetitions in each set . Determining the exact length of time for several exercises...
Uk Manual
Page 22
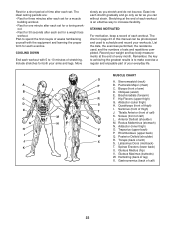
...thigh) J. Sartorius (front of each workout. Anterior Deltoid (shoulder) M. Triceps (back of calf) K. Spinae Erectors (lower back) U. Record your weight and key body measurements at the end of each workout is to increase flexibility. Brachioradials (forearm) F. out. • Rest for 30 seconds after each...) B. Biceps (front of calf) L. Latissimus Dorsi (mid back) T. Rest for a short period of time after each set for a weight loss workout. Ease into each stretch gradually and go only as far as you can be photocopied and used , and the numbers of stretching....
...thigh) J. Sartorius (front of each workout. Anterior Deltoid (shoulder) M. Triceps (back of calf) K. Spinae Erectors (lower back) U. Record your weight and key body measurements at the end of each workout is to increase flexibility. Brachioradials (forearm) F. out. • Rest for 30 seconds after each...) B. Biceps (front of calf) L. Latissimus Dorsi (mid back) T. Rest for a short period of time after each set for a weight loss workout. Ease into each stretch gradually and go only as far as you can be photocopied and used , and the numbers of stretching....
Uk Manual
Page 23
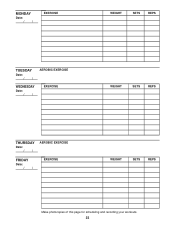
MONDAY Date: // EXERCISE WEIGHT SETS REPS TUESDAY Date: // AEROBIC EXERCISE WEDNESDAY Date: // EXERCISE WEIGHT SETS REPS THURSDAY Date: // AEROBIC EXERCISE FRIDAY Date: // EXERCISE WEIGHT SETS REPS Make photocopies of this page for scheduling and recording your workouts. 23
MONDAY Date: // EXERCISE WEIGHT SETS REPS TUESDAY Date: // AEROBIC EXERCISE WEDNESDAY Date: // EXERCISE WEIGHT SETS REPS THURSDAY Date: // AEROBIC EXERCISE FRIDAY Date: // EXERCISE WEIGHT SETS REPS Make photocopies of this page for scheduling and recording your workouts. 23
Uk Manual
Page 24
... 7125 Please provide the following information when ordering replacement parts: • the MODEL NUMBER of the product (WEEVSY20230) • the NAME of the product (WEIDER® 9025 weight system) • the SERIAL NUMBER of the product (see the front cover of this manual) • the KEY NUMBER and DESCRIPTION of the part(s) (see...
... 7125 Please provide the following information when ordering replacement parts: • the MODEL NUMBER of the product (WEEVSY20230) • the NAME of the product (WEIDER® 9025 weight system) • the SERIAL NUMBER of the product (see the front cover of this manual) • the KEY NUMBER and DESCRIPTION of the part(s) (see...

Uk Manual
Page 26
... Seat Frame Leg Lever Right Fly Arm Left Fly Arm Butterfly Frame Right VKR Arm Left VKR Arm Right Pedal Left Pedal Weight Weight Tube Bumper Weight Tube Top Weight Weight Pin Locking Bar Lock 40mm x 50mm Inner Cap Arm Handle 25mm Dome Inner Cap Pad Tube 19mm Round Inner Cap Seat... Bracket Grip Tape 38mm Square Bushing Pedal Cover Resistance Cylinder 16mm Round Outer Cap 16mm Retainer 16mm Round Bushing Grip VKR Handle 7mm Spacer Weight Bumper 10mm Spacer 90mm Pulley "V"-pulley Cable Trap Pulley Cover Pulley Plate Double "U"-bracket Small "U"-bracket "U"-bracket 12mm Spacer Butterfly Cable Low ...
... Seat Frame Leg Lever Right Fly Arm Left Fly Arm Butterfly Frame Right VKR Arm Left VKR Arm Right Pedal Left Pedal Weight Weight Tube Bumper Weight Tube Top Weight Weight Pin Locking Bar Lock 40mm x 50mm Inner Cap Arm Handle 25mm Dome Inner Cap Pad Tube 19mm Round Inner Cap Seat... Bracket Grip Tape 38mm Square Bushing Pedal Cover Resistance Cylinder 16mm Round Outer Cap 16mm Retainer 16mm Round Bushing Grip VKR Handle 7mm Spacer Weight Bumper 10mm Spacer 90mm Pulley "V"-pulley Cable Trap Pulley Cover Pulley Plate Double "U"-bracket Small "U"-bracket "U"-bracket 12mm Spacer Butterfly Cable Low ...


