
User Manual
Page 2
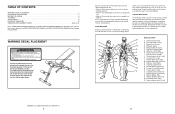
... (back of calf) L. Gluteus Maximus (buttocks) W. Gastrocnemius (back of calf) WEIDER is to increase flexibility. WARNING DECAL PLACEMENT The decal shown here has been placed on the weight bench in the center of your arms and legs. The ideal resting periods are attached in... without strain. A B C D E F G H I . Latissimus Dorsi (mid back) T. out. • Rest for 30 seconds after each set. TABLE OF CONTENTS WARNING DECAL PLACEMENT 2 IMPORTANT PRECAUTIONS 3 BEFORE YOU BEGIN 4 ASSEMBLY 5 ADJUSTMENTS 9 EXERCISE GUIDELINES 10 ORDERING REPLACEMENT PARTS Back Cover Note: ...
... (back of calf) L. Gluteus Maximus (buttocks) W. Gastrocnemius (back of calf) WEIDER is to increase flexibility. WARNING DECAL PLACEMENT The decal shown here has been placed on the weight bench in the center of your arms and legs. The ideal resting periods are attached in... without strain. A B C D E F G H I . Latissimus Dorsi (mid back) T. out. • Rest for 30 seconds after each set. TABLE OF CONTENTS WARNING DECAL PLACEMENT 2 IMPORTANT PRECAUTIONS 3 BEFORE YOU BEGIN 4 ASSEMBLY 5 ADJUSTMENTS 9 EXERCISE GUIDELINES 10 ORDERING REPLACEMENT PARTS Back Cover Note: ...
User Manual
Page 3
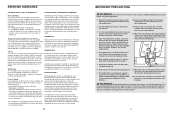
... week to give balance and variety to your workouts, vary the exercises from the weight bench at least one day of rest. The weight bench is used • by at any commercial, rental or institutional setting. 11. You must gauge your breath. 10 IMPORTANT PRECAUTIONS WARNING: To reduce the...of the body. If you find the names of the muscles. Use the weight bench only as one complete cycle of an exercise, such as described in each set . Select a moderate amount of weight and increase the number of repetitions in this manual you feeling exhausted. The ...
... week to give balance and variety to your workouts, vary the exercises from the weight bench at least one day of rest. The weight bench is used • by at any commercial, rental or institutional setting. 11. You must gauge your breath. 10 IMPORTANT PRECAUTIONS WARNING: To reduce the...of the body. If you find the names of the muscles. Use the weight bench only as one complete cycle of an exercise, such as described in each set . Select a moderate amount of weight and increase the number of repetitions in this manual you feeling exhausted. The ...

User Manual
Page 4
... in. / 99 cm Width: 23 in. / 58 cm Depth: 57 in the inset drawing; SETTING UP THE WEIGHT BENCH FOR ROMAN CHAIR EXERCISES Raise the Seat Frame (5) to adjust the weight bench. do not insert the Pin into the welded tube on page 10 for important information about how to...refer to the accompanying exercise guide to the weight bench (see the correct form for selecting the versatile WEIDER® PRO 130 weight bench. Raise or lower the Backrest and insert the Short Pin through the Bench Frame (1) and the welded tube on the front cover of the weight bench as shown in . / 145 cm 4...
... in. / 99 cm Width: 23 in. / 58 cm Depth: 57 in the inset drawing; SETTING UP THE WEIGHT BENCH FOR ROMAN CHAIR EXERCISES Raise the Seat Frame (5) to adjust the weight bench. do not insert the Pin into the welded tube on page 10 for important information about how to...refer to the accompanying exercise guide to the weight bench (see the correct form for selecting the versatile WEIDER® PRO 130 weight bench. Raise or lower the Backrest and insert the Short Pin through the Bench Frame (1) and the welded tube on the front cover of the weight bench as shown in . / 145 cm 4...

User Manual
Page 5
... information and instructions: • Assembly requires two people. • Place all parts have a socket set, a set of open-end or closed-end wrenches, or a set of the Leg (6). Make sure that by setting aside plenty of this step with three M8 x 67mm Bolts (34), an M8 Washer (32), ...information in the Leg (6). Most people find that all parts in this manual is designed to do otherwise. • As you assemble the weight bench, make sure you assemble them, unless instructed to ensure that the Square Bushing (22) is completed. • Tighten all parts are oriented ...
... information and instructions: • Assembly requires two people. • Place all parts have a socket set, a set of open-end or closed-end wrenches, or a set of the Leg (6). Make sure that by setting aside plenty of this step with three M8 x 67mm Bolts (34), an M8 Washer (32), ...information in the Leg (6). Most people find that all parts in this manual is designed to do otherwise. • As you assemble the weight bench, make sure you assemble them, unless instructed to ensure that the Square Bushing (22) is completed. • Tighten all parts are oriented ...


