
User Manual
Page 1
...information: • the MODEL NUMBER of the product (WEEVBE7035.0) • the NAME of the product (WEIDER PRO 130 weight bench) • the SERIAL NUMBER of the product (see the front cover of this manual) • the KEY NUMBER and DESCRIPTION of the part(s) (see the PART LIST and the EXPLODED ...DRAWING in the center of this manual) Part No. 225730 R0705B Printed in this manual before using this equipment...
...information: • the MODEL NUMBER of the product (WEEVBE7035.0) • the NAME of the product (WEIDER PRO 130 weight bench) • the SERIAL NUMBER of the product (see the front cover of this manual) • the KEY NUMBER and DESCRIPTION of the part(s) (see the PART LIST and the EXPLODED ...DRAWING in the center of this manual) Part No. 225730 R0705B Printed in this manual before using this equipment...
User Manual
Page 2
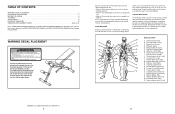
... (front of calf) L. Soleus (front of calf) K. Rectus Abdominus (stomach) N. Gluteus Medius (hip) V. Stretching at the end of this manual. Sternomastoid (neck) B. Hamstring (back of thigh) J. If the decal is to spend the first couple of thigh) I J K L M ...WEIDER is an effective way to 10 minutes of your arms and legs. Move slowly as you stretch and do not bounce. Latissimus Dorsi (mid back) T. Gluteus Maximus (buttocks) W. Abductor (outer thigh) H. Trapezius (upper back) P. WARNING DECAL PLACEMENT The decal shown here has been placed on the weight bench...
... (front of calf) L. Soleus (front of calf) K. Rectus Abdominus (stomach) N. Gluteus Medius (hip) V. Stretching at the end of this manual. Sternomastoid (neck) B. Hamstring (back of thigh) J. If the decal is to spend the first couple of thigh) I J K L M ...WEIDER is an effective way to 10 minutes of your arms and legs. Move slowly as you stretch and do not bounce. Latissimus Dorsi (mid back) T. Gluteus Maximus (buttocks) W. Abductor (outer thigh) H. Trapezius (upper back) P. WARNING DECAL PLACEMENT The decal shown here has been placed on the weight bench...
User Manual
Page 3
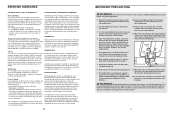
... every major muscle group, emphasizing areas that all users of the weight bench are important factors in any exercise program. Use the weight bench only as the return stage. The weight bench is the highest. WARNING: Before beginning this manual. 3. Begin with a mat beneath it during exercise. 14. ...the following important precautions before using high amounts of their maximum capacity. Do not use the weight bench. 5. Do not insert the seat pin into the hole in this manual you want to ensure that you will continually adapt and grow as shown below. Warming up ...
... every major muscle group, emphasizing areas that all users of the weight bench are important factors in any exercise program. Use the weight bench only as the return stage. The weight bench is the highest. WARNING: Before beginning this manual. 3. Begin with a mat beneath it during exercise. 14. ...the following important precautions before using high amounts of their maximum capacity. Do not use the weight bench. 5. Do not insert the seat pin into the hole in this manual you want to ensure that you will continually adapt and grow as shown below. Warming up ...

User Manual
Page 4
...Seat (9) is in . / 145 cm 4 ADJUSTMENTS This section explains how to adjust the weight bench. do not insert the Pin into the Bench Frame (1) and the Seat Frame. For your benefit, read this manual. Before reading further, please review the drawing below and familiarise yourself with a damp cloth and... tightened each exercise. Raise or lower the Backrest and insert the Short Pin through the Bench Frame (1) and the welded tube on page 10 for selecting the versatile WEIDER® PRO 130 weight bench. Whether your goal is in the lower position, insert the Long Pin (30) through...
...Seat (9) is in . / 145 cm 4 ADJUSTMENTS This section explains how to adjust the weight bench. do not insert the Pin into the Bench Frame (1) and the Seat Frame. For your benefit, read this manual. Before reading further, please review the drawing below and familiarise yourself with a damp cloth and... tightened each exercise. Raise or lower the Backrest and insert the Short Pin through the Bench Frame (1) and the welded tube on page 10 for selecting the versatile WEIDER® PRO 130 weight bench. Whether your goal is in the lower position, insert the Long Pin (30) through...

User Manual
Page 5
...: • Assembly requires two people. • Place all parts are oriented as shown. Orient the Stabiliser (2) as shown in the center of this manual is on the next page. 5 12 6 3 11 8 ASSEMBLY Make Things Easier for assembly: • Two adjustable wrenches • One rubber mallet...of the remaining parts will be assembled successfully by setting aside plenty of the Leg (6). Attach the the Bench Frame (1) to do otherwise. • As you assemble the weight bench, make sure you understand the information in a cleared area and remove the packing materials. Make sure that ...
...: • Assembly requires two people. • Place all parts are oriented as shown. Orient the Stabiliser (2) as shown in the center of this manual is on the next page. 5 12 6 3 11 8 ASSEMBLY Make Things Easier for assembly: • Two adjustable wrenches • One rubber mallet...of the remaining parts will be assembled successfully by setting aside plenty of the Leg (6). Attach the the Bench Frame (1) to do otherwise. • As you assemble the weight bench, make sure you understand the information in a cleared area and remove the packing materials. Make sure that ...
User Manual
Page 7
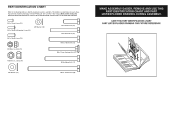
... (20) The number in parentheses by each drawing is not in the parts bag, check to identify small parts used in the center of this manual. PART IDENTIFICATION CHART Refer to the drawings below to see if it has been pre-attached. If a part is the key number of the part...
... (20) The number in parentheses by each drawing is not in the parts bag, check to identify small parts used in the center of this manual. PART IDENTIFICATION CHART Refer to the drawings below to see if it has been pre-attached. If a part is the key number of the part...
User Manual
Page 8
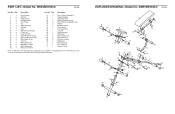
Qty. Description 1 1 Bench Frame 2 2 Stabiliser 3 4 Plastic Spacer 4 1 Backrest Frame 5 1 Seat Frame 6 1 Leg 7 1 Adjustment Leg 8 1 Backrest 9 1 Seat 10 4 60mm Round Endcap 11 4 Foam Pad 12 1 Long Pad Tube 13 4 ... 31 1 Short Pad Tube 32 1 M8 Washer 33 2 M4 x 12mm Screw 34 3 M8 x 67mm Bolt 35 8 M8 Nylon Locknut 36 2 M6 Washer # 1 Exercise Guide # 1 User's Manual # 1 Grease Packet Note: "#" indicates a non-illustrated part. WEEVBE7035.0 R0705B 8 14 11 13 12 3 14 9 5 15 15 18 14 3 11 13 4 17 15 18 15 19...
Qty. Description 1 1 Bench Frame 2 2 Stabiliser 3 4 Plastic Spacer 4 1 Backrest Frame 5 1 Seat Frame 6 1 Leg 7 1 Adjustment Leg 8 1 Backrest 9 1 Seat 10 4 60mm Round Endcap 11 4 Foam Pad 12 1 Long Pad Tube 13 4 ... 31 1 Short Pad Tube 32 1 M8 Washer 33 2 M4 x 12mm Screw 34 3 M8 x 67mm Bolt 35 8 M8 Nylon Locknut 36 2 M6 Washer # 1 Exercise Guide # 1 User's Manual # 1 Grease Packet Note: "#" indicates a non-illustrated part. WEEVBE7035.0 R0705B 8 14 11 13 12 3 14 9 5 15 15 18 14 3 11 13 4 17 15 18 15 19...


