
Owner Manual
Page 1
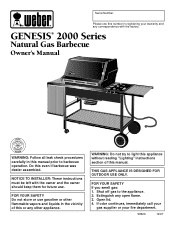
... and liquids in this manual prior to barbecue operation. Extinguish any other appliance. FOR YOUR SAFETY Do not store or use . WARNING: Do not try to the appliance. 2. GENESIS® 2000 Series Natural Gas Barbecue Owner's Manual WE BER BER WE ® WARNING: Follow all leak check procedures carefully in the vicinity of this even if barbecue was dealer assembled. FOR YOUR SAFETY If...
... and liquids in this manual prior to barbecue operation. Extinguish any other appliance. FOR YOUR SAFETY Do not store or use . WARNING: Do not try to the appliance. 2. GENESIS® 2000 Series Natural Gas Barbecue Owner's Manual WE BER BER WE ® WARNING: Follow all leak check procedures carefully in the vicinity of this even if barbecue was dealer assembled. FOR YOUR SAFETY If...
Owner Manual
Page 2
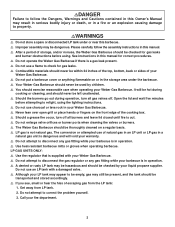
... relight, using . The conversion or attempted use a flame to check for gas leaks and burner obstructions before using the lighting instructions. ƽ Do not use an LP tank with your Weber Gas Barbecue. ƽ Do not attempt to disconnect the gas regulator or any gas fitting while your barbecue is in operation. ƽ Use heat-resistant barbecue mitts or gloves when operating barbecue. See instructions in this manual for correct procedures. ƽ Do not operate the Weber Gas Barbecue if...
... relight, using . The conversion or attempted use a flame to check for gas leaks and burner obstructions before using the lighting instructions. ƽ Do not use an LP tank with your Weber Gas Barbecue. ƽ Do not attempt to disconnect the gas regulator or any gas fitting while your barbecue is in operation. ƽ Use heat-resistant barbecue mitts or gloves when operating barbecue. See instructions in this manual for correct procedures. ƽ Do not operate the Weber Gas Barbecue if...
Owner Manual
Page 3
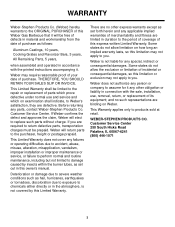
... to the period of coverage of this express written Limited Warranty. Weber is not covered by insects within the burner tubes, as follows: Aluminum Castings, 10 years, Cooking Grates and Flavorizer Bars, 3 years, All Remaining Parts, 5 years, when assembled and operated in accordance with the sale, installation, use and service and which prove defective under normal use , removal, return, or replacement of its equipment;
... to the period of coverage of this express written Limited Warranty. Weber is not covered by insects within the burner tubes, as follows: Aluminum Castings, 10 years, Cooking Grates and Flavorizer Bars, 3 years, All Remaining Parts, 5 years, when assembled and operated in accordance with the sale, installation, use and service and which prove defective under normal use , removal, return, or replacement of its equipment;

Owner Manual
Page 4
... Daniels Road, Palatine, IL 60067-6266. Printed in the U.S.A. 4 Canada: Rd 1987 Reg. #58,034; #1,279,540; #1,283,586; #1,300,994; #1,300,995. Weber, , Genesis, Flavorizer and Crossover are U.S. Genesis Gas Barbecues are covered under the following patent nos.: U.S.A. #4,677,964; 4,727,853; #4,777,927; #4,829,978; #4,860,724; #4,941,817; #4,966,125; #5,070,776; #D293...
... Daniels Road, Palatine, IL 60067-6266. Printed in the U.S.A. 4 Canada: Rd 1987 Reg. #58,034; #1,279,540; #1,283,586; #1,300,994; #1,300,995. Weber, , Genesis, Flavorizer and Crossover are U.S. Genesis Gas Barbecues are covered under the following patent nos.: U.S.A. #4,677,964; 4,727,853; #4,777,927; #4,829,978; #4,860,724; #4,941,817; #4,966,125; #5,070,776; #D293...

Owner Manual
Page 5
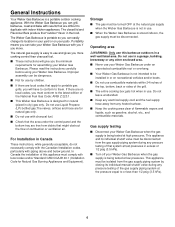
.... e) Weber Warm-Up Basket for precision cooking measures grill temperature, and can be removed and inserted into the food. g) Crossover Ignition System with Gas Catcher Ignition Chamber. f) Separate burners for temperature control. Contents WARNINGS 2 Warranty & Patents 3-4 General Instructions 6 Assembly 7-20 Operating Instructions Lighting 21-22 Cooking 23 Storage and/or Nonuse 23 Cleaning 23 Troubleshooting & Maintenance Annual Maintenance 24 General Maintenance 25-27 Troubleshooting 28 Parts Listing...
.... e) Weber Warm-Up Basket for precision cooking measures grill temperature, and can be removed and inserted into the food. g) Crossover Ignition System with Gas Catcher Ignition Chamber. f) Separate burners for temperature control. Contents WARNINGS 2 Warranty & Patents 3-4 General Instructions 6 Assembly 7-20 Operating Instructions Lighting 21-22 Cooking 23 Storage and/or Nonuse 23 Cleaning 23 Troubleshooting & Maintenance Annual Maintenance 24 General Maintenance 25-27 Troubleshooting 28 Parts Listing...
Owner Manual
Page 6
... Propane (LP) bottled gas.The valves, orifices and hose are no local codes, you move. s Keep any electrical supply cord and the fuel supply hose away from debris that system at the natural gas supply when the Weber Gas Barbecue is stored indoors, the gas supply must comply with charcoal fuel. If there are for use . s Do not use your Weber Gas Barbecue when the gas supply is a portable outdoor...
... Propane (LP) bottled gas.The valves, orifices and hose are no local codes, you move. s Keep any electrical supply cord and the fuel supply hose away from debris that system at the natural gas supply when the Weber Gas Barbecue is stored indoors, the gas supply must comply with charcoal fuel. If there are for use . s Do not use your Weber Gas Barbecue when the gas supply is a portable outdoor...
Owner Manual
Page 7
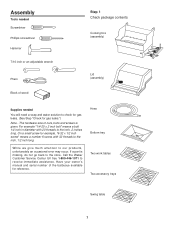
... for reference. If a part is given. Call the Weber Customer Service Center toll free 1-800-446-1071 to the store. On a small screw for example, "6-32 x 1/2 inch screw" means a number 6 screw, with 20 threads to our products, unfortunately an occasional error may occur. Have your owner's manual and serial number of the barbecue available for gas leaks.") Note - Assembly Tools needed Screwdriver Phillips...
... for reference. If a part is given. Call the Weber Customer Service Center toll free 1-800-446-1071 to the store. On a small screw for example, "6-32 x 1/2 inch screw" means a number 6 screw, with 20 threads to our products, unfortunately an occasional error may occur. Have your owner's manual and serial number of the barbecue available for gas leaks.") Note - Assembly Tools needed Screwdriver Phillips...
Owner Manual
Page 12
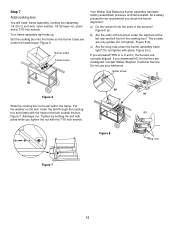
... not use your barbecue. Put the washer on the bolt. Do not tighten. Contact Weber-Stephen Customer Service. The screws are misaligned. Step 7 Add cooking box You will need: frame assembly, cooking box assembly, 1/4-20 x 2 inch bolt, nylon washer, 1/4-20 keps nut, pliers and a 7/16 inch wrench. If you check the burner alignment: a) Do the valves fit into the frame so the burner tubes...
... not use your barbecue. Put the washer on the bolt. Do not tighten. Contact Weber-Stephen Customer Service. The screws are misaligned. Step 7 Add cooking box You will need: frame assembly, cooking box assembly, 1/4-20 x 2 inch bolt, nylon washer, 1/4-20 keps nut, pliers and a 7/16 inch wrench. If you check the burner alignment: a) Do the valves fit into the frame so the burner tubes...
Owner Manual
Page 14
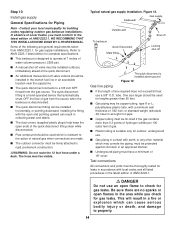
... flame to the latest edition of Local Codes, you check for gas leaks. This will result in collecting water and debris. Step 10 Install gas supply General Specifications for outdoor, underground use. In absence of ANSI Z223.1. s This barbecue is suitable only for Piping Note - s A manual shut-off The quick disconnect is disconnected. s The quick disconnect connects to operate at 7 inches of line...
... flame to the latest edition of Local Codes, you check for gas leaks. This will result in collecting water and debris. Step 10 Install gas supply General Specifications for outdoor, underground use. In absence of ANSI Z223.1. s This barbecue is suitable only for Piping Note - s A manual shut-off The quick disconnect is disconnected. s The quick disconnect connects to operate at 7 inches of line...
Owner Manual
Page 16
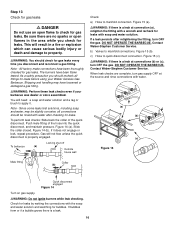
.... Note - Figure 14 (a). Figure 14 (b). If it . Gas will result in the area while you check for leaks. Locking shut off To barbecue (a) Outside house wall Check: a) Hose to apply it does not engage or lock, repeat procedure. Contact Weber-Stephen Customer Service. b) Valves to quick disconnect connection. c) Hose to manifold connections. When leak checks are no sparks...
.... Note - Figure 14 (a). Figure 14 (b). If it . Gas will result in the area while you check for leaks. Locking shut off To barbecue (a) Outside house wall Check: a) Hose to apply it does not engage or lock, repeat procedure. Contact Weber-Stephen Customer Service. b) Valves to quick disconnect connection. c) Hose to manifold connections. When leak checks are no sparks...

Owner Manual
Page 18
... pin cotter Hinge pin Step 17 Install tool holders, control panel and burner control knobs You will need : three tool holders, control panel, two Phillips screws/washers, a Phillips screwdriver, and three burner control knobs. Hook the tool holders over both frame braces. (Hold the Crossover Ignition button up while setting the control panel in place.) Line up the holes in the control panel with a Phillips screwdriver until...
... pin cotter Hinge pin Step 17 Install tool holders, control panel and burner control knobs You will need : three tool holders, control panel, two Phillips screws/washers, a Phillips screwdriver, and three burner control knobs. Hook the tool holders over both frame braces. (Hold the Crossover Ignition button up while setting the control panel in place.) Line up the holes in the control panel with a Phillips screwdriver until...

Owner Manual
Page 19
Step 18 Install swing table You will need: swing table end bracket, two 10-24 hex nuts, two 10-24 x 1 3/4 inch machine screws, slide bar assembly, swing table, four nylon washers, screwdriver and pliers. Push the support rod into the frame. Figure 23 (a). Figure 23 (b). Figure 24 (a). Call our Customer Service Center to hang down. To...
Step 18 Install swing table You will need: swing table end bracket, two 10-24 hex nuts, two 10-24 x 1 3/4 inch machine screws, slide bar assembly, swing table, four nylon washers, screwdriver and pliers. Push the support rod into the frame. Figure 23 (a). Figure 23 (b). Figure 24 (a). Call our Customer Service Center to hang down. To...

Owner Manual
Page 20
... trays between the two frame connectors. Set the warming rack into the ends of the lid. Insert tubing plugs into the slots at the rear of barbecue (f) (c) Slide Figure 27 Unlocked position Locked position Figure 26 ƽCAUTION: To keep the barbecue stationary, the tabs on each 1 3/4 inch screw, insert screws through frame and slide bar assembly...
... trays between the two frame connectors. Set the warming rack into the ends of the lid. Insert tubing plugs into the slots at the rear of barbecue (f) (c) Slide Figure 27 Unlocked position Locked position Figure 26 ƽCAUTION: To keep the barbecue stationary, the tabs on each 1 3/4 inch screw, insert screws through frame and slide bar assembly...
Owner Manual
Page 21
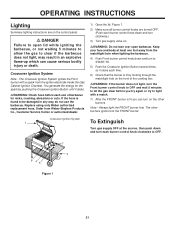
... Replace using only Weber authorized replacement hose. Note - To Extinguish Turn gas supply OFF at least one foot away from the matchlight hole when lighting the barbecue. 4) Push Front burner control knob down and turn to START/ HI. 5) Push the Crossover Ignition Button several times, so it clicks each time. 6) Check that the burner is found to be damaged in an explosive flame-up...
... Replace using only Weber authorized replacement hose. Note - To Extinguish Turn gas supply OFF at least one foot away from the matchlight hole when lighting the barbecue. 4) Push Front burner control knob down and turn to START/ HI. 5) Push the Crossover Ignition Button several times, so it clicks each time. 6) Check that the burner is found to be damaged in an explosive flame-up...
Owner Manual
Page 23
... the catch pan under the control panel and the bottom tray are free from grill and wash with warm soapy water. Brush any obstructions in your retailer or the Weber-Stephen Customer Service Center. Catch pan - When the Weber Gas Barbecue is an energy efficient appliance. Outside surfaces - Clean with warm soapy water. Preheating Your Weber Genesis Gas Barbecue is stored indoors, the gas supply MUST...
... the catch pan under the control panel and the bottom tray are free from grill and wash with warm soapy water. Brush any obstructions in your retailer or the Weber-Stephen Customer Service Center. Catch pan - When the Weber Gas Barbecue is an energy efficient appliance. Outside surfaces - Clean with warm soapy water. Preheating Your Weber Genesis Gas Barbecue is stored indoors, the gas supply MUST...

Owner Manual
Page 24
... Weber Spider Stopper Guards To inspect the Spider Stopper Guards, remove the control panel and look to be rinsed with the soap and water solution and watching for your safety. ƽWARNING: Check hose before each use the barbecue. Note - Figure 3 (b). DO NOT OPERATE THE BARBECUE. If they have dust or dirt on gas supply. ƽWARNING: Do not ignite burners...
... Weber Spider Stopper Guards To inspect the Spider Stopper Guards, remove the control panel and look to be rinsed with the soap and water solution and watching for your safety. ƽWARNING: Check hose before each use the barbecue. Note - Figure 3 (b). DO NOT OPERATE THE BARBECUE. If they have dust or dirt on gas supply. ƽWARNING: Do not ignite burners...

Owner Manual
Page 25
... burner flames appearing yellow and lazy. 2. Check and clean the air shutter opening at least once a year. (See section "Annual Maintenance".) Also inspect and clean the Spider Stopper Guards if any outdoor gas appliance, is shown in Figure 6. This is factory installed. Replacing Main Burners a) Your Weber Gas Barbecue must be uniform the length of the burner tube, follow the burner cleaning procedures. c) Remove control...
... burner flames appearing yellow and lazy. 2. Check and clean the air shutter opening at least once a year. (See section "Annual Maintenance".) Also inspect and clean the Spider Stopper Guards if any outdoor gas appliance, is shown in Figure 6. This is factory installed. Replacing Main Burners a) Your Weber Gas Barbecue must be uniform the length of the burner tube, follow the burner cleaning procedures. c) Remove control...
Owner Manual
Page 27
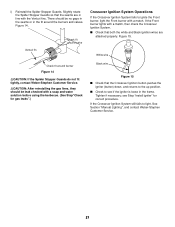
...in line with a soap and water solution before using the barbecue. (See Step"Check for correct procedure. If the Front burner lights with a match. Venturi fin Check fit around valve Crossover Ignition System Operations If the Crossover Ignition System fails to see Step "Install igniter" for gas leaks...If the Crossover Ignition System still fails to the up position. Slightly rotate the Spider Stopper Guards so that the Crossover Ignition button pushes the igniter (button) down, and returns to light, See Section "Manual Lighting", and contact Weber-Stephen Customer Service. 27
...in line with a soap and water solution before using the barbecue. (See Step"Check for correct procedure. If the Front burner lights with a match. Venturi fin Check fit around valve Crossover Ignition System Operations If the Crossover Ignition System fails to see Step "Install igniter" for gas leaks...If the Crossover Ignition System still fails to the up position. Slightly rotate the Spider Stopper Guards so that the Crossover Ignition button pushes the igniter (button) down, and returns to light, See Section "Manual Lighting", and contact Weber-Stephen Customer Service. 27

Owner Manual
Page 28
...: ƽCAUTION: Do not line the bottom tray with a match? If you can light the Front burner with burned-on grease? Are the cooking grates and Flavorizer Bars heavily coated with a match, then check the Crossover Ignition System. Flame is low when burner is porcelain-on high for 10 to be corrected using these methods, please contact Weber-Stephen Customer Service. 28 Clean thoroughly...
...: ƽCAUTION: Do not line the bottom tray with a match? If you can light the Front burner with burned-on grease? Are the cooking grates and Flavorizer Bars heavily coated with a match, then check the Crossover Ignition System. Flame is low when burner is porcelain-on high for 10 to be corrected using these methods, please contact Weber-Stephen Customer Service. 28 Clean thoroughly...
Owner Manual
Page 31
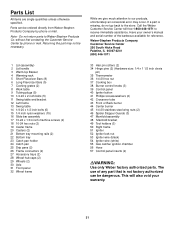
.../washers (2) 42 Crossover tube 43 Front or Back burner 44 Center burner 45 1/4-20 stainless steel wing nuts (2) 46 Spider Stopper Guards (3) 47 Manifold assembly 48 Manifold bracket 49 Tool holders (3) 50 Right frame 51 Igniter 52 Igniter lock nut 53 Igniter wire (black) 54 Igniter wire (white) 55 Gas catcher ignition chamber 56 Hose 57 Control panel inserts (2) ƽWARNING: Use only Weber factory authorized parts. Do not return...
.../washers (2) 42 Crossover tube 43 Front or Back burner 44 Center burner 45 1/4-20 stainless steel wing nuts (2) 46 Spider Stopper Guards (3) 47 Manifold assembly 48 Manifold bracket 49 Tool holders (3) 50 Right frame 51 Igniter 52 Igniter lock nut 53 Igniter wire (black) 54 Igniter wire (white) 55 Gas catcher ignition chamber 56 Hose 57 Control panel inserts (2) ƽWARNING: Use only Weber factory authorized parts. Do not return...


