User Manual
Page 1
User's Manual © 2010 VTech Printed in China 91-002478-003-000
User's Manual © 2010 VTech Printed in China 91-002478-003-000
User Manual
Page 2
To learn more about VTech® toys, visit www.vtechuk.com
To learn more about VTech® toys, visit www.vtechuk.com
User Manual
Page 3
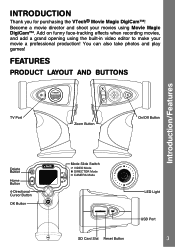
... USB Port 3 Become a movie director and shoot your movie a professional production! You can also take photos and play games! INTRODUCTION Thank you for purchasing the VTech® Movie Magic DigiCam™!
... USB Port 3 Become a movie director and shoot your movie a professional production! You can also take photos and play games! INTRODUCTION Thank you for purchasing the VTech® Movie Magic DigiCam™!
User Manual
Page 4
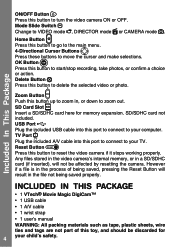
... the selected video or photo. Delete Button Press this button to reset the video camera if it stops working properly. INCLUDED IN THIS PACKAGE • 1 VTech® Movie Magic DigiCam™ • 1 USB cable • 1 A/V cable • 1 wrist strap • 1 user's manual WARNING: All packing materials ...camera. Included In This Package ON/OFF Button Press this button to go to the main menu. 4-Directional Cursor Buttons Press these buttons to move the cursor and make selections. Home Button Press this button to VIDEO mode , DIRECTOR mode or CAMERA mode . SD Card Slot Insert ...
... the selected video or photo. Delete Button Press this button to reset the video camera if it stops working properly. INCLUDED IN THIS PACKAGE • 1 VTech® Movie Magic DigiCam™ • 1 USB cable • 1 A/V cable • 1 wrist strap • 1 user's manual WARNING: All packing materials ...camera. Included In This Package ON/OFF Button Press this button to go to the main menu. 4-Directional Cursor Buttons Press these buttons to move the cursor and make selections. Home Button Press this button to VIDEO mode , DIRECTOR mode or CAMERA mode . SD Card Slot Insert ...
User Manual
Page 5
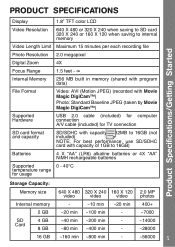
PRODUCT SPECIFICATIONS Product Specifications/Getting Started Display 1.8" TFT color LCD Video Resolution 640 X 480 or 320 X 240 when saving to SD card 320 X 240 or 160 X 120 when saving to internal memory Video Length Limit Maximum 15 minutes per each recording file Photo Resolution 2.0 megapixel Digital Zoom 4X Focus Range 1.5 feet - ∞ Internal Memory 256 MB built in memory (shared with program data) File Format Video: AVI (Motion JPEG) (recorded with Movie Magic DigiCam™) Photo: Standard Baseline JPEG (taken by Movie Magic DigiCam™) Supported Hardware USB ...
PRODUCT SPECIFICATIONS Product Specifications/Getting Started Display 1.8" TFT color LCD Video Resolution 640 X 480 or 320 X 240 when saving to SD card 320 X 240 or 160 X 120 when saving to internal memory Video Length Limit Maximum 15 minutes per each recording file Photo Resolution 2.0 megapixel Digital Zoom 4X Focus Range 1.5 feet - ∞ Internal Memory 256 MB built in memory (shared with program data) File Format Video: AVI (Motion JPEG) (recorded with Movie Magic DigiCam™) Photo: Standard Baseline JPEG (taken by Movie Magic DigiCam™) Supported Hardware USB ...
User Manual
Page 6
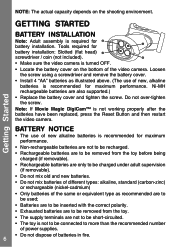
Getting Started NOTE: The actual capacity depends on the bottom of the video camera. Ni-MH rechargeable batteries are not to be short-circuited. • The toy is not to be connected to more than the recommended number of power supplies. • Do not dispose of new, alkaline batteries is not working properly after the batteries have been replaced, press the Reset Button and then restart the video camera. Note: If Movie Magic DigiCam™ is recommended for maximum performance. BATTERY NOTICE • The use of batteries in fire. 6 GETTING STARTED Battery Installation Note: ...
Getting Started NOTE: The actual capacity depends on the bottom of the video camera. Ni-MH rechargeable batteries are not to be short-circuited. • The toy is not to be connected to more than the recommended number of power supplies. • Do not dispose of new, alkaline batteries is not working properly after the batteries have been replaced, press the Reset Button and then restart the video camera. Note: If Movie Magic DigiCam™ is recommended for maximum performance. BATTERY NOTICE • The use of batteries in fire. 6 GETTING STARTED Battery Installation Note: ...
User Manual
Page 7
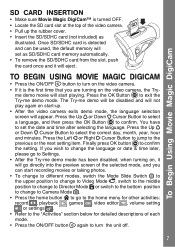
You have to set as illustrated. The Try-me demo movie will set the date and time after selecting the language. Press the Up or Down Cursor Button to select a language, and then press the OK Button to select the correct day, month, year, hour and minutes. me demo will be used, the default memory will start -up the rubber cover. • Insert the SD/SDHC card (not included) as SD/SDHC card memory automatically. • To remove the SD/SDHC card from the slot, push the card once and it is the first time that you are turning on the video camera, the Try- Press the Up or ...
You have to set as illustrated. The Try-me demo movie will set the date and time after selecting the language. Press the Up or Down Cursor Button to select a language, and then press the OK Button to select the correct day, month, year, hour and minutes. me demo will be used, the default memory will start -up the rubber cover. • Insert the SD/SDHC card (not included) as SD/SDHC card memory automatically. • To remove the SD/SDHC card from the slot, push the card once and it is the first time that you are turning on the video camera, the Try- Press the Up or ...
User Manual
Page 8
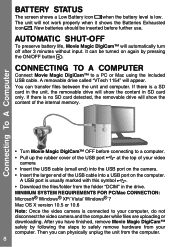
... DigiCam™ will show the content of the USB cable into a USB port on again by following the steps to your computer. A removable drive called "VTech 1154" will show the content in the drive. Connecting To A Computer • Turn Movie Magic DigiCam™ OFF before further use. If there is usually...
... DigiCam™ will show the content of the USB cable into a USB port on again by following the steps to your computer. A removable drive called "VTech 1154" will show the content in the drive. Connecting To A Computer • Turn Movie Magic DigiCam™ OFF before further use. If there is usually...
User Manual
Page 9
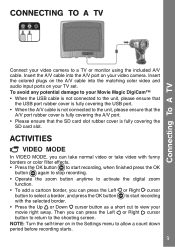
ACTIVITIES VIDEO MODE In VIDEO MODE, you can take normal video or take video with the selected border. NOTE: Turn the self-timer on in the Settings menu to the unit, please ensure that the A/V port rubber cover is fully covering the A/V port. • Please ensure that the USB port rubber cover is fully covering the USB port. • When the A/V cable is not connected to allow a count down period before recording starts. 9 CONNECTING TO A TV Connecting To A TV Connect your movie right away. or Right cursor to start recording, when finished press the OK button again to ...
ACTIVITIES VIDEO MODE In VIDEO MODE, you can take normal video or take video with the selected border. NOTE: Turn the self-timer on in the Settings menu to the unit, please ensure that the A/V port rubber cover is fully covering the A/V port. • Please ensure that the USB port rubber cover is fully covering the USB port. • When the A/V cable is not connected to allow a count down period before recording starts. 9 CONNECTING TO A TV Connecting To A TV Connect your movie right away. or Right cursor to start recording, when finished press the OK button again to ...
User Manual
Page 10
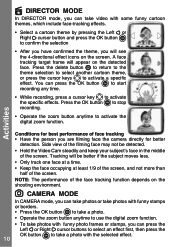
... steadily and keep your subject's face in the middle of the screen. Side view of the filming face may not be better if the subject moves less. • Only track one face at a time. • Keep the face occupying at least 1/9 of the screen, and not more than half of the...
... steadily and keep your subject's face in the middle of the screen. Side view of the filming face may not be better if the subject moves less. • Only track one face at a time. • Keep the face occupying at least 1/9 of the screen, and not more than half of the...
User Manual
Page 11
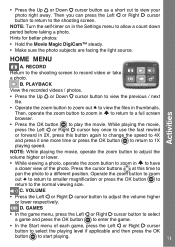
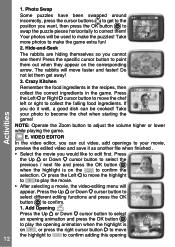
• Press the Up or Down cursor button as a short cut to view the files in thumbnails. PLAYBACK View the recorded videos / photos. • Press the Up or Down cursor button to view the previous / next file. • Operate the zoom button to zoom out to view your photo right away. GAMES • In the game menu, press the Left or Right cursor button to select a game and press the OK button to start playing. 11 VOLUME • Press the Left or Right cursor button to allow a count down period before taking a photo. D. NOTE: Turn the self-timer on in to return to a full ...
• Press the Up or Down cursor button as a short cut to view the files in thumbnails. PLAYBACK View the recorded videos / photos. • Press the Up or Down cursor button to view the previous / next file. • Operate the zoom button to zoom out to view your photo right away. GAMES • In the game menu, press the Left or Right cursor button to select a game and press the OK button to start playing. 11 VOLUME • Press the Left or Right cursor button to allow a count down period before taking a photo. D. NOTE: Turn the self-timer on in to return to a full ...
User Manual
Page 12
...and press the OK button when the highlight is on , or press the right cursor button to move the highlight to to confirm the selection. Press the Up or Down cursor button to select different ...corresponding arrow. NOTE: Operate the Zoom button to confirm. 1. Or press the Left to move the highlight to 12 to confirm adding this opening animation when the highlight is on the to play the... opening 1. The rabbits will move the chef left or right to the position you cannot see them ! Crazy Kitchen Remember ...
...and press the OK button when the highlight is on , or press the right cursor button to move the highlight to to confirm the selection. Press the Up or Down cursor button to select different ...corresponding arrow. NOTE: Operate the Zoom button to confirm. 1. Or press the Left to move the highlight to 12 to confirm adding this opening animation when the highlight is on the to play the... opening 1. The rabbits will move the chef left or right to the position you cannot see them ! Crazy Kitchen Remember ...

User Manual
Page 13
... entering a specific setting menu, select to the end pointer. E.g. If the free memory is on or , press the Left or Right cursor button to move the highlight to to cancel adding an opening and return to set a new start / end pointer on the timeline to confirm your selection. 2. Or select...(if inserted) while in the cut video menu. Self-timer Press the Up or Down cursor button to the video editing menu. 2. Activities or move the start position or end position of language, self-timer, video resolution, indoor light frequency, memory and date & time setting here. SETTINGS You ...
... entering a specific setting menu, select to the end pointer. E.g. If the free memory is on or , press the Left or Right cursor button to move the highlight to to cancel adding an opening and return to set a new start / end pointer on the timeline to confirm your selection. 2. Or select...(if inserted) while in the cut video menu. Self-timer Press the Up or Down cursor button to the video editing menu. 2. Activities or move the start position or end position of language, self-timer, video resolution, indoor light frequency, memory and date & time setting here. SETTINGS You ...
User Manual
Page 14
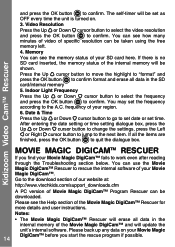
... Up or Down cursor button to select the video resolution and press the OK button to the next item. Press the Up cursor button to move the highlight to "format" and press the OK button to confirm format and erase all the items are finished, press the OK button to rescue...
... Up or Down cursor button to select the video resolution and press the OK button to the next item. Press the Up cursor button to move the highlight to "format" and press the OK button to confirm format and erase all the items are finished, press the OK button to rescue...
User Manual
Page 15
... types of flashing colors or patterns, especially on a television screen at close range and handling a Movie Magic DigiCam™ as a controller for every hour of VTech® products. Care & Maintenance • The Movie Magic DigiCam™ Rescuer is to be used to dismantle it. 5 Always keep the unit away from direct...
... types of flashing colors or patterns, especially on a television screen at close range and handling a Movie Magic DigiCam™ as a controller for every hour of VTech® products. Care & Maintenance • The Movie Magic DigiCam™ Rescuer is to be used to dismantle it. 5 Always keep the unit away from direct...
User Manual
Page 16
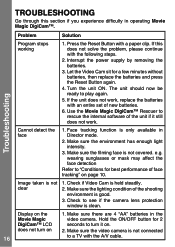
Interrupt the power supply by removing the batteries. 3. The unit should now be ready to a TV with the A/V cable. Face tracking function is held steadily. 2. Display on the Movie Magic DigiCam™ LCD does not turn it still does not work , replace the batteries with a paper clip. Make sure the environment has enough light intensity. 3. Check if Video Cam is only available in Director mode. 2. Make sure there are 4 "AA" batteries in operating Movie Magic DigiCam™. Image taken is clean. Check to turn on page 10. TROUBLESHOOTING Go through this does not ...
Interrupt the power supply by removing the batteries. 3. The unit should now be ready to a TV with the A/V cable. Face tracking function is held steadily. 2. Display on the Movie Magic DigiCam™ LCD does not turn it still does not work , replace the batteries with a paper clip. Make sure the environment has enough light intensity. 3. Check if Video Cam is only available in Director mode. 2. Make sure there are 4 "AA" batteries in operating Movie Magic DigiCam™. Image taken is clean. Check to turn on page 10. TROUBLESHOOTING Go through this does not ...
User Manual
Page 17
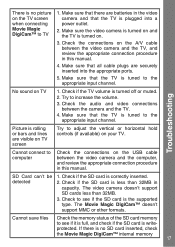
Troubleshooting No sound on your TV. Make sure that the TV is tuned to increase the volume. 3. Picture is rolling or bars and lines are visible on TV screen Try to TV 1. Check if the SD card is less than 32MB. 3. The Movie Magic DigiCam™ doesn't support MMC or other formats. Make sure the video camera is turned on and the TV is turned on the TV screen when connecting Movie Magic DigiCam™ to adjust the vertical or horizontal hold controls (if available) on TV 1. Check if the TV volume is correctly inserted. 2. The video camera doesn't support SD cards ...
Troubleshooting No sound on your TV. Make sure that the TV is tuned to increase the volume. 3. Picture is rolling or bars and lines are visible on TV screen Try to TV 1. Check if the SD card is less than 32MB. 3. The Movie Magic DigiCam™ doesn't support MMC or other formats. Make sure the video camera is turned on and the TV is turned on the TV screen when connecting Movie Magic DigiCam™ to adjust the vertical or horizontal hold controls (if available) on TV 1. Check if the TV volume is correctly inserted. 2. The video camera doesn't support SD cards ...

User Manual
Page 18
... of malfunction, dead battery, or repairs. Other Info Can't view the downloaded video or photo files 1. and its file naming system. Company: VTech® Electronics North America, L.L.C. Movie Magic DigiCam™ does not support video or photo files created by Movie Magic DigiCam™. 2. and ...its suppliers assume no responsibility for any damage or loss caused by using this software. VTech® Electronics North America, L.L.C. Make sure your product or model number (the model number is typically located on other models...
... of malfunction, dead battery, or repairs. Other Info Can't view the downloaded video or photo files 1. and its file naming system. Company: VTech® Electronics North America, L.L.C. Movie Magic DigiCam™ does not support video or photo files created by Movie Magic DigiCam™. 2. and ...its suppliers assume no responsibility for any damage or loss caused by using this software. VTech® Electronics North America, L.L.C. Make sure your product or model number (the model number is typically located on other models...
User Manual
Page 19
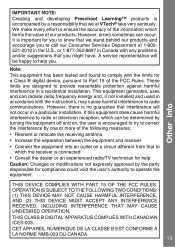
... which the receiver is connected • Consult the dealer or an experienced radio/TV technician for help you to call our Consumer Services Department at VTech® take very seriously. Other Info IMPORTANT NOTE: Creating and developing Preschool Learning™ products is accompanied by the party responsible for compliance could void...
... which the receiver is connected • Consult the dealer or an experienced radio/TV technician for help you to call our Consumer Services Department at VTech® take very seriously. Other Info IMPORTANT NOTE: Creating and developing Preschool Learning™ products is accompanied by the party responsible for compliance could void...

User Manual
Page 20
Insert it into the groove behind the bar and then push it through Step 2 Feed the end of the strap. Wrist Strap Attachment Instructions Step 1 Locate the thread loop on the end of the strap up through the loop and pull it all the way through Step 3 Make sure the loop is securely tightened around the bar
Insert it into the groove behind the bar and then push it through Step 2 Feed the end of the strap. Wrist Strap Attachment Instructions Step 1 Locate the thread loop on the end of the strap up through the loop and pull it all the way through Step 3 Make sure the loop is securely tightened around the bar
