
User Manual
Page 1
User's Manual © 2010 VTech Printed in China 91-002478-003-000
User's Manual © 2010 VTech Printed in China 91-002478-003-000
User Manual
Page 2
To learn more about VTech® toys, visit www.vtechuk.com
To learn more about VTech® toys, visit www.vtechuk.com
User Manual
Page 3
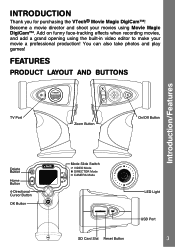
You can also take photos and play games! Features PRODUCT LAYOUT AND BUTTONS Introduction/Features TV Port Delete Button Home Button 4-Directional Cursor Button OK Button Zoom Button On/Off Button Mode Slide Switch VIDEO Mode DIRECTOR Mode CAMERA Mode LED Light SD Card Slot Reset Button USB Port 3 Become a movie director and shoot your movies using the built-in video editor to make your movie a professional production! Add on funny face-tracking effects when recording movies, and...
You can also take photos and play games! Features PRODUCT LAYOUT AND BUTTONS Introduction/Features TV Port Delete Button Home Button 4-Directional Cursor Button OK Button Zoom Button On/Off Button Mode Slide Switch VIDEO Mode DIRECTOR Mode CAMERA Mode LED Light SD Card Slot Reset Button USB Port 3 Become a movie director and shoot your movies using the built-in video editor to make your movie a professional production! Add on funny face-tracking effects when recording movies, and...
User Manual
Page 4
... discarded for memory expansion. Mode Slide Switch Change to move the cursor and make selections. Home Button Press this button to your child's safety. Reset Button Press this button to go to the main menu. 4-Directional Cursor Buttons Press these buttons to VIDEO mode , DIRECTOR mode or CAMERA mode . SD Card Slot Insert a SD/SDHC card here for 4 your computer. USB Port Plug the included USB cable into this toy, and should be affected...
... discarded for memory expansion. Mode Slide Switch Change to move the cursor and make selections. Home Button Press this button to your child's safety. Reset Button Press this button to go to the main menu. 4-Directional Cursor Buttons Press these buttons to VIDEO mode , DIRECTOR mode or CAMERA mode . SD Card Slot Insert a SD/SDHC card here for 4 your computer. USB Port Plug the included USB cable into this toy, and should be affected...
User Manual
Page 5
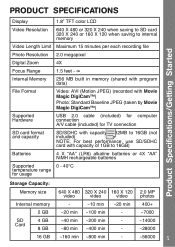
... (Motion JPEG) (recorded with Movie Magic DigiCam™) Photo: Standard Baseline JPEG (taken by Movie Magic DigiCam™) Supported Hardware USB 2.0 cable (included) for computer connection A/V cable (included) for TV connection SD card format and capacity SD/SDHC with capacity of 32MB to 16GB (not included) NOTE: For best performance, use SD/SDHC card with capacity of 1GB to 16GB) Batteries...
... (Motion JPEG) (recorded with Movie Magic DigiCam™) Photo: Standard Baseline JPEG (taken by Movie Magic DigiCam™) Supported Hardware USB 2.0 cable (included) for computer connection A/V cable (included) for TV connection SD card format and capacity SD/SDHC with capacity of 32MB to 16GB (not included) NOTE: For best performance, use SD/SDHC card with capacity of 1GB to 16GB) Batteries...
User Manual
Page 6
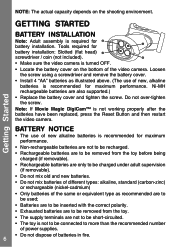
... battery cover and tighten the screw. Loosen the screw using a screwdriver and remove the battery cover. • Install 4 "AA" batteries as illustrated above. (The use of new alkaline batteries is recommended for battery installation: Slotted (flat head) screwdriver / coin (not included). • Make sure the video camera is not to be connected to be short-circuited. • The toy is turned OFF. • Locate the battery cover on the shooting environment. Getting Started...
... battery cover and tighten the screw. Loosen the screw using a screwdriver and remove the battery cover. • Install 4 "AA" batteries as illustrated above. (The use of new alkaline batteries is recommended for battery installation: Slotted (flat head) screwdriver / coin (not included). • Make sure the video camera is not to be connected to be short-circuited. • The toy is turned OFF. • Locate the battery cover on the shooting environment. Getting Started...
User Manual
Page 7
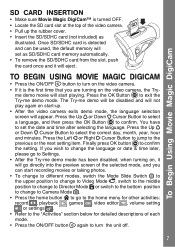
... Mode Slide Switch to the upper position to change to Video Mode , switch to the middle position to change to Director Mode or switch to the bottom position to change the language or date & time later, please go directly into the preview screen of the selected mode, and you are turning on , it will go to Settings. • After the Try-me demo movie will start -up the rubber cover...
... Mode Slide Switch to the upper position to change to Video Mode , switch to the middle position to change to Director Mode or switch to the bottom position to change the language or date & time later, please go directly into the preview screen of the selected mode, and you are turning on , it will go to Settings. • After the Try-me demo movie will start -up the rubber cover...
User Manual
Page 8
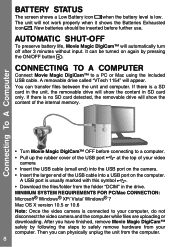
... DigiCam™ OFF before further use. BATTERY STATUS The screen shows a Low Battery icon when the battery level is a SD card in the unit, the removable drive will show the content of the USB cable into a USB port on the computer. New batteries should be turned on again by following the steps to a computer. • Pull up the rubber cover of the USB port at the top of...
... DigiCam™ OFF before further use. BATTERY STATUS The screen shows a Low Battery icon when the battery level is a SD card in the unit, the removable drive will show the content of the USB cable into a USB port on the computer. New batteries should be turned on again by following the steps to a computer. • Pull up the rubber cover of the USB port at the top of...
User Manual
Page 9
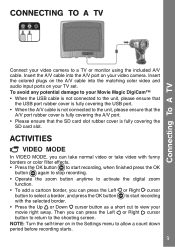
... to stop recording. • Operate the zoom button anytime to activate the digital zoom function. • To add a cartoon border, you can press the Left button to view your movie right away. CONNECTING TO A TV Connecting To A TV Connect your video camera to allow a count down period before recording starts. 9 Insert the colored plugs on the A/V cable into the A/V port on your TV set. NOTE: Turn...
... to stop recording. • Operate the zoom button anytime to activate the digital zoom function. • To add a cartoon border, you can press the Left button to view your movie right away. CONNECTING TO A TV Connecting To A TV Connect your video camera to allow a count down period before recording starts. 9 Insert the colored plugs on the A/V cable into the A/V port on your TV set. NOTE: Turn...
User Manual
Page 10
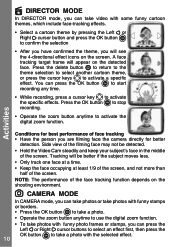
... subject moves less. • Only track one face at a time. • Keep the face occupying at least 1/9 of the screen, and not more than half of the screen. CAMERA MODE In CAMERA mode, you can take photos or take photos with funny stamps or borders. • Press the OK button to take a photo. • Operate the zoom button anytime to use the...
... subject moves less. • Only track one face at a time. • Keep the face occupying at least 1/9 of the screen, and not more than half of the screen. CAMERA MODE In CAMERA mode, you can take photos or take photos with funny stamps or borders. • Press the OK button to take a photo. • Operate the zoom button anytime to use the...
User Manual
Page 11
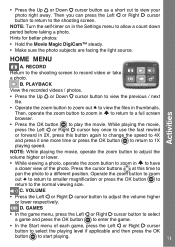
... adjust the volume higher or lower respectively. RECORD Return to the shooting screen to play the movie. Then, operate the zoom button to zoom in to return to a full screen browser. • Press the OK button to record video or take a photo. C. Operate the zoom button to zoom out to return to smaller magnification or press the OK button to return to allow a count...
... adjust the volume higher or lower respectively. RECORD Return to the shooting screen to play the movie. Then, operate the zoom button to zoom in to return to a full screen browser. • Press the OK button to record video or take a photo. C. Operate the zoom button to zoom out to return to smaller magnification or press the OK button to return to allow a count...
User Manual
Page 12
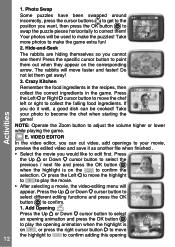
... the to make the game extra fun! 2. Press the specific cursor button to move faster and faster! If you would like to play the movie. • After selecting a movie, the video-editing menu will appear. E. Press the Up or Down cursor button to select different editing functions and press the OK button to adjust the volume higher or lower while playing the game. Add...
... the to make the game extra fun! 2. Press the specific cursor button to move faster and faster! If you would like to play the movie. • After selecting a movie, the video-editing menu will appear. E. Press the Up or Down cursor button to select different editing functions and press the OK button to adjust the volume higher or lower while playing the game. Add...

User Manual
Page 13
... and return to return without saving any changes. 1. Make sure the battery status is enough free memory before starting editing. Make sure there is good. Language Press the Up or Down cursor button to select a language and press the OK button to confirm your edited video as a new video. Activities or move the start / end pointer on the timeline to set the self-timer on or , press...
... and return to return without saving any changes. 1. Make sure the battery status is enough free memory before starting editing. Make sure there is good. Language Press the Up or Down cursor button to select a language and press the OK button to confirm your edited video as a new video. Activities or move the start / end pointer on the timeline to set the self-timer on or , press...
User Manual
Page 14
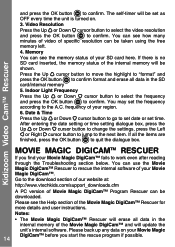
... of video of specific resolution can see the Help section of Movie Magic DigiCam™ Program Rescuer can use the Movie Magic DigiCam™ Rescuer to work even after reading through the Troubleshooting section below. Memory You can be taken using the free memory left. 4. Please back up any data on . 3. Kidizoom Video CamTM Rescuer and press the OK button to...
... of video of specific resolution can see the Help section of Movie Magic DigiCam™ Program Rescuer can use the Movie Magic DigiCam™ Rescuer to work even after reading through the Troubleshooting section below. Memory You can be taken using the free memory left. 4. Please back up any data on . 3. Kidizoom Video CamTM Rescuer and press the OK button to...
User Manual
Page 15
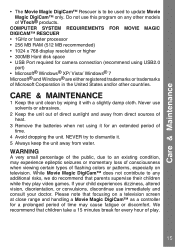
... direct sources of heat. 3 Remove the batteries when not using USB2.0 port) • Microsoft® Windows® XP/ Vista/ Windows® 7 Microsoft® and Windows® are either registered trademarks or trademarks of Microsoft Corporation in the United States and/or other models of VTech® products. We recommend that children take a 15 minutes break for camera connection (recommend using...
... direct sources of heat. 3 Remove the batteries when not using USB2.0 port) • Microsoft® Windows® XP/ Vista/ Windows® 7 Microsoft® and Windows® are either registered trademarks or trademarks of Microsoft Corporation in the United States and/or other models of VTech® products. We recommend that children take a 15 minutes break for camera connection (recommend using...
User Manual
Page 16
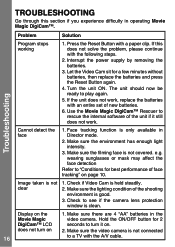
... Reset Button with the following steps. 2. Interrupt the power supply by removing the batteries. 3. Turn the unit ON. Use the Movie Magic DigiCam™ Rescuer to a TV with an entire set of face tracking" on page 10. Make sure the filming face is clean. Troubleshooting Problem Program stops working Cannot detect the face Solution 1. Face tracking function is not connected to rescue the internal software of the shooting...
... Reset Button with the following steps. 2. Interrupt the power supply by removing the batteries. 3. Turn the unit ON. Use the Movie Magic DigiCam™ Rescuer to a TV with an entire set of face tracking" on page 10. Make sure the filming face is clean. Troubleshooting Problem Program stops working Cannot detect the face Solution 1. Face tracking function is not connected to rescue the internal software of the shooting...
User Manual
Page 17
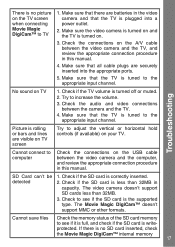
... available) on . 3. The Movie Magic DigiCam™ doesn't support MMC or other formats. Troubleshooting No sound on the A/V cable between the video camera and the TV, and review the appropriate connection procedure in the video camera and that all cable plugs are visible on TV screen Try to increase the volume. 3. Make sure that the TV is tuned to the appropriate input channel. Check...
... available) on . 3. The Movie Magic DigiCam™ doesn't support MMC or other formats. Troubleshooting No sound on the A/V cable between the video camera and the TV, and review the appropriate connection procedure in the video camera and that all cable plugs are visible on TV screen Try to increase the volume. 3. Make sure that the TV is tuned to the appropriate input channel. Check...

User Manual
Page 18
... deletion of data as a result of malfunction, dead battery, or repairs. VTech® Electronics North America, L.L.C. Address: 1155 West Dundee Road, Suite 130, Arlington Heights, IL, 60004 USA Phone: 1-800-521-2010 in the U.S.,or 1-877-352-8697 in Canada. Other Info Can't view the downloaded video or photo files 1. and its suppliers assume no responsibility for any problems...
... deletion of data as a result of malfunction, dead battery, or repairs. VTech® Electronics North America, L.L.C. Address: 1155 West Dundee Road, Suite 130, Arlington Heights, IL, 60004 USA Phone: 1-800-521-2010 in the U.S.,or 1-877-352-8697 in Canada. Other Info Can't view the downloaded video or photo files 1. and its suppliers assume no responsibility for any problems...
User Manual
Page 19
... • Connect the equipment into an outlet on a circuit different from that we stand behind our products and encourage you . If this equipment does cause harmful interference to radio or television reception, which can be happy to help Caution: Changes or modifications ...user's authority to operate the equipment. CET APPAREIL NUMÉRIQUE DE LA CLASSE B EST CONFORME À LA NORME NMB-003 DU CANADA. 19 THIS DEVICE COMPLIES WITH PART 15 OF THE FCC RULES. A service representative will not occur in a particular installation. This equipment generates, uses and can occur. We make...
... • Connect the equipment into an outlet on a circuit different from that we stand behind our products and encourage you . If this equipment does cause harmful interference to radio or television reception, which can be happy to help Caution: Changes or modifications ...user's authority to operate the equipment. CET APPAREIL NUMÉRIQUE DE LA CLASSE B EST CONFORME À LA NORME NMB-003 DU CANADA. 19 THIS DEVICE COMPLIES WITH PART 15 OF THE FCC RULES. A service representative will not occur in a particular installation. This equipment generates, uses and can occur. We make...

User Manual
Page 20
Insert it into the groove behind the bar and then push it all the way through Step 3 Make sure the loop is securely tightened around the bar Wrist Strap Attachment Instructions Step 1 Locate the thread loop on the end of the strap up through the loop and pull it through Step 2 Feed the end of the strap.
Insert it into the groove behind the bar and then push it all the way through Step 3 Make sure the loop is securely tightened around the bar Wrist Strap Attachment Instructions Step 1 Locate the thread loop on the end of the strap up through the loop and pull it through Step 2 Feed the end of the strap.


