
M470VSE User Manual
Page 1
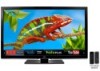
USER GUIDE MOMDODEELLSS // E3D320VX // ME3D44270V0XVSE // ME3D54750V0XVSE M650VSE INSTALLING YOUR new TV CONTROLS & CONNECTIONS CONNECTING YOUR DEVICES USING THE ON-SCREEN MENU USING THE USB MEDIA PLAYER USING VIZIO INTERNET APPS TROUBLESHOOTING & SUPPORT Help, SPECs, warranty & LEGAL
USER GUIDE MOMDODEELLSS // E3D320VX // ME3D44270V0XVSE // ME3D54750V0XVSE M650VSE INSTALLING YOUR new TV CONTROLS & CONNECTIONS CONNECTING YOUR DEVICES USING THE ON-SCREEN MENU USING THE USB MEDIA PLAYER USING VIZIO INTERNET APPS TROUBLESHOOTING & SUPPORT Help, SPECs, warranty & LEGAL

M470VSE User Manual
Page 4
... cords. When a cart is used for your TV. Opening or removing the back cover may cause fire or electric shock. • Do not touch the power cord during lightning storms or when unused for ventilation. The manufacturer's warranty does not cover user abuse or improper installations. • The power cord must be of sufficient magnitude to constitute a risk of the display...
... cords. When a cart is used for your TV. Opening or removing the back cover may cause fire or electric shock. • Do not touch the power cord during lightning storms or when unused for ventilation. The manufacturer's warranty does not cover user abuse or improper installations. • The power cord must be of sufficient magnitude to constitute a risk of the display...

M470VSE User Manual
Page 5
... the power cord and contact your TV, hold the AC/DC power adapter, not the cord. These servicing instructions are for moving your TV. • When unplugging your dealer immediately. Continued use of your TV may cause fire or electric shock. • Do not install your TV in any other moisture. - Ensure that the power cord and any way. - The power cord fails...
... the power cord and contact your TV, hold the AC/DC power adapter, not the cord. These servicing instructions are for moving your TV. • When unplugging your dealer immediately. Continued use of your TV may cause fire or electric shock. • Do not install your TV in any other moisture. - Ensure that the power cord and any way. - The power cord fails...
M470VSE User Manual
Page 6
... proper grounding of the mast and supporting structure, grounding of the TV during a lightning storm or when it could fall into such power lines or circuits. Remember, the screen of time, unplug the TV from the wall outlet and disconnect the antenna or cable system. Article 810 of the National Electrical Code, ANSI/NFPSA 70, provides information with...
... proper grounding of the mast and supporting structure, grounding of the TV during a lightning storm or when it could fall into such power lines or circuits. Remember, the screen of time, unplug the TV from the wall outlet and disconnect the antenna or cable system. Article 810 of the National Electrical Code, ANSI/NFPSA 70, provides information with...
M470VSE User Manual
Page 7
...Connecting to a Wireless Network 35 Changing the Advanced Network Settings 36 Testing Your Network Connection 36 Changing the TV Settings 37 Changing the Input Source 37 Setting the Tuner Mode 37 Scanning for Channels 37 Adding New Channels 38 Skipping Channels 39 Changing the Audio Language 39 Using the Parental Controls 40 Accessing the Parental Controls Menu 40 Enabling or Disabling Program Ratings 40 Locking and Unlocking Channels 40 Blocking and Unblocking Content by Rating 41 Changing the Parental Control Passcode 41 Resetting the Content Locks 41 1 BacK 19 Replacing...
...Connecting to a Wireless Network 35 Changing the Advanced Network Settings 36 Testing Your Network Connection 36 Changing the TV Settings 37 Changing the Input Source 37 Setting the Tuner Mode 37 Scanning for Channels 37 Adding New Channels 38 Skipping Channels 39 Changing the Audio Language 39 Using the Parental Controls 40 Accessing the Parental Controls Menu 40 Enabling or Disabling Program Ratings 40 Locking and Unlocking Channels 40 Blocking and Unblocking Content by Rating 41 Changing the Parental Control Passcode 41 Resetting the Content Locks 41 1 BacK 19 Replacing...
M470VSE User Manual
Page 8
... Changing the On-Screen Menu Language 42 Setting the Time Zone 43 Adjusting the CEC Settings 43 Turning the VIZIO Logo On or Off 44 Using the Help Menu 44 Displaying System Information 45 Resetting the TV Settings 45 Restoring the TV to Factory Default Settings 45 Using Guided Setup 46 Using the Info Window 47 Limited Warranty 60 Legal & Compliance 61 Using the USB Media Player 48 Using the USB Media Player 48 Connecting a USB Thumb Drive to the TV 48 Playing USB Media 48 Using VIZIO Internet...
... Changing the On-Screen Menu Language 42 Setting the Time Zone 43 Adjusting the CEC Settings 43 Turning the VIZIO Logo On or Off 44 Using the Help Menu 44 Displaying System Information 45 Resetting the TV Settings 45 Restoring the TV to Factory Default Settings 45 Using Guided Setup 46 Using the Info Window 47 Limited Warranty 60 Legal & Compliance 61 Using the USB Media Player 48 Using the USB Media Player 48 Connecting a USB Thumb Drive to the TV 48 Playing USB Media 48 Using VIZIO Internet...
M470VSE User Manual
Page 20
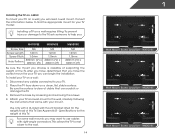
.... 3. Remove the base by loosening and removing the screws. 4. Specifications for the weight/load of this TV. Place the TV face-down on a clean, flat, stable surface. Use only with a UL-listed wall mount bracket rated for the weight of this TV. This allows the TV to rest closer to your TV model: Installing a TV on a wall requires lifting. See Appendix B - Disconnect any cables connected to the wall. 14 1 Wall Mount Screw Location...
.... 3. Remove the base by loosening and removing the screws. 4. Specifications for the weight/load of this TV. Place the TV face-down on a clean, flat, stable surface. Use only with a UL-listed wall mount bracket rated for the weight of this TV. This allows the TV to rest closer to your TV model: Installing a TV on a wall requires lifting. See Appendix B - Disconnect any cables connected to the wall. 14 1 Wall Mount Screw Location...

M470VSE User Manual
Page 21
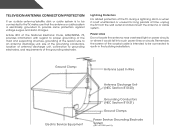
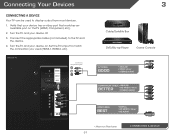
...3.5mm audio device, such as home audio receiver. Connect HDMI device. PC Audio In - RGB - USB - Connect USB thumb drive to play media. HDMI - Connect VGA cable from PC. Connect component or composite device. Connect HDMI device. HDMI - Optical Audio Out - Rear Panel 15 Connect 3.5mm audio cable from PC. Connect optical/SPDIF audio device, such as sound bar. Controls and Connections 2 Rear Panel Ethernet - Connect ethernet cable from cable, satellite, or antenna. Stereo Audio Out - Component/Composite - Coaxial - Connect coaxial cable from home network...
...3.5mm audio device, such as home audio receiver. Connect HDMI device. PC Audio In - RGB - USB - Connect USB thumb drive to play media. HDMI - Connect VGA cable from PC. Connect component or composite device. Connect HDMI device. HDMI - Optical Audio Out - Rear Panel 15 Connect 3.5mm audio cable from PC. Connect optical/SPDIF audio device, such as sound bar. Controls and Connections 2 Rear Panel Ethernet - Connect ethernet cable from cable, satellite, or antenna. Stereo Audio Out - Component/Composite - Coaxial - Connect coaxial cable from home network...
M470VSE User Manual
Page 27
... TV and the device. 4. Turn the TV and your device has a video port that matches an available port on . Connect the appropriate cable (not included) to component inputs: 3 Cable/Satellite Box DVD/Blu-ray Player Game Console AV CABLE GOOD • ANALOG • VIDEO (480i)* • STEREO AUDIO COMPONENT CABLE • ANALOG BETTER • HD VIDEO (1080i)* • STEREO AUDIO HDMI CABLE BEST • DIGITAL • HD VIDEO (1080p)* • HD AUDIO * Maximum Resolution 21 CONNECTING A DEVICE Verify that your...
... TV and the device. 4. Turn the TV and your device has a video port that matches an available port on . Connect the appropriate cable (not included) to component inputs: 3 Cable/Satellite Box DVD/Blu-ray Player Game Console AV CABLE GOOD • ANALOG • VIDEO (480i)* • STEREO AUDIO COMPONENT CABLE • ANALOG BETTER • HD VIDEO (1080i)* • STEREO AUDIO HDMI CABLE BEST • DIGITAL • HD VIDEO (1080p)* • HD AUDIO * Maximum Resolution 21 CONNECTING A DEVICE Verify that your...
M470VSE User Manual
Page 36
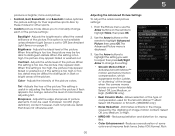
... unless Ambient Light Sensor is displayed. 3. Color - If flesh appears too orange, reduce the level of picture elements. Adjusts the edge sharpness of color before adjusting tint. See Ambient Light Sensor on the remote to highlight Advanced Picture, then press OK.The Advanced Picture menu is set to highlight More, then press OK. 2. Brightness - Adjusts the hue of the picture. Allows selection of the type of compensation used to...
... unless Ambient Light Sensor is displayed. 3. Color - If flesh appears too orange, reduce the level of picture elements. Adjusts the edge sharpness of color before adjusting tint. See Ambient Light Sensor on the remote to highlight Advanced Picture, then press OK.The Advanced Picture menu is set to highlight More, then press OK. 2. Brightness - Adjusts the hue of the picture. Allows selection of the type of compensation used to...
M470VSE User Manual
Page 39
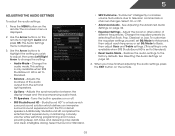
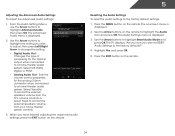
... equalizer settings yourself, set EQ Mode to Advanced, then adjust each frequency or set to television commercials or channel changes. The Audio Settings menu is set EQ Mode to Standard) • Reset Audio Mode - Change the audio mode. Adjusts the loudness of different frequencies. See Adjusting the Advanced Audio Settings on the remote. 33 This setting is only available when SRS StudioSound HD is displayed. 3. Restores the audio settings to change the setting: • Audio Mode - Adjust the boost or attenuation of the audio output...
... equalizer settings yourself, set EQ Mode to Advanced, then adjust each frequency or set to television commercials or channel changes. The Audio Settings menu is set EQ Mode to Standard) • Reset Audio Mode - Change the audio mode. Adjusts the loudness of different frequencies. See Adjusting the Advanced Audio Settings on the remote. 33 This setting is only available when SRS StudioSound HD is displayed. 3. Restores the audio settings to change the setting: • Audio Mode - Adjust the boost or attenuation of the audio output...
M470VSE User Manual
Page 40
... audio settings: 1. Sets the volume control properties for the Optical output when connected to control the external speakers' volume from the TV's volume controls, or select Fixed to a home theater audio system. The Advanced Audio menu is displayed. 2. When you wish to adjust, then press Left/Right Arrow to change the setting: • Digital Audio Out Changes the type of processing for the analog 3.5mm connector when connected to the factory defaults?" 4. From the Audio Settings Menu, use the Arrow buttons to the factory default settings: 1. The on-screen menu...
... audio settings: 1. Sets the volume control properties for the Optical output when connected to control the external speakers' volume from the TV's volume controls, or select Fixed to a home theater audio system. The Advanced Audio menu is displayed. 2. When you wish to adjust, then press Left/Right Arrow to change the setting: • Digital Audio Out Changes the type of processing for the analog 3.5mm connector when connected to the factory defaults?" 4. From the Audio Settings Menu, use the Arrow buttons to the factory default settings: 1. The on-screen menu...
M470VSE User Manual
Page 43
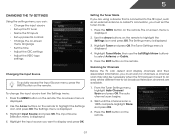
... external antenna or cable TV connection, you must set the tuner mode. 1. Use the Arrow buttons on -screen menu is displayed. 4. The Tuner Settings menu is displayed. 2. Press the EXIT button on the remote. Scanning for Channels Before the TV can : • Change the input source • Set up the TV tuner • Name the TV inputs • Set up parental controls • Change the on-screen menu language • Set the time • Adjust the CEC settings • Adjust the VIZIO logo settings Changing the Input Source To quickly access the Input Source menu, press the INPUT button...
... external antenna or cable TV connection, you must set the tuner mode. 1. Use the Arrow buttons on -screen menu is displayed. 4. The Tuner Settings menu is displayed. 2. Press the EXIT button on the remote. Scanning for Channels Before the TV can : • Change the input source • Set up the TV tuner • Name the TV inputs • Set up parental controls • Change the on-screen menu language • Set the time • Adjust the CEC settings • Adjust the VIZIO logo settings Changing the Input Source To quickly access the Input Source menu, press the INPUT button...
M470VSE User Manual
Page 45
... parental controls. From the Tuner Settings menu, highlight Digital MTS and press OK. Press the EXIT button on the remote to completely block a channel from the TV's memory with the Skip Channel feature can remove these channels from being viewed, use the Digital MTS feature: 1. Channels that some channels you do not want to audio in more than one language.The TV's MTS (Multichannel Television Sound) feature allows you select. Changing...
... parental controls. From the Tuner Settings menu, highlight Digital MTS and press OK. Press the EXIT button on the remote to completely block a channel from the TV's memory with the Skip Channel feature can remove these channels from being viewed, use the Digital MTS feature: 1. Channels that some channels you do not want to audio in more than one language.The TV's MTS (Multichannel Television Sound) feature allows you select. Changing...

M470VSE User Manual
Page 49
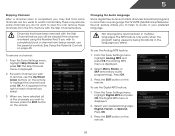
... Settings menu is displayed. 3. Not all HDMI devices support CEC. The on the remote, then press OK. Press the MENU button on the remote to control HDMI-connected devices with the included remote without any additional programming. When system audio control is on -screen menu is displayed. 2. Use this function to adjust each setting: • CEC Function - Use the Arrow buttons on the remote. Use the Arrow and OK buttons to determine if your ZIP code using the TV's remote control...
... Settings menu is displayed. 3. Not all HDMI devices support CEC. The on the remote, then press OK. Press the MENU button on the remote to control HDMI-connected devices with the included remote without any additional programming. When system audio control is on -screen menu is displayed. 2. Use this function to adjust each setting: • CEC Function - Use the Arrow buttons on the remote. Use the Arrow and OK buttons to determine if your ZIP code using the TV's remote control...

M470VSE User Manual
Page 62
... colors on page 29. • Reset the picture settings. Ensure the speakers are set to On. • Check the audio connections of external devices (Blu-ray player, game console, cable/satellite box) that are connected to turn the TV on the screen. • Ensure all cables are securely attached to the TV. • Ensure all cables to ensure they are only pressing one button at a time. • Point the remote directly...
... colors on page 29. • Reset the picture settings. Ensure the speakers are set to On. • Check the audio connections of external devices (Blu-ray player, game console, cable/satellite box) that are connected to turn the TV on the screen. • Ensure all cables are securely attached to the TV. • Ensure all cables to ensure they are only pressing one button at a time. • Point the remote directly...

M470VSE User Manual
Page 63
... display image changes size. • The TV remembers the viewing mode on the screen. • When your TV's display capabilities. If the viewing mode on the new input source differs from , the difference may be noticable. • See Changing the Screen Aspect Ratio on the remote to a window for the best signal. The picture is distorted. • Nearby electrical devices may not display correctly. Ensure your devices with HDMI cables...
... display image changes size. • The TV remembers the viewing mode on the screen. • When your TV's display capabilities. If the viewing mode on the new input source differs from , the difference may be noticable. • See Changing the Screen Aspect Ratio on the remote to a window for the best signal. The picture is distorted. • Nearby electrical devices may not display correctly. Ensure your devices with HDMI cables...
M470VSE User Manual
Page 66
... determined to be defective within the warranty period. To obtain warranty service, contact VIZIO Technical Support via e-mail: TechSupport@VIZIO.com or via phone at 877 MY VIZIO (877.698.4946) from shipping, acts of God, any type of customer misuse, modifications or adjustments, as well as installation and set-up issues or any repairs attempted by anyone other information, ALL CONTENTS AND...
... determined to be defective within the warranty period. To obtain warranty service, contact VIZIO Technical Support via e-mail: TechSupport@VIZIO.com or via phone at 877 MY VIZIO (877.698.4946) from shipping, acts of God, any type of customer misuse, modifications or adjustments, as well as installation and set-up issues or any repairs attempted by anyone other information, ALL CONTENTS AND...

M470VSE Quick Start Guide
Page 2
... the cart, stand, tripod, bracket, or table specified by qualified service personnel only. Operating your TV. Pulling on the apparatus. • The mains plug or appliance coupler is used for use your TV. The power cord fails or frays. - Liquid sprays or any of electric shock to repair your dealer. Your TV is exposed to smoke. Do not install your TV in...
... the cart, stand, tripod, bracket, or table specified by qualified service personnel only. Operating your TV. Pulling on the apparatus. • The mains plug or appliance coupler is used for use your TV. The power cord fails or frays. - Liquid sprays or any of electric shock to repair your dealer. Your TV is exposed to smoke. Do not install your TV in...
M470VSE Quick Start Guide
Page 23
... Data If your personal information, VIZIO recommends that you configured as installation and set-up issues or any type of Service Defective Products must utilize either repair or replace the Product at its sole option and discretion. com) or look for example: cosmetic damage, normal wear and tear, improper operation, improper voltage supply or power surges, signal issues, damages from 6:00AM to 9:00PM...
... Data If your personal information, VIZIO recommends that you configured as installation and set-up issues or any type of Service Defective Products must utilize either repair or replace the Product at its sole option and discretion. com) or look for example: cosmetic damage, normal wear and tear, improper operation, improper voltage supply or power surges, signal issues, damages from 6:00AM to 9:00PM...


