XVTHP200 Quick Start Guide
Page 1
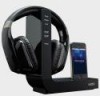
QUICK START GUIDE ACTIVE NOISE CANCELLING HIGH DEFINITION HEADPHONES WITH WIRELESS DOCK FOR iPod® XVTHP200 -
QUICK START GUIDE ACTIVE NOISE CANCELLING HIGH DEFINITION HEADPHONES WITH WIRELESS DOCK FOR iPod® XVTHP200 -
XVTHP200 Quick Start Guide
Page 2
... damage. Do not drop, sit on as needed. Do not use headphones while operating a motor vehicle or a bicycle. Sounds that you rely on , or allow the headphones to loud music may have an unfamiliar character when using headphones, especially for extended periods. Do not wear... Labs, Inc. iPhone® and iPod® are trademarks of Apple Inc., registered in the U.S. and other countries. Incorporated under license from SRS Labs, Inc. Avoid extreme volume when using headphones. Manufactured under license from Dolby Laboratories. Doing so is dangerous and ...
... damage. Do not drop, sit on as needed. Do not use headphones while operating a motor vehicle or a bicycle. Sounds that you rely on , or allow the headphones to loud music may have an unfamiliar character when using headphones, especially for extended periods. Do not wear... Labs, Inc. iPhone® and iPod® are trademarks of Apple Inc., registered in the U.S. and other countries. Incorporated under license from SRS Labs, Inc. Avoid extreme volume when using headphones. Manufactured under license from Dolby Laboratories. Doing so is dangerous and ...
XVTHP200 Quick Start Guide
Page 3
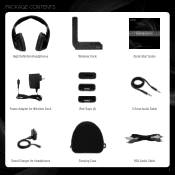
PACKAGE CONTENTS High Definition Headphones Wireless Dock Quick Start Guide Power Adapter for Wireless Dock iPod Trays (3) 3.5mm Audio Cable Travel Charger for Headphones Carrying Case RCA Audio Cable 1
PACKAGE CONTENTS High Definition Headphones Wireless Dock Quick Start Guide Power Adapter for Wireless Dock iPod Trays (3) 3.5mm Audio Cable Travel Charger for Headphones Carrying Case RCA Audio Cable 1
XVTHP200 Quick Start Guide
Page 4
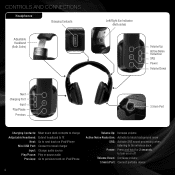
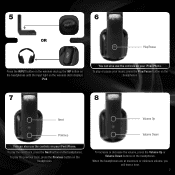
... Adjustable Headband: Extend headband to fit Next: Go to next track on iPod/iPhone Mini USB Port: Connect to travel charger Input: Change audio source Play/Pause: Play or pause audio Previous: Go to previous track on iPod/iPhone Volume Up: Increase volume Active Noise Reduction: Activate to block background noise SRS: Activate SRS sound processing when listening to the wireless dock Power: Press and hold for 2 seconds to turn...
... Adjustable Headband: Extend headband to fit Next: Go to next track on iPod/iPhone Mini USB Port: Connect to travel charger Input: Change audio source Play/Pause: Play or pause audio Previous: Go to previous track on iPod/iPhone Volume Up: Increase volume Active Noise Reduction: Activate to block background noise SRS: Activate SRS sound processing when listening to the wireless dock Power: Press and hold for 2 seconds to turn...
XVTHP200 Quick Start Guide
Page 5
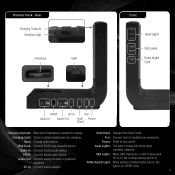
... mode Charging Light: Turns on when headphones are charging Pair: Connect dock to headphones wirelessly Input: Change audio source Power: Press to turn on/off iPod Dock: Connect iPod to use as audio source Input Lights: The light corresponds to the input Audio In: Connect analog audio device currently selected SPDIF: Connect digital audio device Audio Out: Connect analog receiver or powered speakers DC In: Connect power adapter SRS Lights: When SRS TruVolume or SRS TruSurround HD is on, the corresponding light is on Dolby Digital Light: When playing a Dolby Digital source, the light...
... mode Charging Light: Turns on when headphones are charging Pair: Connect dock to headphones wirelessly Input: Change audio source Power: Press to turn on/off iPod Dock: Connect iPod to use as audio source Input Lights: The light corresponds to the input Audio In: Connect analog audio device currently selected SPDIF: Connect digital audio device Audio Out: Connect analog receiver or powered speakers DC In: Connect power adapter SRS Lights: When SRS TruVolume or SRS TruSurround HD is on, the corresponding light is on Dolby Digital Light: When playing a Dolby Digital source, the light...
XVTHP200 Quick Start Guide
Page 6
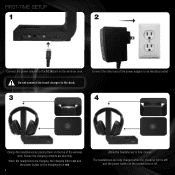
... on and the power button on the headphones is red. 4 Allow the headphones to the DC IN port on the headphones is off . The headphones are touching. FIRST-TIME SETUP 1 2 Connect the power adapter to fully charge. Ensure the charging contacts are fully charged when the charging light is off and the power button on the wireless dock. Connect the other end of the wireless dock.
... on and the power button on the headphones is red. 4 Allow the headphones to the DC IN port on the headphones is off . The headphones are touching. FIRST-TIME SETUP 1 2 Connect the power adapter to fully charge. Ensure the charging contacts are fully charged when the charging light is off and the power button on the wireless dock. Connect the other end of the wireless dock.
XVTHP200 Quick Start Guide
Page 7
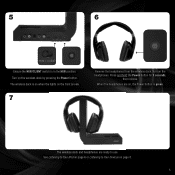
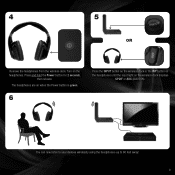
The wireless dock is on when the lights on the front are on , the Power button is in the HUB position. When the headphones are ready to Your Devices on page 6 or Listening to use. 5 6 Ensure the HUB/CLIENT switch is green. Turn on the wireless dock by pressing the Power button. Press and hold the Power button for 2 seconds, then release. See Listening to Your iPod on page 8. 5 The wireless dock and headphones are on . 7 Remove the headphones from the wireless dock. Turn on the headphones.
The wireless dock is on when the lights on the front are on , the Power button is in the HUB position. When the headphones are ready to Your Devices on page 6 or Listening to use. 5 6 Ensure the HUB/CLIENT switch is green. Turn on the wireless dock by pressing the Power button. Press and hold the Power button for 2 seconds, then release. See Listening to Your iPod on page 8. 5 The wireless dock and headphones are on . 7 Remove the headphones from the wireless dock. Turn on the headphones.

XVTHP200 Quick Start Guide
Page 8
... page 4. The headphones are on the wireless dock by lifting from the wireless dock. Turn on when the Power button is green. Trays can be removed by pressing the Power button. Locate the tray that fits your iPod/iPhone is on when the front lights are on the headphones. The wireless dock is inserted completely. 4 Turn on . 6 Remove the headphones from the fingernail slot. 3 Place your...
... page 4. The headphones are on the wireless dock by lifting from the wireless dock. Turn on when the Power button is green. Trays can be removed by pressing the Power button. Locate the tray that fits your iPod/iPhone is on when the front lights are on the headphones. The wireless dock is inserted completely. 4 Turn on . 6 Remove the headphones from the fingernail slot. 3 Place your...
XVTHP200 Quick Start Guide
Page 9
... button on your iPod/iPhone. To play or pause your music, press the Play/Pause button on the headphones. 7 8 Next Volume Up Previous You can also use the controls on the headphones. Volume Down To increase or decrease the volume, press the Volume Up or Volume Down buttons on the wireless dock displays iPod. 5 6 OR Play/Pause Press the INPUT button on the wireless dock or the INP button on the headphones until the input light...
... button on your iPod/iPhone. To play or pause your music, press the Play/Pause button on the headphones. 7 8 Next Volume Up Previous You can also use the controls on the headphones. Volume Down To increase or decrease the volume, press the Volume Up or Volume Down buttons on the wireless dock displays iPod. 5 6 OR Play/Pause Press the INPUT button on the wireless dock or the INP button on the headphones until the input light...
XVTHP200 Quick Start Guide
Page 10
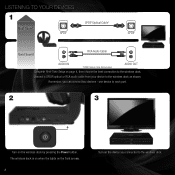
... the best connection to the wireless dock. The wireless dock is on when the lights on the front are on. 8 Turn on the device you can connect two devices - Connect a SPDIF/optical or RCA audio cable from your device to the wireless dock. LISTENING TO YOUR DEVICES 1 Best Sound SPDIF SPDIF/Optical Cable* SPDIF Good Sound RCA Audio Cable AUDIO IN *SPDIF/Optical Cable Not Included AUDIO OUT Complete First-Time Setup on the wireless dock by pressing the Power button...
... the best connection to the wireless dock. The wireless dock is on when the lights on the front are on. 8 Turn on the device you can connect two devices - Connect a SPDIF/optical or RCA audio cable from your device to the wireless dock. LISTENING TO YOUR DEVICES 1 Best Sound SPDIF SPDIF/Optical Cable* SPDIF Good Sound RCA Audio Cable AUDIO IN *SPDIF/Optical Cable Not Included AUDIO OUT Complete First-Time Setup on the wireless dock by pressing the Power button...
XVTHP200 Quick Start Guide
Page 11
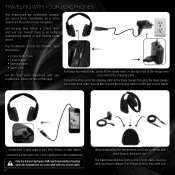
You can now listen to your devices wirelessly using the headphones-up to 60 feet away! 9 Turn on the wireless dock displays SPDIF or AUX (AUDIO IN). Press and hold the Power button for 2 seconds, then release. 4 5 OR Remove the headphones from the wireless dock. The headphones are on when the Power button is green. 6 Press the INPUT button on the wireless dock or the INP button on the headphones until the input light on the headphones.
You can now listen to your devices wirelessly using the headphones-up to 60 feet away! 9 Turn on the wireless dock displays SPDIF or AUX (AUDIO IN). Press and hold the Power button for 2 seconds, then release. 4 5 OR Remove the headphones from the wireless dock. The headphones are on when the Power button is green. 6 Press the INPUT button on the wireless dock or the INP button on the headphones until the input light on the headphones.
XVTHP200 Quick Start Guide
Page 12
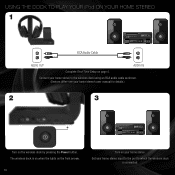
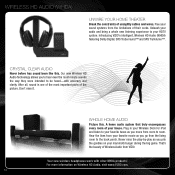
USING THE DOCK TO PLAY YOUR iPod ON YOUR HOME STEREO 1 RCA Audio Cable AUDIO OUT AUDIO IN Complete First-Time Setup on your home stereo. Set your home stereo input to the port to the wireless dock using an RCA audio cable as shown. (Devices differ-see your home stereo to which the wireless dock is on when the lights on the front are on. 10 Turn on page 4. The wireless dock is connected. Connect your home stereo's user manual for details.) 2 3 Turn on the wireless dock by pressing the Power button.
USING THE DOCK TO PLAY YOUR iPod ON YOUR HOME STEREO 1 RCA Audio Cable AUDIO OUT AUDIO IN Complete First-Time Setup on your home stereo. Set your home stereo input to the port to the wireless dock using an RCA audio cable as shown. (Devices differ-see your home stereo to which the wireless dock is on when the lights on the front are on. 10 Turn on page 4. The wireless dock is connected. Connect your home stereo's user manual for details.) 2 3 Turn on the wireless dock by pressing the Power button.

XVTHP200 Quick Start Guide
Page 13
You can now share your iPod/iPhone music on your home stereo. Use the volume controls on your home stereo to play, pause, or change tracks. Ensure your iPod/iPhone is inserted completely. 6 Press the INPUT button on the wireless dock until the input light on your iPod/iPhone in the iPod dock. Use the controls on the wireless dock displays iPod. 4 5 iPod Place your iPod/iPhone to increase or decrease volume. 11
You can now share your iPod/iPhone music on your home stereo. Use the volume controls on your home stereo to play, pause, or change tracks. Ensure your iPod/iPhone is inserted completely. 6 Press the INPUT button on the wireless dock until the input light on your iPod/iPhone in the iPod dock. Use the controls on the wireless dock displays iPod. 4 5 iPod Place your iPod/iPhone to increase or decrease volume. 11
XVTHP200 Quick Start Guide
Page 14
..., or other device. Connect the other end to a USB port on this page. Only the Volume Up/Down, ANR, and Power buttons function when the headphones are comfortable, portable, and feature Noise Cancellation, all of the headphones and connect the charging cable. Your headphones include the following travel accessories: • 3.5mm Audio Cable • Travel Charger • Charging Cable • Travel Case...
..., or other device. Connect the other end to a USB port on this page. Only the Volume Up/Down, ANR, and Power buttons function when the headphones are comfortable, portable, and feature Noise Cancellation, all of the headphones and connect the charging cable. Your headphones include the following travel accessories: • 3.5mm Audio Cable • Travel Charger • Charging Cable • Travel Case...
XVTHP200 Quick Start Guide
Page 15
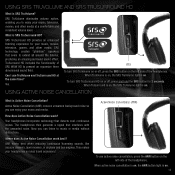
...button light is on or off , press and hold the SRS button for your music, television, movies, and other media. SRS To turn SRS TruSurround HD on or off , press the SRS button on , the SRS TruVolume light is SRS TruSurround HD? To turn SRS TruVolume on . SRS TruVolume eliminates volume...! Can I use active noise cancellation, press the ANR button on . The headphones then generate a signal that detects loud, continuous noises. SRS technology creates "phantom" speakers that seem to present an expansive three dimensional sound field. How does Active Noise Cancellation work best?
...button light is on or off , press and hold the SRS button for your music, television, movies, and other media. SRS To turn SRS TruSurround HD on or off , press the SRS button on , the SRS TruVolume light is SRS TruSurround HD? To turn SRS TruVolume on . SRS TruVolume eliminates volume...! Can I use active noise cancellation, press the ANR button on . The headphones then generate a signal that detects loud, continuous noises. SRS technology creates "phantom" speakers that seem to present an expansive three dimensional sound field. How does Active Noise Cancellation work best?
XVTHP200 Quick Start Guide
Page 16
... cords. Plug in your Wireless Dock for iPod and listen to your mammoth burger during the big game. Introducing VIZIO's intelligent, Wireless HD Audio (WHDA) featuring Dolby Digital, SRS TruSurround™ and SRS TruVolume™. Our new Wireless HD Audio Technology allows you pile the goodies on Wireless HD Audio, visit www.VIZIO.com. 14 Don't miss it. Your new wireless headphones work with accuracy and clarity. Free...
... cords. Plug in your Wireless Dock for iPod and listen to your mammoth burger during the big game. Introducing VIZIO's intelligent, Wireless HD Audio (WHDA) featuring Dolby Digital, SRS TruSurround™ and SRS TruVolume™. Our new Wireless HD Audio Technology allows you pile the goodies on Wireless HD Audio, visit www.VIZIO.com. 14 Don't miss it. Your new wireless headphones work with accuracy and clarity. Free...
XVTHP200 Quick Start Guide
Page 17
... headphones. Turn on the device. The lights on the headphones only control iPod/iPhone. • The iPod/iPhone must be connected to the wireless dock. When the headphones are not supported. (Devices differ-see your device. • Ensure the headphones are touching the metal pins on . • Try charging the headphones using the travel charger, is securely connected to output PCM or Dolby Digital Bitstream...
... headphones. Turn on the device. The lights on the headphones only control iPod/iPhone. • The iPod/iPhone must be connected to the wireless dock. When the headphones are not supported. (Devices differ-see your device. • Ensure the headphones are touching the metal pins on . • Try charging the headphones using the travel charger, is securely connected to output PCM or Dolby Digital Bitstream...
XVTHP200 Quick Start Guide
Page 18
... clean the wireless dock or headphones, gently wipe them with unreadable or removed serial numbers, or requiring routine maintenance are to damage your ears, or muffled speech. PRE-AUTHORIZATION MUST BE OBTAINED BEFORE SENDING ANY PRODUCT TO A VIZIO SERVICE CENTER. THIS WARRANTY IS SUBJECT TO CHANGE WITHOUT NOTICE. CARE & MAINTENANCE Do not use . ONE-YEAR LIMITED WARRANTY ON PARTS AND...
... clean the wireless dock or headphones, gently wipe them with unreadable or removed serial numbers, or requiring routine maintenance are to damage your ears, or muffled speech. PRE-AUTHORIZATION MUST BE OBTAINED BEFORE SENDING ANY PRODUCT TO A VIZIO SERVICE CENTER. THIS WARRANTY IS SUBJECT TO CHANGE WITHOUT NOTICE. CARE & MAINTENANCE Do not use . ONE-YEAR LIMITED WARRANTY ON PARTS AND...

XVTHP200 Quick Start Guide
Page 19
...@vizio.com Web: www.vizio.com SPECIFICATIONS Speakers: 40mm Neodymium Drivers Sensitivity 96±3 dB 1mW at 1.5mm Distortion: 1KHz < 10% Impedance: 32 Ohm ± 20% at the number below. If this equipment does cause harmful interference to radio or television reception, which the receiver is not responsible for the operation of the FCC Rules. Shielded interface cables and AC power cord...
...@vizio.com Web: www.vizio.com SPECIFICATIONS Speakers: 40mm Neodymium Drivers Sensitivity 96±3 dB 1mW at 1.5mm Distortion: 1KHz < 10% Impedance: 32 Ohm ± 20% at the number below. If this equipment does cause harmful interference to radio or television reception, which the receiver is not responsible for the operation of the FCC Rules. Shielded interface cables and AC power cord...

XVTHP200 Quick Start Guide
Page 20
VIZIO, THE V LOGO, WHERE VISION MEETS VALUE, AND OTHER VIZIO TRADEMARKS ARE THE INTELLECTUAL PROPERTY OF VIZIO INC. PRODUCT FEATURES AND SPECIFICATIONS ARE SUBJECT TO CHANGE WITHOUT NOTICE. © 2010 VIZIO INC. TRADEMARKS SHOWN ARE THE PROPERTY OF THEIR RESPECTIVE OWNERS. IMAGES USED ARE FOR ILLUSTRATION PURPOSES ONLY. ALL RIGHTS RESERVED. 101012ST-NC
VIZIO, THE V LOGO, WHERE VISION MEETS VALUE, AND OTHER VIZIO TRADEMARKS ARE THE INTELLECTUAL PROPERTY OF VIZIO INC. PRODUCT FEATURES AND SPECIFICATIONS ARE SUBJECT TO CHANGE WITHOUT NOTICE. © 2010 VIZIO INC. TRADEMARKS SHOWN ARE THE PROPERTY OF THEIR RESPECTIVE OWNERS. IMAGES USED ARE FOR ILLUSTRATION PURPOSES ONLY. ALL RIGHTS RESERVED. 101012ST-NC


