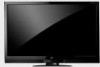

XVT3D650SV User Manual
Page 5
... fit only into your HDTV, hold the AC/DC power adapter, not the cord. XVT3D650SV • Your HDTV should be installed near your HDTV and easily accessible. • Only power of the marked voltage can damage the remote control or injure the operator. • If any smoke or odor becomes apparent, unplug the...
... fit only into your HDTV, hold the AC/DC power adapter, not the cord. XVT3D650SV • Your HDTV should be installed near your HDTV and easily accessible. • Only power of the marked voltage can damage the remote control or injure the operator. • If any smoke or odor becomes apparent, unplug the...
XVT3D650SV User Manual
Page 7
... Distance and Angle 4 Correct 3D Viewing Distance and Angle 4 Controls & Connections 5 Front Panel 5 Using the Jag Wheel 5 Using the Quick Menu 5 Rear Panel 6 Bluetooth Remote 7 Replacing the Batteries 8 Activating the Bluetooth Remote Control 8 Using the Remote for Your Other Devices 8 Completing the First-Time Setup 9...the Audio Language 21 Changing the Names of the Inputs 21 Activating Game Mode 22 Using the Parental Controls 22 Accessing the Parental Controls Menu 22 Enabling or Disabling Program Ratings 22 Locking and Unlocking Channels 22 Blocking and Unblocking Content ...
... Distance and Angle 4 Correct 3D Viewing Distance and Angle 4 Controls & Connections 5 Front Panel 5 Using the Jag Wheel 5 Using the Quick Menu 5 Rear Panel 6 Bluetooth Remote 7 Replacing the Batteries 8 Activating the Bluetooth Remote Control 8 Using the Remote for Your Other Devices 8 Completing the First-Time Setup 9...the Audio Language 21 Changing the Names of the Inputs 21 Activating Game Mode 22 Using the Parental Controls 22 Accessing the Parental Controls Menu 22 Enabling or Disabling Program Ratings 22 Locking and Unlocking Channels 22 Blocking and Unblocking Content ...
XVT3D650SV User Manual
Page 9
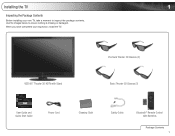
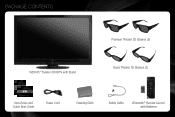
... missing or damaged. Premium Theater 3D Glasses (2) VIZIO 65" Theater 3D HDTV with Stand Basic Theater 3D Glasses (2) XVT3D424SV / XVT3D474SV / XVT3D554SV QUICK START GUIDE XVT3D424SV / XVT3D474SV / XVT3D554SV QUICK START GUIDE User Guide and Quick Start Guide Power Cord Cleaning Cloth Safety Cable Bluetooth® Remote Control with Batteries Package Contents 1 Installing the TV...
... missing or damaged. Premium Theater 3D Glasses (2) VIZIO 65" Theater 3D HDTV with Stand Basic Theater 3D Glasses (2) XVT3D424SV / XVT3D474SV / XVT3D554SV QUICK START GUIDE XVT3D424SV / XVT3D474SV / XVT3D554SV QUICK START GUIDE User Guide and Quick Start Guide Power Cord Cleaning Cloth Safety Cable Bluetooth® Remote Control with Batteries Package Contents 1 Installing the TV...
XVT3D650SV User Manual
Page 13
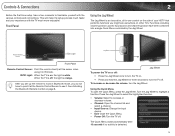
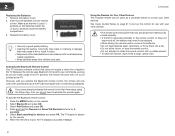
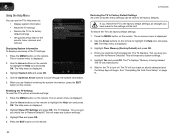
This will make the setup process much more enjoyable! Remote Control Sensor VIZIO Light Front Panel Remote Control Sensor: Point the remote directly at this sensor when using it in Bluetooth mode, you do not have been combined into a single Quick Menu controlled by the Jag Wheel. After you might see as ...for three seconds to turn the Jag Wheel. Functions including volume up/down have to point it at the Remote Control Sensor to use it. See Activating the Bluetooth Remote Control on or off . Press the Jag Wheel to select the highlighted function. • Volume: Select to ...
This will make the setup process much more enjoyable! Remote Control Sensor VIZIO Light Front Panel Remote Control Sensor: Point the remote directly at this sensor when using it in Bluetooth mode, you do not have been combined into a single Quick Menu controlled by the Jag Wheel. After you might see as ...for three seconds to turn the Jag Wheel. Functions including volume up/down have to point it at the Remote Control Sensor to use it. See Activating the Bluetooth Remote Control on or off . Press the Jag Wheel to select the highlighted function. • Volume: Select to ...
XVT3D650SV User Manual
Page 15
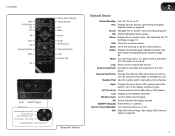
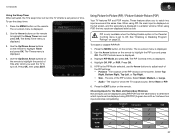
...number pad to the previous on or off. Bluetooth® Remote 7 OK: Select highlighted menu option. Menu: Display the on page 32. With each press of the button, the TV will increase or decrease by one. VIA Shortcuts: Control VIZIO Internet Apps. 3D: Switch between 3D display modes. See ... Close the on page 33. See Using VIZIO Internet Apps on -screen menu. Channel Up/Down: Change the channel. Device Power/Standby: Turn external device on or off or on page 15. See Adjusting the TV Settings on . XVT3D650SV Input A/V Controls List Exit OK Back VIA Volume Up/Down ...
...number pad to the previous on or off. Bluetooth® Remote 7 OK: Select highlighted menu option. Menu: Display the on page 32. With each press of the button, the TV will increase or decrease by one. VIA Shortcuts: Control VIZIO Internet Apps. 3D: Switch between 3D display modes. See ... Close the on page 33. See Using VIZIO Internet Apps on -screen menu. Channel Up/Down: Change the channel. Device Power/Standby: Turn external device on or off or on page 15. See Adjusting the TV Settings on . XVT3D650SV Input A/V Controls List Exit OK Back VIA Volume Up/Down ...
XVT3D650SV User Manual
Page 16
... your other devices. Select Bluetooth and press OK. 3. The TV begins to the TV. To activate the Bluetooth remote control: 1. Select Start searching for 5 seconds. 5. When the remote is not pointed at the TV. 2 XVT3D650SV Replacing the Batteries 1. Press and hold the Record and Green VIA Shortcut buttons for devices and press OK. Make...
... your other devices. Select Bluetooth and press OK. 3. The TV begins to the TV. To activate the Bluetooth remote control: 1. Select Start searching for 5 seconds. 5. When the remote is not pointed at the TV. 2 XVT3D650SV Replacing the Batteries 1. Press and hold the Record and Green VIA Shortcut buttons for devices and press OK. Make...
XVT3D650SV User Manual
Page 17
... to read and accept the Terms of Service and Privacy Policy for use the Arrow Up/Down buttons on the remote. Enter the network key using the QUERTY Keypad on the remote. If you are not connecting your TV to an electrical outlet. See Installing the TV on and the Setup App... not see this step. Before you begin the first-time setup: • Your TV should be installed and the power cord should be connected. See Controls & Connections on page 5. • If you have a wireless network, have the network key ready. • If you through each of available networks and press OK...
... to read and accept the Terms of Service and Privacy Policy for use the Arrow Up/Down buttons on the remote. Enter the network key using the QUERTY Keypad on the remote. If you are not connecting your TV to an electrical outlet. See Installing the TV on and the Setup App... not see this step. Before you begin the first-time setup: • Your TV should be installed and the power cord should be connected. See Controls & Connections on page 5. • If you have a wireless network, have the network key ready. • If you through each of available networks and press OK...
XVT3D650SV User Manual
Page 23
... • Adjust the audio settings • Adjust the tuner settings • Name device inputs • Activate Game Mode • Set the parental controls • Change the on-screen menu language • Set the time Changing the Input Source External devices such as DVD players, Blu-Ray Players, ...and video game consoles can be connected to highlight Picture Mode, then use one of the picture. Use the Up/Down Arrow buttons on the remote to highlight the TV Settings icon and press OK. The TV Settings menu is displayed. 3. To change the picture mode: • Standard ...
... • Adjust the audio settings • Adjust the tuner settings • Name device inputs • Activate Game Mode • Set the parental controls • Change the on-screen menu language • Set the time Changing the Input Source External devices such as DVD players, Blu-Ray Players, ...and video game consoles can be connected to highlight Picture Mode, then use one of the picture. Use the Up/Down Arrow buttons on the remote to highlight the TV Settings icon and press OK. The TV Settings menu is displayed. 3. To change the picture mode: • Standard ...
XVT3D650SV User Manual
Page 26
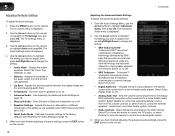
...virtualization technology developed by the VIZIO remote. When you wish to adjust, then press Left/Right Arrow to change the setting: • Audio Mode - XVT3D650SV Adjusting the Advanced Audio Settings To adjust the advanced audio settings: 1. Use the Arrow buttons to control the external speakers' volume ... On or Off. • SRS TruVolume - Restores the audio settings to control the external audio device. 3. Select TV to force the remote to control the TV's audio, or select External to force the remote to the factory defaults. Adjusts the loudness of the audio output from your ...
...virtualization technology developed by the VIZIO remote. When you wish to adjust, then press Left/Right Arrow to change the setting: • Audio Mode - XVT3D650SV Adjusting the Advanced Audio Settings To adjust the advanced audio settings: 1. Use the Arrow buttons to control the external speakers' volume ... On or Off. • SRS TruVolume - Restores the audio settings to control the external audio device. 3. Select TV to force the remote to control the TV's audio, or select External to force the remote to the factory defaults. Adjusts the loudness of the audio output from your ...
XVT3D650SV User Manual
Page 28
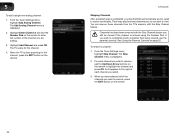
.... 2. XVT3D650SV Skipping Channels After a channel scan is completed, you may also be viewed if the channel is done scanning for the channel. 4. If you do not want to view. From the Tuner Settings menu, highlight Skip Channel. An X appears to remove, press the EXIT button on the remote. 20 ...3. When you wish to remove, use the Number Pad on the remote. The TV scans for the channel, press the EXIT button on the remote to highlight the channel and press OK. See Using the Parental Controls on the remote to enter the number of each channel you have been removed with ...
.... 2. XVT3D650SV Skipping Channels After a channel scan is completed, you may also be viewed if the channel is done scanning for the channel. 4. If you do not want to view. From the Tuner Settings menu, highlight Skip Channel. An X appears to remove, press the EXIT button on the remote. 20 ...3. When you wish to remove, use the Number Pad on the remote. The TV scans for the channel, press the EXIT button on the remote to highlight the channel and press OK. See Using the Parental Controls on the remote to enter the number of each channel you have been removed with ...
XVT3D650SV User Manual
Page 30
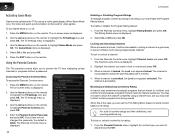
..., highlight the content type you to prevent children from viewing inappropriate material. Press the EXIT button on the remote. The on the remote to highlight Parental Controls and press OK. 4. 5 XVT3D650SV Activating Game Mode Game mode optimizes the TV for video games. Use the Arrow buttons on -screen menu is locked, the Lock icon...
..., highlight the content type you to prevent children from viewing inappropriate material. Press the EXIT button on the remote. The on the remote to highlight Parental Controls and press OK. 4. 5 XVT3D650SV Activating Game Mode Game mode optimizes the TV for video games. Use the Arrow buttons on -screen menu is locked, the Lock icon...
XVT3D650SV User Manual
Page 31
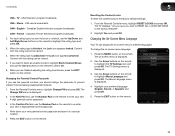
..., use the Number Pad on the remote to block all unrated content, highlight Block Unrated Shows and use the parental controls, you want to enter your new 4-digit parental control passcode. 4. The TV displays, "... and press OK. English - The Menu Language menu is displayed. 2. Press the EXIT button on the remote to select On. 6. Canadian French television program broadcasts. 2. To change the passcode to the factory-default settings... the rating type is displayed. 2. Highlight your new parental control passcode and save it in different languages. XVT3D650SV 5 USA -
..., use the Number Pad on the remote to block all unrated content, highlight Block Unrated Shows and use the parental controls, you want to enter your new 4-digit parental control passcode. 4. The TV displays, "... and press OK. English - The Menu Language menu is displayed. 2. Press the EXIT button on the remote to select On. 6. Canadian French television program broadcasts. 2. To change the passcode to the factory-default settings... the rating type is displayed. 2. Highlight your new parental control passcode and save it in different languages. XVT3D650SV 5 USA -
XVT3D650SV User Manual
Page 33
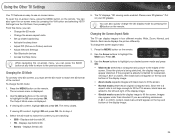
...with black bars to -use on the top and bottom of the screen. Changing the Screen Aspect Ratio The TV can display images in -Picture) controls • Adjust Network Settings • Pair Bluetooth devices • Access the Help menu While navigating the on-screen menu, you can : •...different modes: Wide, Zoom, Normal, and Stretch. If the program is being stretched, the display image may appear wider than intended. Put on the remote. Using the Other TV Settings 6 Your TV features an easy-to fit the screen. • Normal mode preserves an original 4:3 aspect ratio. ...
...with black bars to -use on the top and bottom of the screen. Changing the Screen Aspect Ratio The TV can display images in -Picture) controls • Adjust Network Settings • Pair Bluetooth devices • Access the Help menu While navigating the on-screen menu, you can : •...different modes: Wide, Zoom, Normal, and Stretch. If the program is being stretched, the display image may appear wider than intended. Put on the remote. Using the Other TV Settings 6 Your TV features an easy-to fit the screen. • Normal mode preserves an original 4:3 aspect ratio. ...
XVT3D650SV User Manual
Page 35
...icon and press OK. Press the EXIT button on the remote. Press the MENU button on the remote. The Sleep Timer menu is displayed. 4. PIP is only available when the Rating Enable option in a smaller window. Select Main or PIP. 6. XVT3D650SV 6 Using the Sleep Timer When activated, the TV's ...Choosing Inputs for which inputs can be displayed using POP, the two inputs are displayed side by side. Press OK, then press EXIT. The PIP Controls menu is displayed. 2. The size of the PIP window on -screen menu is set period of the PIP settings: • Position - The on...
...icon and press OK. Press the EXIT button on the remote. Press the MENU button on the remote. The Sleep Timer menu is displayed. 4. PIP is only available when the Rating Enable option in a smaller window. Select Main or PIP. 6. XVT3D650SV 6 Using the Sleep Timer When activated, the TV's ...Choosing Inputs for which inputs can be displayed using POP, the two inputs are displayed side by side. Press OK, then press EXIT. The PIP Controls menu is displayed. 2. The size of the PIP window on -screen menu is set period of the PIP settings: • Position - The on...
XVT3D650SV User Manual
Page 38
... • Reset the TV settings • Restore the TV to the factory defaults. XVT3D650SV Restoring the TV to Factory Default Settings All of the TV settings: 1. Press the MENU button on the remote. Highlight Yes and press OK. 6 Using the Help Menu You can be lost! The...page 9. 30 The TV displays "Memory is displayed. 2. Press the MENU button on the remote. Highlight Reset TV Settings and press OK. Press the EXIT button on the remote. Enter your parental control passcode. When you would like to Restore Defaults? See "Completing the First-Time Setup" on...
... • Reset the TV settings • Restore the TV to the factory defaults. XVT3D650SV Restoring the TV to Factory Default Settings All of the TV settings: 1. Press the MENU button on the remote. Highlight Yes and press OK. 6 Using the Help Menu You can be lost! The...page 9. 30 The TV displays "Memory is displayed. 2. Press the MENU button on the remote. Highlight Reset TV Settings and press OK. Press the EXIT button on the remote. Enter your parental control passcode. When you would like to Restore Defaults? See "Completing the First-Time Setup" on...
XVT3D650SV User Manual
Page 47
...Ensure no sound. • Press Volume Up on the remote control. • Press the MUTE button on page 15. Address: 39 Tesla Irvine, CA 92618, USA Phone: (877) 698-4946 Fax: (949) 585-9563 Email: techsupport@vizio.com Web: www.VIZIO.com Hours of external devices (Blu-ray player, game ...console, cable/satellite box) that are connected to select a different input source. • If you are securely attached. 39 The colors on the remote control to the TV. • If...
...Ensure no sound. • Press Volume Up on the remote control. • Press the MUTE button on page 15. Address: 39 Tesla Irvine, CA 92618, USA Phone: (877) 698-4946 Fax: (949) 585-9563 Email: techsupport@vizio.com Web: www.VIZIO.com Hours of external devices (Blu-ray player, game ...console, cable/satellite box) that are connected to select a different input source. • If you are securely attached. 39 The colors on the remote control to the TV. • If...
XVT3D650SV User Manual
Page 49
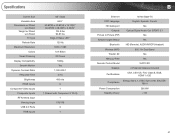
...with Component Y Pb R) 1 178/178 3 1 B Ethernet OSD Language HD Gameport Outputs Picture In Picture (PIP) Ambient Light Sensor Bluetooth Wireless (WiFi) Theater 3D Mercury-Free Remote Control Model Glasses Certifications 10/100 Base-TX English, Spanish, French Yes Optical Digital Audio Out (SPDIF) 5.1 Yes Yes HID... (Remote), A2DP/AVRCP (Headset) 802.11n Dual-Band Yes Yes VUR10 3D 4 Polarized Glasses Included CSA, CSA-US, FCC Class B, BQB, HDMI 1.4 3D Compliance Energy Star ...
...with Component Y Pb R) 1 178/178 3 1 B Ethernet OSD Language HD Gameport Outputs Picture In Picture (PIP) Ambient Light Sensor Bluetooth Wireless (WiFi) Theater 3D Mercury-Free Remote Control Model Glasses Certifications 10/100 Base-TX English, Spanish, French Yes Optical Digital Audio Out (SPDIF) 5.1 Yes Yes HID... (Remote), A2DP/AVRCP (Headset) 802.11n Dual-Band Yes Yes VUR10 3D 4 Polarized Glasses Included CSA, CSA-US, FCC Class B, BQB, HDMI 1.4 3D Compliance Energy Star ...
XVT3D650SV Quick Start Guide
Page 3
PACKAGE CONTENTS Premium Theater 3D Glasses (2) VIZIO 65" Theater 3D HDTV with Stand Basic Theater 3D Glasses (2) XVT3D424SV / XVT3D474SV / XVT3D554SV QUICK START GUIDE XVT3D424SV / XVT3D474SV / XVT3D554SV QUICK START GUIDE User Guide and Quick Start Guide Power Cord Cleaning Cloth Safety Cable Bluetooth® Remote Control with Batteries
PACKAGE CONTENTS Premium Theater 3D Glasses (2) VIZIO 65" Theater 3D HDTV with Stand Basic Theater 3D Glasses (2) XVT3D424SV / XVT3D474SV / XVT3D554SV QUICK START GUIDE XVT3D424SV / XVT3D474SV / XVT3D554SV QUICK START GUIDE User Guide and Quick Start Guide Power Cord Cleaning Cloth Safety Cable Bluetooth® Remote Control with Batteries
XVT3D650SV Quick Start Guide
Page 4
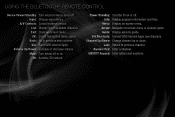
List: Display list of available channels. A/V Controls: Control external device. Exit: Close on -screen menu. Back: Go to previous channel. Menu: Display on -screen menu. Number Pad: Enter a channel. Power/...Display program information and time. OK: Select highlighted menu option. VIA: Start VIZIO Internet Apps. VIA Shortcuts: Control VIZIO Internet Apps (see diagram). Volume Up/Down: Increase or decrease volume. Arrow: Navigate on or off. USING THE BLUETOOTH® REMOTE CONTROL Device Power/Standby: Turn external device on -screen menu or episode guide. Input...
List: Display list of available channels. A/V Controls: Control external device. Exit: Close on -screen menu. Back: Go to previous channel. Menu: Display on -screen menu. Number Pad: Enter a channel. Power/...Display program information and time. OK: Select highlighted menu option. VIA: Start VIZIO Internet Apps. VIA Shortcuts: Control VIZIO Internet Apps (see diagram). Volume Up/Down: Increase or decrease volume. Arrow: Navigate on or off. USING THE BLUETOOTH® REMOTE CONTROL Device Power/Standby: Turn external device on -screen menu or episode guide. Input...
XVT3D650SV Quick Start Guide
Page 19
The TV does not respond when I cannot access VIZIO Internet Apps, or my Apps are using the RGB (computer) input, ensure you are not working correctly. • Press the VIA button on the front ... desktop resolution. • Some television channels add black bars to Wide or Zoom Mode. Press MENU > 3D > SBS. I press buttons on the remote control. • Insert new batteries into the remote. • Ensure no objects are blocking the TV's sensor. (The sensor is displayed as two separate images. • Enable SBS (side-by...
The TV does not respond when I cannot access VIZIO Internet Apps, or my Apps are using the RGB (computer) input, ensure you are not working correctly. • Press the VIA button on the front ... desktop resolution. • Some television channels add black bars to Wide or Zoom Mode. Press MENU > 3D > SBS. I press buttons on the remote control. • Insert new batteries into the remote. • Ensure no objects are blocking the TV's sensor. (The sensor is displayed as two separate images. • Enable SBS (side-by...


