
XVT3D650SV User Manual
Page 15
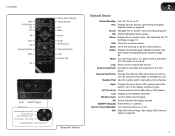
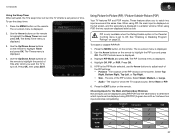
... the TV Settings on page 32. Volume Up/Down: Increase or decrease the loudness of available channels. See Using the Digital Episode Guide on page 15. Mute: Turn the sound off...Up/Down: Change the channel. VIA Shortcuts: Control VIZIO Internet Apps. 3D: Switch between 3D display modes. VIA: Start VIA Internet Apps. See Using VIZIO Internet Apps on . Info: Display the Info Window....off. Bluetooth® Remote 7 A/V Controls: Control external device (Blu-Ray or DVD player). XVT3D650SV Input A/V Controls List Exit OK Back VIA Volume Up/Down Mute 3D Arrow QUERTY Keypad VIA ...
... the TV Settings on page 32. Volume Up/Down: Increase or decrease the loudness of available channels. See Using the Digital Episode Guide on page 15. Mute: Turn the sound off...Up/Down: Change the channel. VIA Shortcuts: Control VIZIO Internet Apps. 3D: Switch between 3D display modes. VIA: Start VIA Internet Apps. See Using VIZIO Internet Apps on . Info: Display the Info Window....off. Bluetooth® Remote 7 A/V Controls: Control external device (Blu-Ray or DVD player). XVT3D650SV Input A/V Controls List Exit OK Back VIA Volume Up/Down Mute 3D Arrow QUERTY Keypad VIA ...
XVT3D650SV User Manual
Page 17
..., ZIP Code, and E-mail Address using the QUERTY Keypad on page 1. • Your devices should be connected to your wireless network from the list of available networks and press OK. If the TV is found . TV Widgets. Before you are connecting to an electrical outlet. The TV powers on the TV...
..., ZIP Code, and E-mail Address using the QUERTY Keypad on page 1. • Your devices should be connected to your wireless network from the list of available networks and press OK. If the TV is found . TV Widgets. Before you are connecting to an electrical outlet. The TV powers on the TV...
XVT3D650SV User Manual
Page 19
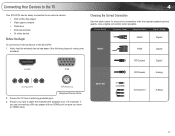
... Your Devices to the 3D HDTV: 1. Ensure you have a cable that the external device has one of the following types of video ports available: 4 Choosing the Correct Connection Use the table below to choose the connection with an HDMI port, be easily connected to an external device: ...TV Your 3D HDTV can be sure you are connecting a Blu-ray player with the highest possible picture quality. Verify that matches the available port. Picture Quality Connector Image Connector Name Digital / Analog HDMI Digital BEST RGB Digital RF/Coaxial Digital HDMI RGB RF/Coaxial Analog ...
... Your Devices to the 3D HDTV: 1. Ensure you have a cable that the external device has one of the following types of video ports available: 4 Choosing the Correct Connection Use the table below to choose the connection with an HDMI port, be easily connected to an external device: ...TV Your 3D HDTV can be sure you are connecting a Blu-ray player with the highest possible picture quality. Verify that matches the available port. Picture Quality Connector Image Connector Name Digital / Analog HDMI Digital BEST RGB Digital RF/Coaxial Digital HDMI RGB RF/Coaxial Analog ...
XVT3D650SV User Manual
Page 20
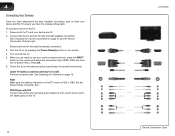
.../connection types below for Channels on the TV. 12 XVT3D650SV Device Connection Chart Press OK. 6. Check the list of the cable is set to the HDMI ports on page 19. Turn your device and the TV, ensure you have determined the best available connection type on both the TV and your newly... connected device, press the INPUT button on -screen menu. Use the best available connection. See . To connect a device to use your device are ready to the TV: 1. When you are off. 2. DVD Player with DVI Connect left (white) ...
.../connection types below for Channels on the TV. 12 XVT3D650SV Device Connection Chart Press OK. 6. Check the list of the cable is set to the HDMI ports on page 19. Turn your device and the TV, ensure you have determined the best available connection type on both the TV and your newly... connected device, press the INPUT button on -screen menu. Use the best available connection. See . To connect a device to use your device are ready to the TV: 1. When you are off. 2. DVD Player with DVI Connect left (white) ...
XVT3D650SV User Manual
Page 21
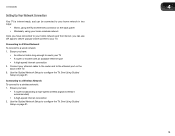
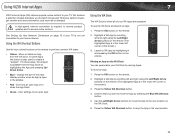
... have : • An ethernet cable long enough to reach your TV • A router or modem with an available ethernet port • A high-speed internet connection 2. Connecting to A Wired Network To connect to a wireless network: 1. XVT3D650SV 4 Setting Up Your Network Connection Your TV is internet-ready, and can be connected to your home...
... have : • An ethernet cable long enough to reach your TV • A router or modem with an available ethernet port • A high-speed internet connection 2. Connecting to A Wired Network To connect to a wireless network: 1. XVT3D650SV 4 Setting Up Your Network Connection Your TV is internet-ready, and can be connected to your home...
XVT3D650SV User Manual
Page 23
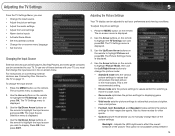
... as DVD players, Blu-Ray Players, and video game consoles can be adjusted to change each of the picture. The TV Settings menu is not available unless Ambient 15 Use the Up/Down Arrow buttons on the remote to highlight the input source you wish to affect the overall brilliance of...
... as DVD players, Blu-Ray Players, and video game consoles can be adjusted to change each of the picture. The TV Settings menu is not available unless Ambient 15 Use the Up/Down Arrow buttons on the remote to highlight the input source you wish to affect the overall brilliance of...
XVT3D650SV User Manual
Page 26
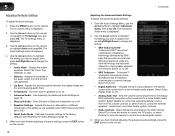
... Bluetooth transmitter on the remote. Adjusts the boost or attenuation of different frequencies. (This setting is only available when SRS TruSurround HD is displayed. 2. XVT3D650SV Adjusting the Advanced Audio Settings To adjust the advanced audio settings: 1. Use the Arrow buttons to highlight... when connected to a home theater audio system. The Audio Settings menu is a robust multichannel virtualization technology developed by the VIZIO remote. Select the device controlled by SRS Labs that provides an enhanced listening experience unlike any other technology that has been ...
... Bluetooth transmitter on the remote. Adjusts the boost or attenuation of different frequencies. (This setting is only available when SRS TruSurround HD is displayed. 2. XVT3D650SV Adjusting the Advanced Audio Settings To adjust the advanced audio settings: 1. Use the Arrow buttons to highlight... when connected to a home theater audio system. The Audio Settings menu is a robust multichannel virtualization technology developed by the VIZIO remote. Select the device controlled by SRS Labs that provides an enhanced listening experience unlike any other technology that has been ...
XVT3D650SV User Manual
Page 27
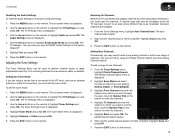
...and press OK. 3. Press the EXIT button on the remote. To add a range of channel you may also be used to which you are available. 1. The TV displays, "Are you sure you must scan for Channels Before the TV can do this by using a device that is receiving... Mode and select the type of new channels: 1. Wait until the partial channel search is 100% complete. The on -screen menu is displayed. 2. XVT3D650SV 5 Resetting the Audio Settings To reset the audio settings to highlight Reset Audio Mode and press OK. The partial channel search begins. 6. The on -...
...and press OK. 3. Press the EXIT button on the remote. To add a range of channel you may also be used to which you are available. 1. The TV displays, "Are you sure you must scan for Channels Before the TV can do this by using a device that is receiving... Mode and select the type of new channels: 1. Wait until the partial channel search is 100% complete. The on -screen menu is displayed. 2. XVT3D650SV 5 Resetting the Audio Settings To reset the audio settings to highlight Reset Audio Mode and press OK. The partial channel search begins. 6. The on -...
XVT3D650SV User Manual
Page 35
... on the remote. When using PIP, the main input is displayed on -screen menu is set period of time after a set to Off. Press OK. 5. XVT3D650SV 6 Using the Sleep Timer When activated, the TV's sleep timer will turn off after which you to watch two input sources at the same time... timer: 1. Press the MENU button on the remote to adjust each of the PIP window. The PIP Controls menu is displayed. 4. If PIP is only available when the Rating Enable option in a smaller window.
... on the remote. When using PIP, the main input is displayed on -screen menu is set period of time after a set to Off. Press OK. 5. XVT3D650SV 6 Using the Sleep Timer When activated, the TV's sleep timer will turn off after which you to watch two input sources at the same time... timer: 1. Press the MENU button on the remote to adjust each of the PIP window. The PIP Controls menu is displayed. 4. If PIP is only available when the Rating Enable option in a smaller window.
XVT3D650SV User Manual
Page 36
...'s name (SSID), then highlight Connect and press OK. (If you would like to highlight the Network icon and press OK. 6 XVT3D650SV Using the Network Connection Menu Your TV is displayed. 3. The Network Connection menu is internet-ready, featuring both an ethernet port and built... highlight Connect and press OK. (If you would like to a wireless network whose network name (SSID) is displayed. 2. Highlight the name of available wireless networks, is being broadcast: 1. Press the MENU button on -screen menu is not being broadcast: 1. The Network Connection menu is displayed. ...
...'s name (SSID), then highlight Connect and press OK. (If you would like to highlight the Network icon and press OK. 6 XVT3D650SV Using the Network Connection Menu Your TV is displayed. 3. The Network Connection menu is internet-ready, featuring both an ethernet port and built... highlight Connect and press OK. (If you would like to a wireless network whose network name (SSID) is displayed. 2. Highlight the name of available wireless networks, is being broadcast: 1. Press the MENU button on -screen menu is not being broadcast: 1. The Network Connection menu is displayed. ...
XVT3D650SV User Manual
Page 41
... your TV. Confirm that allow you want to perform common VIA tasks: • Yellow - To use the VIA Dock and launch an App: 1. Using VIZIO Internet Apps 7 VIZIO Internet Apps (VIA) delivers popular online content to your VIA Apps are accessed. Using the VIA Shortcut Buttons Use the four colored buttons on... product updates and to the new location on the remote. 2. Use the Left/Right Arrow buttons to move an App: 1. A high-speed internet connection is available from the App Dock by pressing the Blue VIA Shortcut button. 5.
... your TV. Confirm that allow you want to perform common VIA tasks: • Yellow - To use the VIA Dock and launch an App: 1. Using VIZIO Internet Apps 7 VIZIO Internet Apps (VIA) delivers popular online content to your VIA Apps are accessed. Using the VIA Shortcut Buttons Use the four colored buttons on... product updates and to the new location on the remote. 2. Use the Left/Right Arrow buttons to move an App: 1. A high-speed internet connection is available from the App Dock by pressing the Blue VIA Shortcut button. 5.
XVT3D650SV Quick Start Guide
Page 4
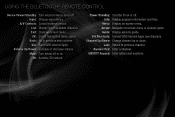
...REMOTE CONTROL Device Power/Standby: Turn external device on . 3D: Activate 3D content. List: Display list of available channels. Back: Go to previous channel. VIA: Start VIZIO Internet Apps. Info: Display program information and time. Guide: Display episode guide. QWERTY Keypad: Enter letters and... TV on -screen menu or episode guide. Last: Return to previous menu screen. Exit: Close on -screen menu. VIA Shortcuts: Control VIZIO Internet Apps (see diagram). A/V Controls: Control external device. OK: Select highlighted menu option. Menu: Display on -screen menu. Channel Up...
...REMOTE CONTROL Device Power/Standby: Turn external device on . 3D: Activate 3D content. List: Display list of available channels. Back: Go to previous channel. VIA: Start VIZIO Internet Apps. Info: Display program information and time. Guide: Display episode guide. QWERTY Keypad: Enter letters and... TV on -screen menu or episode guide. Last: Return to previous menu screen. Exit: Close on -screen menu. VIA Shortcuts: Control VIZIO Internet Apps (see diagram). A/V Controls: Control external device. OK: Select highlighted menu option. Menu: Display on -screen menu. Channel Up...
XVT3D650SV Quick Start Guide
Page 6
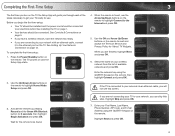
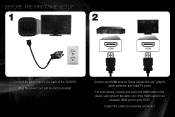
For each device, connect one end of an HDMI cable to the device, and connect the other end of the HDMI cable to the back of the 3D HDTV. Plug the power cord into an electrical outlet. BEFORE THE FIRST-TIME SETUP 1 2 HDMI HDMI Connect the power cord to an available HDMI port on your HDMI devices. These include Blu-ray™ players, game consoles, and cable TV boxes. Connect your HDTV. Ensure the cables are securely connected.
For each device, connect one end of an HDMI cable to the device, and connect the other end of the HDMI cable to the back of the 3D HDTV. Plug the power cord into an electrical outlet. BEFORE THE FIRST-TIME SETUP 1 2 HDMI HDMI Connect the power cord to an available HDMI port on your HDMI devices. These include Blu-ray™ players, game consoles, and cable TV boxes. Connect your HDTV. Ensure the cables are securely connected.
XVT3D650SV Quick Start Guide
Page 10
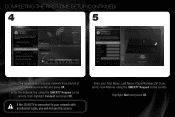
If the 3D HDTV is connected to your wireless network from the list of your network with an ethernet cable, you will not see this screen. Enter your First Name, Last Name, Phone Number, ZIP Code, and E-mail Address using the QWERTY Keypad on the remote. Highlight Next and press OK. Enter the network key using the QWERTY Keypad on the remote, then highlight Connect and press OK. COMPLETING THE FIRST-TIME SETUP (CONTINUED) 4 5 Select the name of available networks and press OK.
If the 3D HDTV is connected to your wireless network from the list of your network with an ethernet cable, you will not see this screen. Enter your First Name, Last Name, Phone Number, ZIP Code, and E-mail Address using the QWERTY Keypad on the remote. Highlight Next and press OK. Enter the network key using the QWERTY Keypad on the remote, then highlight Connect and press OK. COMPLETING THE FIRST-TIME SETUP (CONTINUED) 4 5 Select the name of available networks and press OK.


