

XVT3D424SV User Manual
Page 9
...Contents Chapter 1: Installing the TV 1 Installing the TV Stand...1 Installing the TV on a Wall...3 Chapter 2: Controls and Connections 4 Using the Jag Wheel Control...6 Using the Quick Menu...6 Remote Control Buttons...8 Replacing the Batteries...9 Activating the Bluetooth ...10 Chapter 3: Completing the First-Time Setup 11 Chapter 4: Connecting Your Devices to the TV 14 Choosing the Correct Connection 15 Connecting Your Devices...16 Setting Up Your Network Connection 18 Connecting to A Wired Network 18 Connecting to a Wireless Network 18 Chapter 5: Using the On-Screen Menu 19 Changing ...
...Contents Chapter 1: Installing the TV 1 Installing the TV Stand...1 Installing the TV on a Wall...3 Chapter 2: Controls and Connections 4 Using the Jag Wheel Control...6 Using the Quick Menu...6 Remote Control Buttons...8 Replacing the Batteries...9 Activating the Bluetooth ...10 Chapter 3: Completing the First-Time Setup 11 Chapter 4: Connecting Your Devices to the TV 14 Choosing the Correct Connection 15 Connecting Your Devices...16 Setting Up Your Network Connection 18 Connecting to A Wired Network 18 Connecting to a Wireless Network 18 Chapter 5: Using the On-Screen Menu 19 Changing ...
XVT3D424SV User Manual
Page 10
...(POP 37 Choosing Inputs for the Main and Secondary Windows 37 Using the Network Connection Menu 38 Connecting to a Wireless Network 38 Changing the Advanced Network Settings 39 Testing Your Network Connection 39 Setting Up a Bluetooth Device...39 Using the Help Menu...40 Displaying ...System Information 40 Resetting the TV Settings...40 Restoring the TV to Factory Default Settings 41 Using Guided Setup...41 Using the Digital Episode Guide...42 Using the Info Window...42 Chapter 6: Using VIZIO...
...(POP 37 Choosing Inputs for the Main and Secondary Windows 37 Using the Network Connection Menu 38 Connecting to a Wireless Network 38 Changing the Advanced Network Settings 39 Testing Your Network Connection 39 Setting Up a Bluetooth Device...39 Using the Help Menu...40 Displaying ...System Information 40 Resetting the TV Settings...40 Restoring the TV to Factory Default Settings 41 Using Guided Setup...41 Using the Digital Episode Guide...42 Using the Info Window...42 Chapter 6: Using VIZIO...

XVT3D424SV User Manual
Page 17
... Out (Optical) Connect to access a network or the Internet. HDMI (1,2,3,4) Connect external devices (Blu-Ray, DVD, cable TV box, game console). Component 2 Ethernet Controls and Connections Composite AV RGB PC Audio Audio Out (Optical) HDMI (1,2,3,4) RGB PC Video DTV/TV Audio Out (L/R) Rear Panel Detail Ethernet Connect an ethernet cable to audio device (VIZIO sound bar...
... Out (Optical) Connect to access a network or the Internet. HDMI (1,2,3,4) Connect external devices (Blu-Ray, DVD, cable TV box, game console). Component 2 Ethernet Controls and Connections Composite AV RGB PC Audio Audio Out (Optical) HDMI (1,2,3,4) RGB PC Video DTV/TV Audio Out (L/R) Rear Panel Detail Ethernet Connect an ethernet cable to audio device (VIZIO sound bar...

XVT3D424SV User Manual
Page 23
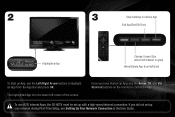
... Arrow Up/Down buttons on the TV, the Setup App will guide you through each of the steps necessary to get your network with an ethernet cable, connect it to the ethernet port on and the Setup App starts. First-Time Setup 2. See Chapter 1: Installing the TV on the... highlight Begin Activation and press OK. See Chapter 2: Controls and Connections on page 4. • If you have a wireless network, have the network key ready. • If you begin the first-time setup: • Your TV should be connected. Before you are connecting to your TV ready for use. When the remote is found ...
... Arrow Up/Down buttons on the TV, the Setup App will guide you through each of the steps necessary to get your network with an ethernet cable, connect it to the ethernet port on and the Setup App starts. First-Time Setup 2. See Chapter 1: Installing the TV on the... highlight Begin Activation and press OK. See Chapter 2: Controls and Connections on page 4. • If you have a wireless network, have the network key ready. • If you begin the first-time setup: • Your TV should be connected. Before you are connecting to your TV ready for use. When the remote is found ...

XVT3D424SV User Manual
Page 24
...and press OK. 5. Highlight Next and press OK. 7. Choose the input to which your TV signal is connected to read and accept the Terms of available networks and press OK. 3 If the TV is connected. Answer the on-screen questions about your First Name, Last Name, Phone Number, ZIP Code, and E-...mail Address using the Arrows and OK button on the remote. Enter your TV connection using the QUERTY Keypad on the remote. 12 4. Enter the network key using the QUERTY Keypad on the remote to your wireless network from the list of Service and Privacy Policy for Yahoo! Use the OK and...
...and press OK. 5. Highlight Next and press OK. 7. Choose the input to which your TV signal is connected to read and accept the Terms of available networks and press OK. 3 If the TV is connected. Answer the on-screen questions about your First Name, Last Name, Phone Number, ZIP Code, and E-...mail Address using the Arrows and OK button on the remote. Enter your TV connection using the QUERTY Keypad on the remote. 12 4. Enter the network key using the QUERTY Keypad on the remote to your wireless network from the list of Service and Privacy Policy for Yahoo! Use the OK and...

XVT3D424SV User Manual
Page 30
... online content to your TV • A router or modem with an available ethernet port • A high-speed internet connection 2. Connect your ethernet cable to the router and to reach your TV. Connecting to A Wired Network To connect to the TV 18 Ensure you have: • An ethernet cable long enough to the ethernet port on...
... online content to your TV • A router or modem with an available ethernet port • A high-speed internet connection 2. Connect your ethernet cable to the router and to reach your TV. Connecting to A Wired Network To connect to the TV 18 Ensure you have: • An ethernet cable long enough to the ethernet port on...

XVT3D424SV User Manual
Page 50
... and press OK. Use the Arrow buttons on the remote to use the on the remote, enter your network's password, then highlight Connect and press OK. (If you would like to a wireless network whose network name (SSID) is displayed. 4. Highlight Enter Access Point Name and press OK. 4. Using the QUERTY Keypad on -screen keyboard...
... and press OK. Use the Arrow buttons on the remote to use the on the remote, enter your network's password, then highlight Connect and press OK. (If you would like to a wireless network whose network name (SSID) is displayed. 4. Highlight Enter Access Point Name and press OK. 4. Using the QUERTY Keypad on -screen keyboard...

XVT3D424SV User Manual
Page 51
The Change Settings menu is displayed. 3. Pref. Press the EXIT button on -screen menu is displayed. 2. Testing Your Network Connection To test your network connection. 3. From the Network Connection menu, highlight Manual Setup and press OK. DNS Server - The on the remote. To change any of the Change Settings menu. 4. Use the Arrow and ...
The Change Settings menu is displayed. 3. Pref. Press the EXIT button on -screen menu is displayed. 2. Testing Your Network Connection To test your network connection. 3. From the Network Connection menu, highlight Manual Setup and press OK. DNS Server - The on the remote. To change any of the Change Settings menu. 4. Use the Arrow and ...

XVT3D424SV User Manual
Page 52
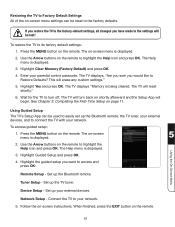
... on -screen menu is displayed. 3. Press the EXIT button on the remote. Highlight Start searching for the remote, tuner, devices, and network Displaying System Information To display a summary of connected devices. 6. If the pairing is successful, the device will erase any custom settings." 4. When you would like to its factory default settings...
... on -screen menu is displayed. 3. Press the EXIT button on the remote. Highlight Start searching for the remote, tuner, devices, and network Displaying System Information To display a summary of connected devices. 6. If the pairing is successful, the device will erase any custom settings." 4. When you would like to its factory default settings...
XVT3D424SV User Manual
Page 53
...reset shortly." 6. Use the Arrow buttons on the remote to highlight the Help icon and press OK. Highlight the guided setup you would like to connect the TV with your external devices. The TV will erase any custom settings." 5. The on -screen menu is displayed. 5 2. If you ... highlight the Help icon and press OK. Using Guided Setup The TV's Setup App can be lost! To access guided setup: 1. Device Setup - Network Setup - Use the Arrow buttons on page 11. Tuner Setup - The Help menu is displayed. 3. To restore the TV to the settings will...
...reset shortly." 6. Use the Arrow buttons on the remote to highlight the Help icon and press OK. Highlight the guided setup you would like to connect the TV with your external devices. The TV will erase any custom settings." 5. The on -screen menu is displayed. 5 2. If you ... highlight the Help icon and press OK. Using Guided Setup The TV's Setup App can be lost! To access guided setup: 1. Device Setup - Network Setup - Use the Arrow buttons on page 11. Tuner Setup - The Help menu is displayed. 3. To restore the TV to the settings will...
XVT3D424SV User Manual
Page 55
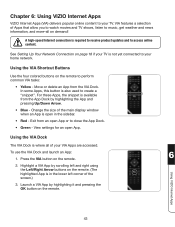
... Apps VIZIO Internet Apps (VIA) delivers popular online content to your home network. Change the size of the screen.) 3. Highlight a VIA App by highlighting it and pressing the OK button on the remote to create a "snippet". A high-speed Internet connection is also used to perform common VIA tasks: • ...some Apps, this button is required to receive product updates and to your TV. Using VIZIO Internet Apps 43 To use the VIA Dock and launch an App: 1. See Setting Up Your Network Connection on page 18 if your VIA Apps are accessed. View settings for an open in the...
... Apps VIZIO Internet Apps (VIA) delivers popular online content to your home network. Change the size of the screen.) 3. Highlight a VIA App by highlighting it and pressing the OK button on the remote to create a "snippet". A high-speed Internet connection is also used to perform common VIA tasks: • ...some Apps, this button is required to receive product updates and to your TV. Using VIZIO Internet Apps 43 To use the VIA Dock and launch an App: 1. See Setting Up Your Network Connection on page 18 if your VIA Apps are accessed. View settings for an open in the...

XVT3D424SV User Manual
Page 65
See Changing the 3D Mode on . See Setting Up Your Network Connection on page 18. • Press the Green VIA Shortcut button to your external devices are turned on and that they are securely connected. • Check all cables to ensure they are not working . Power will be turned off . Unplug the power ...both the TV and the electrical outlet. Turn the TV on page 19. I cannot access VIZIO Internet Apps, or my Apps are working correctly. • Press the VIA button on the remote. • Ensure the TV is connected to display the help screen for an App. The TV displays, "No RGB Signal...
See Changing the 3D Mode on . See Setting Up Your Network Connection on page 18. • Press the Green VIA Shortcut button to your external devices are turned on and that they are securely connected. • Check all cables to ensure they are not working . Power will be turned off . Unplug the power ...both the TV and the electrical outlet. Turn the TV on page 19. I cannot access VIZIO Internet Apps, or my Apps are working correctly. • Press the VIA button on the remote. • Ensure the TV is connected to display the help screen for an App. The TV displays, "No RGB Signal...
XVT3D424SV User Manual
Page 71
... Info Window 42 Input Labels 32 Input Source 23 J Jag Wheel 6 M Movie mode 24 Moving an App 43 MTS (Multichannel Television Sound) 31 N Network Connection Menu 38 Noise Reduction 25 Normal mode 20 O On-Screen Menu 19 On-Screen Menu Language 36 Owner PIN 45 P Parental Control Passcode 35 Parental... 20 A Activating the Bluetooth Remote Control 9 Adaptive Luma 25 Adding a New App 44 Adding New Channels 30 Advanced Audio Settings 28 Advanced Network Settings 39 Advanced Picture Settings 25 Ambient Light Sensor 25 Audio Language 31 Audio Settings 27 Auto Adjust 27 Auto Channel Scan 30 B Backlight ...
... Info Window 42 Input Labels 32 Input Source 23 J Jag Wheel 6 M Movie mode 24 Moving an App 43 MTS (Multichannel Television Sound) 31 N Network Connection Menu 38 Noise Reduction 25 Normal mode 20 O On-Screen Menu 19 On-Screen Menu Language 36 Owner PIN 45 P Parental Control Passcode 35 Parental... 20 A Activating the Bluetooth Remote Control 9 Adaptive Luma 25 Adding a New App 44 Adding New Channels 30 Advanced Audio Settings 28 Advanced Network Settings 39 Advanced Picture Settings 25 Ambient Light Sensor 25 Audio Language 31 Audio Settings 27 Auto Adjust 27 Auto Channel Scan 30 B Backlight ...
XVT3D424SV User Manual
Page 72
System Information 40 T Testing Your Network Connection 39 Time Zone 36 Tint 24 Tuner Mode 29 Tuner Settings Menu 29 TV Settings Menu 23 TV Stand 1 U User Profiles 45 V Vertical Position 27 VIA Dock 43 VIA Shortcut Buttons 43 Vivid mode 24 VIZIO Internet Apps 43 W wall mount 3 Wide mode 20 Wired Network 18 Wireless Network 18 Z Zoom mode 20
System Information 40 T Testing Your Network Connection 39 Time Zone 36 Tint 24 Tuner Mode 29 Tuner Settings Menu 29 TV Settings Menu 23 TV Stand 1 U User Profiles 45 V Vertical Position 27 VIA Dock 43 VIA Shortcut Buttons 43 Vivid mode 24 VIZIO Internet Apps 43 W wall mount 3 Wide mode 20 Wired Network 18 Wireless Network 18 Z Zoom mode 20
XVT3D424SV Quick Start Guide
Page 12
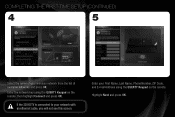
COMPLETING THE FIRST-TIME SETUP (CONTINUED) 4 5 Select the name of available networks and press OK. If the 3D HDTV is connected to your wireless network from the list of your network with an ethernet cable, you will not see this screen. Enter the network key using the QUERTY Keypad on the remote, then highlight Connect and press OK. Enter your First Name, Last Name, Phone Number, ZIP Code, and E-mail Address using the QUERTY Keypad on the remote. Highlight Next and press OK.
COMPLETING THE FIRST-TIME SETUP (CONTINUED) 4 5 Select the name of available networks and press OK. If the 3D HDTV is connected to your wireless network from the list of your network with an ethernet cable, you will not see this screen. Enter the network key using the QUERTY Keypad on the remote, then highlight Connect and press OK. Enter your First Name, Last Name, Phone Number, ZIP Code, and E-mail Address using the QUERTY Keypad on the remote. Highlight Next and press OK.
XVT3D424SV Quick Start Guide
Page 15
To use VIZIO Internet Apps, the 3D HDTV must be set up with a high-speed internet connection. 2 3 View Settings for Active App Exit App/Exit VIA Dock Highlighted App Change Screen Size (when VIA Sidebar is in the User Guide. Once you did not set up your network during First-Time Setup, ...see Setting Up Your Network Connection in the lower left corner of the screen. The highlighted App is open) Move/Delete App from the App Bar ...
To use VIZIO Internet Apps, the 3D HDTV must be set up with a high-speed internet connection. 2 3 View Settings for Active App Exit App/Exit VIA Dock Highlighted App Change Screen Size (when VIA Sidebar is in the User Guide. Once you did not set up your network during First-Time Setup, ...see Setting Up Your Network Connection in the lower left corner of the screen. The highlighted App is open) Move/Delete App from the App Bar ...
XVT3D424SV Quick Start Guide
Page 19
... • Ensure your connected devices are not working correctly. • Press the VIA button on the remote. • Ensure the TV is on the front of the picture. • Set the TV to the picture. The TV does not respond when I cannot access VIZIO Internet Apps, or my...If using a supported desktop resolution. • Some television channels add black bars to Wide or Zoom Mode. Press MENU > 3D > SBS. See Connecting to Your Network in the User's Guide. Press MENU, then select Wide. • Adjust the video settings of your device is displayed as two separate images. &#...
... • Ensure your connected devices are not working correctly. • Press the VIA button on the remote. • Ensure the TV is on the front of the picture. • Set the TV to the picture. The TV does not respond when I cannot access VIZIO Internet Apps, or my...If using a supported desktop resolution. • Some television channels add black bars to Wide or Zoom Mode. Press MENU > 3D > SBS. See Connecting to Your Network in the User's Guide. Press MENU, then select Wide. • Adjust the video settings of your device is displayed as two separate images. &#...


