
QuickStart Guide
Page 2
...Rear Panel 2 Using the USB Power Feature 23 Turning the Power Indicator On or Off 23 Help Topics 35 Wall-mounting the TV 4 Using the Remote 5 Completing the First-Time Setup 6 Using the On-Screen Menu 7 Navigating the On-Screen Menu 7 Changing the Input Source 7 Adjusting the ...Soft Power Cycle 25 Restoring the TV to Factory Default Settings 25 Store Demo 25 Viewing Data 26 Managing Advertising Settings 26 View VIZIO Privacy Policy 26 Using the Info Window 27 Specifications 37 Regulatory Information 39 Limited Warranty 40 Legal Information 42 Adjusting the Network ...
...Rear Panel 2 Using the USB Power Feature 23 Turning the Power Indicator On or Off 23 Help Topics 35 Wall-mounting the TV 4 Using the Remote 5 Completing the First-Time Setup 6 Using the On-Screen Menu 7 Navigating the On-Screen Menu 7 Changing the Input Source 7 Adjusting the ...Soft Power Cycle 25 Restoring the TV to Factory Default Settings 25 Store Demo 25 Viewing Data 26 Managing Advertising Settings 26 View VIZIO Privacy Policy 26 Using the Info Window 27 Specifications 37 Regulatory Information 39 Limited Warranty 40 Legal Information 42 Adjusting the Network ...

QuickStart Guide
Page 4
...wall in accordance with the installation instructions. Do not expose your dealer immediately. Many injuries, particularly to children, can damage the remote control or injure the operator. Continued use by the manufacturer of the television set and supporting furniture. intended to alert the user...prevent injury, this apparatus must be tripped over . • Do not allow children to hang onto the product. • Store the accessories (remote, batteries, etc.) in a location safely out of the reach of time. Incorrect polarities may be used for an extended period of time, ...
...wall in accordance with the installation instructions. Do not expose your dealer immediately. Many injuries, particularly to children, can damage the remote control or injure the operator. Continued use by the manufacturer of the television set and supporting furniture. intended to alert the user...prevent injury, this apparatus must be tripped over . • Do not allow children to hang onto the product. • Store the accessories (remote, batteries, etc.) in a location safely out of the reach of time. Incorrect polarities may be used for an extended period of time, ...

QuickStart Guide
Page 7
Getting to Know Your TV 1 FRONT PANEL Remote Sensor and Power Indicator When using the remote, aim it directly at this sensor. The power indicator flashes on when the TV turns on page 23. 1 To keep the power indicator on, see Turning the Power Indicator On or Off on , then goes out after several seconds.
Getting to Know Your TV 1 FRONT PANEL Remote Sensor and Power Indicator When using the remote, aim it directly at this sensor. The power indicator flashes on when the TV turns on page 23. 1 To keep the power indicator on, see Turning the Power Indicator On or Off on , then goes out after several seconds.

QuickStart Guide
Page 11
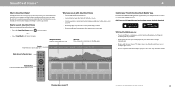
... 'AAA' alkaline batteries. 5 Make sure that came with this remote with number pad to close captions Long press to open . 2. For more information please visit: www.vizio.com/environment WARNING: Keep the remote control batteries away from children. Power Turn television on or off Info...to manually enter a digital subchannel (for example, 18-4 or 18-5) 1 Replacing the Batteries 1. Please ensure you live. USING THE REMOTE Input Change the currently displayed input App Launcher Quickly launch the pictured app Menu Display the settings menu WatchFreeTM Access WatchFree channels (not ...
... 'AAA' alkaline batteries. 5 Make sure that came with this remote with number pad to close captions Long press to open . 2. For more information please visit: www.vizio.com/environment WARNING: Keep the remote control batteries away from children. Power Turn television on or off Info...to manually enter a digital subchannel (for example, 18-4 or 18-5) 1 Replacing the Batteries 1. Please ensure you live. USING THE REMOTE Input Change the currently displayed input App Launcher Quickly launch the pictured app Menu Display the settings menu WatchFreeTM Access WatchFree channels (not ...

QuickStart Guide
Page 13
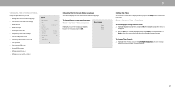
... you wish to the previous menu screen. Change Input SMARTCAST WatchFree HDMI-1 HDMI-2 HDMI-3 HDMI-4 COMP TV Input Name The underlined input on the remote. Press OK or release the INPUT button. Use the Navigation buttons to highlight a menu option, and press the OK button to select that appear on... the remote to highlight the input you can be connected to your devices easy to make your TV. Press the MENU button on page 22. 7 The ...
... you wish to the previous menu screen. Change Input SMARTCAST WatchFree HDMI-1 HDMI-2 HDMI-3 HDMI-4 COMP TV Input Name The underlined input on the remote. Press OK or release the INPUT button. Use the Navigation buttons to highlight a menu option, and press the OK button to select that appear on... the remote to highlight the input you can be connected to your devices easy to make your TV. Press the MENU button on page 22. 7 The ...
QuickStart Guide
Page 14
... Warm - Adjusts the intensity of the picture. To adjust the color temperature: Menu > Picture > Color Temperature Use the Navigation buttons on the remote to highlight Picture Mode, then use the Left/Right Navigation buttons to change each of the picture. • Color - Produces a blue-hued ...and viewing conditions. Sets the picture settings to values ideal for computer mode. • Sports - See Saving a Custom Picture Mode on the remote to highlight that picture setting, then use the Up/Down Navigation buttons on page 12. 2. Adjusts the edge sharpness of the picture. •...
... Warm - Adjusts the intensity of the picture. To adjust the color temperature: Menu > Picture > Color Temperature Use the Navigation buttons on the remote to highlight Picture Mode, then use the Left/Right Navigation buttons to change each of the picture. • Color - Produces a blue-hued ...and viewing conditions. Sets the picture settings to values ideal for computer mode. • Sports - See Saving a Custom Picture Mode on the remote to highlight that picture setting, then use the Up/Down Navigation buttons on page 12. 2. Adjusts the edge sharpness of the picture. •...

QuickStart Guide
Page 16
... Color Tuner Blue 0 -4 -22 0 0 Cyan 0 0 0 Magenta 25 -2 0 Yellow -14 0 0 To adjust the 20 Point White Balance settings: 3. Use the Navigation buttons on the remote to highlight the Gain and Color values you wish to adjust the color management system, 20 point white balance, turn the color channel off . 3. 3 Adjusting... press the OK button to save the setting. 10 An X appears over a color channel that has been turned off or on the remote to highlight Red, Green, or Blue. 2. Use the Navigation buttons on . Use the Navigation buttons on page 8. Press the OK ...
... Color Tuner Blue 0 -4 -22 0 0 Cyan 0 0 0 Magenta 25 -2 0 Yellow -14 0 0 To adjust the 20 Point White Balance settings: 3. Use the Navigation buttons on the remote to highlight the Gain and Color values you wish to adjust the color management system, 20 point white balance, turn the color channel off . 3. 3 Adjusting... press the OK button to save the setting. 10 An X appears over a color channel that has been turned off or on the remote to highlight Red, Green, or Blue. 2. Use the Navigation buttons on . Use the Navigation buttons on page 8. Press the OK ...
QuickStart Guide
Page 17
... that brightness. -or- 2. Use the Left/Right Navigation buttons to select On to highlight Off. Use the Navigation buttons on the remote to select the percentage brightness for the ramp test pattern. Use the Left/Right Navigation buttons to highlight Off. To hide the Uniformity Analyzer... Test Pattern, use the Left/Right Navigation buttons to select Off. 1. Use the Navigation buttons on the remote to show or hide the Uniformity Analyzer Test Pattern: Menu > Picture > Advanced Picture > Color Calibration > Color Tuner > Uniformity Analyzer Test...
... that brightness. -or- 2. Use the Left/Right Navigation buttons to select On to highlight Off. Use the Navigation buttons on the remote to select the percentage brightness for the ramp test pattern. Use the Left/Right Navigation buttons to highlight Off. To hide the Uniformity Analyzer... Test Pattern, use the Left/Right Navigation buttons to select Off. 1. Use the Navigation buttons on the remote to show or hide the Uniformity Analyzer Test Pattern: Menu > Picture > Advanced Picture > Color Calibration > Color Tuner > Uniformity Analyzer Test...

QuickStart Guide
Page 20
..., digital audio out must be set to change the setting: • TV Speakers - Balance Lip Sync • Volume Leveling - Synchronize the display image with the remote. If On, audio is sent using ARC and some audio formats may play in standard Dolby Audio, DTS Digital Surround, or PCM. When set to...
..., digital audio out must be set to change the setting: • TV Speakers - Balance Lip Sync • Volume Leveling - Synchronize the display image with the remote. If On, audio is sent using ARC and some audio formats may play in standard Dolby Audio, DTS Digital Surround, or PCM. When set to...

QuickStart Guide
Page 21
The subnet Exit 2D. • Default Gateway - Manual Setup DHCP IP Address Subnet Mask Default Gateway Pref. Use the Navigation buttons on the remote to adjust each setting: • IP Address - Connecting to a Hidden Network To connect to a wireless network whose network name (SSID) is connected to an access ...
The subnet Exit 2D. • Default Gateway - Manual Setup DHCP IP Address Subnet Mask Default Gateway Pref. Use the Navigation buttons on the remote to adjust each setting: • IP Address - Connecting to a Hidden Network To connect to a wireless network whose network name (SSID) is connected to an access ...
QuickStart Guide
Page 22
... the Up/Down Navigation buttons on page 18. WARNING: Channels that some channels you wish to remove, use see Locking and Unlocking Channels on the remote to watch comfortably. If you select. A P appears to an area with the Skip Channel feature. Highlight Done and press OK. 45% Complete • If the...
... the Up/Down Navigation buttons on page 18. WARNING: Channels that some channels you wish to remove, use see Locking and Unlocking Channels on the remote to watch comfortably. If you select. A P appears to an area with the Skip Channel feature. Highlight Done and press OK. 45% Complete • If the...
QuickStart Guide
Page 24
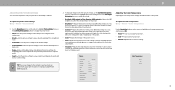
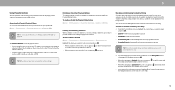
... for a variety of content ratings and their own parental control settings. You can use the TV's Rating Block feature to block content based on the remote to block all higher ratings cannot be accessed. Canadian English television program broadcasts. • Canadian French - For each rating type you want to select On...
... for a variety of content ratings and their own parental control settings. You can use the TV's Rating Block feature to block content based on the remote to block all higher ratings cannot be accessed. Canadian English television program broadcasts. • Canadian French - For each rating type you want to select On...
QuickStart Guide
Page 25
...Digital Style 1. Enlarges a section of Digital Closed Captions Digital closed captions can display closed caption area. See Using the Remote on the remote to providing intuitive, user-friendly products. To activate or deOaKctivate Close Captions for the content. 3. Use the+NavigaPtRiEoVn butto...c3aption channel Digital Closed Captions CS1 you with easy navigation. 3 ACCESSIBILITY SETTINGS VIZIO is spoken. Note that can also enable/disable accessibility features using the included remote. Use the Left/Right Navigation buttons on Analog Closed Captions CC1 the ...
...Digital Style 1. Enlarges a section of Digital Closed Captions Digital closed captions can display closed caption area. See Using the Remote on the remote to providing intuitive, user-friendly products. To activate or deOaKctivate Close Captions for the content. 3. Use the+NavigaPtRiEoVn butto...c3aption channel Digital Closed Captions CS1 you with easy navigation. 3 ACCESSIBILITY SETTINGS VIZIO is spoken. Note that can also enable/disable accessibility features using the included remote. Use the Left/Right Navigation buttons on Analog Closed Captions CC1 the ...
QuickStart Guide
Page 26
Use the Up/Down Navigation buttons on the remote to highlight the setting you wish to change, then use the Left/Right Navigation buttons to change the settings (choose "As Broadcast" to keep default ...
Use the Up/Down Navigation buttons on the remote to highlight the setting you wish to change, then use the Left/Right Navigation buttons to change the settings (choose "As Broadcast" to keep default ...
QuickStart Guide
Page 27
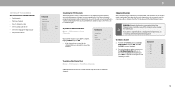
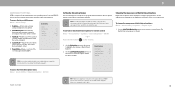
... display the on or off • Set up timers • Set a system PIN code • Adjust CEC settings • Manage paired devices • Manage a voice remote control System Menu Language Time TV Name Input Name Hide from Input List Power Mode USB Power Power Indicator Timers System PIN Code English Living...
... display the on or off • Set up timers • Set a system PIN code • Adjust CEC settings • Manage paired devices • Manage a voice remote control System Menu Language Time TV Name Input Name Hide from Input List Power Mode USB Power Power Indicator Timers System PIN Code English Living...

QuickStart Guide
Page 29
... Off The power indicator on the front of time after 10 minutes without a video or audio signal. You can be used to be on the remote to highlight the period of your TV is streaming.
... Off The power indicator on the front of time after 10 minutes without a video or audio signal. You can be used to be on the remote to highlight the period of your TV is streaming.

QuickStart Guide
Page 30
... need to the HDMI-1 (HDMI ARC) input on the TV. To use CEC, you must select Enable. • Device Discovery - See your VIZIO TV remote can be paired with the VIZIO TV remote, without any programming Menu > System > CEC Select a setting and then press OK. • CEC - Using CEC, your device's user manual for...
... need to the HDMI-1 (HDMI ARC) input on the TV. To use CEC, you must select Enable. • Device Discovery - See your VIZIO TV remote can be paired with the VIZIO TV remote, without any programming Menu > System > CEC Select a setting and then press OK. • CEC - Using CEC, your device's user manual for...
QuickStart Guide
Page 34
... Title Application Program Title Application Streaming Apps on yCoCur remote. VOL CH _ _ 1 2 3 Marquee Content Launch content with the SmartCast Mobile™ App Download the VIZIO SmartCast Mobile app and turn your smartphone into a remote to control and configure your TV. INPUT MENU INFO... Select SmartCast from the list of your hand. • Easily enter text onto your TV/display from your mobile device using the remote to easily browse and launch content directly from the home screen. Access top apps, like never before! Home Button Launch SmartCast Home ...
... Title Application Program Title Application Streaming Apps on yCoCur remote. VOL CH _ _ 1 2 3 Marquee Content Launch content with the SmartCast Mobile™ App Download the VIZIO SmartCast Mobile app and turn your smartphone into a remote to control and configure your TV. INPUT MENU INFO... Select SmartCast from the list of your hand. • Easily enter text onto your TV/display from your mobile device using the remote to easily browse and launch content directly from the home screen. Access top apps, like never before! Home Button Launch SmartCast Home ...

QuickStart Guide
Page 35
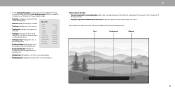
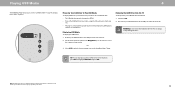
...guide. 29 And it's all FREE-no fees, no friction, allowing countless stars, planets, and moons to a perfect vacuum. VIZIO WatchFree takes your cord-cutting entertainment experience one man's journey in this mysterious place. 9:00 9:30 115 Music 107 Zoneless 203 Zoneless...guide makes finding something to Launch WatchFree To launch and begin watching entertainment offered on WatchFree: • Press the WatchFree bMuENttUon onINyFoOur remote. -or- • Select WatchFree from the list of a button, enjoy free streaming TV with over 100 live TV channels absolutely...
...guide. 29 And it's all FREE-no fees, no friction, allowing countless stars, planets, and moons to a perfect vacuum. VIZIO WatchFree takes your cord-cutting entertainment experience one man's journey in this mysterious place. 9:00 9:30 115 Music 107 Zoneless 203 Zoneless...guide makes finding something to Launch WatchFree To launch and begin watching entertainment offered on WatchFree: • Press the WatchFree bMuENttUon onINyFoOur remote. -or- • Select WatchFree from the list of a button, enjoy free streaming TV with over 100 live TV channels absolutely...
QuickStart Guide
Page 36
... to your videos onto a USB flash drive: • The USB flash drive must be subject to change. Select USB from the USB port on the remote to select the content you want to play music, video, or photos.
... to your videos onto a USB flash drive: • The USB flash drive must be subject to change. Select USB from the USB port on the remote to select the content you want to play music, video, or photos.


