
SB4021M-A1 Quick Start Guide
Page 2
If the provided plug does not fit into your outlet, consult an electrician for a long period of time with the apparatus. Do not place your Unit in a bookcase or cabinet unless proper ventilation is provided. • Never push any object into your Unit. For more information, contact your dealer. • When connected to a power outlet, power is always flowing into the slots and openings on your Unit enclosure. If water penetrates into the apparatus, the apparatus has been exposed to rain or moisture, does not operate normally, or has been dropped. • To reduce the risk ...
If the provided plug does not fit into your outlet, consult an electrician for a long period of time with the apparatus. Do not place your Unit in a bookcase or cabinet unless proper ventilation is provided. • Never push any object into your Unit. For more information, contact your dealer. • When connected to a power outlet, power is always flowing into the slots and openings on your Unit enclosure. If water penetrates into the apparatus, the apparatus has been exposed to rain or moisture, does not operate normally, or has been dropped. • To reduce the risk ...
SB4021M-A1 Quick Start Guide
Page 3
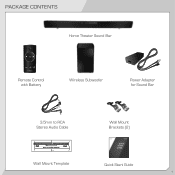
PACKAGE CONTENTS Home Theater Sound Bar Remote Control with Battery Wireless Subwoofer Power Adapter for Sound Bar 3.5mm to RCA Stereo Audio Cable Wall Mount Brackets (2) Wall Mount Template Quick Start Guide 1
PACKAGE CONTENTS Home Theater Sound Bar Remote Control with Battery Wireless Subwoofer Power Adapter for Sound Bar 3.5mm to RCA Stereo Audio Cable Wall Mount Brackets (2) Wall Mount Template Quick Start Guide 1
SB4021M-A1 Quick Start Guide
Page 4
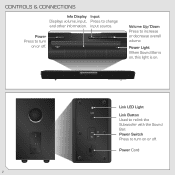
Power Light When Sound Bar is on, this light is on. Link LED Light Link Button Used to increase or decrease overall volume. Power Press to turn on or off . Power Switch Press to change and other information. Volume Up/Down Press to re-link the Subwoofer with the Sound Bar. CONTROLS & CONNECTIONS Info Display Input Displays volume, input, Press to turn on or off . input source. Power Cord 2
Power Light When Sound Bar is on, this light is on. Link LED Light Link Button Used to increase or decrease overall volume. Power Press to turn on or off . Power Switch Press to change and other information. Volume Up/Down Press to re-link the Subwoofer with the Sound Bar. CONTROLS & CONNECTIONS Info Display Input Displays volume, input, Press to turn on or off . input source. Power Cord 2

SB4021M-A1 Quick Start Guide
Page 5
Digital Optical In Digital Coaxial In Analog 3.5mm In 1.85 1.85 Wall Mount Posts USB 1.85 1.85 Power Port USB USB USB Port 3
Digital Optical In Digital Coaxial In Analog 3.5mm In 1.85 1.85 Wall Mount Posts USB 1.85 1.85 Power Port USB USB USB Port 3

SB4021M-A1 Quick Start Guide
Page 6
FIRST-TIME SETUP 1 1.85 BETTER DIGITAL OPTICAL CABLE* 4 BETTER DIGITAL COAXIAL CABLE* GOOD 3.5MM CABLE* GOOD 3.5MM TO RCA CABLE CHOOSE ONE CABLE: GOOD BETTER AND CONNECT IT TO YOUR TV *Not Included
FIRST-TIME SETUP 1 1.85 BETTER DIGITAL OPTICAL CABLE* 4 BETTER DIGITAL COAXIAL CABLE* GOOD 3.5MM CABLE* GOOD 3.5MM TO RCA CABLE CHOOSE ONE CABLE: GOOD BETTER AND CONNECT IT TO YOUR TV *Not Included

SB4021M-A1 Quick Start Guide
Page 7
Be sure the TV port is an audio output, not an audio input. 5 USB Connect the Sound Bar to your TV using one of the connection types to the left. Choose the best possible connection type.
Be sure the TV port is an audio output, not an audio input. 5 USB Connect the Sound Bar to your TV using one of the connection types to the left. Choose the best possible connection type.
SB4021M-A1 Quick Start Guide
Page 9
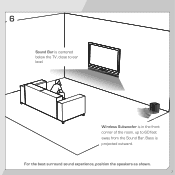
Bass is in the front corner of the room, up to ear level. For the best surround sound experience, position the speakers as shown. 7 6 Sound Bar is centered below the TV, close to 60 feet away from the Sound Bar. Wireless Subwoofer is projected outward.
Bass is in the front corner of the room, up to ear level. For the best surround sound experience, position the speakers as shown. 7 6 Sound Bar is centered below the TV, close to 60 feet away from the Sound Bar. Wireless Subwoofer is projected outward.

SB4021M-A1 Quick Start Guide
Page 10
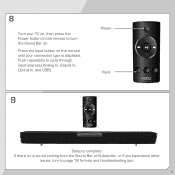
7 Flip the ON/OFF Switch to ON. 8
7 Flip the ON/OFF Switch to ON. 8
SB4021M-A1 Quick Start Guide
Page 11
If there is no sound coming from the Sound Bar or Subwoofer, or if you experience other issues, turn to turn the Sound Bar on. 8 Turn your connection type is complete. Power Input 9 Setup is displayed. Push repeatedly to cycle through input sources (Analog In, Coaxial In, Optical In, and USB). Press the Input button on the remote until your TV on, then press the Power button on the remote to page 18 for help and troubleshooting tips. 9
If there is no sound coming from the Sound Bar or Subwoofer, or if you experience other issues, turn to turn the Sound Bar on. 8 Turn your connection type is complete. Power Input 9 Setup is displayed. Push repeatedly to cycle through input sources (Analog In, Coaxial In, Optical In, and USB). Press the Input button on the remote until your TV on, then press the Power button on the remote to page 18 for help and troubleshooting tips. 9
SB4021M-A1 Quick Start Guide
Page 12
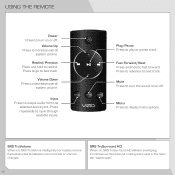
Input Press to next track. Press to advance to output audio from the selected device port. SRS TruVolume When on, SRS TruVolume intelligently normalizes volume fluctuations due to decrease overall system volume. Volume Down Press to television commercials or channel changes. Play/Pause Press to display menu options. Menu Press to play or pause track. Press to go to fast forward. Fast Forward/Next Press and hold to cycle through available inputs. Mute Press to turn the sound on or off . SRS TruSurround HD When on, SRS TruSurround HD delivers enveloping, immersive ...
Input Press to next track. Press to advance to output audio from the selected device port. SRS TruVolume When on, SRS TruVolume intelligently normalizes volume fluctuations due to decrease overall system volume. Volume Down Press to television commercials or channel changes. Play/Pause Press to display menu options. Menu Press to play or pause track. Press to go to fast forward. Fast Forward/Next Press and hold to cycle through available inputs. Mute Press to turn the sound on or off . SRS TruSurround HD When on, SRS TruSurround HD delivers enveloping, immersive ...
SB4021M-A1 Quick Start Guide
Page 13
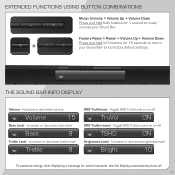
THE SOUND BAR INFO DISPLAY Volume - Increase or decrease brightness level Bright 10 To conserve energy, after displaying a message for several seconds, the Info Display automatically shuts off TruVol ON SRS TruSurround - Toggle SRS TruVolume on or off TSHD ON Brightness Level - EXTENDED FUNCTIONS USING BUTTON COMBINATIONS Mute/Unmute = Volume Up + Volume Down + Press and hold all 3 buttons for 10 seconds to its fac+tory default settings. Increase or decrease bass level Bass 9 Treble Level - Factory Reset = Power + Volume Up + Volume Down + + Press and hold ...
THE SOUND BAR INFO DISPLAY Volume - Increase or decrease brightness level Bright 10 To conserve energy, after displaying a message for several seconds, the Info Display automatically shuts off TruVol ON SRS TruSurround - Toggle SRS TruVolume on or off TSHD ON Brightness Level - EXTENDED FUNCTIONS USING BUTTON COMBINATIONS Mute/Unmute = Volume Up + Volume Down + Press and hold all 3 buttons for 10 seconds to its fac+tory default settings. Increase or decrease bass level Bass 9 Treble Level - Factory Reset = Power + Volume Up + Volume Down + + Press and hold ...
SB4021M-A1 Quick Start Guide
Page 14
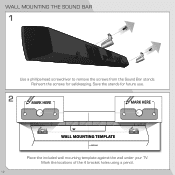
Save the stands for safekeeping. Reinsert the screws for future use. 2 MARK HERE MARK HERE TEMPLATE WALL MO Place the included wall mounting template against the wall under your TV. WALL MOUNTING THE SOUND BAR 1 OULNEDABVAE RTHAINSDSPYAOCUERBTEVTWE Use a phillips-head screwdriver to remove the screws from the Sound Bar stands. NE Mark the locations of the 4 bracket holes using a pencil. 12
Save the stands for safekeeping. Reinsert the screws for future use. 2 MARK HERE MARK HERE TEMPLATE WALL MO Place the included wall mounting template against the wall under your TV. WALL MOUNTING THE SOUND BAR 1 OULNEDABVAE RTHAINSDSPYAOCUERBTEVTWE Use a phillips-head screwdriver to remove the screws from the Sound Bar stands. NE Mark the locations of the 4 bracket holes using a pencil. 12
SB4021M-A1 Quick Start Guide
Page 15
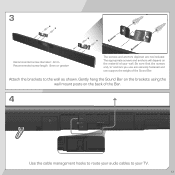
Gently hang the Sound Bar on the brackets using the wall mount posts on the material of your TV. 13 Be sure that the screws and/or anchors you use are not included. Attach the brackets to your wall. The appropriate screws and anchors will depend on the back of the Bar. 4 USB 1.85 1.85 Use the cable management hooks to route your audio cables to the wall as shown. 3 Recommended screw diameter: 4mm Recommended screw length: 8mm or greater The screws and anchors depicted are securely fastened and can support the weight of the Sound Bar.
Gently hang the Sound Bar on the brackets using the wall mount posts on the material of your TV. 13 Be sure that the screws and/or anchors you use are not included. Attach the brackets to your wall. The appropriate screws and anchors will depend on the back of the Bar. 4 USB 1.85 1.85 Use the cable management hooks to route your audio cables to the wall as shown. 3 Recommended screw diameter: 4mm Recommended screw length: 8mm or greater The screws and anchors depicted are securely fastened and can support the weight of the Sound Bar.
SB4021M-A1 Quick Start Guide
Page 16
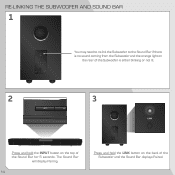
RE-LINKING THE SUBWOOFER AND SOUND BAR 1 You may need to re-link the Subwoofer to the Sound Bar if there is no sound coming from the Subwoofer and the orange light on the rear of the Subwoofer is either blinking or not lit. 2 3 Press and hold the LINK button on the top of the Subwoofer until the Sound Bar displays Paired. The Sound Bar will display Pairing. 14 Press and hold the INPUT button on the back of the Sound Bar for 5 seconds.
RE-LINKING THE SUBWOOFER AND SOUND BAR 1 You may need to re-link the Subwoofer to the Sound Bar if there is no sound coming from the Subwoofer and the orange light on the rear of the Subwoofer is either blinking or not lit. 2 3 Press and hold the LINK button on the top of the Subwoofer until the Sound Bar displays Paired. The Sound Bar will display Pairing. 14 Press and hold the INPUT button on the back of the Sound Bar for 5 seconds.

SB4021M-A1 Quick Start Guide
Page 17
Many universal remote controls can be sure that the + sign on the battery cover to open. Push the battery cover until it clicks back into the slot as shown. PROGRAMMING YOUR UNIVERSAL REMOTE When replacing an old battery with a new CR2032, be programmed to your Sound Bar. As each universal remote works differently, you should refer to control your remote's user manual for instructions on programming. 15 REPLACING THE REMOTE BATTERY 1 2 Insert a flat-head screwdriver into place. Gently push down on the tab, then press and pull downward on the battery is facing up.
Many universal remote controls can be sure that the + sign on the battery cover to open. Push the battery cover until it clicks back into the slot as shown. PROGRAMMING YOUR UNIVERSAL REMOTE When replacing an old battery with a new CR2032, be programmed to your Sound Bar. As each universal remote works differently, you should refer to control your remote's user manual for instructions on programming. 15 REPLACING THE REMOTE BATTERY 1 2 Insert a flat-head screwdriver into place. Gently push down on the tab, then press and pull downward on the battery is facing up.
SB4021M-A1 Quick Start Guide
Page 18
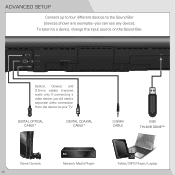
USB 1.85 Optical, Coaxial, and 3.5mm cables transmit audio only. To listen to your TV. ADVANCED SETUP Connect up to four different devices to the Sound Bar (devices shown are examples-you will need a separate video connection from the device to a device, change the input source on the Sound Bar. If connecting a video device, you can use any device). DIGITAL OPTICAL CABLE* DIGITAL COAXIAL CABLE* 3.5MM CABLE USB THUMB DRIVE™ Game Console 16 Network Media Player Tablet/MP3 Player/Laptop
USB 1.85 Optical, Coaxial, and 3.5mm cables transmit audio only. To listen to your TV. ADVANCED SETUP Connect up to four different devices to the Sound Bar (devices shown are examples-you will need a separate video connection from the device to a device, change the input source on the Sound Bar. If connecting a video device, you can use any device). DIGITAL OPTICAL CABLE* DIGITAL COAXIAL CABLE* 3.5MM CABLE USB THUMB DRIVE™ Game Console 16 Network Media Player Tablet/MP3 Player/Laptop

SB4021M-A1 Quick Start Guide
Page 19
...It's stylishly slim with up to 7.1 channels of a button on -demand movies, TV shows, music, and more. It's all at www.VIZIO.com *Not Included 17 Available at the push of crystal-clear digital surround sound. in Wi-Fi delivers easy wireless access to on the enhanced... 2-sided remote with full keyboard.* Sold separately. ONE POWERFUL MOVIE MACHINE VIZIO RECOMMENDS 3D BLU-RAY™ PLAYER WITH WIRELESS INTERNET APPS The VIZIO 3D Blu-ray™ Player with Wireless Internet Apps delivers breathtaking 3D and 1080p Full HD video performance ...
...It's stylishly slim with up to 7.1 channels of a button on -demand movies, TV shows, music, and more. It's all at www.VIZIO.com *Not Included 17 Available at the push of crystal-clear digital surround sound. in Wi-Fi delivers easy wireless access to on the enhanced... 2-sided remote with full keyboard.* Sold separately. ONE POWERFUL MOVIE MACHINE VIZIO RECOMMENDS 3D BLU-RAY™ PLAYER WITH WIRELESS INTERNET APPS The VIZIO 3D Blu-ray™ Player with Wireless Internet Apps delivers breathtaking 3D and 1080p Full HD video performance ...
SB4021M-A1 Quick Start Guide
Page 20
There is turned on. See Re-Linking the Subwoofer and Sound Bar on page 14. • Move the Subwoofer closer to the Sound Bar. • Turn the Subwoofer power switch to ON. • To conserve power, the Subwoofer will need to pair the Subwoofer with the original device. • Connect your device to a different input on the Sound Bar. How do I want to return my Sound Bar to factory settings. • Press and hold the Power, Volume Up, and Volume Down buttons for the Subwoofer to link after 30 minutes if not in use . Press Volume Up on the remote control or on the top of your ...
There is turned on. See Re-Linking the Subwoofer and Sound Bar on page 14. • Move the Subwoofer closer to the Sound Bar. • Turn the Subwoofer power switch to ON. • To conserve power, the Subwoofer will need to pair the Subwoofer with the original device. • Connect your device to a different input on the Sound Bar. How do I want to return my Sound Bar to factory settings. • Press and hold the Power, Volume Up, and Volume Down buttons for the Subwoofer to link after 30 minutes if not in use . Press Volume Up on the remote control or on the top of your ...

SB4021M-A1 Quick Start Guide
Page 21
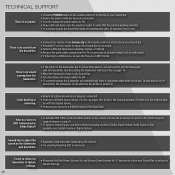
Sunday: 8 AM TO 4 PM (PST) We speak English • Se habla Español • Nous parlons Français 19 DO YOU HAVE QUESTIONS? LET US HELP! We can help with: • New Product Setup • Connecting Your Devices • Technical Problems • And More Phone: (877) 878-4946 (TOLL-FREE) Email: techsupport@VIZIO.com Web: www.VIZIO.com/support Hours of operation: Monday - Friday: 5 AM TO 9 PM (PST) Saturday - YOUR PRODUCT INCLUDES FREE LIFETIME TECH SUPPORT The VIZIO support team is highly trained and is based in the United States.
Sunday: 8 AM TO 4 PM (PST) We speak English • Se habla Español • Nous parlons Français 19 DO YOU HAVE QUESTIONS? LET US HELP! We can help with: • New Product Setup • Connecting Your Devices • Technical Problems • And More Phone: (877) 878-4946 (TOLL-FREE) Email: techsupport@VIZIO.com Web: www.VIZIO.com/support Hours of operation: Monday - Friday: 5 AM TO 9 PM (PST) Saturday - YOUR PRODUCT INCLUDES FREE LIFETIME TECH SUPPORT The VIZIO support team is highly trained and is based in the United States.

SB4021M-A1 Quick Start Guide
Page 22
...THE PURCHASE PRICE OF THE PRODUCT. THIS WARRANTY IS SUBJECT TO CHANGE WITHOUT NOTICE. Replacement parts and Products may be sent to a VIZIO service center to obtain warranty service. Replacement parts and Products are warranted for the remaining portion of the original warranty or for ninety (... that a Product is required to show that affords an equal degree of protection. TruSurround HD and TruVolume technologies are not covered. VIZIO is greater. VIZIO SHALL NOT BE RESPONSIBLE FOR LOSS OF USE, LOSS OF INFORMATION OR DATA, COMMERCIAL LOSS, LOST REVENUE OR LOST PROFITS, OR ...
...THE PURCHASE PRICE OF THE PRODUCT. THIS WARRANTY IS SUBJECT TO CHANGE WITHOUT NOTICE. Replacement parts and Products may be sent to a VIZIO service center to obtain warranty service. Replacement parts and Products are warranted for the remaining portion of the original warranty or for ninety (... that a Product is required to show that affords an equal degree of protection. TruSurround HD and TruVolume technologies are not covered. VIZIO is greater. VIZIO SHALL NOT BE RESPONSIBLE FOR LOSS OF USE, LOSS OF INFORMATION OR DATA, COMMERCIAL LOSS, LOST REVENUE OR LOST PROFITS, OR ...
