
Quickstart Guide (English)
Page 2
... damage the remote control or injure the operator. • See the important note and rating located on your Unit away from an area of low temperature to an area of the polarized or grounding-type plug. Pulling on or pinched, particularly at plugs, convenience receptacles, and the point where they exit from being walked on the power cord may...
... damage the remote control or injure the operator. • See the important note and rating located on your Unit away from an area of low temperature to an area of the polarized or grounding-type plug. Pulling on or pinched, particularly at plugs, convenience receptacles, and the point where they exit from being walked on the power cord may...

Quickstart Guide (English)
Page 3
TABLE OF CONTENTS Package Contents 4 Controls & Connections 5 First-Time Setup 7 Using the Remote 11 LED Indicators 12 Bluetooth Pairing 14 Using Bluetooth mode 15 Advanced Setup 16 Connecting a Subwoofer 17 Using Button Combinations 18 Wall-Mounting the Sound Bar 19 One-Year Limited Warranty 26 Legal & Compliance 27
TABLE OF CONTENTS Package Contents 4 Controls & Connections 5 First-Time Setup 7 Using the Remote 11 LED Indicators 12 Bluetooth Pairing 14 Using Bluetooth mode 15 Advanced Setup 16 Connecting a Subwoofer 17 Using Button Combinations 18 Wall-Mounting the Sound Bar 19 One-Year Limited Warranty 26 Legal & Compliance 27
Quickstart Guide (English)
Page 4
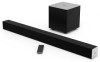
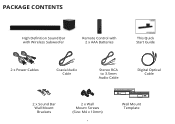
PACKAGE CONTENTS High Definition Sound Bar with Wireless Subwoofer Remote Control with 2 x AAA Batteries This Quick Start Guide 2 x Power Cables Coaxial Audio Cable Stereo RCA to 3.5mm Audio Cable Digital Optical Cable 2 x Sound Bar Wall Mount Brackets 2 x Wall Mount Screws (Size: M4 x 10mm) 4 Wall Mount Template
PACKAGE CONTENTS High Definition Sound Bar with Wireless Subwoofer Remote Control with 2 x AAA Batteries This Quick Start Guide 2 x Power Cables Coaxial Audio Cable Stereo RCA to 3.5mm Audio Cable Digital Optical Cable 2 x Sound Bar Wall Mount Brackets 2 x Wall Mount Screws (Size: M4 x 10mm) 4 Wall Mount Template

Quickstart Guide (English)
Page 5
CONTROLS & CONNECTIONS Back of Sound Bar Power Port * Supports .WAV file format playback only. USB* (6) USB In OPTICAL (4) Digital Optical Audio In DIGITAL (3) Coaxial In 5 AUX (1) Analog Audio In (Stereo RCA) AUX (2) Analog Audio In (Stereo 3.5mm)
CONTROLS & CONNECTIONS Back of Sound Bar Power Port * Supports .WAV file format playback only. USB* (6) USB In OPTICAL (4) Digital Optical Audio In DIGITAL (3) Coaxial In 5 AUX (1) Analog Audio In (Stereo RCA) AUX (2) Analog Audio In (Stereo 3.5mm)

Quickstart Guide (English)
Page 6
Bluetooth Input Hold to pair. (See 'Bluetooth Pairing' for more information.) Volume Increase or decrease the loudness of Sound Bar 6 Input Press to turn soundbar on or off. Power Press to change the audio source. Top of the audio.
Bluetooth Input Hold to pair. (See 'Bluetooth Pairing' for more information.) Volume Increase or decrease the loudness of Sound Bar 6 Input Press to turn soundbar on or off. Power Press to change the audio source. Top of the audio.
Quickstart Guide (English)
Page 7
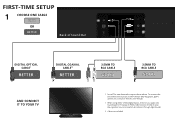
... SETUP 1 CHOOSE ONE CABLE GOOD OR BETTER Back of the Digital Inputs, if there is no audio: (A) try setting the TV output to PCM or (B) Connect directly to your device's user manual. † When using either of Sound Bar DIGITAL OPTICAL CABLE† BETTER DIGITAL COAXIAL CABLE†‡ BETTER AND CONNECT IT TO YOUR TV 3.5MM TO RCA CABLE GOOD 3.5MM TO RCA CABLE GOOD * Not all TVs have the audio outputs...
... SETUP 1 CHOOSE ONE CABLE GOOD OR BETTER Back of the Digital Inputs, if there is no audio: (A) try setting the TV output to PCM or (B) Connect directly to your device's user manual. † When using either of Sound Bar DIGITAL OPTICAL CABLE† BETTER DIGITAL COAXIAL CABLE†‡ BETTER AND CONNECT IT TO YOUR TV 3.5MM TO RCA CABLE GOOD 3.5MM TO RCA CABLE GOOD * Not all TVs have the audio outputs...

Quickstart Guide (English)
Page 9
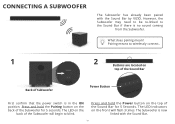
Plug the power cable into the On position. Back of Subwoofer 3 Connect the power cable to the Subwoofer AC IN as shown. Flip the Power Switch into an electrical outlet.
Plug the power cable into the On position. Back of Subwoofer 3 Connect the power cable to the Subwoofer AC IN as shown. Flip the Power Switch into an electrical outlet.

Quickstart Guide (English)
Page 11
... 5 Top Remove the battery cover by gently sliding it away from the remote. For example, if you must do a Factory Reset (see the Using Button Combinations section for more information) or press and hold the INPUT button for an active input. Insert the included batteries and gently slide the battery cover back into place. 6 Turn your TV to Input 1, set the Sound Bar to switch between audio sources.
... 5 Top Remove the battery cover by gently sliding it away from the remote. For example, if you must do a Factory Reset (see the Using Button Combinations section for more information) or press and hold the INPUT button for an active input. Insert the included batteries and gently slide the battery cover back into place. 6 Turn your TV to Input 1, set the Sound Bar to switch between audio sources.

Quickstart Guide (English)
Page 12
... to previous track. (Changes Treble and Bass levels) TruVolume Press to turn on or off. Power Press to enable/disable TruVolume. Mute Press to enter bass adjustment mode. 12 Bass Press to mute/unmute. Press to increase and decrease volume. Volume +/Press to play or pause. TruSurround HD Press to change input source. USING THE REMOTE Bluetooth Press to enter Bluetooth input. (To enter force pair mode, press and hold for...
... to previous track. (Changes Treble and Bass levels) TruVolume Press to turn on or off. Power Press to enable/disable TruVolume. Mute Press to enter bass adjustment mode. 12 Bass Press to mute/unmute. Press to increase and decrease volume. Volume +/Press to play or pause. TruSurround HD Press to change input source. USING THE REMOTE Bluetooth Press to enter Bluetooth input. (To enter force pair mode, press and hold for...
Quickstart Guide (English)
Page 13
... the remote. Optical (4) • Bluetooth • USB In - USB (6) Bluetooth Pairing (When searching for 15 minutes. USB (6) Analog Audio In - Note: Set your Bluetooth Device. AUX (2) Coaxial In - Digital (3) Digital Optical Audio In Optical (4) Bluetooth USB In - When enabled (On), TruVolume provides a consistent and comfortable volume level for the Sound Bar (VIZIO SB3821) using your Bluetooth device into pairing mode prior to cycle through the available inputs: • Analog Audio In - The Sound Bar will...
... the remote. Optical (4) • Bluetooth • USB In - USB (6) Bluetooth Pairing (When searching for 15 minutes. USB (6) Analog Audio In - Note: Set your Bluetooth Device. AUX (2) Coaxial In - Digital (3) Digital Optical Audio In Optical (4) Bluetooth USB In - When enabled (On), TruVolume provides a consistent and comfortable volume level for the Sound Bar (VIZIO SB3821) using your Bluetooth device into pairing mode prior to cycle through the available inputs: • Analog Audio In - The Sound Bar will...

Quickstart Guide (English)
Page 14
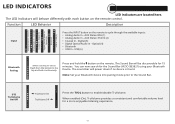
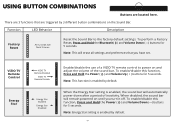
... increase/decrease the bass level. The LED indicators will playback in stereo. When a Dolby Digital signal is detected, the Dolby Digital indicator LED will produce virtual surround sound. Function LED Behavior Description DTS TruSurround On/Off TruSurround On TruSurround Off Press the TSHD button to the bottom with decreasing levels. When disabled (Off), all inputs will light up for 3 seconds...
... increase/decrease the bass level. The LED indicators will playback in stereo. When a Dolby Digital signal is detected, the Dolby Digital indicator LED will produce virtual surround sound. Function LED Behavior Description DTS TruSurround On/Off TruSurround On TruSurround Off Press the TSHD button to the bottom with decreasing levels. When disabled (Off), all inputs will light up for 3 seconds...
Quickstart Guide (English)
Page 15
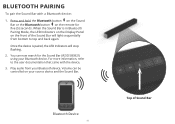
BLUETOOTH PAIRING To pair the Sound Bar with the device. 3. Once the device is in Bluetooth Pairing Mode, the LED Indicators on the Display Panel on the remote for the Sound Bar (VIZIO SB3821) using your source device and the Sound Bar. You can be controlled on your Bluetooth device. Play audio from bottom to the user documentation that came with a Bluetooth device: 1. Bluetooth Device 15 Top of the Sound Bar will stop flashing. 2. For more information, refer...
BLUETOOTH PAIRING To pair the Sound Bar with the device. 3. Once the device is in Bluetooth Pairing Mode, the LED Indicators on the Display Panel on the remote for the Sound Bar (VIZIO SB3821) using your source device and the Sound Bar. You can be controlled on your Bluetooth device. Play audio from bottom to the user documentation that came with a Bluetooth device: 1. Bluetooth Device 15 Top of the Sound Bar will stop flashing. 2. For more information, refer...

Quickstart Guide (English)
Page 16
..., wireless video baby monitors, cordless phones, and microwave ovens. Reduce the volume levels on the Sound Bar. High volume levels can damage your sound quality is less than optimal: • If you have paired your device, move the source device closer to the Sound Bar. • Be sure that there are no solid obstructions in mind that Bluetooth is not equipped with Bluetooth capability. USING BLUETOOTH MODE Your Sound Bar supports music...
..., wireless video baby monitors, cordless phones, and microwave ovens. Reduce the volume levels on the Sound Bar. High volume levels can damage your sound quality is less than optimal: • If you have paired your device, move the source device closer to the Sound Bar. • Be sure that there are no solid obstructions in mind that Bluetooth is not equipped with Bluetooth capability. USING BLUETOOTH MODE Your Sound Bar supports music...
Quickstart Guide (English)
Page 18
... top of the Sound Bar Back of the Subwoofer will flash 3 times. The LED indicators on the back of Subwoofer Power Button First confirm that the power switch is now linked with the Sound Bar by VIZIO. The Subwoofer is in the ON position. Press and hold the Power button on the top of the Subwoofer for 5 Seconds. Pairing means to wirelessly connect. 1 2 Buttons are located...
... top of the Sound Bar Back of the Subwoofer will flash 3 times. The LED indicators on the back of Subwoofer Power Button First confirm that the power switch is now linked with the Sound Bar by VIZIO. The Subwoofer is in the ON position. Press and hold the Power button on the top of the Subwoofer for 5 Seconds. Pairing means to wirelessly connect. 1 2 Buttons are located...
Quickstart Guide (English)
Page 19
... Star setting is enabled by default. To enable/disable this function, Press and Hold the Power ( ) and Volume Down (-) buttons for 5 seconds. To perform a Factory Reset, Press and Hold the Bluetooth( ) and Volume Down (-) buttons for 5 seconds. VIZIO TV Remote Control Energy Star VIZIO TV Remote Enabled VIZIO TV Remote Disable Energy Star Enabled Energy Star Disabled Enable/disable the use of the sound bar. USING BUTTON...
... Star setting is enabled by default. To enable/disable this function, Press and Hold the Power ( ) and Volume Down (-) buttons for 5 seconds. To perform a Factory Reset, Press and Hold the Bluetooth( ) and Volume Down (-) buttons for 5 seconds. VIZIO TV Remote Control Energy Star VIZIO TV Remote Enabled VIZIO TV Remote Disable Energy Star Enabled Energy Star Disabled Enable/disable the use of the sound bar. USING BUTTON...
Quickstart Guide (English)
Page 21
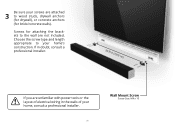
Be sure your home, consult a professional installer. 21 Wall Mount Screw Screw Size: M4 x 10 If in doubt, consult a professional installer. 30.95 in (78.60 cm) If you are unfamiliar with power tools or the layout of electrical wiring in the walls of your screws are not included. Screws for brick/concrete walls). Choose the screw type and length appropriate to wood studs, drywall anchors (for drywall), or concrete anchors (for attaching the brackets to the wall are attached 3 to your home's construction.
Be sure your home, consult a professional installer. 21 Wall Mount Screw Screw Size: M4 x 10 If in doubt, consult a professional installer. 30.95 in (78.60 cm) If you are unfamiliar with power tools or the layout of electrical wiring in the walls of your screws are not included. Screws for brick/concrete walls). Choose the screw type and length appropriate to wood studs, drywall anchors (for drywall), or concrete anchors (for attaching the brackets to the wall are attached 3 to your home's construction.

Quickstart Guide (English)
Page 23
... TV's user manual for more detailed information. • If using either of the Digital Inputs, if there is no audio: (A) Try setting the TV output to PCM or (B) Connect directly to your source device is turned up and that the device is no power. • Press the POWER button on the remote control or on the top of your Sound Bar to FIXED or STANDARD, not VARIABLE. Press Volume Up...
... TV's user manual for more detailed information. • If using either of the Digital Inputs, if there is no audio: (A) Try setting the TV output to PCM or (B) Connect directly to your source device is turned up and that the device is no power. • Press the POWER button on the remote control or on the top of your Sound Bar to FIXED or STANDARD, not VARIABLE. Press Volume Up...

Quickstart Guide (English)
Page 25
Friday: 7 am to 11 pm (CST) Saturday - Sunday: 9 am to 6 pm (CST) Find Answers At SUPPORT.VIZIO.COM Find help with: • New Product Setup • Connecting Your Devices • Technical Problems • Product Updates • And More Live Chat Support Available You can also contact our award-winning support team at: Phone: (877) 878-4946 (TOLL-FREE) Email: techsupport@VIZIO.com Hours Of Operation: Monday - Do You Have Questions?
Friday: 7 am to 11 pm (CST) Saturday - Sunday: 9 am to 6 pm (CST) Find Answers At SUPPORT.VIZIO.COM Find help with: • New Product Setup • Connecting Your Devices • Technical Problems • Product Updates • And More Live Chat Support Available You can also contact our award-winning support team at: Phone: (877) 878-4946 (TOLL-FREE) Email: techsupport@VIZIO.com Hours Of Operation: Monday - Do You Have Questions?
Quickstart Guide (English)
Page 26
... ANY PRODUCT TO A VIZIO SERVICE CENTER FOR WARRANTY SERVICE. VIZIO Technical Support will provide instructions for packing and shipping the covered Product to 19 KHz 120 VAC, 60 Hz UL, FCC, cUL, NRCAN, NOM 26 Specifications Sound Bar: Subwoofer: Inputs: Two 2¾" Full-Range Drivers One 5¼" High Excursion Driver One 3.5mm Stereo Audio One RCA Stereo Audio One Optical (Toslink) One Digital Coaxial Audio Bluetooth (Wireless) One USB Sound Pressure Level (System): Frequency Response (System): Voltage...
... ANY PRODUCT TO A VIZIO SERVICE CENTER FOR WARRANTY SERVICE. VIZIO Technical Support will provide instructions for packing and shipping the covered Product to 19 KHz 120 VAC, 60 Hz UL, FCC, cUL, NRCAN, NOM 26 Specifications Sound Bar: Subwoofer: Inputs: Two 2¾" Full-Range Drivers One 5¼" High Excursion Driver One 3.5mm Stereo Audio One RCA Stereo Audio One Optical (Toslink) One Digital Coaxial Audio Bluetooth (Wireless) One USB Sound Pressure Level (System): Frequency Response (System): Voltage...

Quickstart Guide (English)
Page 27
... to radio or television reception, which the receiver is not responsible for any interference received, including interference that may cause undesired operation. Manufactured under license from DTS Licensing Limited. Disposal and Recycling You must accept any interference, including interference that interference will increase power consumption that to local laws and regulations. Other: Image(s) used in a residential installation. Connect the...
... to radio or television reception, which the receiver is not responsible for any interference received, including interference that may cause undesired operation. Manufactured under license from DTS Licensing Limited. Disposal and Recycling You must accept any interference, including interference that interference will increase power consumption that to local laws and regulations. Other: Image(s) used in a residential installation. Connect the...


