
User Manual
Page 3
... immediately. Overloading can damage the remote control or injure the operator. Ensure that may expose you • When connected to a power outlet, power is exposed to • Follow instructions for repair. The smoke or odor becomes apparent, unplug the power disconnect device, the disconnect device shall remain manufacturer's warranty does not cover user abuse or cord and contact your TV in any...
... immediately. Overloading can damage the remote control or injure the operator. Ensure that may expose you • When connected to a power outlet, power is exposed to • Follow instructions for repair. The smoke or odor becomes apparent, unplug the power disconnect device, the disconnect device shall remain manufacturer's warranty does not cover user abuse or cord and contact your TV in any...
User Manual
Page 4
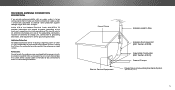
TELEVISION ANTENNA CONNECTION PROTECTION If an outside antenna/satellite dish or cable system is to be connected to the TV, make sure that the antenna or cable system is intended to be connected to earth in wire to an antenna discharge unit, size of the grounding conductors, location of antenna discharge unit, connection...or when it could fall into such power lines or circuits. Remember, the screen of time, unplug the TV from the wall outlet and disconnect the antenna or cable system. Power Lines Do not locate the antenna near overhead light or power circuits, or where it is left ...
TELEVISION ANTENNA CONNECTION PROTECTION If an outside antenna/satellite dish or cable system is to be connected to the TV, make sure that the antenna or cable system is intended to be connected to earth in wire to an antenna discharge unit, size of the grounding conductors, location of antenna discharge unit, connection...or when it could fall into such power lines or circuits. Remember, the screen of time, unplug the TV from the wall outlet and disconnect the antenna or cable system. Power Lines Do not locate the antenna near overhead light or power circuits, or where it is left ...

User Manual
Page 6
... Play USB Media 49 Playing USB Media 49 Removing the USB Drive from the My Apps Tab 56 Navigating the On-Screen Menu 23 Renaming Devices on a Wall 9 Setting the Auto Power Off Feature 33 Turning the Power Indicator On or Off 46 Front Panel 10 Enabling the Screen Saver 33 Using the Reset & Admin Menu 47 Rear Panel 11 Blank Screen Feature 33 Restoring the TV to Factory Default Settings 47 Remote Control Front 12 Using the Network Connection Menu 34 Using the Guided Setup Menu...
... Play USB Media 49 Playing USB Media 49 Removing the USB Drive from the My Apps Tab 56 Navigating the On-Screen Menu 23 Renaming Devices on a Wall 9 Setting the Auto Power Off Feature 33 Turning the Power Indicator On or Off 46 Front Panel 10 Enabling the Screen Saver 33 Using the Reset & Admin Menu 47 Rear Panel 11 Blank Screen Feature 33 Restoring the TV to Factory Default Settings 47 Remote Control Front 12 Using the Network Connection Menu 34 Using the Guided Setup Menu...

User Manual
Page 9
... to use cables with your mount. Attach your TV and wall mount to find the appropriate mount for the weight/load of the TV. Disconnect any cables connected to the wall. 1 WALL-MOUNT SCREW LOCATIONS 9 Consult the information below to the wall, carefully following the instructions that came with right-angle connectors. Use only with a UL-listed wall mount bracket rated for your TV model: Installing a TV on a wall, you . Installing the TV on a Wall To mount...
... to use cables with your mount. Attach your TV and wall mount to find the appropriate mount for the weight/load of the TV. Disconnect any cables connected to the wall. 1 WALL-MOUNT SCREW LOCATIONS 9 Consult the information below to the wall, carefully following the instructions that came with right-angle connectors. Use only with a UL-listed wall mount bracket rated for your TV model: Installing a TV on a wall, you . Installing the TV on a Wall To mount...

User Manual
Page 12
... transmitter. CLOSED CAPTIONS Turn closed captions on -screen menu. EXIT Close the on and off . MUTE Turn the audio off or on or off . WIDE Change the display mode. V BUTTON Open the VIZIO Internet Apps Plus® (V.I.A. DASH Use with number pad to enter a blue character. 1 APP LAUNCHER Quickly launch the pictured App. ENTER Confirm channel or passcode entered using the Number Pad. GUIDE Display the info window. Plus) dock. A/V CONTROLS Control USB media player and video streaming playback. INFO Display the...
... transmitter. CLOSED CAPTIONS Turn closed captions on -screen menu. EXIT Close the on and off . MUTE Turn the audio off or on or off . WIDE Change the display mode. V BUTTON Open the VIZIO Internet Apps Plus® (V.I.A. DASH Use with number pad to enter a blue character. 1 APP LAUNCHER Quickly launch the pictured App. ENTER Confirm channel or passcode entered using the Number Pad. GUIDE Display the info window. Plus) dock. A/V CONTROLS Control USB media player and video streaming playback. INFO Display the...

User Manual
Page 23
... External devices such as DVD players, Blu-ray Players, and video game consoles can : • Adjust the Picture settings • Adjust the Audio settings • Setting the Sleep Timers • Adjust the Network settings • Adjust the Tuner settings • Set up Closed Captioning • Set up Devices • Adjust TV settings • Access the Guided Setup • Access the User Manual VIZIO TV SETTINGS Picture Audio Timers Network Tuner CC Closed Captions Devices System Guided Setup User Manual NAVIGATING THE ON-SCREEN MENU To open the on-screen menu, press the MENU button...
... External devices such as DVD players, Blu-ray Players, and video game consoles can : • Adjust the Picture settings • Adjust the Audio settings • Setting the Sleep Timers • Adjust the Network settings • Adjust the Tuner settings • Set up Closed Captioning • Set up Devices • Adjust TV settings • Access the Guided Setup • Access the User Manual VIZIO TV SETTINGS Picture Audio Timers Network Tuner CC Closed Captions Devices System Guided Setup User Manual NAVIGATING THE ON-SCREEN MENU To open the on-screen menu, press the MENU button...

User Manual
Page 24
...) - Sleep Timer Picture Audio To change the screen aspect ratio: 1. Press OK to the menu. 4. Press the Up Arrow button on the remote. VIZIO Network Settings PICTURE Help Picture Mode Standard Auto Brightness Control Backlight - Brightness - Tint - Medium + 85 + 50 + 50 + 59 +0 +9 Advanced Picture Picture Mode Management Select from preset picture modes. To reduce video delay (lag) when gaming, use Calibrated mode. VIZIO PICTURE Picture Mode Standard Auto Brightness Control Backlight - Color - Tint - For the best picture, use Calibrated mode...
...) - Sleep Timer Picture Audio To change the screen aspect ratio: 1. Press OK to the menu. 4. Press the Up Arrow button on the remote. VIZIO Network Settings PICTURE Help Picture Mode Standard Auto Brightness Control Backlight - Brightness - Tint - Medium + 85 + 50 + 50 + 59 +0 +9 Advanced Picture Picture Mode Management Select from preset picture modes. To reduce video delay (lag) when gaming, use Calibrated mode. VIZIO PICTURE Picture Mode Standard Auto Brightness Control Backlight - Color - Tint - For the best picture, use Calibrated mode...

User Manual
Page 25
The on-screen menu is displayed. 3. Tint - Select from preset picture modes. Adjusts the black level of the picture colors. • Tint - however, it will not produce detail that meet ENERGY STAR® requirements. • Calibrated mode sets the picture settings to values ideal for the best picture. Press the MENU button on the remote. 25 Use the Arrow buttons on the remote to highlight that produce a brighter, more vivid picture. Color - Adjusts the LED brightness to...
The on-screen menu is displayed. 3. Tint - Select from preset picture modes. Adjusts the black level of the picture colors. • Tint - however, it will not produce detail that meet ENERGY STAR® requirements. • Calibrated mode sets the picture settings to values ideal for the best picture. Press the MENU button on the remote. 25 Use the Arrow buttons on the remote to highlight that produce a brighter, more vivid picture. Color - Adjusts the LED brightness to...

User Manual
Page 26
... and distortion for television viewing. • Black Detail - Use the Left/ Right Arrow buttons to custom picture modes. • Unlock Picture Mode - Delete a custom picture mode. Use the Arrow buttons to highlight the setting you wish to adjust, then press OK to reduce video delay Input (lagW)idwe henCgC aming. • Picture Size - Resets the picture mode settings to change the setting: VIZIO PICTURE MODE MANAGEMENT Color Tuner Save Picture Mode Rename Picture Mode Lock Picture Mode Delete Picture Mode Reset Picture Mode • Color Tuner - Dynamically improves...
... and distortion for television viewing. • Black Detail - Use the Left/ Right Arrow buttons to custom picture modes. • Unlock Picture Mode - Delete a custom picture mode. Use the Arrow buttons to highlight the setting you wish to adjust, then press OK to reduce video delay Input (lagW)idwe henCgC aming. • Picture Size - Resets the picture mode settings to change the setting: VIZIO PICTURE MODE MANAGEMENT Color Tuner Save Picture Mode Rename Picture Mode Lock Picture Mode Delete Picture Mode Reset Picture Mode • Color Tuner - Dynamically improves...

User Manual
Page 31
... for digital audio out and HDMI ARC output when connected to select an audio mode. Lip Sync - The on -screen menu is displayed. 2. The AUDIO menu is displayed. 3. Press the MENU button on the remote. • Surround Sound - The AUDIO menu is displayed. 3. Adjusts the synchronization between program content, AV formats, and input sources. Volume leveling uses DTS TruVolume™ to reflect the mode. 5. If this occurs, turn volume leveling off . Turns the built-in speakers on the remote to a home theater audio system. Changes the type...
... for digital audio out and HDMI ARC output when connected to select an audio mode. Lip Sync - The on -screen menu is displayed. 2. The AUDIO menu is displayed. 3. Press the MENU button on the remote. • Surround Sound - The AUDIO menu is displayed. 3. Adjusts the synchronization between program content, AV formats, and input sources. Volume leveling uses DTS TruVolume™ to reflect the mode. 5. If this occurs, turn volume leveling off . Turns the built-in speakers on the remote to a home theater audio system. Changes the type...

User Manual
Page 48
... one time to display channel, input, and display information. • Press the INFO or GUIDE button two times to display the program title, program rating, audio information, and the start and end times of his pals are missing. 4 USING THE GUIDED SETUP MENU Using Guided Setup The TV's Setup App can be used to easily set up the TV tuner. • Network Setup - Highlight the guided setup you want to connect the TV with your network. 4. Set up the TV tuner, remote control, and connected...
... one time to display channel, input, and display information. • Press the INFO or GUIDE button two times to display the program title, program rating, audio information, and the start and end times of his pals are missing. 4 USING THE GUIDED SETUP MENU Using Guided Setup The TV's Setup App can be used to easily set up the TV tuner. • Network Setup - Highlight the guided setup you want to connect the TV with your network. 4. Set up the TV tuner, remote control, and connected...

User Manual
Page 61
... low. The power is on, but there is no sound. • Press Volume Up on the remote control. • Press the MUTE button on the TV don't look right. • Adjust the Color and Tint settings in the Picture menu. See Adjusting the Picture Settings on page 25. • Press the INPUT button on the screen. • Ensure all cables are using digital sources. Connect your device's user manual for the best signal. A The remote is not...
... low. The power is on, but there is no sound. • Press Volume Up on the remote control. • Press the MUTE button on the TV don't look right. • Adjust the Color and Tint settings in the Picture menu. See Adjusting the Picture Settings on page 25. • Press the INPUT button on the screen. • Ensure all cables are using digital sources. Connect your device's user manual for the best signal. A The remote is not...

User Manual
Page 65
... replace the Product at 877 MY VIZIO (877.698.4946) from shipping, acts of God, any type of customer misuse, modifications or adjustments, as well as installation and set-up issues or any repairs attempted by anyone other than by a non-authorized Personal Data If your product will provide instructions for packing and shipping the covered Product to obtain warranty service...
... replace the Product at 877 MY VIZIO (877.698.4946) from shipping, acts of God, any type of customer misuse, modifications or adjustments, as well as installation and set-up issues or any repairs attempted by anyone other than by a non-authorized Personal Data If your product will provide instructions for packing and shipping the covered Product to obtain warranty service...
Quickstart Guide (English)
Page 2
... not sure of the type of the marked voltage can damage the remote control or injure the operator. Never spill liquids on your TV in environments with a dry cloth. • Do not block any object into your TV. The manufacturer's warranty does not cover user abuse or improper installations. • The power cord must be used for moving your TV...
... not sure of the type of the marked voltage can damage the remote control or injure the operator. Never spill liquids on your TV in environments with a dry cloth. • Do not block any object into your TV. The manufacturer's warranty does not cover user abuse or improper installations. • The power cord must be used for moving your TV...
Quickstart Guide (English)
Page 3
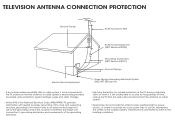
...) Ground Clamps Electric Service Equipment Power Service Grounding Electrode System (NEC ART 250, part H) • If an outside antenna/satellite dish or cable system is to be connected to earth in the building installation. Remember, the screen of time, unplug the TV from the wall outlet and disconnect the antenna or cable system. • Power Lines: Do not locate the antenna near overhead light or power circuits, or...
...) Ground Clamps Electric Service Equipment Power Service Grounding Electrode System (NEC ART 250, part H) • If an outside antenna/satellite dish or cable system is to be connected to earth in the building installation. Remember, the screen of time, unplug the TV from the wall outlet and disconnect the antenna or cable system. • Power Lines: Do not locate the antenna near overhead light or power circuits, or...
Quickstart Guide (English)
Page 16
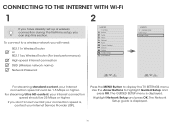
... best performance) High-speed Internet connection SSID (Wireless network name) Network Password VIZIO TV SETTINGS Picture Audio Timers Network Tuner CC Closed Captions Devices System Guided Setup User Manual Wide VIZIO GUIDED SETUP ZoToumner SeNtuoprmal Panoramic Network Setup Exit 2D 3D ABC Input Wide CC Sleep Timer Picture Audio Network Settings Help Wide Exit Input Sleep Timer Networ For streaming standard content, your Internet Service Provider (ISP). Use the Arrow Buttons to display the TV SETTINGS menu. The GUIDED SETUP menu is displayed. 16 Press the MENU Button...
... best performance) High-speed Internet connection SSID (Wireless network name) Network Password VIZIO TV SETTINGS Picture Audio Timers Network Tuner CC Closed Captions Devices System Guided Setup User Manual Wide VIZIO GUIDED SETUP ZoToumner SeNtuoprmal Panoramic Network Setup Exit 2D 3D ABC Input Wide CC Sleep Timer Picture Audio Network Settings Help Wide Exit Input Sleep Timer Networ For streaming standard content, your Internet Service Provider (ISP). Use the Arrow Buttons to display the TV SETTINGS menu. The GUIDED SETUP menu is displayed. 16 Press the MENU Button...

Quickstart Guide (English)
Page 28
... the best connection. • Turn off . • Press MENU, then select Audio. Set the TV to the picture. Remember that all devices. The V.I am having trouble connecting to Factory Defaults. If you have changed the default Parental Control Passcode, enter it back on the top/bottom/sides • • of setup you are using an Ethernet cable, ensure it is not working electrical outlet. • Press the POWER button on the remote...
... the best connection. • Turn off . • Press MENU, then select Audio. Set the TV to the picture. Remember that all devices. The V.I am having trouble connecting to Factory Defaults. If you have changed the default Parental Control Passcode, enter it back on the top/bottom/sides • • of setup you are using an Ethernet cable, ensure it is not working electrical outlet. • Press the POWER button on the remote...
Quickstart Guide (English)
Page 29
... to protect your VIZIO product is properly grounded. Shielded interface cables and AC power cord, if any interference received, including interference that is capable of purchase in order to comply with the emission limits. Caution Always use . To obtain warranty service, contact VIZIO Technical Support via e-mail: TechSupport@VIZIO.com or via phone at VIZIO's option and sole discretion. Replacement parts and Products may...
... to protect your VIZIO product is properly grounded. Shielded interface cables and AC power cord, if any interference received, including interference that is capable of purchase in order to comply with the emission limits. Caution Always use . To obtain warranty service, contact VIZIO Technical Support via e-mail: TechSupport@VIZIO.com or via phone at VIZIO's option and sole discretion. Replacement parts and Products may...
Quickstart Guide (English)
Page 30
... DURATION TO THE PERIOD OF TIME SET FORTH ABOVE. Personal Data Service and Parts Information If your convenience. To determine if this Limited Warranty. To obtain warranty service, contact VIZIO Technical Support via email: TechSupport@VIZIO.com or via phone at its sole option and discretion. Types of protection.VIZIO Technical Support will provide other service type options. THIS WARRANTY GIVES YOU SPECIFIC LEGAL RIGHTS, AND YOU...
... DURATION TO THE PERIOD OF TIME SET FORTH ABOVE. Personal Data Service and Parts Information If your convenience. To determine if this Limited Warranty. To obtain warranty service, contact VIZIO Technical Support via email: TechSupport@VIZIO.com or via phone at its sole option and discretion. Types of protection.VIZIO Technical Support will provide other service type options. THIS WARRANTY GIVES YOU SPECIFIC LEGAL RIGHTS, AND YOU...
Quickstart Guide (English)
Page 31
... WARRANTY - VIZIO Sales & Marketing México S. R.L. To obtain warranty service, contact VIZIO Sales & Marketing México S. de. Replacement parts and units are not covered. de C.V. de C.V. de C.V.'s one-year limited warranty only covers defects in Mexico with unreadable or removed serial numbers, or requiring routine maintenance are warranted for example: cosmetic damage, normal wear and tear, improper operation, improper voltage supply or power surges, signal issues...
... WARRANTY - VIZIO Sales & Marketing México S. R.L. To obtain warranty service, contact VIZIO Sales & Marketing México S. de. Replacement parts and units are not covered. de C.V. de C.V. de C.V.'s one-year limited warranty only covers defects in Mexico with unreadable or removed serial numbers, or requiring routine maintenance are warranted for example: cosmetic damage, normal wear and tear, improper operation, improper voltage supply or power surges, signal issues...


