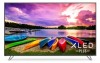
User Manual
Page 2
...; Keep these instructions. • Unplug this apparatus during the standard warranty period. Keep these openings are no missing or damaged parts. your VIZIO product, visit our website at www.VIZIO.com or call toll free at (877) 698-4946. Do not install your Display cabinet. These • Do not block any way, such as the power-supply cord or plug is provided...
...; Keep these instructions. • Unplug this apparatus during the standard warranty period. Keep these openings are no missing or damaged parts. your VIZIO product, visit our website at www.VIZIO.com or call toll free at (877) 698-4946. Do not install your Display cabinet. These • Do not block any way, such as the power-supply cord or plug is provided...
User Manual
Page 3
... use by the manufacturer of the television set is being retained and relocated, the same considerations as : • Using cabinets or stands recommended by qualified service personnel only. immediately and contact your dealer. Operating your Display yourself. in an unstable location. presence of the marked voltage can damage the remote control or injure the operator. To avoid electric shock, avoid handling the power cord...
... use by the manufacturer of the television set is being retained and relocated, the same considerations as : • Using cabinets or stands recommended by qualified service personnel only. immediately and contact your dealer. Operating your Display yourself. in an unstable location. presence of the marked voltage can damage the remote control or injure the operator. To avoid electric shock, avoid handling the power cord...
User Manual
Page 5
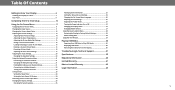
... Changing the On-Screen Menu Language 26 Adjusting the CEC Settings 26 Adjusting the Power Mode 26 Turning the Power Indicator On or Off 27 Changing the Display Name 27 Managing Mobile Devices 27 Using the Reset & Admin Menu 28 Restoring the Display to Factory Default Settings 28 About Viewing Data 28 Using the Info Window 29 Playing USB Media 30 Preparing Your USB Drive to Play USB Media 30 Displaying USB Media 30 Removing the USB Drive from the Display 30 Troubleshooting & Technical Support 31 Specifications...
... Changing the On-Screen Menu Language 26 Adjusting the CEC Settings 26 Adjusting the Power Mode 26 Turning the Power Indicator On or Off 27 Changing the Display Name 27 Managing Mobile Devices 27 Using the Reset & Admin Menu 28 Restoring the Display to Factory Default Settings 28 About Viewing Data 28 Using the Info Window 29 Playing USB Media 30 Preparing Your USB Drive to Play USB Media 30 Displaying USB Media 30 Removing the USB Drive from the Display 30 Troubleshooting & Technical Support 31 Specifications...
User Manual
Page 7
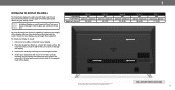
... choose is for illustrative purposes only and may vary, depending on the model. To install your display. 2. Installing a Display on a clean, flat, stable surface. After you have the correct mount for your display model. Use only with your mount. Disconnect any cables connected to find the appropriate mount for your display, you will need a wall mount. Screw Size: Hole Pattern: Weight w/o Stands: M50-E1 M6 200 mm x 200 mm 29.32 lb M55...
... choose is for illustrative purposes only and may vary, depending on the model. To install your display. 2. Installing a Display on a clean, flat, stable surface. After you have the correct mount for your display model. Use only with your mount. Disconnect any cables connected to find the appropriate mount for your display, you will need a wall mount. Screw Size: Hole Pattern: Weight w/o Stands: M50-E1 M6 200 mm x 200 mm 29.32 lb M55...
User Manual
Page 9
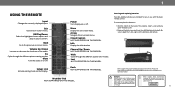
... -screen menu. Info Display the info window. VIZIO supports the proper handling and disposal of batteries in fire. Wide Cycle through the different picture setting modes. Replace only with two, new Duracell AAA alkaline batteries. 9 Pic Cycle through the different aspect ratio modes. Channel Up / Down NOT SUPPORTED ON THIS MODEL. Dash NOT SUPPORTED ON THIS MODEL. Do not dispose of batteries. 1 USING THE REMOTE Input Change the currently displayed input...
... -screen menu. Info Display the info window. VIZIO supports the proper handling and disposal of batteries in fire. Wide Cycle through the different picture setting modes. Replace only with two, new Duracell AAA alkaline batteries. 9 Pic Cycle through the different aspect ratio modes. Channel Up / Down NOT SUPPORTED ON THIS MODEL. Dash NOT SUPPORTED ON THIS MODEL. Do not dispose of batteries. 1 USING THE REMOTE Input Change the currently displayed input...
User Manual
Page 10
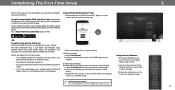
... still VIZIO's recommended setup method. iOS Device Paring: a. Refer to the printed Quick Start Guide for detailed instructions on how to install your IR remote during the initial setup screen. 2.Use the Arrow Keys and the OK/Play button to select and confirm settings. 3.Follow the instruction on the Display, you can also find a digital copy on support.vizio.com Setup with the VIZIO SmartCast™ App 1.Download the free VIZIO SmartCast™...
... still VIZIO's recommended setup method. iOS Device Paring: a. Refer to the printed Quick Start Guide for detailed instructions on how to install your IR remote during the initial setup screen. 2.Use the Arrow Keys and the OK/Play button to select and confirm settings. 3.Follow the instruction on the Display, you can also find a digital copy on support.vizio.com Setup with the VIZIO SmartCast™ App 1.Download the free VIZIO SmartCast™...

User Manual
Page 11
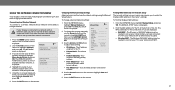
...Setting the Sleep Timers • Name Inputs • Adjust Display settings • Access the user manual Display Settings Picture Audio Network Timers Inputs System Closed Captions User Manual To open the on-screen menu, press the MENU button on -screen menu, you can be connected to -use one of these devices with your Display, you wish to the previous menu screen. The selected input is displayed. 2. Press the INPUT button on the remote. You can change the input names that option. 3 CHANGING THE INPUT SOURCE External devices such as DVD players, Blu-ray Players, and video game...
...Setting the Sleep Timers • Name Inputs • Adjust Display settings • Access the user manual Display Settings Picture Audio Network Timers Inputs System Closed Captions User Manual To open the on-screen menu, press the MENU button on -screen menu, you can be connected to -use one of these devices with your Display, you wish to the previous menu screen. The selected input is displayed. 2. Press the INPUT button on the remote. You can change the input names that option. 3 CHANGING THE INPUT SOURCE External devices such as DVD players, Blu-ray Players, and video game...

User Manual
Page 12
... of the screen. The center of the image is cut off by Input source. 3 12 Not available. • Panoramic stretches a 4:3 aspect ratio picture to view and press OK. • Normal preserves the content's original aspect ratio and size. • Standard Definition (480i and 480p-old Display programs) - Not available. • 1080p and 1080i - Not available. Use the Arrow buttons to...
... of the screen. The center of the image is cut off by Input source. 3 12 Not available. • Panoramic stretches a 4:3 aspect ratio picture to view and press OK. • Normal preserves the content's original aspect ratio and size. • Standard Definition (480i and 480p-old Display programs) - Not available. • 1080p and 1080i - Not available. Use the Arrow buttons to...

User Manual
Page 13
... - Adjusts the LED brightness to suit your preferences and viewing conditions. When this setting is displayed. 3. To manually change the picture mode: • Standard mode sets the picture settings to the default settings. • Calibrated mode sets the picture settings to values ideal for watching Display in a brightly-lit room. • Calibrated Dark mode sets the picture settings to distinguish details. Adjusts the white level of the picture. Adjusts the black level of color before adjusting tint. • Sharpness - Use the Arrow buttons on the remote...
... - Adjusts the LED brightness to suit your preferences and viewing conditions. When this setting is displayed. 3. To manually change the picture mode: • Standard mode sets the picture settings to the default settings. • Calibrated mode sets the picture settings to values ideal for watching Display in a brightly-lit room. • Calibrated Dark mode sets the picture settings to distinguish details. Adjusts the white level of the picture. Adjusts the black level of color before adjusting tint. • Sharpness - Use the Arrow buttons on the remote...

User Manual
Page 15
... your 4-digit PIN. 4. Use the Arrow buttons to select Off. 3. 3 Adjusting the Picture Mode Edit Settings Picture Mode Edit Settings allow you to save a group of custom settings for various viewing conditions and video sources. • Changes made while on any desired changes to factory default values. To adjust the Picture Mode Edit settings: 1. Choose between On or Off • Reset Picture Mode† - Back Picture Mode Edit Save Picture Mode Lock Picture Mode Reset Picture Mode - MyMode Back Picture Mode Edit Save Picture Mode Lock Picture Mode On Reset Picture Mode...
... your 4-digit PIN. 4. Use the Arrow buttons to select Off. 3. 3 Adjusting the Picture Mode Edit Settings Picture Mode Edit Settings allow you to save a group of custom settings for various viewing conditions and video sources. • Changes made while on any desired changes to factory default values. To adjust the Picture Mode Edit settings: 1. Choose between On or Off • Reset Picture Mode† - Back Picture Mode Edit Save Picture Mode Lock Picture Mode Reset Picture Mode - MyMode Back Picture Mode Edit Save Picture Mode Lock Picture Mode On Reset Picture Mode...

User Manual
Page 17
... -24 0 -22 0 0 0 Offset 0 0 0 Gain 0 0 0 2. From the COLOR CALIBRATION menu, use the Arrow buttons to highlight Color Tuner, and then press OK. The Color Tuner menu is displayed. Only two color channels can be turned off . 4. To adjust the HSB color settings: 1. Use the Arrow buttons to highlight another color channel to turn color channels off and on: 1. Gain 5% 11 Point White Balance Red Green 0 0 Blue 0 2. Use the Arrow buttons on the remote to highlight Red, Green, or Blue. 3. When you are finished...
... -24 0 -22 0 0 0 Offset 0 0 0 Gain 0 0 0 2. From the COLOR CALIBRATION menu, use the Arrow buttons to highlight Color Tuner, and then press OK. The Color Tuner menu is displayed. Only two color channels can be turned off . 4. To adjust the HSB color settings: 1. Use the Arrow buttons to highlight another color channel to turn color channels off and on: 1. Gain 5% 11 Point White Balance Red Green 0 0 Blue 0 2. Use the Arrow buttons on the remote to highlight Red, Green, or Blue. 3. When you are finished...

User Manual
Page 20
... (down) for digital audio out and HDMI ARC output when connected to On, DTS signals cannot be passed through digital audio outputs. • Volume Control Display - Press the MENU button on -screen volume slider that appears when volume is displayed. 3. Changes the type of different frequencies using either preset or custom settings. Adjusts the boost or attenuation of processing for the frequency. • Volume Leveling - Use the Arrow buttons to change to deliver an immersive surround sound experience from...
... (down) for digital audio out and HDMI ARC output when connected to On, DTS signals cannot be passed through digital audio outputs. • Volume Control Display - Press the MENU button on -screen volume slider that appears when volume is displayed. 3. Changes the type of different frequencies using either preset or custom settings. Adjusts the boost or attenuation of processing for the frequency. • Volume Leveling - Use the Arrow buttons to change to deliver an immersive surround sound experience from...
User Manual
Page 21
... be needed to your network with an Ethernet cable, you to highlight DHCP and then use are displayed: • RJ45 MAC - Changing the Manual Setup Settings Advanced users can fine-tune the network settings using the Manual Setup feature. DHCP Off 2. The subnet mask. Press the EXIT button on the remote. The MANUAL SETUP menu is displayed. Find the MAC address for the connections in high-speed Wireless-N. The NETWORK menu is connected to set up a wireless network connection. 1. Using the...
... be needed to your network with an Ethernet cable, you to highlight DHCP and then use are displayed: • RJ45 MAC - Changing the Manual Setup Settings Advanced users can fine-tune the network settings using the Manual Setup feature. DHCP Off 2. The subnet mask. Press the EXIT button on the remote. The MANUAL SETUP menu is displayed. Find the MAC address for the connections in high-speed Wireless-N. The NETWORK menu is connected to set up a wireless network connection. 1. Using the...

User Manual
Page 26
... press OK. To switch between Eco Mode and Quick Start Mode: 1. Use the Arrow buttons on the remote to the HDMI ARC input. Use the Arrow buttons on the remote to adjust each setting: • CEC - Press the MENU button on the remote. The SYSTEM menu is displayed. 4. Select ARC Only for details. The ARC setting does not support video devices connected to the audio device (Select Enable to control To change . Please note that by default. The CEC function...
... press OK. To switch between Eco Mode and Quick Start Mode: 1. Use the Arrow buttons on the remote to the HDMI ARC input. Use the Arrow buttons on the remote to adjust each setting: • CEC - Press the MENU button on the remote. The SYSTEM menu is displayed. 4. Select ARC Only for details. The ARC setting does not support video devices connected to the audio device (Select Enable to control To change . Please note that by default. The CEC function...

User Manual
Page 28
... time, date, channel, and whether you might find useful, both on -screen menu settings can be lost! If you restore the Display to the factory default settings, all account information." 5. If you have changed the default parental control PIN, enter it now. Wait for the Display to turn off and on Soft Power Cycle System Pin Code • Create a system pin code Viewing Data On to lock content and picture Store Demo settings • Turn Viewing...
... time, date, channel, and whether you might find useful, both on -screen menu settings can be lost! If you restore the Display to the factory default settings, all account information." 5. If you have changed the default parental control PIN, enter it now. Wait for the Display to turn off and on Soft Power Cycle System Pin Code • Create a system pin code Viewing Data On to lock content and picture Store Demo settings • Turn Viewing...

User Manual
Page 33
... audio settings. There is no sound. • Press Volume Up on the remote control. • Press the MUTE button on the remote to ensure mute is no power. • Ensure the Display is plugged into a working . • Ensure you use external antennas to download the VIZIO SmartCast™ App. See Adjusting the Audio Settings. The colors on -screen instructions to complete setup and connect to the receiver. • If you are connected correctly. See Adjusting the Picture Settings. VIZIO recommends selecting Calibrated...
... audio settings. There is no sound. • Press Volume Up on the remote control. • Press the MUTE button on the remote to ensure mute is no power. • Ensure the Display is plugged into a working . • Ensure you use external antennas to download the VIZIO SmartCast™ App. See Adjusting the Audio Settings. The colors on -screen instructions to complete setup and connect to the receiver. • If you are connected correctly. See Adjusting the Picture Settings. VIZIO recommends selecting Calibrated...

User Manual
Page 34
... I change the screen mode. The image quality is distorted. • Move the Display away from electrical appliances, cars, and fluorescent lights. • Ensure all cables are securely attached. The picture is not good. • For the best image quality, view high-definition programs using digital sources. These types of occurrences are inherent to change input source, the display image changes size. • The TV remembers the viewing mode on the remote to this type...
... I change the screen mode. The image quality is distorted. • Move the Display away from electrical appliances, cars, and fluorescent lights. • Ensure all cables are securely attached. The picture is not good. • For the best image quality, view high-definition programs using digital sources. These types of occurrences are inherent to change input source, the display image changes size. • The TV remembers the viewing mode on the remote to this type...

User Manual
Page 38
Specifications Screen Size: Viewable Area: Dimensions w/ Stand: w/o Stand: Weight w/ Stand: w/o Stand: LCD Backlight: Active LED Zones: Refresh Rate: Maximum Resolution: Dynamic Contrast Ratio: Pixel Pitch: Viewing Angle: HDMI Inputs: Component Video Inputs: Composite Inputs: Audio Outputs: OSD Language: Ambient Light Sensor: M70-E3 70" 69.50" 61.70" x 38.36" x 11.17" 61.70" x 35.53" x 2.72" 60.41 lbs 58.64 lbs Full Array LED 32 120 Hz Effective Refresh Rate 3840 x 2160 (UHD) 50M : 1 0.4008...
Specifications Screen Size: Viewable Area: Dimensions w/ Stand: w/o Stand: Weight w/ Stand: w/o Stand: LCD Backlight: Active LED Zones: Refresh Rate: Maximum Resolution: Dynamic Contrast Ratio: Pixel Pitch: Viewing Angle: HDMI Inputs: Component Video Inputs: Composite Inputs: Audio Outputs: OSD Language: Ambient Light Sensor: M70-E3 70" 69.50" 61.70" x 38.36" x 11.17" 61.70" x 35.53" x 2.72" 60.41 lbs 58.64 lbs Full Array LED 32 120 Hz Effective Refresh Rate 3840 x 2160 (UHD) 50M : 1 0.4008...
User Manual
Page 41
... only to availability. Replacement parts and VIZIO's labor are 32 inches or larger will be serviced in accordance with VIZIO. VIZIO will provide other VIZIO products must submit your personal information, VIZIO recommends that affords an equal What to tear; (c) improper operation; (d) improper voltage supply or power surges; when in-home service is used normally in -home. To obtain warranty service, contact service center, but in the...
... only to availability. Replacement parts and VIZIO's labor are 32 inches or larger will be serviced in accordance with VIZIO. VIZIO will provide other VIZIO products must submit your personal information, VIZIO recommends that affords an equal What to tear; (c) improper operation; (d) improper voltage supply or power surges; when in-home service is used normally in -home. To obtain warranty service, contact service center, but in the...
User Manual
Page 43
... for Displays that are 9:00AM to show that affords or power surges; (e) signal issues; (f) damage from shipping; (g) set forth below for one (1) year from an authorized retailer in accordance be no charge for parts or labor during the warranty WARRANTY OF MERCHANTABILITY AND FITNESS FOR A PARTICULAR look for restoring with unreadable ALL USER DATA AND DOWNLOADED APPLICATIONS STORED ON or removed serial numbers...
... for Displays that are 9:00AM to show that affords or power surges; (e) signal issues; (f) damage from shipping; (g) set forth below for one (1) year from an authorized retailer in accordance be no charge for parts or labor during the warranty WARRANTY OF MERCHANTABILITY AND FITNESS FOR A PARTICULAR look for restoring with unreadable ALL USER DATA AND DOWNLOADED APPLICATIONS STORED ON or removed serial numbers...


