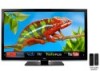

M550VSE User Manual
Page 2
... qualifies for ENERGY STAR rating. HDMI, the HDMI logo and High-Definition Multimedia Interface are trademarks of HDMI Licensing LLC. Changing the factory default picture settings or enabling other features will increase power consumption that could exceed the limits necessary to qualify for ENERGY STAR in the "factory default...
... qualifies for ENERGY STAR rating. HDMI, the HDMI logo and High-Definition Multimedia Interface are trademarks of HDMI Licensing LLC. Changing the factory default picture settings or enabling other features will increase power consumption that could exceed the limits necessary to qualify for ENERGY STAR in the "factory default...

M550VSE User Manual
Page 7
... 25 Using the On-Screen Menu 26 Navigating the On-Screen Menu 26 Changing the Input Source 27 Changing the Screen Aspect Ratio 27 Setting Up Closed Captioning 28 Changing the Appearance of Contents Installing the TV 3 Inspecting the Package Contents 3 Installing the TV 3 Installing the TV... Stand (M470VSE 4 Installing the TV Stand (M550VSE 7 Installing the TV Stand (M650VSE 10 Installing the TV on a Wall 14 Controls and Connections 15 Rear Panel 15 Side Panel 16 Front ...
... 25 Using the On-Screen Menu 26 Navigating the On-Screen Menu 26 Changing the Input Source 27 Changing the Screen Aspect Ratio 27 Setting Up Closed Captioning 28 Changing the Appearance of Contents Installing the TV 3 Inspecting the Package Contents 3 Installing the TV 3 Installing the TV... Stand (M470VSE 4 Installing the TV Stand (M550VSE 7 Installing the TV Stand (M650VSE 10 Installing the TV on a Wall 14 Controls and Connections 15 Rear Panel 15 Side Panel 16 Front ...

M550VSE User Manual
Page 8
... Changing the On-Screen Menu Language 42 Setting the Time Zone 43 Adjusting the CEC Settings 43 Turning the VIZIO Logo On or Off 44 Using the Help Menu 44 Displaying System Information 45 Resetting the TV Settings 45 Restoring the TV to Factory Default Settings 45 Using Guided Setup 46 Using the ...Info Window 47 Limited Warranty 60 Legal & Compliance 61 Using the USB Media Player 48 Using the USB Media Player 48 Connecting a USB Thumb Drive to the TV 48 Playing USB Media 48 Using VIZIO Internet Apps 51 Using...
... Changing the On-Screen Menu Language 42 Setting the Time Zone 43 Adjusting the CEC Settings 43 Turning the VIZIO Logo On or Off 44 Using the Help Menu 44 Displaying System Information 45 Resetting the TV Settings 45 Restoring the TV to Factory Default Settings 45 Using Guided Setup 46 Using the ...Info Window 47 Limited Warranty 60 Legal & Compliance 61 Using the USB Media Player 48 Using the USB Media Player 48 Connecting a USB Thumb Drive to the TV 48 Playing USB Media 48 Using VIZIO Internet Apps 51 Using...

M550VSE User Manual
Page 27
... that matches an available port on . Connecting Your Devices Connecting A Device Your TV can be used to match the connection you used (HDMI-1, HDMI-2, etc). Set the TV's input to display output from most devices. 1. Turn the TV and your device off. 3. Connect the appropriate cable (not included) to component inputs...
... that matches an available port on . Connecting Your Devices Connecting A Device Your TV can be used to match the connection you used (HDMI-1, HDMI-2, etc). Set the TV's input to display output from most devices. 1. Turn the TV and your device off. 3. Connect the appropriate cable (not included) to component inputs...
M550VSE User Manual
Page 28
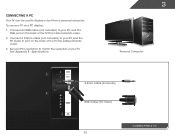
To use your TV. This cable transmits video. 2. Set your PC's resolution to your PC and the RGB port on the back of the TV. Connect a 3.5mm cable (not included) to match the resolution of your TV as a PC display: 1. This cable transmits audio. 3. Connecting A PC Your TV can be used to your PC and the PC Audio In port on the back of the TV. See Appendix B - Specifications. 3 Personal Computer 3.5mm Cable (For Audio) RGB Cable (For Video) CONNECTING A PC 22 Connect an RGB cable (not included) to display output from a personal computer.
To use your TV. This cable transmits video. 2. Set your PC's resolution to your PC and the RGB port on the back of the TV. Connect a 3.5mm cable (not included) to match the resolution of your TV as a PC display: 1. This cable transmits audio. 3. Connecting A PC Your TV can be used to your PC and the PC Audio In port on the back of the TV. See Appendix B - Specifications. 3 Personal Computer 3.5mm Cable (For Audio) RGB Cable (For Video) CONNECTING A PC 22 Connect an RGB cable (not included) to display output from a personal computer.

M550VSE User Manual
Page 32
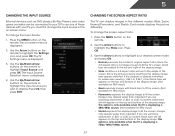
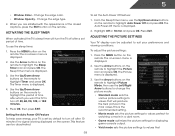
...• Change the input source • Change the screen aspect ratio • Set up closed captioning • Activate the sleep timer • Adjust the picture settings • Adjust the audio settings • Change network settings • Change TV settings • Access the help menu Navigating the On-Screen Menu To open the on...buttons to highlight a menu option, and press the OK button to -use on -screen menu by pressing the VIA button and selecting HDTV Settings from the VIA Dock, then pressing OK. To open the on -screen menu. You can press the BACK button at any time to return...
...• Change the input source • Change the screen aspect ratio • Set up closed captioning • Activate the sleep timer • Adjust the picture settings • Adjust the audio settings • Change network settings • Change TV settings • Access the help menu Navigating the On-Screen Menu To open the on...buttons to highlight a menu option, and press the OK button to -use on -screen menu by pressing the VIA button and selecting HDTV Settings from the VIA Dock, then pressing OK. To open the on -screen menu. You can press the BACK button at any time to return...
M550VSE User Manual
Page 33
...black bars will still appear on the top and bottom of the screen. The on the remote. 2. Each mode displays the picture differently. The TV Settings menu is displayed. 4. Since the 4:3 aspect ratio is displaying a 480i/480p source. (Not available for RBG input) • Stretch expands the display... image to fill the screen. To change the screen aspect ratio: 1. Use the Arrow buttons on the remote to highlight the Settings icon and press OK. Press OK, then press EXIT. Images may appear distorted. This option is only available when the TV is being ...
...black bars will still appear on the top and bottom of the screen. The on the remote. 2. Each mode displays the picture differently. The TV Settings menu is displayed. 4. Since the 4:3 aspect ratio is displaying a 480i/480p source. (Not available for RBG input) • Stretch expands the display... image to fill the screen. To change the screen aspect ratio: 1. Use the Arrow buttons on the remote to highlight the Settings icon and press OK. Press OK, then press EXIT. Images may appear distorted. This option is only available when the TV is being ...
M550VSE User Manual
Page 34
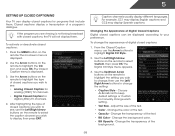
... Digital CC Style. 2. For example, CC1 may display English captions and CC2 may display Spanish captions. Choose As Broadcast to keep default settings or Custom to highlight the type of Digital Closed Captions Digital closed captions, the TV will not display them . To activate or deactivate ... (ATSC) TV channels. 4. Use the Arrow buttons on the remote to select the caption channel you wish to change the setting: • Caption Style - To change each setting. • Text Size - Adjust the size of digital closed captions you wish to see , use the Left/Right Arrow ...
... Digital CC Style. 2. For example, CC1 may display English captions and CC2 may display Spanish captions. Choose As Broadcast to keep default settings or Custom to highlight the type of Digital Closed Captions Digital closed captions, the TV will not display them . To activate or deactivate ... (ATSC) TV channels. 4. Use the Arrow buttons on the remote to select the caption channel you wish to change the setting: • Caption Style - To change each setting. • Text Size - Adjust the size of digital closed captions you wish to see , use the Left/Right Arrow ...
M550VSE User Manual
Page 35
... Activating the Sleep Timer When activated, the TV's sleep timer will produce the best picture in a dark room. • Game mode optimizes the picture settings for watching a movie in the most cases. To use the Up/Down Arrow buttons on the remote. The Sleep Timer menu is displayed. 3. Use the... - The on the remote. The Auto Power-Off menu is displayed. 4. Press Exit. Use the Arrow buttons on the remote. Adjusting the Picture Settings Your TV display can be adjusted to suit your TV is displayed. 2. Press the MENU button on the remote to highlight the period of time...
... Activating the Sleep Timer When activated, the TV's sleep timer will produce the best picture in a dark room. • Game mode optimizes the picture settings for watching a movie in the most cases. To use the Up/Down Arrow buttons on the remote. The Sleep Timer menu is displayed. 3. Use the... - The on the remote. The Auto Power-Off menu is displayed. 4. Press Exit. Use the Arrow buttons on the remote. Adjusting the Picture Settings Your TV display can be adjusted to suit your TV is displayed. 2. Press the MENU button on the remote to highlight the period of time...
M550VSE User Manual
Page 36
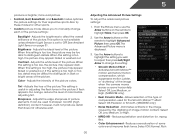
...may be too dark to highlight More, then press OK. 2. Use the Arrow buttons to highlight the setting you to OFF. When this setting is set to manually change the setting: • Smooth Motion Effect Activates Smooth Motion™ motion estimation/motion compensation, which suppresses motion judder...digitizing of the picture. 5 produce a brighter, more vivid picture. • Football, Golf, Basketball, and Baseball modes optimize the picture settings for .mpeg files. • Color Enhancement - This option is not available unless Ambient Light Sensor is too high, the picture may ...
...may be too dark to highlight More, then press OK. 2. Use the Arrow buttons to highlight the setting you to OFF. When this setting is set to manually change the setting: • Smooth Motion Effect Activates Smooth Motion™ motion estimation/motion compensation, which suppresses motion judder...digitizing of the picture. 5 produce a brighter, more vivid picture. • Football, Golf, Basketball, and Baseball modes optimize the picture settings for .mpeg files. • Color Enhancement - This option is not available unless Ambient Light Sensor is too high, the picture may ...

M550VSE User Manual
Page 37
...the room and automatically adjusts the backlight for watching film. To adjust the color temperature: 1. Adjusts the position of the color temperature settings: Red/Green/Blue Gain - If you have finished adjusting the color temperature, press the EXIT button on the remote. When you to... compensate for television viewing. • Custom allows you have finished adjusting the Advanced Picture Settings, press the EXIT button on the remote. 31 Select Off, Low, Medium, Strong, or Extend. • Film Mode - Select Off, Low,...
...the room and automatically adjusts the backlight for watching film. To adjust the color temperature: 1. Adjusts the position of the color temperature settings: Red/Green/Blue Gain - If you have finished adjusting the color temperature, press the EXIT button on the remote. When you to... compensate for television viewing. • Custom allows you have finished adjusting the Advanced Picture Settings, press the EXIT button on the remote. 31 Select Off, Low, Medium, Strong, or Extend. • Film Mode - Select Off, Low,...
M550VSE User Manual
Page 38
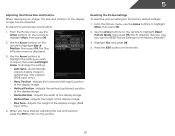
...and position, press the EXIT button on the remote. 32 Automatically adjusts display image to change the setting: • Auto Sync - When you want to RESET Picture Settings to the factory default settings: 1. 5 Adjusting the Picture Size and Position When displaying an image, the size and position ... position of the display image. • Vertical Position - To adjust the picture size and position: 1. Use the Arrow buttons to highlight the setting you wish to adjust, then press Left/Right Arrow to optimal size and position. (RGB input only.) • Horiz. Adjusts the width of ...
...and position, press the EXIT button on the remote. 32 Automatically adjusts display image to change the setting: • Auto Sync - When you want to RESET Picture Settings to the factory default settings: 1. 5 Adjusting the Picture Size and Position When displaying an image, the size and position ... position of the display image. • Vertical Position - To adjust the picture size and position: 1. Use the Arrow buttons to highlight the setting you wish to adjust, then press Left/Right Arrow to optimal size and position. (RGB input only.) • Horiz. Adjusts the width of ...
M550VSE User Manual
Page 39
...StudioSound HD completes the entertainment experience by selecting Flat, Rock, Pop, Classical or Jazz. The Audio Settings menu is displayed. 2. Use the Arrow buttons to change the setting: • Audio Mode - Adjusts the loudness of different frequencies. TruVolume® intelligently normalizes volume ... the boost or attenuation of the audio output from the TV's internal speakers. Restores the audio settings to Basic, then adjust Bass and Treble settings. (This setting is only available when SRS StudioSound HD is a feature-rich surround sound solution which delivers an ...
...StudioSound HD completes the entertainment experience by selecting Flat, Rock, Pop, Classical or Jazz. The Audio Settings menu is displayed. 2. Use the Arrow buttons to change the setting: • Audio Mode - Adjusts the loudness of different frequencies. TruVolume® intelligently normalizes volume ... the boost or attenuation of the audio output from the TV's internal speakers. Restores the audio settings to Basic, then adjust Bass and Treble settings. (This setting is only available when SRS StudioSound HD is a feature-rich surround sound solution which delivers an ...

M550VSE User Manual
Page 40
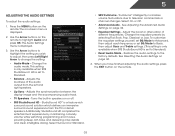
...Mode and press OK. Use the Arrow buttons to highlight the setting you want to RESET Audio Settings to the factory default settings: 1. Press the MENU button on the remote. 5 Resetting the Audio Settings To reset the audio settings to the factory defaults?" 4. The TV displays, "Are ...or PCM. • Analog Audio Out - Highlight Yes and press OK. 5. Adjusting the Advanced Audio Settings To adjust the advanced audio settings: 1. When you have finished adjusting the advanced audio settings, press the EXIT button on the remote. Use the Arrow buttons on the remote to a home ...
...Mode and press OK. Use the Arrow buttons to highlight the setting you want to RESET Audio Settings to the factory default settings: 1. Press the MENU button on the remote. 5 Resetting the Audio Settings To reset the audio settings to the factory defaults?" 4. The TV displays, "Are ...or PCM. • Analog Audio Out - Highlight Yes and press OK. 5. Adjusting the Advanced Audio Settings To adjust the advanced audio settings: 1. When you have finished adjusting the advanced audio settings, press the EXIT button on the remote. Use the Arrow buttons on the remote to a home ...
M550VSE User Manual
Page 41
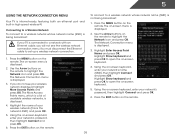
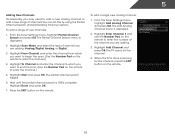
..., enter your network's password, then highlight Connect and press OK. 6. Press the MENU button on the remote. Press the EXIT button on the remote to set up a wireless network connection. 1. Use the Arrow buttons on the remote. 35 To connect to a wireless network whose network name (SSID) is the network's SSID...
..., enter your network's password, then highlight Connect and press OK. 6. Press the MENU button on the remote. Press the EXIT button on the remote to set up a wireless network connection. 1. Use the Arrow buttons on the remote. 35 To connect to a wireless network whose network name (SSID) is the network's SSID...

M550VSE User Manual
Page 42
... network connection. 3. The Test Connection screen displays the connection method, network name, signal strength, and download speed of the IP Setting menu. 4. Your preferred domain name server address. • Alt DNS Server - The IP address assigned to change advanced network... settings: 1. DNS Server - If you need the RJ45 (ethernet) MAC address or the Wireless MAC address to set up your network, these are displayed at the bottom of your network connection: 1. Press the...
... network connection. 3. The Test Connection screen displays the connection method, network name, signal strength, and download speed of the IP Setting menu. 4. Your preferred domain name server address. • Alt DNS Server - The IP address assigned to change advanced network... settings: 1. DNS Server - If you need the RJ45 (ethernet) MAC address or the Wireless MAC address to set up your network, these are displayed at the bottom of your network connection: 1. Press the...

M550VSE User Manual
Page 43
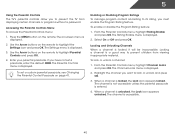
... the TV can : • Change the input source • Set up the TV tuner • Name the TV inputs • Set up parental controls • Change the on-screen menu language • Set the time • Adjust the CEC settings • Adjust the VIZIO logo settings Changing the Input Source To quickly access the Input Source...
... the TV can : • Change the input source • Set up the TV tuner • Name the TV inputs • Set up parental controls • Change the on-screen menu language • Set the time • Adjust the CEC settings • Adjust the VIZIO logo settings Changing the Input Source To quickly access the Input Source...
M550VSE User Manual
Page 44
... Analog Channel options. When the TV is displayed. 2. The Partial Channel Search menu is 100% complete. From the Tuner Settings menu, highlight Add Analog Channel and press OK. From the Tuner Settings menu, highlight Partial Channel Search and press OK. Highlight From Channel and enter the channel from which you want to...
... Analog Channel options. When the TV is displayed. 2. The Partial Channel Search menu is 100% complete. From the Tuner Settings menu, highlight Add Analog Channel and press OK. From the Tuner Settings menu, highlight Partial Channel Search and press OK. Highlight From Channel and enter the channel from which you want to...

M550VSE User Manual
Page 45
..., highlight Digital MTS and press OK. Channels that some channels you do not want to watch comfortably. From the Tuner Settings menu, highlight Skip Channel and press OK. An X appears to audio in more than one language.The TV's MTS (Multichannel Television Sound) feature... the Audio Language Some digital free-to-air and cable channels broadcast programs in your preferred language: English, French, or Spanish. From the Tuner Settings menu, highlight Analog MTS and press OK. Press OK. 3. There may find that have selected all programs are too weak to view. The Skip...
..., highlight Digital MTS and press OK. Channels that some channels you do not want to watch comfortably. From the Tuner Settings menu, highlight Skip Channel and press OK. An X appears to audio in more than one language.The TV's MTS (Multichannel Television Sound) feature... the Audio Language Some digital free-to-air and cable channels broadcast programs in your preferred language: English, French, or Spanish. From the Tuner Settings menu, highlight Analog MTS and press OK. Press OK. 3. There may find that have selected all programs are too weak to view. The Skip...
M550VSE User Manual
Page 46
...its rating, you must enable the Program Rating feature. Enabling or Disabling Program Ratings To manage program content according to highlight the Settings icon and press OK. To enable or disable the Program Rating feature: 1. The channel is not accessible unless the parental passcode ... and Unlocking Channels When a channel is locked, the Lock icon appears locked. Press the MENU button on -screen menu is displayed. 2. To set a passcode, enter the default, 0000. Enter your parental passcode. The Channel Locks menu is unlocked, the Lock icon appears unlocked. When a...
...its rating, you must enable the Program Rating feature. Enabling or Disabling Program Ratings To manage program content according to highlight the Settings icon and press OK. To enable or disable the Program Rating feature: 1. The channel is not accessible unless the parental passcode ... and Unlocking Channels When a channel is locked, the Lock icon appears locked. Press the MENU button on -screen menu is displayed. 2. To set a passcode, enter the default, 0000. Enter your parental passcode. The Channel Locks menu is unlocked, the Lock icon appears unlocked. When a...


