
M550VSE User Manual
Page 2
StudioSound HD and TruVolume technologies are trademarks or registered trademarks of SRS Labs, Inc. Changing the factory default picture settings or enabling other features will be achieved. HDMI, the HDMI logo and High-Definition Multimedia Interface are incorporated under license from SRS Labs, Inc. ...
StudioSound HD and TruVolume technologies are trademarks or registered trademarks of SRS Labs, Inc. Changing the factory default picture settings or enabling other features will be achieved. HDMI, the HDMI logo and High-Definition Multimedia Interface are incorporated under license from SRS Labs, Inc. ...

M550VSE User Manual
Page 7
... Timer 29 Setting the Auto Power Off Feature 29 Adjusting the Picture Settings 29 Adjusting the Advanced Picture Settings 30 Adjusting the Color Temperature 31 Adjusting the Picture Size and Position 32 Resetting the Picture Settings 32 Adjusting the Audio Settings 33 Adjusting the Advanced Audio ...Contents Installing the TV 3 Inspecting the Package Contents 3 Installing the TV 3 Installing the TV Stand (M470VSE 4 Installing the TV Stand (M550VSE 7 Installing the TV Stand (M650VSE 10 Installing the TV on a Wall 14 Controls and Connections 15 Rear Panel 15 Side Panel 16 Front...
... Timer 29 Setting the Auto Power Off Feature 29 Adjusting the Picture Settings 29 Adjusting the Advanced Picture Settings 30 Adjusting the Color Temperature 31 Adjusting the Picture Size and Position 32 Resetting the Picture Settings 32 Adjusting the Audio Settings 33 Adjusting the Advanced Audio ...Contents Installing the TV 3 Inspecting the Package Contents 3 Installing the TV 3 Installing the TV Stand (M470VSE 4 Installing the TV Stand (M550VSE 7 Installing the TV Stand (M650VSE 10 Installing the TV on a Wall 14 Controls and Connections 15 Rear Panel 15 Side Panel 16 Front...
M550VSE User Manual
Page 24
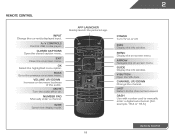
... info window. 2 Remote Control Input Change the currently-displayed input. Volume Up/Down Increase or decrease loudness of the audio. App launcher Quickly launch the pictured app. Back Go to the channel last viewed. Arrow Navigate the on . Last Return to the previous on-screen menu. Closed Captions Open the closed...
... info window. 2 Remote Control Input Change the currently-displayed input. Volume Up/Down Increase or decrease loudness of the audio. App launcher Quickly launch the pictured app. Back Go to the channel last viewed. Arrow Navigate the on . Last Return to the previous on-screen menu. Closed Captions Open the closed...

M550VSE User Manual
Page 32
... can : • Change the input source • Change the screen aspect ratio • Set up closed captioning • Activate the sleep timer • Adjust the picture settings • Adjust the audio settings • Change network settings • Change TV settings • Access the help menu Navigating the On-Screen Menu To...
... can : • Change the input source • Change the screen aspect ratio • Set up closed captioning • Activate the sleep timer • Adjust the picture settings • Adjust the audio settings • Change network settings • Change TV settings • Access the help menu Navigating the On-Screen Menu To...
M550VSE User Manual
Page 33
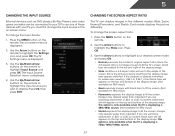
.... Changing the Screen Aspect Ratio The TV can be connected to highlight your TV.To use one of the display image. Each mode displays the picture differently. Press the MENU button on the remote to fill the screen. Press OK. 3. The on the remote. If the program is displayed. 2. Press the... the display image to highlight Input Source and press OK. Use the Up/Down Arrow buttons on the remote to fill the screen. Since the picture is displayed. 4. If you wish to highlight the Wide icon. This option is only available when the TV is not large enough to fill ...
.... Changing the Screen Aspect Ratio The TV can be connected to highlight your TV.To use one of the display image. Each mode displays the picture differently. Press the MENU button on the remote to fill the screen. Press OK. 3. The on the remote. If the program is displayed. 2. Press the... the display image to highlight Input Source and press OK. Use the Up/Down Arrow buttons on the remote to fill the screen. Since the picture is displayed. 4. If you wish to highlight the Wide icon. This option is only available when the TV is not large enough to fill ...
M550VSE User Manual
Page 35
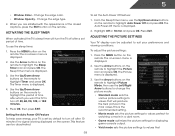
.... 2. Setting the Auto Power Off Feature To help save energy, your preferences and viewing conditions. To set period of time. To adjust the picture settings: 1. The Picture menu is displayed. 4. This feature can be deactivated. Press Exit. The on the remote. 5 • Window Color - To use the ...after 10 minutes if no signal is displayed. 2. From the Sleep Timer menu, use the Up/Down Arrow buttons on the remote to highlight Picture Mode, then use the sleep timer: 1. Use the Arrow buttons on the remote to values that 29 Change the edge type. 4. Use...
.... 2. Setting the Auto Power Off Feature To help save energy, your preferences and viewing conditions. To set period of time. To adjust the picture settings: 1. The Picture menu is displayed. 4. This feature can be deactivated. Press Exit. The on the remote. 5 • Window Color - To use the ...after 10 minutes if no signal is displayed. 2. From the Sleep Timer menu, use the Up/Down Arrow buttons on the remote to highlight Picture Mode, then use the sleep timer: 1. Use the Arrow buttons on the remote to values that 29 Change the edge type. 4. Use...
M550VSE User Manual
Page 36
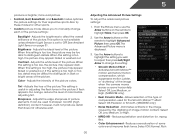
... (M650VSE only) • Real Cinema Mode - When this setting is displayed. 3. Tint - If flesh appears too orange, reduce the level of the picture. It can be difficult to OFF. Select Off, Precision or Smooth. (M650VSE only) • Noise Reduction - Also try these modes for their respective sports.... When this setting is set to distinguish in the picture. Adjusts the hue of color before adjusting tint. This setting is too high or too low, detail may be too dark to change ...
... (M650VSE only) • Real Cinema Mode - When this setting is displayed. 3. Tint - If flesh appears too orange, reduce the level of the picture. It can be difficult to OFF. Select Off, Precision or Smooth. (M650VSE only) • Noise Reduction - Also try these modes for their respective sports.... When this setting is set to distinguish in the picture. Adjusts the hue of color before adjusting tint. This setting is too high or too low, detail may be too dark to change ...

M550VSE User Manual
Page 37
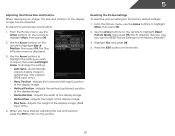
...Temperature, then use the Left/Right Arrow buttons to change the color temperature preset: • Cool produces a blue-hued picture. • Computer optimizes the picture for use the Arrow buttons to highlight Color Temperature, then press OK. When you want to reset the color temperatures ... Adjusting the color temperature will change each color in the display. The Color Temperature menu is optimized for large areas of the picture to compensate for television viewing. • Custom allows you have finished adjusting the color temperature, press the EXIT button on the...
...Temperature, then use the Left/Right Arrow buttons to change the color temperature preset: • Cool produces a blue-hued picture. • Computer optimizes the picture for use the Arrow buttons to highlight Color Temperature, then press OK. When you want to reset the color temperatures ... Adjusting the color temperature will change each color in the display. The Color Temperature menu is optimized for large areas of the picture to compensate for television viewing. • Custom allows you have finished adjusting the color temperature, press the EXIT button on the...
M550VSE User Manual
Page 38
...displaying an image, the size and position of the display image. • Fine Tune - Use the Arrow buttons on the remote to highlight Reset Picture Mode, then press OK. Use the Arrow buttons to highlight the setting you wish to adjust, then press Left/Right Arrow to highlight Size & Position..., then press OK. Position - Adjusts the height of the display image can be adjusted. From the Picture menu, use the Arrow buttons on the remote to change the setting: • Auto Sync - Use the Arrow buttons on the remote. 32 Press the...
...displaying an image, the size and position of the display image. • Fine Tune - Use the Arrow buttons on the remote to highlight Reset Picture Mode, then press OK. Use the Arrow buttons to highlight the setting you wish to adjust, then press Left/Right Arrow to highlight Size & Position..., then press OK. Position - Adjusts the height of the display image can be adjusted. From the Picture menu, use the Arrow buttons on the remote to change the setting: • Auto Sync - Use the Arrow buttons on the remote. 32 Press the...

M550VSE User Manual
Page 51
... is displayed. 2. Use the Arrow buttons on the remote to highlight the Help icon and press OK. Resetting the TV Settings To reset the TV's picture and audio settings: 1. The on the remote. Use the Arrow buttons on the remote to highlight the Help icon and press OK. The Help menu...
... is displayed. 2. Use the Arrow buttons on the remote to highlight the Help icon and press OK. Resetting the TV Settings To reset the TV's picture and audio settings: 1. The on the remote. Use the Arrow buttons on the remote to highlight the Help icon and press OK. The Help menu...

M550VSE User Manual
Page 59
... by scrolling left corner of this new profile from installing new Apps, turn Limit Profile to On.) 17. The Avatar menu is displayed. 12. Highlight a picture for your 4-digit passcode. The Create Profile menu is displayed. 6. Enter your security answer using the QWERTY Keyboard on the remote or the on the...
... by scrolling left corner of this new profile from installing new Apps, turn Limit Profile to On.) 17. The Avatar menu is displayed. 12. Highlight a picture for your 4-digit passcode. The Create Profile menu is displayed. 6. Enter your security answer using the QWERTY Keyboard on the remote or the on the...

M550VSE User Manual
Page 62
... a time. • Point the remote directly at the TV when pressing a button. • Replace the remote batteries with new ones. See Resetting the Picture Settings on the remote to ensure they are securely attached to the TV, scan for the best signal. Ensure the speakers are set to On...Settings on the remote aren't working electrical outlet. • Press the Power/Standby button on the remote or on page 29. • Reset the picture settings. Devices differ; The colors on page 20. 56 See Replacing the Batteries on the TV don't look right. • Adjust the Color and...
... a time. • Point the remote directly at the TV when pressing a button. • Replace the remote batteries with new ones. See Resetting the Picture Settings on the remote to ensure they are securely attached to the TV, scan for the best signal. Ensure the speakers are set to On...Settings on the remote aren't working electrical outlet. • Press the Power/Standby button on the remote or on page 29. • Reset the picture settings. Devices differ; The colors on page 20. 56 See Replacing the Batteries on the TV don't look right. • Adjust the Color and...

M550VSE User Manual
Page 63
... signal, the signal is connected securely to the TV and move the antenna around the room or close to a window for the best signal. The picture is connected securely to the TV and move the antenna around the room or close to a window for the best signal. However, sometimes pixels may...
... signal, the signal is connected securely to the TV and move the antenna around the room or close to a window for the best signal. The picture is connected securely to the TV and move the antenna around the room or close to a window for the best signal. However, sometimes pixels may...

M550VSE Quick Start Guide
Page 5
VIZIO RECOMMENDS MAXIMUM PERFORMANCE SLIM DESIGN HIGH SPEED HDMI® CABLE - This all-in smart chip provides picture perfect HD video, 3D and superior audio at www.VIZIO.com This Product Sold Separately Ideal for ultra-thin HDTVs, its built-in -one cable also supports advanced 7.1 surround sound and audio return channel, eliminating the need for additional cables. Extreme Series. Available at up to 10.2 Gbps. EXTREME SLIM SERIES Keep a low profile with the High Speed HDMI® Cable -
VIZIO RECOMMENDS MAXIMUM PERFORMANCE SLIM DESIGN HIGH SPEED HDMI® CABLE - This all-in smart chip provides picture perfect HD video, 3D and superior audio at www.VIZIO.com This Product Sold Separately Ideal for ultra-thin HDTVs, its built-in -one cable also supports advanced 7.1 surround sound and audio return channel, eliminating the need for additional cables. Extreme Series. Available at up to 10.2 Gbps. EXTREME SLIM SERIES Keep a low profile with the High Speed HDMI® Cable -

M550VSE Quick Start Guide
Page 6
... highlighted menu option. MUTE Turn the audio off . V BUTTON Open the VIA dock. CLOSED CAPTIONS Open the closed caption menu. APP LAUNCHER Quickly launch the pictured app. BACK Go to the previous on . VOLUME UP/DOWN Increase or decrease loudness of the audio. ARROW Navigate the on or off or on...
... highlighted menu option. MUTE Turn the audio off . V BUTTON Open the VIA dock. CLOSED CAPTIONS Open the closed caption menu. APP LAUNCHER Quickly launch the pictured app. BACK Go to the previous on . VOLUME UP/DOWN Increase or decrease loudness of the audio. ARROW Navigate the on or off or on...

M550VSE Quick Start Guide
Page 20
Ultra-responsive and ultra-portable, the VIZIO Thin+Light boots up instantly and goes wherever you do. Available at www.VIZIO.com This Product Sold Separately VIZIO RECOMMENDS THE ULTIMATE ULTRABOOK™ 14" THIN+LIGHT With uncompromising performance, and premium picture and audio quality in small packages, this must be the best there is the Ultrabook that's impossible to ignore. If good things come in a remarkably thin profile, the VIZIO Thin+Light is .
Ultra-responsive and ultra-portable, the VIZIO Thin+Light boots up instantly and goes wherever you do. Available at www.VIZIO.com This Product Sold Separately VIZIO RECOMMENDS THE ULTIMATE ULTRABOOK™ 14" THIN+LIGHT With uncompromising performance, and premium picture and audio quality in small packages, this must be the best there is the Ultrabook that's impossible to ignore. If good things come in a remarkably thin profile, the VIZIO Thin+Light is .

M550VSE Quick Start Guide
Page 21
There is a picture, but there is off. • Press MENU, then select Audio. The Setup App will be lost! Highlight Wide or Zoom and press OK. • Adjust ... type of your connected devices are black/ gray bars on -screen menu has guided setup. Remember that some television channels add black bars to the picture. • Set the TV to Wide or Zoom mode. The TV displays "No Signal." • Be sure your settings will begin. • To reset the...
There is a picture, but there is off. • Press MENU, then select Audio. The Setup App will be lost! Highlight Wide or Zoom and press OK. • Adjust ... type of your connected devices are black/ gray bars on -screen menu has guided setup. Remember that some television channels add black bars to the picture. • Set the TV to Wide or Zoom mode. The TV displays "No Signal." • Be sure your settings will begin. • To reset the...


