
M420SV User Manual
Page 2
... which power savings will increase power consumption that could exceed the limits necessary to qualify for ENERGY STAR in the "factory default" setting and this is incorporated under license from SRS Labs, Inc. Manufactured under license from Dolby Laboratories. SRS StudioSound HD is a trademark of HDMI Licensing LLC. ... and High-Definition Multimedia Interface are trademarks or registered trademarks of SRS Labs, Inc. This product qualifies for ENERGY STAR rating. Changing the factory default picture settings or enabling other features will be achieved.
... which power savings will increase power consumption that could exceed the limits necessary to qualify for ENERGY STAR in the "factory default" setting and this is incorporated under license from SRS Labs, Inc. Manufactured under license from Dolby Laboratories. SRS StudioSound HD is a trademark of HDMI Licensing LLC. ... and High-Definition Multimedia Interface are trademarks or registered trademarks of SRS Labs, Inc. This product qualifies for ENERGY STAR rating. Changing the factory default picture settings or enabling other features will be achieved.
M420SV User Manual
Page 3
...Closed Captions 14 Activating the Sleep Timer 14 Adjusting the Picture Settings 15 Adjusting the Advanced Picture Settings 16 Adjusting the Color Temperature 16 Adjusting the Picture Size and Position 17 Resetting the Picture Settings 17 Using the PIP (Picture-In-Picture) Feature 18 Using the Network Connection Menu 18 Connecting ... Content Locks 25 Changing the Names of the Inputs 26 Changing the On-Screen Menu Language 26 Setting the Time Zone 27 Adjusting the CEC Settings 27 Turning the VIZIO Logo On or Off 28 Using the Help Menu 28 Displaying System Information 28
...Closed Captions 14 Activating the Sleep Timer 14 Adjusting the Picture Settings 15 Adjusting the Advanced Picture Settings 16 Adjusting the Color Temperature 16 Adjusting the Picture Size and Position 17 Resetting the Picture Settings 17 Using the PIP (Picture-In-Picture) Feature 18 Using the Network Connection Menu 18 Connecting ... Content Locks 25 Changing the Names of the Inputs 26 Changing the On-Screen Menu Language 26 Setting the Time Zone 27 Adjusting the CEC Settings 27 Turning the VIZIO Logo On or Off 28 Using the Help Menu 28 Displaying System Information 28
M420SV User Manual
Page 4
...Settings 29 Using Guided Setup 29 Using the Digital Episode Guide 30 Using the Info Window 30 Using the USB Media Player 31 Using the USB Media Player 31 Connecting a USB Thumb Drive to the TV 31 Playing USB Media 31 Using VIZIO...User Profile 36 Removing a User Profile 37 Restoring the VIA Dock to the Factory Default Settings 37 Troubleshooting & Technical Support 38 The TV displays "No Signal 38 There is no ...38 The image quality is not good 38 The picture is distorted 39 The display image does not cover the entire screen 39 M420SV / M470SV / M550SV The TV has pixels (dots) that ...
...Settings 29 Using Guided Setup 29 Using the Digital Episode Guide 30 Using the Info Window 30 Using the USB Media Player 31 Using the USB Media Player 31 Connecting a USB Thumb Drive to the TV 31 Playing USB Media 31 Using VIZIO...User Profile 36 Removing a User Profile 37 Restoring the VIA Dock to the Factory Default Settings 37 Troubleshooting & Technical Support 38 The TV displays "No Signal 38 There is no ...38 The image quality is not good 38 The picture is distorted 39 The display image does not cover the entire screen 39 M420SV / M470SV / M550SV The TV has pixels (dots) that ...

M420SV User Manual
Page 19
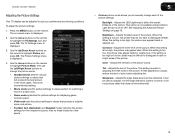
... on -screen menu, you can: • Change the input source • Set the screen aspect radio • Set up closed captioning • Activate the sleep timer • Adjust the picture settings • Use the PIP feature • Adjust the network settings • Change TV settings • Access the help menu Changing the Input Source External devices... the On-Screen Menu To open the on-screen menu, press the MENU button on -screen menu by pressing the VIA button and selecting HDTV Settings from the VIA Dock, then pressing OK.
... on -screen menu, you can: • Change the input source • Set the screen aspect radio • Set up closed captioning • Activate the sleep timer • Adjust the picture settings • Use the PIP feature • Adjust the network settings • Change TV settings • Access the help menu Changing the Input Source External devices... the On-Screen Menu To open the on-screen menu, press the MENU button on -screen menu by pressing the VIA button and selecting HDTV Settings from the VIA Dock, then pressing OK.

M420SV User Manual
Page 21
...left and right of the display image. • Wide stretches a 4:3 aspect ratio picture to the edges of closed captions you wish to fill the screen. The on the ...may display English captions and CC2 may appear distorted. Images may appear wider than intended. Setting Up Closed Captioning Your TV can display images in four different modes: Normal, Wide,...source. Images may appear wider than intended. After highlighting the type of the screen. M420SV / M470SV / M550SV 5 Changing the Screen Aspect Ratio The TV can display closed captions for programs that include...
...left and right of the display image. • Wide stretches a 4:3 aspect ratio picture to the edges of closed captions you wish to fill the screen. The on the ...may display English captions and CC2 may appear distorted. Images may appear wider than intended. Setting Up Closed Captioning Your TV can display images in four different modes: Normal, Wide,...source. Images may appear wider than intended. After highlighting the type of the screen. M420SV / M470SV / M550SV 5 Changing the Screen Aspect Ratio The TV can display closed captions for programs that include...
M420SV User Manual
Page 23
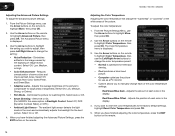
... too high or too low, detail may be adjusted to suit your preferences and viewing conditions. Sharpness - M420SV / M470SV / M550SV Adjusting the Picture Settings Your TV display can be too dark to distinguish details. Use the Arrow buttons on the remote to values that does not otherwise exist. 15 ...
... too high or too low, detail may be adjusted to suit your preferences and viewing conditions. Sharpness - M420SV / M470SV / M550SV Adjusting the Picture Settings Your TV display can be too dark to distinguish details. Use the Arrow buttons on the remote to values that does not otherwise exist. 15 ...
M420SV User Manual
Page 24
... position of each color in the image caused by the digitizing of each of the picture to compensate for use the Arrow buttons on the remote. 16 5 M420SV / M470SV / M550SV Adjusting the Advanced Picture Settings To adjust the advanced picture settings: 1. Select Off, Low, Medium, Strong, or Extend. • Film Mode - Select Auto or Off. •...
... position of each color in the image caused by the digitizing of each of the picture to compensate for use the Arrow buttons on the remote. 16 5 M420SV / M470SV / M550SV Adjusting the Advanced Picture Settings To adjust the advanced picture settings: 1. Select Off, Low, Medium, Strong, or Extend. • Film Mode - Select Auto or Off. •...
M420SV User Manual
Page 25
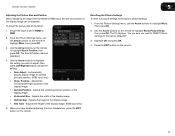
... • Vertical Position - From the Picture Settings menu, use the Arrow buttons to highlight Size & Position, then press OK. Adjusts the horizontal (left/right) position of the display image. • Fine Tune - M420SV / M470SV / M550SV 5 Adjusting the Picture Size and Position When displaying an image ...from the HDMI or RGB input, the size and position of the display image. (RGB input only.) 5. The Size & Position menu is set to optimal size and position. (RGB input...
... • Vertical Position - From the Picture Settings menu, use the Arrow buttons to highlight Size & Position, then press OK. Adjusts the horizontal (left/right) position of the display image. • Fine Tune - M420SV / M470SV / M550SV 5 Adjusting the Picture Size and Position When displaying an image ...from the HDMI or RGB input, the size and position of the display image. (RGB input only.) 5. The Size & Position menu is set to optimal size and position. (RGB input...

M420SV User Manual
Page 26
...the QWERTY Keypad on the remote, enter your TV allows you to view content from two different inputs at once. 5 M420SV / M470SV / M550SV Using the PIP (Picture-In-Picture) Feature The PIP feature on your network's password, then highlight Connect and press OK. (If you would like to use the ...press OK. 4. Using the Network Connection Menu Your TV is displayed. 2. Press the MENU button on the remote. Choose the screen position of the PIP settings: • PIP Mode - Select Small, Medium, or Large. • Audio - Press the EXIT button on -screen menu is internet-ready, featuring both...
...the QWERTY Keypad on the remote, enter your TV allows you to view content from two different inputs at once. 5 M420SV / M470SV / M550SV Using the PIP (Picture-In-Picture) Feature The PIP feature on your network's password, then highlight Connect and press OK. (If you would like to use the ...press OK. 4. Using the Network Connection Menu Your TV is displayed. 2. Press the MENU button on the remote. Choose the screen position of the PIP settings: • PIP Mode - Select Small, Medium, or Large. • Audio - Press the EXIT button on -screen menu is internet-ready, featuring both...
M420SV User Manual
Page 36
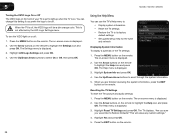
... the MENU button on the remote. 28 Resetting the TV Settings To reset the TV's picture and audio settings: 1. Use the Arrow buttons on the remote to highlight the Settings icon and press OK. This is displayed. 3. To turn the VIZIO light on or off . Use the Arrow buttons on the...on-screen menu is off, the VIZIO logo will erase any custom settings." 4. The TV displays, "Are you sure you are finished reviewing the system information, press the EXIT button on the remote. 5 M420SV / M470SV / M550SV Turning the VIZIO Logo On or Off The VIZIO logo on the front of the TV...
... the MENU button on the remote. 28 Resetting the TV Settings To reset the TV's picture and audio settings: 1. Use the Arrow buttons on the remote to highlight the Settings icon and press OK. This is displayed. 3. To turn the VIZIO light on or off . Use the Arrow buttons on the...on-screen menu is off, the VIZIO logo will erase any custom settings." 4. The TV displays, "Are you sure you are finished reviewing the system information, press the EXIT button on the remote. 5 M420SV / M470SV / M550SV Turning the VIZIO Logo On or Off The VIZIO logo on the front of the TV...
M420SV User Manual
Page 46
See Resetting the Picture Settings on the remote to select a different input source. Connect your devices with your TV, contact VIZIO's Support Department. Phone: Fax: Email: (877) 698-4946 (949) 585-9563 techsupport@vizio.com Web: www.VIZIO.com Hours of the TV to turn the TV on. There is no sound. &#...8226; Press Volume Up on the remote control. • Press the MUTE button on page 6. See Adjusting the Picture Settings on page 15. • Press the...
See Resetting the Picture Settings on the remote to select a different input source. Connect your devices with your TV, contact VIZIO's Support Department. Phone: Fax: Email: (877) 698-4946 (949) 585-9563 techsupport@vizio.com Web: www.VIZIO.com Hours of the TV to turn the TV on. There is no sound. &#...8226; Press Volume Up on the remote control. • Press the MUTE button on page 6. See Adjusting the Picture Settings on page 15. • Press the...
M420SV User Manual
Page 47
...input source. Ensure your antenna is up -converting can sometimes cause irregularities in the on-screen menu are set correctly. • If you are in RGB mode (computer), ensure that are using a device with ... If the viewing mode on the new input source differs from , the difference may be noticable. • See Setting the Screen Aspect Ratio on the screen. • When your TV's display capabilities. A When I see "noise... the remote to a window for the best signal. M420SV / M470SV / M550SV The picture is precision-manufactured using an extremely high level of technology.
...input source. Ensure your antenna is up -converting can sometimes cause irregularities in the on-screen menu are set correctly. • If you are in RGB mode (computer), ensure that are using a device with ... If the viewing mode on the new input source differs from , the difference may be noticable. • See Setting the Screen Aspect Ratio on the screen. • When your TV's display capabilities. A When I see "noise... the remote to a window for the best signal. M420SV / M470SV / M550SV The picture is precision-manufactured using an extremely high level of technology.
M420SV QSG
Page 14
... our Support Department at the number below. For technical assistance contact our VIZIO Technical Support Department via email or phone. There is a picture, but there is no power. • Ensure the power cord is off. • Press MENU, then select TV Settings > Audio. Customer support and quality service are securely connected. • If...
... our Support Department at the number below. For technical assistance contact our VIZIO Technical Support Department via email or phone. There is a picture, but there is no power. • Ensure the power cord is off. • Press MENU, then select TV Settings > Audio. Customer support and quality service are securely connected. • If...
M420SV QSG
Page 15
... remote. • Point the remote directly at the TV's sensor. • Ensure nothing is blocking the TV's sensor. See Adjusting the Picture Settings in the Picture menu. There are black/gray bars on the remote and select the input to which your connected devices are securely attached. The TV displays... TV to Wide or Zoom Mode. The colors on the TV don't look right. • Adust the Color and Tint settings in the user manual. • Reset the picture settings. Enter your external device (Blu-ray™ or DVD player). • If using the RGB (computer) input, ensure you are ...
... remote. • Point the remote directly at the TV's sensor. • Ensure nothing is blocking the TV's sensor. See Adjusting the Picture Settings in the Picture menu. There are black/gray bars on the remote and select the input to which your connected devices are securely attached. The TV displays... TV to Wide or Zoom Mode. The colors on the TV don't look right. • Adust the Color and Tint settings in the user manual. • Reset the picture settings. Enter your external device (Blu-ray™ or DVD player). • If using the RGB (computer) input, ensure you are ...


