
M3D550KDE User Manual
Page 4
... least three feet should be replaced when using dropped or damaged appliances. Wait before cleaning your TV. • When moving your TV. The manufacturer's warranty does not cover user abuse or improper installations. • The power cord must be maintained between your TV cabinet. To totally disconnect power, unplug the power cord. • The lightning flash with arrowhead symbol within an...
... least three feet should be replaced when using dropped or damaged appliances. Wait before cleaning your TV. • When moving your TV. The manufacturer's warranty does not cover user abuse or improper installations. • The power cord must be maintained between your TV cabinet. To totally disconnect power, unplug the power cord. • The lightning flash with arrowhead symbol within an...

M3D550KDE User Manual
Page 5
... with instructions. These servicing instructions are for repair. Your TV is used for moving your TV. • When unplugging your TV, hold the AC/DC power adapter, not the cord. Ensure that the power cord and any other cables are qualified to rain or other than that may cause fire or electric shock. • Do not install your TV in the operating instructions unless...
... with instructions. These servicing instructions are for repair. Your TV is used for moving your TV. • When unplugging your TV, hold the AC/DC power adapter, not the cord. Ensure that the power cord and any other cables are qualified to rain or other than that may cause fire or electric shock. • Do not install your TV in the operating instructions unless...

M3D550KDE User Manual
Page 7
... 810-21) Ground Clamps Power Service Grounding Electrode System (NEC ART 250, part H) Article 810 of the National Electrical Code, ANSI/NFPSA 70, provides information with regard to proper grounding of the mast and supporting structure, grounding of the lead-in the building installation. Television Antenna Connection Protection If an outside antenna/satellite dish or cable system is to be...
... 810-21) Ground Clamps Power Service Grounding Electrode System (NEC ART 250, part H) Article 810 of the National Electrical Code, ANSI/NFPSA 70, provides information with regard to proper grounding of the mast and supporting structure, grounding of the lead-in the building installation. Television Antenna Connection Protection If an outside antenna/satellite dish or cable system is to be...
M3D550KDE User Manual
Page 8
...Changing the Input Source 30 Setting the Tuner Mode 31 Scanning for Channels 31 Adding New Channels 31 Skipping Channels 32 Changing the Audio Language 33 Using the Parental Controls 33 Accessing the Parental Controls Menu 33 Enabling or Disabling Program Ratings 34 Locking and Unlocking Channels 34 Blocking and Unblocking Content by Rating 34 Changing the Parental Control Passcode 35 1 FRONT (Model M3D550KDE 11 Remote Control - Back (Model M3D470KDE 10 Remote Control - FRONT (Model M3D470KDE 9 Remote Control - Table of Digital Closed Captions.. 22 Activating the Sleep...
...Changing the Input Source 30 Setting the Tuner Mode 31 Scanning for Channels 31 Adding New Channels 31 Skipping Channels 32 Changing the Audio Language 33 Using the Parental Controls 33 Accessing the Parental Controls Menu 33 Enabling or Disabling Program Ratings 34 Locking and Unlocking Channels 34 Blocking and Unblocking Content by Rating 34 Changing the Parental Control Passcode 35 1 FRONT (Model M3D550KDE 11 Remote Control - Back (Model M3D470KDE 10 Remote Control - FRONT (Model M3D470KDE 9 Remote Control - Table of Digital Closed Captions.. 22 Activating the Sleep...

M3D550KDE User Manual
Page 9
... Locks 35 Changing the Names of the Inputs 35 Changing the On-Screen Menu Language 36 Setting the Time Zone 36 Adjusting the CEC Settings 37 Using the Help Menu 37 Displaying System Information 38 Resetting the TV Settings 38 Restoring the TV to Factory Default Settings 38 Using Guided Setup 39 Using the Info Window 40 Using the USB Media Player 41 Using the USB Media Player 41 Connecting a USB Thumb Drive to the TV 41 Playing USB Media 41 Using VIZIO Internet Apps 44 Using the VIA Shortcut Buttons...
... Locks 35 Changing the Names of the Inputs 35 Changing the On-Screen Menu Language 36 Setting the Time Zone 36 Adjusting the CEC Settings 37 Using the Help Menu 37 Displaying System Information 38 Resetting the TV Settings 38 Restoring the TV to Factory Default Settings 38 Using Guided Setup 39 Using the Info Window 40 Using the USB Media Player 41 Using the USB Media Player 41 Connecting a USB Thumb Drive to the TV 41 Playing USB Media 41 Using VIZIO Internet Apps 44 Using the VIA Shortcut Buttons...
M3D550KDE User Manual
Page 12
.... 5 Specifications for your TV. 2. M3D470KDE M3D550KDE Screw Size: Screw Pitch: Screw Length: Hole Pattern: M6 1.0mm 20mm 400mm (V) x 400mm (H) M6 1.0mm 20mm 400mm (V) x 400mm (H) Be sure the mount you will need a wall mount. Disconnect any cables connected to the wall, carefully following the instructions that can begin the installation. 1 Installing the TV on a Wall To mount your TV on a clean, flat, stable surface. Attach your mount. Use only with your TV and wall mount...
.... 5 Specifications for your TV. 2. M3D470KDE M3D550KDE Screw Size: Screw Pitch: Screw Length: Hole Pattern: M6 1.0mm 20mm 400mm (V) x 400mm (H) M6 1.0mm 20mm 400mm (V) x 400mm (H) Be sure the mount you will need a wall mount. Disconnect any cables connected to the wall, carefully following the instructions that can begin the installation. 1 Installing the TV on a Wall To mount your TV on a clean, flat, stable surface. Attach your mount. Use only with your TV and wall mount...
M3D550KDE User Manual
Page 16
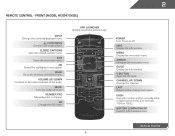
.... A/V Controls Control USB media player. App launcher Quickly launch the pictured app. 3D Power Turn TV on or off or on. Dash Use with number pad to the channel last viewed. Remote Control 9 Exit Close the on -screen menu. Info Display the info window. Back Go to the previous on -screen menu. Number Pad Manually enter a channel. 3D Change the 3D mode. Menu Display the on -screen menu. Channel Up/Down Change the channel. V Button Open the VIA dock. Arrow Navigate the on -screen menu. Closed Captions Open...
.... A/V Controls Control USB media player. App launcher Quickly launch the pictured app. 3D Power Turn TV on or off or on. Dash Use with number pad to the channel last viewed. Remote Control 9 Exit Close the on -screen menu. Info Display the info window. Back Go to the previous on -screen menu. Number Pad Manually enter a channel. 3D Change the 3D mode. Menu Display the on -screen menu. Channel Up/Down Change the channel. V Button Open the VIA dock. Arrow Navigate the on -screen menu. Closed Captions Open...

M3D550KDE User Manual
Page 18
... Buttons Control VIZIO Internet Apps. Number Pad Manually enter a channel. 3D Change the 3D mode. 11 2 device power Turn a connected device on -screen menu. Info Display the info window. Arrow Navigate the on or off . Channel Up/Down Change the channel. Remote Control - Guide Display the info window. Menu Display the on -screen menu. A/V Controls Control USB photo slideshow and V.I .A. Exit Close the on -screen menu. Volume Up/Down Increase or decrease loudness of the TV audio. apps. V Button Open the VIZIO Internet Apps dock. V.I .A. Mute Turn the sound...
... Buttons Control VIZIO Internet Apps. Number Pad Manually enter a channel. 3D Change the 3D mode. 11 2 device power Turn a connected device on -screen menu. Info Display the info window. Arrow Navigate the on or off . Channel Up/Down Change the channel. Remote Control - Guide Display the info window. Menu Display the on -screen menu. A/V Controls Control USB photo slideshow and V.I .A. Exit Close the on -screen menu. Volume Up/Down Increase or decrease loudness of the TV audio. apps. V Button Open the VIZIO Internet Apps dock. V.I .A. Mute Turn the sound...

M3D550KDE User Manual
Page 29
.... • Color - The Digital CC Style menu appears. 3. Adjust the size of Digital Closed Captions Digital closed captions can be displayed according to your TV is being displayed on the remote to turn off: 30, 60, 90, 120, or 180 minutes. 5. Change the transparency of the text. • BG Color - Change the edge type. 4. Press the MENU button on the remote to change the setting: • Caption Style - The Sleep Timer menu is displayed. 2. Setting the Auto Power Off Feature To help save...
.... • Color - The Digital CC Style menu appears. 3. Adjust the size of Digital Closed Captions Digital closed captions can be displayed according to your TV is being displayed on the remote to turn off: 30, 60, 90, 120, or 180 minutes. 5. Change the transparency of the text. • BG Color - Change the edge type. 4. Press the MENU button on the remote to change the setting: • Caption Style - The Sleep Timer menu is displayed. 2. Setting the Auto Power Off Feature To help save...

M3D550KDE User Manual
Page 30
... displayed. 3. Color - Tint - however, it will not produce detail that will produce the best picture in dark or bright areas of the picture. To adjust the picture settings: 1. The on the remote to highlight Picture Mode, then use the Left/Right Arrow buttons to change each of the picture. Use the Arrow buttons on -screen menu is useful in adjusting the flesh tones in a dark room. • Game mode optimizes the picture settings for displaying game console output...
... displayed. 3. Color - Tint - however, it will not produce detail that will produce the best picture in dark or bright areas of the picture. To adjust the picture settings: 1. The on the remote to highlight Picture Mode, then use the Left/Right Arrow buttons to change each of the picture. Use the Arrow buttons on -screen menu is useful in adjusting the flesh tones in a dark room. • Game mode optimizes the picture settings for displaying game console output...

M3D550KDE User Manual
Page 33
... MENU button on -screen menu is displayed. 3. The on the remote. Adjusts the loudness of the audio output from the left and right speakers. • Lip Sync - See Adjusting the Advanced Audio Settings on the remote to highlight Reset Picture Mode, then press OK. Restores the audio settings to the factory default settings: 1. Adjusting the Audio Settings To adjust the audio settings: 1. The Audio Settings menu is displayed. 2. Turns bluetooth audio on or off . (For M3D550KDE only) • Reset Audio Mode - Use the Arrow buttons on page 27. • Bluetooth Audio...
... MENU button on -screen menu is displayed. 3. The on the remote. Adjusts the loudness of the audio output from the left and right speakers. • Lip Sync - See Adjusting the Advanced Audio Settings on the remote to highlight Reset Picture Mode, then press OK. Restores the audio settings to the factory default settings: 1. Adjusting the Audio Settings To adjust the audio settings: 1. The Audio Settings menu is displayed. 2. Turns bluetooth audio on or off . (For M3D550KDE only) • Reset Audio Mode - Use the Arrow buttons on page 27. • Bluetooth Audio...

M3D550KDE User Manual
Page 34
... watching programming and movies, providing deep, rich bass, and delivering crisp details and clear, intelligible dialog. Changes the type of audio coming from the TV speakers and external bluetooth devices (M3D550KDE only). 3. Sets the volume control properties for the Optical output when connected to highlight the setting you have finished adjusting the advanced audio settings, press the EXIT button on the remote. 27 Changes the settings of processing for the analog RCA (red/white...
... watching programming and movies, providing deep, rich bass, and delivering crisp details and clear, intelligible dialog. Changes the type of audio coming from the TV speakers and external bluetooth devices (M3D550KDE only). 3. Sets the volume control properties for the Optical output when connected to highlight the setting you have finished adjusting the advanced audio settings, press the EXIT button on the remote. 27 Changes the settings of processing for the analog RCA (red/white...

M3D550KDE User Manual
Page 37
... settings Changing the Input Source To quickly access the Input Source menu, press the INPUT button on -screen menu is displayed. 2. Changing the TV Settings M3D470KDE Using the settings menu, you can : • Change the input source • Set up the Picture • Name the TV inputs • Adjust game settings • Set up parental controls • Change the on-screen menu language • Set the time • Adjust the CEC settings • Adjust the power light settings M3D550KDE Using the settings menu, you want to highlight the Settings icon and press OK. The on the remote...
... settings Changing the Input Source To quickly access the Input Source menu, press the INPUT button on -screen menu is displayed. 2. Changing the TV Settings M3D470KDE Using the settings menu, you can : • Change the input source • Set up the Picture • Name the TV inputs • Adjust game settings • Set up parental controls • Change the on-screen menu language • Set the time • Adjust the CEC settings • Adjust the power light settings M3D550KDE Using the settings menu, you want to highlight the Settings icon and press OK. The on the remote...

M3D550KDE User Manual
Page 38
... television channels are available. 1. Wait until the partial channel search is displayed. 3. Highlight Antenna or Cable and press OK. 5. Wait until the channel scan is displayed. 2. The Settings menu is 100% complete. Highlight Scan Mode and select the type of new channels: 1. 5 Setting the Tuner Mode If you are using the Partial Channel Search and Add Analog Channel options. Use the Arrow buttons on -screen menu is 100% complete. The auto channel scan begins. 2. Press the EXIT button on the remote...
... television channels are available. 1. Wait until the partial channel search is displayed. 3. Highlight Antenna or Cable and press OK. 5. Wait until the channel scan is displayed. 2. The Settings menu is 100% complete. Highlight Scan Mode and select the type of new channels: 1. 5 Setting the Tuner Mode If you are using the Partial Channel Search and Add Analog Channel options. Use the Arrow buttons on -screen menu is 100% complete. The auto channel scan begins. 2. Press the EXIT button on the remote...

M3D550KDE User Manual
Page 58
.... A The TV displays "No Signal." • Press the INPUT button on the remote control to select a different input source. • If you are using cable TV, satellite, or antenna connected directly to the TV, scan for channels. See Adjusting the Picture Settings on the TV don't look right. • Adust the Color and Tint settings in the Picture menu. The power is plugged into a working . • Ensure you are securely attached. See Replacing the Batteries...
.... A The TV displays "No Signal." • Press the INPUT button on the remote control to select a different input source. • If you are using cable TV, satellite, or antenna connected directly to the TV, scan for channels. See Adjusting the Picture Settings on the TV don't look right. • Adust the Color and Tint settings in the Picture menu. The power is plugged into a working . • Ensure you are securely attached. See Replacing the Batteries...

M3D550KDE User Manual
Page 59
... remote to adjust the volume. Connect your antenna is distorted. • Nearby electrical devices may be noticable. • Use the Volume Up/Down buttons on each input source. Ensure your devices with HDMI cables. • If you switch from the one on the screen. • When your TV's digital capabilities exceed a digital broadcast signal, the signal is not good. • For the best image quality, view high-definition programs using an antenna, the signal...
... remote to adjust the volume. Connect your antenna is distorted. • Nearby electrical devices may be noticable. • Use the Volume Up/Down buttons on each input source. Ensure your devices with HDMI cables. • If you switch from the one on the screen. • When your TV's digital capabilities exceed a digital broadcast signal, the signal is not good. • For the best image quality, view high-definition programs using an antenna, the signal...

M3D550KDE User Manual
Page 62
... ANY PRODUCT TO A VIZIO SERVICE CENTER FOR WARRANTY SERVICE. Recovery and reinstallation of user data is capable of a new Product against defects in materials and workmanship for restoring all personal information from warranty service or replacement, whichever is not responsible for the duration of customer misuse, modifications or adjustments, as well as installation and set-up issues or any repairs attempted by anyone...
... ANY PRODUCT TO A VIZIO SERVICE CENTER FOR WARRANTY SERVICE. Recovery and reinstallation of user data is capable of a new Product against defects in materials and workmanship for restoring all personal information from warranty service or replacement, whichever is not responsible for the duration of customer misuse, modifications or adjustments, as well as installation and set-up issues or any repairs attempted by anyone...

M3D550KDE Quick Start Guide
Page 2
... user to your TV and easily accessible. • Only power of important operating and maintenance (servicing) instructions in electric shock or fire. Opening or removing the back cover may compromise the integrity of electric shock or component damage, switch off the power before connecting other components to the presence of the marked voltage can damage the remote control or injure the operator. If repair is used for repair...
... user to your TV and easily accessible. • Only power of important operating and maintenance (servicing) instructions in electric shock or fire. Opening or removing the back cover may compromise the integrity of electric shock or component damage, switch off the power before connecting other components to the presence of the marked voltage can damage the remote control or injure the operator. If repair is used for repair...

M3D550KDE Quick Start Guide
Page 23
... supply or power surges, signal issues, damages from shipping, acts of protection. Products with unreadable or removed serial numbers, or requiring routine maintenance are warranted for the remaining portion of the original warranty or for transportation costs to the "DETAILS" tab of storing personal data and other than by a VIZIO authorized service center. THERE ARE NO EXPRESS WARRANTIES OTHER THAN THOSE LISTED...
... supply or power surges, signal issues, damages from shipping, acts of protection. Products with unreadable or removed serial numbers, or requiring routine maintenance are warranted for the remaining portion of the original warranty or for transportation costs to the "DETAILS" tab of storing personal data and other than by a VIZIO authorized service center. THERE ARE NO EXPRESS WARRANTIES OTHER THAN THOSE LISTED...

M3D550KDE Data Sheet
Page 2
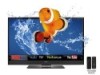
...; TV SPECIFICATIONS Screen Size Diagonal Viewable TV Type Refresh Rate Maximum Resolution 3D VIZIO Internet Apps Remote Control Type Ambient Light Sensor Energy Star Qualified Power Wall Mount & Screw Size WARRANTY 1 year 55" Class 54.64" Edge LED 120Hz 1080p Yes Yes XRT303 Yes ENERGY STAR® 5.3 108W 400mm (V) x 400mm (H), M6 x 1mm x 20mm CONNECTIONS HDMI Inputs Component Video Inputs Composite Inputs RF Antenna Input USB Ports Stereo Audio (RCA) Number of VIZIO Inc. Product features and specifications are for high definition video, 3D, audio and Ethernet...
...; TV SPECIFICATIONS Screen Size Diagonal Viewable TV Type Refresh Rate Maximum Resolution 3D VIZIO Internet Apps Remote Control Type Ambient Light Sensor Energy Star Qualified Power Wall Mount & Screw Size WARRANTY 1 year 55" Class 54.64" Edge LED 120Hz 1080p Yes Yes XRT303 Yes ENERGY STAR® 5.3 108W 400mm (V) x 400mm (H), M6 x 1mm x 20mm CONNECTIONS HDMI Inputs Component Video Inputs Composite Inputs RF Antenna Input USB Ports Stereo Audio (RCA) Number of VIZIO Inc. Product features and specifications are for high definition video, 3D, audio and Ethernet...


