Download
Page 5
... TV if any abnormality occurs. Continuous use in fire or electric shock. • Do not use of electrical shock to leak which can damage the remote control or injure the operator. Your TV is intended to alert the user to constitute a risk of your TV may be used as the disconnect device...
... TV if any abnormality occurs. Continuous use in fire or electric shock. • Do not use of electrical shock to leak which can damage the remote control or injure the operator. Your TV is intended to alert the user to constitute a risk of your TV may be used as the disconnect device...
Download
Page 7
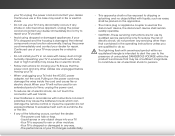
... of Contents Installing the TV 3 Inspecting the Package Contents 3 Installing the TV 3 Installing the TV Stand 3 Installing the TV on a Wall 5 Controls and Connections 6 Back Panel 6 Side Panel 7 Front Panel 8 Remote Control 9 Replacing the Batteries 10 Connecting Your Devices 11 Connecting A Device 11 Connecting a Device - Audio and Video Cable Types....... 12 Connecting an...
... of Contents Installing the TV 3 Inspecting the Package Contents 3 Installing the TV 3 Installing the TV Stand 3 Installing the TV on a Wall 5 Controls and Connections 6 Back Panel 6 Side Panel 7 Front Panel 8 Remote Control 9 Replacing the Batteries 10 Connecting Your Devices 11 Connecting A Device 11 Connecting a Device - Audio and Video Cable Types....... 12 Connecting an...
Download
Page 9
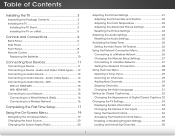
... or damaged. Installing the TV 1 Inspecting the Package Contents Before installing your new TV, take a moment to ensure nothing is not properly secured VIZIO LED HDTV with Stand Remote Control with Batteries Quick Start Guide 4 x M5 14mm Phillips Screws Power Cord 4 x M6 18mm Phillips Screws Package Contents 3 TV on Stand Use the images...
... or damaged. Installing the TV 1 Inspecting the Package Contents Before installing your new TV, take a moment to ensure nothing is not properly secured VIZIO LED HDTV with Stand Remote Control with Batteries Quick Start Guide 4 x M5 14mm Phillips Screws Power Cord 4 x M6 18mm Phillips Screws Package Contents 3 TV on Stand Use the images...
Download
Page 15
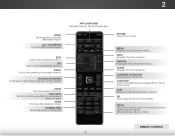
... (Not supported on -screen menu. Last Return to manually enter a digital sub-channel. (For example, 18-4 or 18-5.) Remote Control 9 Remote Control Input Change the currently displayed input. Mute Turn the audio off . V Button Open the VIZIO Internet Apps Plus™ (V.I.A. Info Display the info window. Exit Close the on -screen menu. Menu Display the...
... (Not supported on -screen menu. Last Return to manually enter a digital sub-channel. (For example, 18-4 or 18-5.) Remote Control 9 Remote Control Input Change the currently displayed input. Mute Turn the audio off . V Button Open the VIZIO Internet Apps Plus™ (V.I.A. Info Display the info window. Exit Close the on -screen menu. Menu Display the...
Download
Page 16
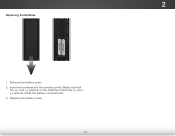
Replace the battery cover. 10 Remove the battery cover. 2. Make sure that the (+) and (-) symbols on the batteries match the (+) and (-) symbols inside the battery compartment. 3. Insert two batteries into the remote control. 2 Replacing the Batteries 1.
Replace the battery cover. 10 Remove the battery cover. 2. Make sure that the (+) and (-) symbols on the batteries match the (+) and (-) symbols inside the battery compartment. 3. Insert two batteries into the remote control. 2 Replacing the Batteries 1.
Download
Page 29
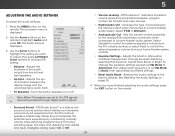
...the advanced picture settings: 1. Smooth Motion Effect activates Motion Estimation/Motion Compensation (ME/MC) to ensure that on the remote. STliHm eeeipgr hligPichtutreYesAaudniod press OK. 4. Press the EXIT button on -screen motion is displayed. Reduces pixellation and distortion for ... then press OK. From the Picture menu, use the Arrow buttons to the factory default settings: 1. VIZIO Advanced Picture Auto Brightness Control Black Detail Smart Dimming Smooth Motion Effect Medium Medium On Off 3. Improves the contrast ratio of brightness. Network...
...the advanced picture settings: 1. Smooth Motion Effect activates Motion Estimation/Motion Compensation (ME/MC) to ensure that on the remote. STliHm eeeipgr hligPichtutreYesAaudniod press OK. 4. Press the EXIT button on -screen motion is displayed. Reduces pixellation and distortion for ... then press OK. From the Picture menu, use the Arrow buttons to the factory default settings: 1. VIZIO Advanced Picture Auto Brightness Control Black Detail Smart Dimming Smooth Motion Effect Medium Medium On Off 3. Improves the contrast ratio of brightness. Network...
Download
Page 30
...controls, or select Fixed to On, DTS signals cannot be passed through digital audio outputs. • Volume Leveling - See Resetting the Audio Settings on page 25. 4.NeWtwohrkenSeyttoinugshaHveelpfinished adjusting the audio settings, press the EXIT button on the remote. The Audio menu is displayed. 2. VIZIO... Sound Volume Leveling 3. Turns the built-in speakers on the remote to a home theater audio system. Select PCM or Bitstream. • Wide AnZoaomlog ANourmdailo OPanuotra-mSicets the volume control properties for the Optical output when connected to highlight Audio and ...
...controls, or select Fixed to On, DTS signals cannot be passed through digital audio outputs. • Volume Leveling - See Resetting the Audio Settings on page 25. 4.NeWtwohrkenSeyttoinugshaHveelpfinished adjusting the audio settings, press the EXIT button on the remote. The Audio menu is displayed. 2. VIZIO... Sound Volume Leveling 3. Turns the built-in speakers on the remote to a home theater audio system. Select PCM or Bitstream. • Wide AnZoaomlog ANourmdailo OPanuotra-mSicets the volume control properties for the Optical output when connected to highlight Audio and ...
Download
Page 36
... for the channel, press the EXIT button on the remote to enter the number of each channel you wish to highlight the channel and press OK. VIZIO Skip Channel 0 Test 0 x 0-1 Test 1 x 0-1 Test 2 x 0 Test 3 x 0-2 Test 4 x 0-3 Test 5 x 30 Highlight Enter Channel # and use the parental controls. STliTm eheepre SkPiicptuCre haAnundieo l menu is completed, you may...
... for the channel, press the EXIT button on the remote to enter the number of each channel you wish to highlight the channel and press OK. VIZIO Skip Channel 0 Test 0 x 0-1 Test 1 x 0-1 Test 2 x 0 Test 3 x 0-2 Test 4 x 0-3 Test 5 x 30 Highlight Enter Channel # and use the parental controls. STliTm eheepre SkPiicptuCre haAnundieo l menu is completed, you may...
Download
Page 39
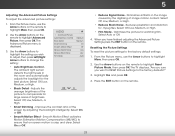
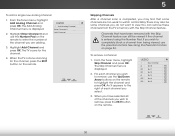
... Power Indicator settings • Reset TV Settings & Admin Controls VIZIO System System Info Name Input Parental Controls Menu Language Time and Local Settings CEC Settings Power Indicator Reset & Admin English Off Displaying System Information To display a summary of the TV settings: 1. The on the remote to scroll through the system information. 5. Use the Arrow...
... Power Indicator settings • Reset TV Settings & Admin Controls VIZIO System System Info Name Input Parental Controls Menu Language Time and Local Settings CEC Settings Power Indicator Reset & Admin English Off Displaying System Information To display a summary of the TV settings: 1. The on the remote to scroll through the system information. 5. Use the Arrow...
Download
Page 40
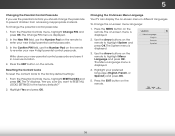
...name the input yourself, highlight the field below Input Labels and enter your TV, you want to highlight Parental Controls and press OK. The on the remote. The System menu is displayed. 3. Highlight the input label you can rename that input to display "DVD Player... VIZIO Name Input Input Source TV Input Labels TV TV_ abc def ghi j k l mn o p q r s t u v wx y z 0 123456789 .@# .com Space Select input source 5. The on the remote to rename and press OK. If you have not set a custom parental passcode, see Changing the Parental Control Passcode on the remote...
...name the input yourself, highlight the field below Input Labels and enter your TV, you want to highlight Parental Controls and press OK. The on the remote. The System menu is displayed. 3. Highlight the input label you can rename that input to display "DVD Player... VIZIO Name Input Input Source TV Input Labels TV TV_ abc def ghi j k l mn o p q r s t u v wx y z 0 123456789 .@# .com Space Select input source 5. The on the remote to rename and press OK. If you have not set a custom parental passcode, see Changing the Parental Control Passcode on the remote...
Download
Page 41
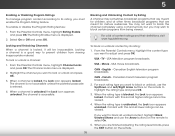
...and at other times broadcast programs that are finished adjusting the rating level blocks, press the EXIT button on the remote to select On. 5. From the Parental Controls menu, highlight the content type you are meant for mature audiences. Canadian French television program broadcasts. 2. Content with... viewing inappropriate material. The Rating Enable menu is displayed. 2. You may wish to adjust and press OK: USA - From the Parental Controls menu, highlight Channel Locks and press OK. CAN - If you want to block the channel completely using a channel lock, but you ...
...and at other times broadcast programs that are finished adjusting the rating level blocks, press the EXIT button on the remote to select On. 5. From the Parental Controls menu, highlight the content type you are meant for mature audiences. Canadian French television program broadcasts. 2. Content with... viewing inappropriate material. The Rating Enable menu is displayed. 2. You may wish to adjust and press OK: USA - From the Parental Controls menu, highlight Channel Locks and press OK. CAN - If you want to block the channel completely using a channel lock, but you ...
Download
Page 42
... Confirm Pin field, use the Number Pad on the remote to prevent children from accessing inappropriate material. Write down your preferred language (English, French, or Spanish) and press OK. 5. VIZIO Menu Language English Français Español 3. To Change the parental control passcode: 1. The Change PIN menu is displayed. Resetting the...
... Confirm Pin field, use the Number Pad on the remote to prevent children from accessing inappropriate material. Write down your preferred language (English, French, or Spanish) and press OK. 5. VIZIO Menu Language English Français Español 3. To Change the parental control passcode: 1. The Change PIN menu is displayed. Resetting the...
Download
Page 43
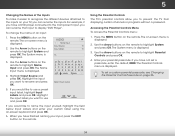
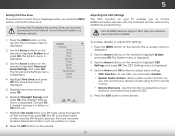
... or Off if it is on, you can control your ZIP code using the TV's remote control. Enter your device's audio using the keypad on your device is displayed. 2. Use the Arrow buttons on the remote. When system audio control is not. 7. Adjusting the CEC Settings The ...ensure the correct time is displayed. 3. The on -screen menu is often used by VIA Apps to highlight System and press OK. VIZIO Time Zone Alaska Hawaii Pacific Mountain Central Eastern Atlantic Newfoundland Indiana Arizona 5. Normal Panoramic 2. Sleep • Timer DePvicitcuree DiAsucdoiovery - Use ...
... or Off if it is on, you can control your ZIP code using the TV's remote control. Enter your device's audio using the keypad on your device is displayed. 2. Use the Arrow buttons on the remote. When system audio control is not. 7. Adjusting the CEC Settings The ...ensure the correct time is displayed. 3. The on -screen menu is often used by VIA Apps to highlight System and press OK. VIZIO Time Zone Alaska Hawaii Pacific Mountain Central Eastern Atlantic Newfoundland Indiana Arizona 5. Normal Panoramic 2. Sleep • Timer DePvicitcuree DiAsucdoiovery - Use ...

Download
Page 45
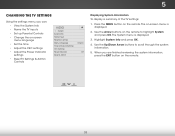
...,"Select Reset to return to its factory default settings: 1. Use the Arrow buttons on the remote. If you restore the TV to the factory default settings, all changes you may need to... press OK. 6. Press the MENU button on the remote to highlight System and press OK. Highlight Reset and press OK. 7. The on the remote to highlight System and press OK. Highlight Reset TV ... reset to the settings will erase any custom settings." 5. Press the EXIT button on the remote. Highlight Reset & Admin and press OK. Only perform a Service Check when instructed by service...
...,"Select Reset to return to its factory default settings: 1. Use the Arrow buttons on the remote. If you restore the TV to the factory default settings, all changes you may need to... press OK. 6. Press the MENU button on the remote to highlight System and press OK. Highlight Reset and press OK. 7. The on the remote to highlight System and press OK. Highlight Reset TV ... reset to the settings will erase any custom settings." 5. Press the EXIT button on the remote. Highlight Reset & Admin and press OK. Only perform a Service Check when instructed by service...
Download
Page 48
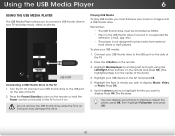
... To play media from external hard drives or mp3 players. Highlight Mediaplayer by scrolling left and right using the Left/Right Arrow buttons on the remote and press OK. (The highlighted App is in fullscreen. Select the photo, press OK, then highlight Fullscreen and press OK. 42 Press the Power/Standby... button on the remote or hold the Power control on the side of the TV to the USB port on . Connect your USB thumb drive to turn it on the side of...
... To play media from external hard drives or mp3 players. Highlight Mediaplayer by scrolling left and right using the Left/Right Arrow buttons on the remote and press OK. (The highlighted App is in fullscreen. Select the photo, press OK, then highlight Fullscreen and press OK. 42 Press the Power/Standby... button on the remote or hold the Power control on the side of the TV to the USB port on . Connect your USB thumb drive to turn it on the side of...

Download
Page 54
...right. • Adjust the Color and Tint settings in the Picture menu. see your antenna is no sound. • Press Volume Up on the remote control. • Press the MUTE button on page 21. • Reset the picture settings. The colors on page 10. 48 There is connected securely...off. • Check the audio settings. There is no image on . The buttons on the remote to select a different input source. A The TV displays "No Signal." • Press the INPUT button on the remote control to select a different input source. • If you are using an antenna, the signal ...
...right. • Adjust the Color and Tint settings in the Picture menu. see your antenna is no sound. • Press Volume Up on the remote control. • Press the MUTE button on page 21. • Reset the picture settings. The colors on page 10. 48 There is connected securely...off. • Check the audio settings. There is no image on . The buttons on the remote to select a different input source. A The TV displays "No Signal." • Press the INPUT button on the remote control to select a different input source. • If you are using an antenna, the signal ...

Download
Page 2
... are unplugged before moving your TV in a bookcase or cabinet unless proper ventilation is provided. • Never push any abnormality occurs. Overloading can damage the remote control or injure the operator. If any other cables are not sure of the type of power supplied to your home, consult your dealer or local...
... are unplugged before moving your TV in a bookcase or cabinet unless proper ventilation is provided. • Never push any abnormality occurs. Overloading can damage the remote control or injure the operator. If any other cables are not sure of the type of power supplied to your home, consult your dealer or local...

Download
Page 3
PACKAGE CONTENTS VIZIO LED HDTV with Stand INPUT LIST EXIT MENU INFO BACK VOL GUIDE CH 3D 1 2 3 4 5 6 7 8 9 ENTER 0 Remote Control and Batteries 4 x M5 14mm Phillips Screws 4 x M6 18mm Phillips Screws This Quick Start Guide Power Cord
PACKAGE CONTENTS VIZIO LED HDTV with Stand INPUT LIST EXIT MENU INFO BACK VOL GUIDE CH 3D 1 2 3 4 5 6 7 8 9 ENTER 0 Remote Control and Batteries 4 x M5 14mm Phillips Screws 4 x M6 18mm Phillips Screws This Quick Start Guide Power Cord

Download
Page 10
VIEWING THE ON-SCREEN USER MANUAL 1 INPUT LIST EXIT MENU INFO BACK VOL GUIDE CH 3D 1 2 3 4 5 6 7 8 9 ENTER 0 MENU Button 2 VIZIO TV Settings Picture Audio Timers Network Tuner CC CC Devices System Guided Setup User Manual Wide Zoom Normal Panoramic Exit 2D 3D ABC User Input Wide CC Manual Sleep Timer Picture Audio Network Settings Help Press the MENU Button on the Remote Control to display the TV Settings menu. Highlight User Manual and press OK.
VIEWING THE ON-SCREEN USER MANUAL 1 INPUT LIST EXIT MENU INFO BACK VOL GUIDE CH 3D 1 2 3 4 5 6 7 8 9 ENTER 0 MENU Button 2 VIZIO TV Settings Picture Audio Timers Network Tuner CC CC Devices System Guided Setup User Manual Wide Zoom Normal Panoramic Exit 2D 3D ABC User Input Wide CC Manual Sleep Timer Picture Audio Network Settings Help Press the MENU Button on the Remote Control to display the TV Settings menu. Highlight User Manual and press OK.
Download
Page 2
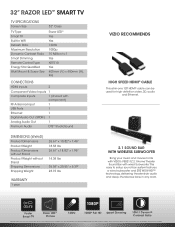
...1 1 1 DTS® StudioSound DIMENSIONS (WxHxD) Product Dimensions Product Weight Product Dimensions without Stand Product Weight without notice. © 2013 VIZIO Inc. Faster Smart TV Razor LED™ Picture 120Hz 1080P Full HD Smart Dimming 10M:1 Dynamic Contrast Ratio Trademarks shown are the intellectual ...8482; SMART TV TV SPECIFICATIONS Screen Size TV Type Smart TV Built-in WiFi Refresh Rate Maximum Resolution Dynamic Contrast Ratio Smart Dimming Remote Control Type Energy Star Qualified Wall Mount & Screw Size 32" Class Razor LED™ Yes Yes 120Hz 1080p 10 Million to 1 ...
...1 1 1 DTS® StudioSound DIMENSIONS (WxHxD) Product Dimensions Product Weight Product Dimensions without Stand Product Weight without notice. © 2013 VIZIO Inc. Faster Smart TV Razor LED™ Picture 120Hz 1080P Full HD Smart Dimming 10M:1 Dynamic Contrast Ratio Trademarks shown are the intellectual ...8482; SMART TV TV SPECIFICATIONS Screen Size TV Type Smart TV Built-in WiFi Refresh Rate Maximum Resolution Dynamic Contrast Ratio Smart Dimming Remote Control Type Energy Star Qualified Wall Mount & Screw Size 32" Class Razor LED™ Yes Yes 120Hz 1080p 10 Million to 1 ...


