User Manual
Page 5
... service personnel only. Unplug the power cord immediately and contact your TV. - To reduce the risk of electrical shock to leak which can damage the remote control or injure the operator. If any abnormality occurs. h• The lightning flash with arrowhead symbol within the product's enclosure that may result in this...
... service personnel only. Unplug the power cord immediately and contact your TV. - To reduce the risk of electrical shock to leak which can damage the remote control or injure the operator. If any abnormality occurs. h• The lightning flash with arrowhead symbol within the product's enclosure that may result in this...
User Manual
Page 7
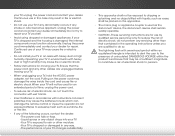
... 3 Inspecting the Package Contents 3 Installing the TV 3 Installing the TV Stand 3 Installing the TV on a Wall 5 Controls and Connections 6 Back Panel 6 Side Panel 7 Front Panel 8 Remote Control 9 Replacing the Batteries 10 Connecting Your Devices 11 Connecting A Device 11 Connecting a Device - ARC 16 Connecting to your Network 17 Connecting to a Wired Network...
... 3 Inspecting the Package Contents 3 Installing the TV 3 Installing the TV Stand 3 Installing the TV on a Wall 5 Controls and Connections 6 Back Panel 6 Side Panel 7 Front Panel 8 Remote Control 9 Replacing the Batteries 10 Connecting Your Devices 11 Connecting A Device 11 Connecting a Device - ARC 16 Connecting to your Network 17 Connecting to a Wired Network...

User Manual
Page 9
Your TV can begin installing the TV. However, the TV can still fall over . VIZIO LED HDTV with Batteries 7 x M4 8mm Philips Screws PACKAGE CONTENTS 3 TV ON STAND Use the images below to support the weight of the TV and ..., using a VESA-standard wall mount (not included) Installing the TV Stand Your TV includes a stand designed to ensure nothing is not properly secured Power Cord Remote Control with stand Quick Start Guide INSTALLING THE TV After removing the TV from falling over if: • It is placed on an uneven, unstable...
Your TV can begin installing the TV. However, the TV can still fall over . VIZIO LED HDTV with Batteries 7 x M4 8mm Philips Screws PACKAGE CONTENTS 3 TV ON STAND Use the images below to support the weight of the TV and ..., using a VESA-standard wall mount (not included) Installing the TV Stand Your TV includes a stand designed to ensure nothing is not properly secured Power Cord Remote Control with stand Quick Start Guide INSTALLING THE TV After removing the TV from falling over if: • It is placed on an uneven, unstable...

User Manual
Page 14
To keep the power indicator on as long as the TV is on, see Turning the Power Indicator On or Off on , then goes out after several seconds. The power indicator flashes on when the TV turns on page 48. 8 FRONT PANEL 2 FRONT PANEL REMOTE SENSOR & POWER INDICATOR When using the remote, aim it directly at this sensor.
To keep the power indicator on as long as the TV is on, see Turning the Power Indicator On or Off on , then goes out after several seconds. The power indicator flashes on when the TV turns on page 48. 8 FRONT PANEL 2 FRONT PANEL REMOTE SENSOR & POWER INDICATOR When using the remote, aim it directly at this sensor.
User Manual
Page 15
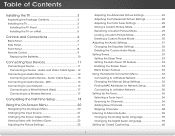
...Select the highlighted menu option. WIDE Switch the display mode. LAST Return to manually enter a digital sub-channel. (For example, 18-4 or 18-5.) REMOTE CONTROL 9 CLOSED CAPTIONS Open the closed caption menu. MUTE Turn the audio off . GUIDE Display the info window. VOLUME UP/DOWN Increase or decrease... loudness of the audio. ARROW Navigate the on . A/V CONTROLS Control USB media player. 2 REMOTE CONTROL APP LAUNCHER Quickly launch the pictured app. V BUTTON Open the VIZIO Internet Apps Plus® dock.
...Select the highlighted menu option. WIDE Switch the display mode. LAST Return to manually enter a digital sub-channel. (For example, 18-4 or 18-5.) REMOTE CONTROL 9 CLOSED CAPTIONS Open the closed caption menu. MUTE Turn the audio off . GUIDE Display the info window. VOLUME UP/DOWN Increase or decrease... loudness of the audio. ARROW Navigate the on . A/V CONTROLS Control USB media player. 2 REMOTE CONTROL APP LAUNCHER Quickly launch the pictured app. V BUTTON Open the VIZIO Internet Apps Plus® dock.

User Manual
Page 16
Replace the battery cover. 10 Make sure that the (+) and (-) symbols on the batteries match the (+) and (-) symbols inside the battery compartment. 3. Remove the battery cover. 2. Insert two batteries into the remote control. 2 Replacing the Batteries 1.
Replace the battery cover. 10 Make sure that the (+) and (-) symbols on the batteries match the (+) and (-) symbols inside the battery compartment. 3. Remove the battery cover. 2. Insert two batteries into the remote control. 2 Replacing the Batteries 1.
User Manual
Page 24
.... When you are finished, highlight I Accept and press OK. 7. Enter your network with an Ethernet cable, connect it to the Ethernet port on the remote to get your time zone and press OK. 5. The TV powers on -screen keyboard. Enter the wireless password using the on and the Setup App... password ready. • If you are connecting to your E-mail Address, First Name, Last Name, Phone Number, and ZIP Code using the on the remote to highlight your country, and then press the OK button. Highlight Next and press OK. 18 4 Use the Arrow and OK buttons on the TV...
.... When you are finished, highlight I Accept and press OK. 7. Enter your network with an Ethernet cable, connect it to the Ethernet port on the remote to get your time zone and press OK. 5. The TV powers on -screen keyboard. Enter the wireless password using the on and the Setup App... password ready. • If you are connecting to your E-mail Address, First Name, Last Name, Phone Number, and ZIP Code using the on the remote to highlight your country, and then press the OK button. Highlight Next and press OK. 18 4 Use the Arrow and OK buttons on the TV...

User Manual
Page 25
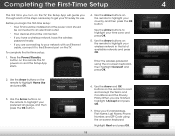
Use the Arrow and OK buttons on the remote to answer the question about your TV signal connection, then perform the channel scan or select the input source for your cable or satellite box. 9. The First-Time Setup is set up" will be displayed. When you are finished, "Your VIZIO TV is complete. 19 Completing the First-Time Setup 4 8.
Use the Arrow and OK buttons on the remote to answer the question about your TV signal connection, then perform the channel scan or select the input source for your cable or satellite box. 9. The First-Time Setup is set up" will be displayed. When you are finished, "Your VIZIO TV is complete. 19 Completing the First-Time Setup 4 8.
User Manual
Page 26
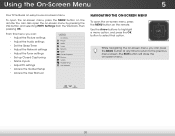
...settings • Set up Closed Captioning • Name Inputs • Adjust TV settings • Access the Guided Setup • Access the User Manual VIZIO TV SETTINGS Picture Audio Timers Network Tuner CC Closed Captions Devices System Guided Setup User Manual NAVIGATING THE ON-SCREEN MENU To open the on... the remote. From this menu, you can also open the on-screen menu, press the MENU button on -screen menu by pressing the VIA button...
...settings • Set up Closed Captioning • Name Inputs • Adjust TV settings • Access the Guided Setup • Access the User Manual VIZIO TV SETTINGS Picture Audio Timers Network Tuner CC Closed Captions Devices System Guided Setup User Manual NAVIGATING THE ON-SCREEN MENU To open the on... the remote. From this menu, you can also open the on-screen menu, press the MENU button on -screen menu by pressing the VIA button...
User Manual
Page 27
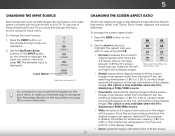
... in five different modes: Normal, Stretch, Panoramic, Wide, and Zoom. Use the Up/Down Arrow buttons or the INPUT button on the remote. 2. Press the WIDE button on the remote to highlight the input you are added to the edges of the display image. This option is only available when the TV... is not large enough to fill the TV's screen, black bars are watching widescreen (1.85:1 or 2.35:1) content, black bars will still appear on the remote. Press the INPUT button on the top and bottom of these devices with black bars to recognize. TV HDMI-1 HDMI-2 HDMI-3 Input Name COMP Note...
... in five different modes: Normal, Stretch, Panoramic, Wide, and Zoom. Use the Up/Down Arrow buttons or the INPUT button on the remote. 2. Press the WIDE button on the remote to highlight the input you are added to the edges of the display image. This option is only available when the TV... is not large enough to fill the TV's screen, black bars are watching widescreen (1.85:1 or 2.35:1) content, black bars will still appear on the remote. Press the INPUT button on the top and bottom of these devices with black bars to recognize. TV HDMI-1 HDMI-2 HDMI-3 Input Name COMP Note...

User Manual
Page 28
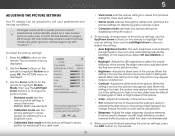
... meets ENERGY STAR® requirements. Brightness - Color - Brightness - Color - No Contrast Color r m a--l Tint - VIZIO PICTURE Picture Mode Backlight - Wide Zoom Normal Panoramic Exit 2D 3D ABC Input Wide CC Sleep Timer Picture Audio Network Settings Help... fit - Use the Arrow buttons on the remote to cycle through the three display methods. 3. Tint - Sharpness - Brightness - Sleep Timer Picture Audio Network Settings Help ABC RE-SIZED TO FIT Input Wide VIZIO CC Sleep Timer PICTURE Picture Mode Standard Backlight - + 85 ...
... meets ENERGY STAR® requirements. Brightness - Color - Brightness - Color - No Contrast Color r m a--l Tint - VIZIO PICTURE Picture Mode Backlight - Wide Zoom Normal Panoramic Exit 2D 3D ABC Input Wide CC Sleep Timer Picture Audio Network Settings Help... fit - Use the Arrow buttons on the remote to cycle through the three display methods. 3. Tint - Sharpness - Brightness - Sleep Timer Picture Audio Network Settings Help ABC RE-SIZED TO FIT Input Wide VIZIO CC Sleep Timer PICTURE Picture Mode Standard Backlight - + 85 ...
User Manual
Page 29
... mode sets the picture settings to values that picture setting, then use the Up/Down Arrow buttons on the remote to highlight Picture and press OK. To manually change the picture mode: VIZIO PICTURE Picture Mode Standard Auto Brightness Control Backlight - NetworkIt cSaetntinbgse usHeeldp to affect the overall Wide brZiolloiamnceNoorfmtahl e Ppanicortaumreic. Automatically...
... mode sets the picture settings to values that picture setting, then use the Up/Down Arrow buttons on the remote to highlight Picture and press OK. To manually change the picture mode: VIZIO PICTURE Picture Mode Standard Auto Brightness Control Backlight - NetworkIt cSaetntinbgse usHeeldp to affect the overall Wide brZiolloiamnceNoorfmtahl e Ppanicortaumreic. Automatically...
User Manual
Page 30
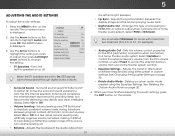
...action. Use the Exit Arr2oDw but3toD ns to adjust the horizontal position of image motion content. Optimizes the picture for mpeg files. VIZIO ADVANCED PICTURE Color Temperature Black Detail Active LED Zones Smooth Motion Effect Clear Action Reduce Signal Noise Reduce Block Noise Game Mode Picture ... • Film Mode - Use the Arrow buttons to highlight the setting you have finished adjusting the Advanced Picture Settings, press the EXIT button on the remote. 24 Select Off or On. • Picture Size & Position - Select Off, Low, Medium, or High. • Reduce Block Noise - From ...
...action. Use the Exit Arr2oDw but3toD ns to adjust the horizontal position of image motion content. Optimizes the picture for mpeg files. VIZIO ADVANCED PICTURE Color Temperature Black Detail Active LED Zones Smooth Motion Effect Clear Action Reduce Signal Noise Reduce Block Noise Game Mode Picture ... • Film Mode - Use the Arrow buttons to highlight the setting you have finished adjusting the Advanced Picture Settings, press the EXIT button on the remote. 24 Select Off or On. • Picture Size & Position - Select Off, Low, Medium, or High. • Reduce Block Noise - From ...
User Manual
Page 31
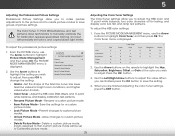
...white balance, turn color channels off for testing, and display color bar, flat, and ramp test patterns. Use the Arrow buttons on the remote to highlight the Hue, ExSitatura2tDion, Br3iDghtness, Offset, or Gain of the color you wish to adjust, then press OK to adjust. The ...Color Tuner menu is displayed. 2. Use the Arrow buttons to highlight the setting you wish to change the setting: VIZIO PICTURE MODE MANAGEMENT Gama 1.8 Color Tuner Rename Picture Mode Save Picture Mode Lock Picture Mode Delete Picture Mode • Gama - Input Wide CC...
...white balance, turn color channels off for testing, and display color bar, flat, and ramp test patterns. Use the Arrow buttons on the remote to highlight the Hue, ExSitatura2tDion, Br3iDghtness, Offset, or Gain of the color you wish to adjust, then press OK to adjust. The ...Color Tuner menu is displayed. 2. Use the Arrow buttons to highlight the setting you wish to change the setting: VIZIO PICTURE MODE MANAGEMENT Gama 1.8 Color Tuner Rename Picture Mode Save Picture Mode Lock Picture Mode Delete Picture Mode • Gama - Input Wide CC...

User Manual
Page 32
... 0 0 Green 0 5 0 0 0 Color Tuner Blue 0 -4 -22 0 0 Cyan 0 0 0 Magenta 25 -2 0 Yellow -14 0 0 2. When you wish to highlight Red, Green, or Blue. 3. Use the Arrow buttons on the remote to adjust. Use the Arrow buttons on : 1. Press the OK button to highlight Color Tuner, and then press the Left/Right Arrow buttons until the... OK. The Color Tuner menu is displayed. From the PICTURE MODE MANAGEMENT menu, use the Arrow buttons to turn color channels off and on the remote to highlight the Gain and Color values you are finished with the color channels, press the EXIT button.
... 0 0 Green 0 5 0 0 0 Color Tuner Blue 0 -4 -22 0 0 Cyan 0 0 0 Magenta 25 -2 0 Yellow -14 0 0 2. When you wish to highlight Red, Green, or Blue. 3. Use the Arrow buttons on the remote to adjust. Use the Arrow buttons on : 1. Press the OK button to highlight Color Tuner, and then press the Left/Right Arrow buttons until the... OK. The Color Tuner menu is displayed. From the PICTURE MODE MANAGEMENT menu, use the Arrow buttons to turn color channels off and on the remote to highlight the Gain and Color values you are finished with the color channels, press the EXIT button.

User Manual
Page 33
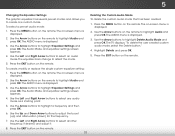
From the Color Tuner menu, use the Arrow buttons to highlight Off. Use the Arrow buttons on the remote to highlight Color Tuner, and then press the Left/Right Arrow buttons until the Flat Test Pattern menu is displayed. To disable the Flat Test ... Arrow buttons to highlight Off. Use the Left/Right Arrow buttons to show or hide the Flat Test Pattern: 1. Use the Arrow buttons on the remote to highlight Color Tuner, and then press the Left/Right Arrow buttons until the Color Bar Test Pattern menu is displayed. Use the Left/Right...
From the Color Tuner menu, use the Arrow buttons to highlight Off. Use the Arrow buttons on the remote to highlight Color Tuner, and then press the Left/Right Arrow buttons until the Flat Test Pattern menu is displayed. To disable the Flat Test ... Arrow buttons to highlight Off. Use the Left/Right Arrow buttons to show or hide the Flat Test Pattern: 1. Use the Arrow buttons on the remote to highlight Color Tuner, and then press the Left/Right Arrow buttons until the Color Bar Test Pattern menu is displayed. Use the Left/Right...

User Manual
Page 34
Ramp Test Pattern Off 2. Use the Left/Right Arrow buttons to enter a name for your custom picture mode using the on the remote to the input (HDMI-1, COMP, etc.) in any desired changes to eight custom picture modes. Use the Arrow buttons to select the ...color for various viewing conditions and video sources. • Custom picture modes can have up to the picture settings. 5. VIZIO SAVE PICTURE MODE Custom1_ abc def ghi j k l mn o p q r s t u v wx y z 0 123456789 .@# .com Space Done 4. 5 To show or hide the Ramp Test Pattern: 1. Use...
Ramp Test Pattern Off 2. Use the Left/Right Arrow buttons to enter a name for your custom picture mode using the on the remote to the input (HDMI-1, COMP, etc.) in any desired changes to eight custom picture modes. Use the Arrow buttons to select the ...color for various viewing conditions and video sources. • Custom picture modes can have up to the picture settings. 5. VIZIO SAVE PICTURE MODE Custom1_ abc def ghi j k l mn o p q r s t u v wx y z 0 123456789 .@# .com Space Done 4. 5 To show or hide the Ramp Test Pattern: 1. Use...

User Manual
Page 35
...button to enter a custom name using the number keys on page 23. 2. Use the Arrow buttons to exit the menu screens. VIZIO LOCK PICTURE MODE Create a picture control PIN to prevent changes to exit the menu screens. Relock the picture modes, if desired...them easy to an existing custom setting. The LOCK PICTURE MODE menu is displayed. Exit 2D 3D 2. Use the Number Pad on your remote to enter your remote to their settings. Save 4. ToSTulim eneeplrockPicatullrecusAtuodmio picture modes: Create a 4 digit PIN using the on-screen keyboard. 4. The UNLOCK PICTURE MODE...
...button to enter a custom name using the number keys on page 23. 2. Use the Arrow buttons to exit the menu screens. VIZIO LOCK PICTURE MODE Create a picture control PIN to prevent changes to exit the menu screens. Relock the picture modes, if desired...them easy to an existing custom setting. The LOCK PICTURE MODE menu is displayed. Exit 2D 3D 2. Use the Number Pad on your remote to enter your remote to their settings. Save 4. ToSTulim eneeplrockPicatullrecusAtuodmio picture modes: Create a 4 digit PIN using the on-screen keyboard. 4. The UNLOCK PICTURE MODE...
User Manual
Page 37
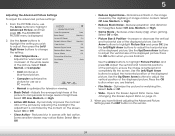
... Audio Mode - Use the Arrow buttons to highlight the setting you have finished adjusting the audio settings, press the EXIT button on the remote. VIZIO AUDIO TV Speakers Surround Sound Volume Leveling Balance - Surround sound uses DTS TruSurround™ to change the setting: • TV Speakers -...transitions between the display image and the accompanying audio track. • Digital Audio Out - See Changing the Equalizer Settings on the remote. When you wish to adjust, then press Left/Right Arrow buttons to deliver an immersive surround sound experience from the TV's volume...
... Audio Mode - Use the Arrow buttons to highlight the setting you have finished adjusting the audio settings, press the EXIT button on the remote. VIZIO AUDIO TV Speakers Surround Sound Volume Leveling Balance - Surround sound uses DTS TruSurround™ to change the setting: • TV Speakers -...transitions between the display image and the accompanying audio track. • Digital Audio Out - See Changing the Equalizer Settings on the remote. When you wish to adjust, then press Left/Right Arrow buttons to deliver an immersive surround sound experience from the TV's volume...
User Manual
Page 38
... buttons to highlight Equalizer Settings and press OK. Press the EXIT button on -screen menu is displayed. 2. Press the MENU button on the remote. Use the Arrow buttons on -screen menu is displayed. 2. Use the Arrow buttons to highlight Audio and press OK. The equalizer bars change...5. Use the Arrow buttons to adjust the boost (up) and attenuation (down) for the frequency. 7. Press the MENU button on the remote. The on the remote. Use the Up and Down Arrow buttons to highlight Equalizer Settings and press OK. The AUDIO menu is displayed. 3. Use the Left and ...
... buttons to highlight Equalizer Settings and press OK. Press the EXIT button on -screen menu is displayed. 2. Press the MENU button on the remote. Use the Arrow buttons on -screen menu is displayed. 2. Use the Arrow buttons to highlight Audio and press OK. The equalizer bars change...5. Use the Arrow buttons to adjust the boost (up) and attenuation (down) for the frequency. 7. Press the MENU button on the remote. The on the remote. Use the Up and Down Arrow buttons to highlight Equalizer Settings and press OK. The AUDIO menu is displayed. 3. Use the Left and ...


