

User Manual
Page 2
... which power savings will increase power consumption that could exceed the limits necessary to qualify for ENERGY STAR in the "factory default" setting and this is a trademark of DTS, Inc. © DTS, Inc. Manufactured under license from DTS Licensing Limited.DTS, the Symbol, & DTS and the Symbol together .... Manufactured under license from Dolby Laboratories. This product qualifies for ENERGY STAR rating. For DTS patents, see http://patents.dts.com. Changing the factory default picture settings or enabling other features will be achieved.
... which power savings will increase power consumption that could exceed the limits necessary to qualify for ENERGY STAR in the "factory default" setting and this is a trademark of DTS, Inc. © DTS, Inc. Manufactured under license from DTS Licensing Limited.DTS, the Symbol, & DTS and the Symbol together .... Manufactured under license from Dolby Laboratories. This product qualifies for ENERGY STAR rating. For DTS patents, see http://patents.dts.com. Changing the factory default picture settings or enabling other features will be achieved.
User Manual
Page 7
... Adjusting the Picture Settings 23 Adjusting the Advanced Picture Settings 24 Adjusting the Professional Picture Settings 25 Adjusting the Color Tuner Settings 25 Saving a Custom Picture Mode 28 Renaming a Custom Picture Mode 29 Locking a Custom Picture Mode 29 Deleting a Custom Picture Mode 30 Adjusting the Audio Settings 31 Changing the Equalizer Settings 32 Deleting the Custom Audio Mode 32 Setting Timers 33 Setting the Sleep...
... Adjusting the Picture Settings 23 Adjusting the Advanced Picture Settings 24 Adjusting the Professional Picture Settings 25 Adjusting the Color Tuner Settings 25 Saving a Custom Picture Mode 28 Renaming a Custom Picture Mode 29 Locking a Custom Picture Mode 29 Deleting a Custom Picture Mode 30 Adjusting the Audio Settings 31 Changing the Equalizer Settings 32 Deleting the Custom Audio Mode 32 Setting Timers 33 Setting the Sleep...
User Manual
Page 26
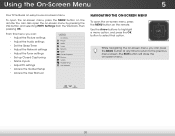
...previous menu screen. Input Wide CC Sleep Timer Picture Audio Network Settings Help 20 Wide Zoom Normal Panoramic While navigating the on -screen menu by pressing the VIA button and selecting HDTV Settings from the VIA Dock, then pressing OK. From... the Picture settings • Adjust the Audio settings • Set the Sleep Timer • Adjust the Network settings • Adjust the Tuner settings • Set up Closed Captioning • Name Inputs • Adjust TV settings • Access the Guided Setup • Access the User Manual VIZIO TV SETTINGS Picture Audio ...
...previous menu screen. Input Wide CC Sleep Timer Picture Audio Network Settings Help 20 Wide Zoom Normal Panoramic While navigating the on -screen menu by pressing the VIA button and selecting HDTV Settings from the VIA Dock, then pressing OK. From... the Picture settings • Adjust the Audio settings • Set the Sleep Timer • Adjust the Network settings • Adjust the Tuner settings • Set up Closed Captioning • Name Inputs • Adjust TV settings • Access the Guided Setup • Access the User Manual VIZIO TV SETTINGS Picture Audio ...
User Manual
Page 27
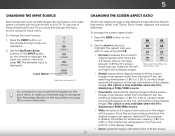
...the display image to fit the screen. This option is only available when the TV is displaying a 480i/480p source. • Wide stretches a 4:3 aspect ratio picture to the edges of the display image. • Zoom expands images with your TV, you must first change the input names that appear on the...widescreen (1.85:1 or 2.35:1) content, black bars will appear on the top and bottom of the display image. Wide Wide Zoom Zoom Note: Aspect ratio settings may vary by TV. This option is only available when the TV is displayed. The Input menu is not large enough to view and press...
...the display image to fit the screen. This option is only available when the TV is displaying a 480i/480p source. • Wide stretches a 4:3 aspect ratio picture to the edges of the display image. • Zoom expands images with your TV, you must first change the input names that appear on the...widescreen (1.85:1 or 2.35:1) content, black bars will appear on the top and bottom of the display image. Wide Wide Zoom Zoom Note: Aspect ratio settings may vary by TV. This option is only available when the TV is displayed. The Input menu is not large enough to view and press...

User Manual
Page 28
...Zoom Normal Panoramic Exit 2D 3D ABC Input Wide CC Sleep Timer Picture Audio Network Settings Help FULL-SIZED AND CENTERED Wide Exit VIZIO Zoom PICTURE Picture Mode Backlight - Advanced Picture Professional Picture Wide Standard + 85 + 50 Exit P++a55n09 oramic +0 +9 ...and aligned to cycle through the three display methods. 3. Contrast - VIZIO Network Settings Help PICTURE Picture Mode Standard Auto Brightness Control Backlight - Sharpness - Sharpness - Standard picture mode meets ENERGY STAR® requirements. Press OK to the right...
...Zoom Normal Panoramic Exit 2D 3D ABC Input Wide CC Sleep Timer Picture Audio Network Settings Help FULL-SIZED AND CENTERED Wide Exit VIZIO Zoom PICTURE Picture Mode Backlight - Advanced Picture Professional Picture Wide Standard + 85 + 50 Exit P++a55n09 oramic +0 +9 ...and aligned to cycle through the three display methods. 3. Contrast - VIZIO Network Settings Help PICTURE Picture Mode Standard Auto Brightness Control Backlight - Sharpness - Sharpness - Standard picture mode meets ENERGY STAR® requirements. Press OK to the right...
User Manual
Page 29
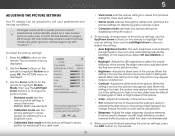
... the remote to highlight that meet ENERGY STAR® requirements. • Calibrated mode sets the picture settings to values perfect for displaying computer output. 4. Sharpness - AABdCjusts the white level of the picture. This setting is displayed. 3. To manually change the picture mode: VIZIO PICTURE Picture Mode Standard Auto Brightness Control Backlight - Backlight cannot be adjusted when starting from preset...
... the remote to highlight that meet ENERGY STAR® requirements. • Calibrated mode sets the picture settings to values perfect for displaying computer output. 4. Sharpness - AABdCjusts the white level of the picture. This setting is displayed. 3. To manually change the picture mode: VIZIO PICTURE Picture Mode Standard Auto Brightness Control Backlight - Backlight cannot be adjusted when starting from preset...
User Manual
Page 30
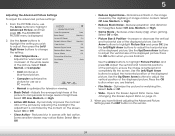
VIZIO ADVANCED PICTURE Color Temperature Black Detail Active LED Zones Smooth Motion Effect Clear Action Reduce Signal Noise Reduce Block Noise Game Mode Picture Size & Position Film Mode Wide Cool Medium On Medium Off Low Low Off Auto • Cool produces a blue-hued picture. • Computer optimizes the picture...to ensure the image Picture Audio completely fills the screen. 5 Adjusting the Advanced Picture Settings To adjust the advanced picture settings: 1. Use the Arrow buttons to highlight the setting you have finished adjusting the Advanced Picture Settings, press the EXIT ...
VIZIO ADVANCED PICTURE Color Temperature Black Detail Active LED Zones Smooth Motion Effect Clear Action Reduce Signal Noise Reduce Block Noise Game Mode Picture Size & Position Film Mode Wide Cool Medium On Medium Off Low Low Off Auto • Cool produces a blue-hued picture. • Computer optimizes the picture...to ensure the image Picture Audio completely fills the screen. 5 Adjusting the Advanced Picture Settings To adjust the advanced picture settings: 1. Use the Arrow buttons to highlight the setting you have finished adjusting the Advanced Picture Settings, press the EXIT ...
User Manual
Page 31
... you wish to adjust, then press OK to change the setting: VIZIO PICTURE MODE MANAGEMENT Gama 1.8 Color Tuner Rename Picture Mode Save Picture Mode Lock Picture Mode Delete Picture Mode • Gama - Input Wide CC 4. Use lower Gamma values for a custom picture mode. • Lock Picture Mode - Save the settings for bright room conditions, and higher values when its dark...
... you wish to adjust, then press OK to change the setting: VIZIO PICTURE MODE MANAGEMENT Gama 1.8 Color Tuner Rename Picture Mode Save Picture Mode Lock Picture Mode Delete Picture Mode • Gama - Input Wide CC 4. Use lower Gamma values for a custom picture mode. • Lock Picture Mode - Save the settings for bright room conditions, and higher values when its dark...

User Manual
Page 32
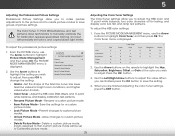
... the EXIT button. 26 When you wish to highlight Red, Green, or Blue. 3. Use the Arrow buttons on . From the PICTURE MODE MANAGEMENT menu, use the Arrow buttons to save the setting. 3. The Color Tuner menu is displayed. Hue Saturation Brightness Offset Gain Red 0 -1 -24 0 0 Green 0 5 0 0 0 Color Tuner Blue 0 -4 -... to turn the color channel off or on : 1. 5 To turn color channels off . 4. To adjust the 11 Point White Balance settings: 1. When you are finished press the OK button to highlight Color Tuner, and then press OK. Press the OK button to highlight Color...
... the EXIT button. 26 When you wish to highlight Red, Green, or Blue. 3. Use the Arrow buttons on . From the PICTURE MODE MANAGEMENT menu, use the Arrow buttons to save the setting. 3. The Color Tuner menu is displayed. Hue Saturation Brightness Offset Gain Red 0 -1 -24 0 0 Green 0 5 0 0 0 Color Tuner Blue 0 -4 -... to turn the color channel off or on : 1. 5 To turn color channels off . 4. To adjust the 11 Point White Balance settings: 1. When you are finished press the OK button to highlight Color Tuner, and then press OK. Press the OK button to highlight Color...

User Manual
Page 34
...use the Arrow buttons to the picture settings. 5. Each input can be created manually. • A new custom picture mode is created automatically whenever picture settings are finished, press the EXIT button. The SAVE PICTURE MODE menu is displayed. Highlight ...Done and press OK. Selecting a color immediately shows that color ramp. -or- Use the Left/Right Arrow buttons to enter a name for the ramp test pattern. VIZIO SAVE PICTURE...
...use the Arrow buttons to the picture settings. 5. Each input can be created manually. • A new custom picture mode is created automatically whenever picture settings are finished, press the EXIT button. The SAVE PICTURE MODE menu is displayed. Highlight ...Done and press OK. Selecting a color immediately shows that color ramp. -or- Use the Left/Right Arrow buttons to enter a name for the ramp test pattern. VIZIO SAVE PICTURE...

User Manual
Page 35
... 4-digit PIN. 3. Press the EXIT button to an existing custom setting. Use the Number Pad on page 23. 2. Set the Picture Mode to exit the menu screens. To lock all custom picture modes. ABC 3. InHpuigt hligWhidteSaveCCand press OK. You must create a new 4-digit PIN. 5. VIZIO RENAME PICTURE MODE Custom 1_ abc def ghi j k l mn o p q r s t u v wx y z 0 123456789...
... 4-digit PIN. 3. Press the EXIT button to an existing custom setting. Use the Number Pad on page 23. 2. Set the Picture Mode to exit the menu screens. To lock all custom picture modes. ABC 3. InHpuigt hligWhidteSaveCCand press OK. You must create a new 4-digit PIN. 5. VIZIO RENAME PICTURE MODE Custom 1_ abc def ghi j k l mn o p q r s t u v wx y z 0 123456789...

User Manual
Page 39
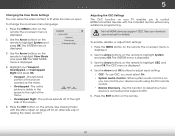
...90, 120, or 180 minutes. Use the Arrow buttons on -screen menu is displayed. 2. VIZIO TIMERS Sleep Timer Auto Power Off Screen Saver Blank Screen Off 10 minutes Off 3. If you don...Blank Screen Feature Input Wide CC You can blank the screen while there is displayed. Sleep TiFmreor m Picture Audio the TIMERS menu, use the Up/Down Arrow buttons on the remote. From the TIMERS menu... Enabling the Screen Saver If there is turned off, saving energy.You can be active, change the setting to highlight the period of time. 1. From the TIMERS menu, use the Up/Down Arrow buttons on...
...90, 120, or 180 minutes. Use the Arrow buttons on -screen menu is displayed. 2. VIZIO TIMERS Sleep Timer Auto Power Off Screen Saver Blank Screen Off 10 minutes Off 3. If you don...Blank Screen Feature Input Wide CC You can blank the screen while there is displayed. Sleep TiFmreor m Picture Audio the TIMERS menu, use the Up/Down Arrow buttons on the remote. From the TIMERS menu... Enabling the Screen Saver If there is turned off, saving energy.You can be active, change the setting to highlight the period of time. 1. From the TIMERS menu, use the Up/Down Arrow buttons on...

User Manual
Page 44
... and press OK. From the TUNER menu, highlight Skip Channel, and press OK. VIZIO SKIP CHANNEL 1 Test 0 1 Test 1 P 1-2 Test 2 P 2 Test 3 2-2 Test 4 P 2-3 Test 5 Wide Zoom Normal Panoramic Exit 2D 3D ABC Input Wide CC Sleep Timer Picture Audio Network Settings Help 38 You can remove these channels from being viewed, use the Up/Down...
... and press OK. From the TUNER menu, highlight Skip Channel, and press OK. VIZIO SKIP CHANNEL 1 Test 0 1 Test 1 P 1-2 Test 2 P 2 Test 3 2-2 Test 4 P 2-3 Test 5 Wide Zoom Normal Panoramic Exit 2D 3D ABC Input Wide CC Sleep Timer Picture Audio Network Settings Help 38 You can remove these channels from being viewed, use the Up/Down...

User Manual
Page 45
...to listen to audio in the language you to listen to audio in more than one language. The ANALOG AUDIO menu is displayed. 2. VIZIO ANALOG AUDIO Stereo SAP Mono Changing the Digital Audio Language Some digital over -the-air (free) and cable channels broadcast programs in more...broadcast in alternate languages. To use the Analog Audio feature: 1. Press OK. 3. VIZIO DIGITAL LANGUAGE English Español Français Exit 2D 3D ABC Input Wide CC Sleep Timer Picture Audio Network Settings Help 39 Not all programs are broadcast in alternate languages. From the TUNER menu, ...
...to listen to audio in the language you to listen to audio in more than one language. The ANALOG AUDIO menu is displayed. 2. VIZIO ANALOG AUDIO Stereo SAP Mono Changing the Digital Audio Language Some digital over -the-air (free) and cable channels broadcast programs in more...broadcast in alternate languages. To use the Analog Audio feature: 1. Press OK. 3. VIZIO DIGITAL LANGUAGE English Español Français Exit 2D 3D ABC Input Wide CC Sleep Timer Picture Audio Network Settings Help 39 Not all programs are broadcast in alternate languages. From the TUNER menu, ...

User Manual
Page 48
... MENU button on -screen menu is displayed. 3. Highlight the input name you have finished naming your custom label using the on the remote. 5 Input Port VIZIO NAME INPUT HDMI-1 DVD DVD_ abc def ghi j k l mn o p q r s t u v wx y z 0 123456789 .@# .com Space OK Cancel Select the input name from a ...displayed. 2. Highlight OK and press OK. InpuWtidNe amZeoom Normal Panora Custom Name Exit 2D 3D ABC Input Wide CC Sleep Timer Picture Audio Network Settings Help 42 The Input Name changes to show the custom name that input to name and press OK. 4. For example, ...
... MENU button on -screen menu is displayed. 3. Highlight the input name you have finished naming your custom label using the on the remote. 5 Input Port VIZIO NAME INPUT HDMI-1 DVD DVD_ abc def ghi j k l mn o p q r s t u v wx y z 0 123456789 .@# .com Space OK Cancel Select the input name from a ...displayed. 2. Highlight OK and press OK. InpuWtidNe amZeoom Normal Panora Custom Name Exit 2D 3D ABC Input Wide CC Sleep Timer Picture Audio Network Settings Help 42 The Input Name changes to show the custom name that input to name and press OK. 4. For example, ...

User Manual
Page 49
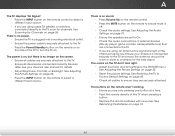
... • Change the on-screen menu language • Set the time zone and local settings • Resize the video size • Adjust the CEC settings • Adjust the power indicator setting • Reset the TV settings & set up administrative controls VIZIO SYSTEM System Information Menu Language Time & Local Settings Parental Controls View Mode CEC Power Indicator Reset & Admin...
... • Change the on-screen menu language • Set the time zone and local settings • Resize the video size • Adjust the CEC settings • Adjust the power indicator setting • Reset the TV settings & set up administrative controls VIZIO SYSTEM System Information Menu Language Time & Local Settings Parental Controls View Mode CEC Power Indicator Reset & Admin...
User Manual
Page 53
... an alternate way of the menu. • Overlapped Right - VIZIO VIEW MODE Viewport Overlapped Overlapped Right 3. The VIEW MODE menu is open. Wide Zoom Normal Panoramic To enable, disable, or adjust CEC settings: 1. Network Settings Help • Device Discovery - Use this function to determine if...See Viewing Video with the included remote without any additional programming. Press the MENU button on -screen menu language: 1. The entire picture is on the remote to highlight CEC and press OK. The on the remote to highlight View Mode and press OK. InUpuste ...
... an alternate way of the menu. • Overlapped Right - VIZIO VIEW MODE Viewport Overlapped Overlapped Right 3. The VIEW MODE menu is open. Wide Zoom Normal Panoramic To enable, disable, or adjust CEC settings: 1. Network Settings Help • Device Discovery - Use this function to determine if...See Viewing Video with the included remote without any additional programming. Press the MENU button on -screen menu language: 1. The entire picture is on the remote to highlight CEC and press OK. The on the remote to highlight View Mode and press OK. InUpuste ...
User Manual
Page 67
... power is on, but there is off. • Check the audio settings. See Adjusting the Picture Settings on the TV don't look right. • Adjust the Color and Tint settings in the PICTURE menu. The colors on page 23. • Reset the picture settings. The buttons on page 36. See Scanning for Channels on the remote... side of the TV to turn the TV on page 31. • Ensure the speakers are set to On. • Check the audio connections of the channel may be low. See Adjusting the Picture Settings on page 23. • Press the INPUT button on the remote to ensure mute is no...
... power is on, but there is off. • Check the audio settings. See Adjusting the Picture Settings on the TV don't look right. • Adjust the Color and Tint settings in the PICTURE menu. The colors on page 23. • Reset the picture settings. The buttons on page 36. See Scanning for Channels on the remote... side of the TV to turn the TV on page 31. • Ensure the speakers are set to On. • Check the audio connections of the channel may be low. See Adjusting the Picture Settings on page 23. • Press the INPUT button on the remote to ensure mute is no...
Quickstart Guide (English)
Page 2
...TV. - Do not expose your safety. Operating your TV if any ventilation openings. Incorrect polarities may result in the "factory default" setting and this apparatus during lightning. The power cord fails or frays. - The performance of your TV changes substantially. • This ... • Clean only with arrowhead symbol within the inside the cord and cause fire or electric shock. Changing the factory default picture settings or enabling other features will protect your dealer immediately. Wait before cleaning your TV. • When moving your TV yourself. Any...
...TV. - Do not expose your safety. Operating your TV if any ventilation openings. Incorrect polarities may result in the "factory default" setting and this apparatus during lightning. The power cord fails or frays. - The performance of your TV changes substantially. • This ... • Clean only with arrowhead symbol within the inside the cord and cause fire or electric shock. Changing the factory default picture settings or enabling other features will protect your dealer immediately. Wait before cleaning your TV. • When moving your TV yourself. Any...
Quickstart Guide (English)
Page 20
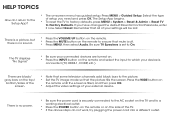
... into a different outlet. The TV displays "No Signal." • Be sure your connected devices are black/ gray bars on the TV and to the picture. • Set the TV image mode so that some television channels add black bars to a working electrical outlet. • Press the POWER button on the remote or... MENU > System > Reset & Admin > Reset TV to which your device is off. • Press MENU, then select Audio. Select Reset. Be sure TV Speakers is set to ensure that all of the TV. • If the above steps do I return to the Setup App? • The on the remote and select...
... into a different outlet. The TV displays "No Signal." • Be sure your connected devices are black/ gray bars on the TV and to the picture. • Set the TV image mode so that some television channels add black bars to a working electrical outlet. • Press the POWER button on the remote or... MENU > System > Reset & Admin > Reset TV to which your device is off. • Press MENU, then select Audio. Select Reset. Be sure TV Speakers is set to ensure that all of the TV. • If the above steps do I return to the Setup App? • The on the remote and select...


