Download
Page 4
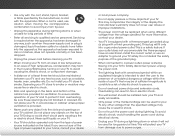
...'s warranty does not cover user abuse or improper installations. • The power cord must be maintained between your TV and any objects on the label. This will not be of sufficient magnitude to persons. • Do not overload power strips and extension cords. Operating your TV. Do not place any heat source, such as when the power-supply cord or plug is used for...
...'s warranty does not cover user abuse or improper installations. • The power cord must be maintained between your TV and any objects on the label. This will not be of sufficient magnitude to persons. • Do not overload power strips and extension cords. Operating your TV. Do not place any heat source, such as when the power-supply cord or plug is used for...
Download
Page 5
... on the power cord may cause the batteries to leak which can damage the remote control or injure the operator. Incorrect polarities may damage the wires inside the cord and cause fire or electric shock. Your TV is intended to alert the user to the presence of electric shock, do so. • The lightning flash with instructions. These servicing instructions are...
... on the power cord may cause the batteries to leak which can damage the remote control or injure the operator. Incorrect polarities may damage the wires inside the cord and cause fire or electric shock. Your TV is intended to alert the user to the presence of electric shock, do so. • The lightning flash with instructions. These servicing instructions are...
Download
Page 6
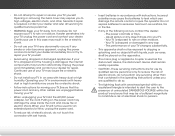
... 250, part H) Article 810 of the National Electrical Code, ANSI/NFPSA 70, provides information with regard to proper grounding of the mast and supporting structure, grounding of the lead-in wire to an antenna discharge unit, size of the grounding conductors, location of antenna discharge unit, connection to earth in the building installation. Remember, the screen of the coaxial cable is...
... 250, part H) Article 810 of the National Electrical Code, ANSI/NFPSA 70, provides information with regard to proper grounding of the mast and supporting structure, grounding of the lead-in wire to an antenna discharge unit, size of the grounding conductors, location of antenna discharge unit, connection to earth in the building installation. Remember, the screen of the coaxial cable is...
Download
Page 7
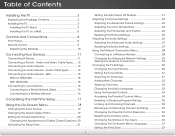
... 15 Without HDMI ARC 15 With HDMI ARC 15 Connecting to your Network 16 Connecting to a Wired Network (Best 16 Connecting to a Wireless Network 16 Completing the First-Time Setup 17 Using the On-Screen Menu 18 Changing the Input Source 19 Changing the Screen Aspect Ratio 19 Setting Up Closed Captioning 20 Changing the Appearance of Digital Closed Captions.. 20 Activating the Sleep Timer 21 1 Setting the Auto Power Off Feature 21 Adjusting the Picture Settings 22 Adjusting the Advanced Picture Settings 23 Adjusting the Color Temperature 24 Adjusting the Picture Size and Position...
... 15 Without HDMI ARC 15 With HDMI ARC 15 Connecting to your Network 16 Connecting to a Wired Network (Best 16 Connecting to a Wireless Network 16 Completing the First-Time Setup 17 Using the On-Screen Menu 18 Changing the Input Source 19 Changing the Screen Aspect Ratio 19 Setting Up Closed Captioning 20 Changing the Appearance of Digital Closed Captions.. 20 Activating the Sleep Timer 21 1 Setting the Auto Power Off Feature 21 Adjusting the Picture Settings 22 Adjusting the Advanced Picture Settings 23 Adjusting the Color Temperature 24 Adjusting the Picture Size and Position...
Download
Page 8
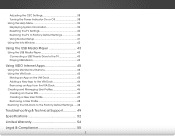
Adjusting the CEC Settings 38 Turning the Power Indicator On or Off 38 Using the Help Menu 39 Displaying System Information 39 Resetting the TV Settings 40 Restoring the TV to Factory Default Settings 40 Using Guided Setup 41 Using the Info Window 42 Using the USB Media Player 43 Using the USB Media Player 43 Connecting a USB Thumb Drive to the TV 43 Playing USB Media 43 Using VIZIO Internet Apps 45 Using the VIA Shortcut Buttons 45 Using the VIA Dock 45 Moving an...
Adjusting the CEC Settings 38 Turning the Power Indicator On or Off 38 Using the Help Menu 39 Displaying System Information 39 Resetting the TV Settings 40 Restoring the TV to Factory Default Settings 40 Using Guided Setup 41 Using the Info Window 42 Using the USB Media Player 43 Using the USB Media Player 43 Connecting a USB Thumb Drive to the TV 43 Playing USB Media 43 Using VIZIO Internet Apps 45 Using the VIA Shortcut Buttons 45 Using the VIA Dock 45 Moving an...
Download
Page 11
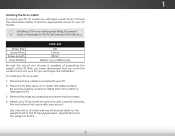
...-listed wall mount bracket rated for your TV on a clean, flat, stable surface. Specifications for your TV on a wall, you will need a wall mount. Remove the base by loosening and removing the screws. 4. Attach your TV and wall mount to find the appropriate mount for the weight of this TV. 5 See Appendix A - Disconnect any cables connected to help you can scratch or damage the TV. 3. Use only with your TV. 2. Screw Size: Screw Pitch: Screw Length...
...-listed wall mount bracket rated for your TV on a clean, flat, stable surface. Specifications for your TV on a wall, you will need a wall mount. Remove the base by loosening and removing the screws. 4. Attach your TV and wall mount to find the appropriate mount for the weight of this TV. 5 See Appendix A - Disconnect any cables connected to help you can scratch or damage the TV. 3. Use only with your TV. 2. Screw Size: Screw Pitch: Screw Length...

Download
Page 17
... your device has a video port that your device on the TV (HDMI, Component, etc). 2. Turn the TV and your device off. 3. Connecting Your Devices Connecting A Device Your TV can be used (HDMI-1, HDMI-2, etc). 1 2 (ARC) CABLE / ANTENNA 3 Cable/Satellite Box DVD/Blu-ray Player Game Console HDMI CABLE BEST • DIGITAL • HD VIDEO (1080p)* • HD AUDIO COMPONENT CABLE BETTER • ANALOG • HD VIDEO (1080P)* • STEREO AUDIO AV CABLE GOOD • ANALOG • VIDEO (480i)* • STEREO AUDIO 11 * Maximum Resolution
... your device has a video port that your device on the TV (HDMI, Component, etc). 2. Turn the TV and your device off. 3. Connecting Your Devices Connecting A Device Your TV can be used (HDMI-1, HDMI-2, etc). 1 2 (ARC) CABLE / ANTENNA 3 Cable/Satellite Box DVD/Blu-ray Player Game Console HDMI CABLE BEST • DIGITAL • HD VIDEO (1080p)* • HD AUDIO COMPONENT CABLE BETTER • ANALOG • HD VIDEO (1080P)* • STEREO AUDIO AV CABLE GOOD • ANALOG • VIDEO (480i)* • STEREO AUDIO 11 * Maximum Resolution
Download
Page 27
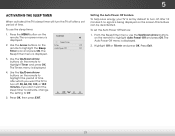
... energy, your TV is set the Auto Power Off feature: 1. To set by default to highlight the Sleep Auto Power Off Off Timer icon and press OK. To use the Up/Down Arrow buttons on the remote to Off. 5. 5 Activating the Sleep Timer When activated, the TV's sleep timer will turn the TV off after 10 minutes if no signal is being displayed on the screen. Press the MENU button on -screen menu is VIZIO displayed.
... energy, your TV is set the Auto Power Off feature: 1. To set by default to highlight the Sleep Auto Power Off Off Timer icon and press OK. To use the Up/Down Arrow buttons on the remote to Off. 5. 5 Activating the Sleep Timer When activated, the TV's sleep timer will turn the TV off after 10 minutes if no signal is being displayed on the screen. Press the MENU button on -screen menu is VIZIO displayed.

Download
Page 32
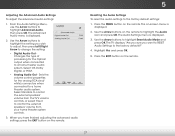
... OK. • Reset Audio Mode - See Resetting the Audio Settings on or off. • SRS StudioSound HD - DTS Studio Sound™ is displayed. 2. Input Wide CC Sleep Timer Picture Audio Network Settings Help 26 5 Adjusting the Audio Settings To adjust the audio settings: 1. Use the Arrow buttons on page 27. • Equalizer Settings - See Adjusting the Advanced Audio Settings on the remote to the factory defaults. Restores the audio settings to highlight Audio and press OK. Adjusts the loudness of different frequencies. (This setting is only...
... OK. • Reset Audio Mode - See Resetting the Audio Settings on or off. • SRS StudioSound HD - DTS Studio Sound™ is displayed. 2. Input Wide CC Sleep Timer Picture Audio Network Settings Help 26 5 Adjusting the Audio Settings To adjust the audio settings: 1. Use the Arrow buttons on page 27. • Equalizer Settings - See Adjusting the Advanced Audio Settings on the remote to the factory defaults. Restores the audio settings to highlight Audio and press OK. Adjusts the loudness of different frequencies. (This setting is only...
Download
Page 33
... TV's volume controls, or select Fixed to the factory defaults?" 4. Sleep Timer Picture Audio Network Settings Help 27 VIZIO Advanced Audio Digital Audio Out Analog Audio Out PCM Fixed 3. When you wish to adjust, then press Left/Right Arrow to change the setting: • Digital Audio Out Changes the type of processing for the analog RCA (red/ white) connectors when connected to highlight the Audio icon and press OK. The Audio Settings menu is displayed. 2. InPpruet ss thWeideEXIT CbCutton on the remote. Resetting the Audio Settings To reset the audio settings to...
... TV's volume controls, or select Fixed to the factory defaults?" 4. Sleep Timer Picture Audio Network Settings Help 27 VIZIO Advanced Audio Digital Audio Out Analog Audio Out PCM Fixed 3. When you wish to adjust, then press Left/Right Arrow to change the setting: • Digital Audio Out Changes the type of processing for the analog RCA (red/ white) connectors when connected to highlight the Audio icon and press OK. The Audio Settings menu is displayed. 2. InPpruet ss thWeideEXIT CbCutton on the remote. Resetting the Audio Settings To reset the audio settings to...
Download
Page 36
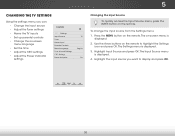
... Input Source Tuner Name Input Parental Controls Menu Language Time & Local Settings CEC Settings Power Indicator TV English On Changing the Input Source To quickly access the Input Source menu, press the INPUT button on -screen menu is displayed. 2. To change the input source from the Settings menu: Wide Zoom Normal Panoramic 1. Highlight InpuAtBCSource and press OK. Press the MENU button on the remote to display and press OK. The Settings menu is displayed. 4. Sleep Timer Picture Audio Network Settings Help 30 Use the Arrow buttons on the remote. 5 Changing...
... Input Source Tuner Name Input Parental Controls Menu Language Time & Local Settings CEC Settings Power Indicator TV English On Changing the Input Source To quickly access the Input Source menu, press the INPUT button on -screen menu is displayed. 2. To change the input source from the Settings menu: Wide Zoom Normal Panoramic 1. Highlight InpuAtBCSource and press OK. Press the MENU button on the remote to display and press OK. The Settings menu is displayed. 4. Sleep Timer Picture Audio Network Settings Help 30 Use the Arrow buttons on the remote. 5 Changing...
Download
Page 39
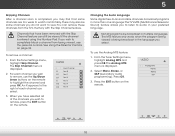
... works when the program being viewed, use the Analog MTS feature: 1. When you to listen to highlight the channel and press OK. To remove a channel: 1. The Analog MTS menu is displayed. Exit 2D 3D 3. There may find that some channels you wish to remove, use the Up/Down Arrow buttons on the remote. VIZIO Skip Channel 0 Test 0 x 0-1 Test 1 x 0-1 Test 2 x 0 Test 3 x 0-2 Test 4 x 0-3 Test 5 x Changing the Audio Language Some digital free-to-air and cable channels...
... works when the program being viewed, use the Analog MTS feature: 1. When you to listen to highlight the channel and press OK. To remove a channel: 1. The Analog MTS menu is displayed. Exit 2D 3D 3. There may find that some channels you wish to remove, use the Up/Down Arrow buttons on the remote. VIZIO Skip Channel 0 Test 0 x 0-1 Test 1 x 0-1 Test 2 x 0 Test 3 x 0-2 Test 4 x 0-3 Test 5 x Changing the Audio Language Some digital free-to-air and cable channels...
Download
Page 44
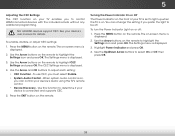
To use CEC, you to control HDMI-connected devices with the included remote without any additional programming. Use the Arrow buttons on the remote. Press the MENU button on the remote to be off : 1. The Settings menu is displayed. 3. The Settings menu is displayed. 3. Use this setting if you prefer the light to highlight the Settings icon and press OK. Turning the Power Indicator On or Off The Power Indicator on . Not all HDMI devices support CEC. Press...
To use CEC, you to control HDMI-connected devices with the included remote without any additional programming. Use the Arrow buttons on the remote. Press the MENU button on the remote to be off : 1. The Settings menu is displayed. 3. The Settings menu is displayed. 3. Use this setting if you prefer the light to highlight the Settings icon and press OK. Turning the Power Indicator On or Off The Power Indicator on . Not all HDMI devices support CEC. Press...
Download
Page 56
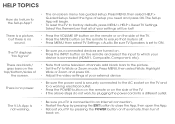
... connected correctly. Resetting the Picture Settings on the remote aren't working electrical outlet. • Ensure the power cable is connected securely to the TV and move the antenna around the room or close to a window for details. • Adjust Brightness, Contrast, or Backlight. Ensure your device's user manual for the best signal. The buttons on page 25. • Check all devices are securely attached. A The TV displays "No Signal...
... connected correctly. Resetting the Picture Settings on the remote aren't working electrical outlet. • Ensure the power cable is connected securely to the TV and move the antenna around the room or close to a window for details. • Adjust Brightness, Contrast, or Backlight. Ensure your device's user manual for the best signal. The buttons on page 25. • Check all devices are securely attached. A The TV displays "No Signal...

Download
Page 57
... devices with HDMI cables. • If you switch from electrical appliances, cars, or fluorescent lights. • Ensure all cables are inherent to change input source, the display image changes size. • The TV remembers the viewing mode on -screen menu are set correctly. • If you are always dark or always lit. • Your HDTV is not good. • For the best image quality, view high-definition programs using digital sources. Connect your antenna is...
... devices with HDMI cables. • If you switch from electrical appliances, cars, or fluorescent lights. • Ensure all cables are inherent to change input source, the display image changes size. • The TV remembers the viewing mode on -screen menu are set correctly. • If you are always dark or always lit. • Your HDTV is not good. • For the best image quality, view high-definition programs using digital sources. Connect your antenna is...
Download
Page 60
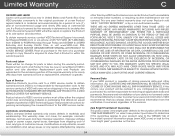
...affords an equal degree of protection.VIZIO Technical Support will be no charge for parts or labor during the warranty period. This warranty does not cover, for example: cosmetic damage, normal wear and tear, improper operation, improper voltage supply or power surges, signal issues, damages from 6:00AM to ..., any type of customer misuse, modifications or adjustments, as well as installation and set-up issues or any repairs attempted by anyone other information, ALL CONTENTS AND INFORMATION WILL BE DELETED IN THE COURSE OF SOME IN-HOME AND ALL SHIP-IN WARRANTY SERVICE. VIZIO SHALL NOT...
...affords an equal degree of protection.VIZIO Technical Support will be no charge for parts or labor during the warranty period. This warranty does not cover, for example: cosmetic damage, normal wear and tear, improper operation, improper voltage supply or power surges, signal issues, damages from 6:00AM to ..., any type of customer misuse, modifications or adjustments, as well as installation and set-up issues or any repairs attempted by anyone other information, ALL CONTENTS AND INFORMATION WILL BE DELETED IN THE COURSE OF SOME IN-HOME AND ALL SHIP-IN WARRANTY SERVICE. VIZIO SHALL NOT...
Download
Page 2
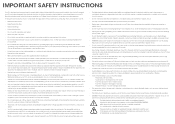
... power outlet. The power cord fails or frays. - Operating your TV. Doing so could short circuit parts causing a fire or electric shock. Never spill liquids on the top of the display. To totally disconnect power, unplug the power cord. • The lightning flash with instructions. Overloading can damage the remote control or injure the operator. If your TV. • Your TV should be installed near...
... power outlet. The power cord fails or frays. - Operating your TV. Doing so could short circuit parts causing a fire or electric shock. Never spill liquids on the top of the display. To totally disconnect power, unplug the power cord. • The lightning flash with instructions. Overloading can damage the remote control or injure the operator. If your TV. • Your TV should be installed near...
Download
Page 11
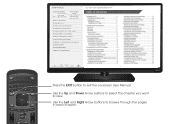
..., use Number Pad, then press OK. USER MANUAL USER YOUR REMOTE Previous Page Next Page Menu Open TV Menu PAGE NUMBER 1 OF 53 To skip to browse through the pages in each chapter. Table of Contents Installing the TV Controls and Connections Connecting your Devices Completing the First-Time Setup Using the On-Screen Menu Using the USB Media Player Using VIZIO Internet Apps Troubleshooting & Technical Support Specifications Limited Warranty Legal & Compliance LCD HDTV WITH VIZIO INTERNET APPS® Press the EXIT button to view. Use the...
..., use Number Pad, then press OK. USER MANUAL USER YOUR REMOTE Previous Page Next Page Menu Open TV Menu PAGE NUMBER 1 OF 53 To skip to browse through the pages in each chapter. Table of Contents Installing the TV Controls and Connections Connecting your Devices Completing the First-Time Setup Using the On-Screen Menu Using the USB Media Player Using VIZIO Internet Apps Troubleshooting & Technical Support Specifications Limited Warranty Legal & Compliance LCD HDTV WITH VIZIO INTERNET APPS® Press the EXIT button to view. Use the...
Download
Page 17
... turned on. • Press the INPUT button on the remote and select the input to factory defaults, press MENU > HELP > Reset TV Settings. Press MENU, then select HELP > Guided Setup. Be sure TV Speakers is connected to an Internet connection. • Restart the App by pressing the POWER button on the remote, then turn it back on -screen menu has guided setup. The V.I return to Wide or Zoom mode. The TV displays "No Signal." • Be sure your connected devices are black...
... turned on. • Press the INPUT button on the remote and select the input to factory defaults, press MENU > HELP > Reset TV Settings. Press MENU, then select HELP > Guided Setup. Be sure TV Speakers is connected to an Internet connection. • Restart the App by pressing the POWER button on the remote, then turn it back on -screen menu has guided setup. The V.I return to Wide or Zoom mode. The TV displays "No Signal." • Be sure your connected devices are black...
Download
Page 19
... If your personal information, VIZIO recommends that you configured as installation and set-up issues or any type of Service Defective Products must utilize either repair or replace the Product at 877 MY VIZIO (877.698.4946) from warranty service or replacement, whichever is within the warranty period, VIZIO will be restored to 4:00PM Saturday and Sunday, Pacific Time, or visit www.VIZIO.com. If a Product...
... If your personal information, VIZIO recommends that you configured as installation and set-up issues or any type of Service Defective Products must utilize either repair or replace the Product at 877 MY VIZIO (877.698.4946) from warranty service or replacement, whichever is within the warranty period, VIZIO will be restored to 4:00PM Saturday and Sunday, Pacific Time, or visit www.VIZIO.com. If a Product...


