
User Manual English
Page 2
... the remote control or injure the operator. To ensure reliable operation of the HD Display. The manufacturer's warranty does not cover user abuse or improper installations. • The power cord must be installed near any servicing other cables are not blocked or covered. E-SERIES HD DISPLAY our HD Display is always owing into your HD Display, unplug the power cord and contact your HD Display and easily accessible. • Only power of...
... the remote control or injure the operator. To ensure reliable operation of the HD Display. The manufacturer's warranty does not cover user abuse or improper installations. • The power cord must be installed near any servicing other cables are not blocked or covered. E-SERIES HD DISPLAY our HD Display is always owing into your HD Display, unplug the power cord and contact your HD Display and easily accessible. • Only power of...
User Manual English
Page 3
... 33 Adjusting Picture Settings 36 Adjusting the Picture Mode Edit Settings 40 Adjusting the Color Calibration Settings 43 Adjusting Audio Settings 45 Adjusting Timer Settings 47 Activating the Sleep Timer 48 Setting the Auto Power Off Feature 48 Adjusting Network Settings 49 Using the Network Connection menu 50 Renaming Devices on the Input Menu 53 Renaming Devices on the Input Menu 54 Enabling HDMI Color Subsampling 54 Changing the Display System Settings 55 Viewing System Information 56 Changing the On-Screen Menu Language 56 Setting the Time and Local Settings 57 Adjusting...
... 33 Adjusting Picture Settings 36 Adjusting the Picture Mode Edit Settings 40 Adjusting the Color Calibration Settings 43 Adjusting Audio Settings 45 Adjusting Timer Settings 47 Activating the Sleep Timer 48 Setting the Auto Power Off Feature 48 Adjusting Network Settings 49 Using the Network Connection menu 50 Renaming Devices on the Input Menu 53 Renaming Devices on the Input Menu 54 Enabling HDMI Color Subsampling 54 Changing the Display System Settings 55 Viewing System Information 56 Changing the On-Screen Menu Language 56 Setting the Time and Local Settings 57 Adjusting...
User Manual English
Page 5
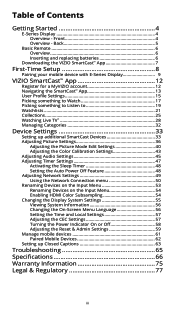
1 Overview - The actual number of ports and their locations may be subject to change. Back 1 2 2 3 1 Power Button Volume Up/Down Buttons Input Button USB 2.0 Port Component Ports HDMI Port Optical/SPDIF Audio Out Port HDMI Ports 3 RCA Audio Out Ports Ethernet Port Note: The images shown here are for illustrative purposes only and may vary, depending on the model. 5
1 Overview - The actual number of ports and their locations may be subject to change. Back 1 2 2 3 1 Power Button Volume Up/Down Buttons Input Button USB 2.0 Port Component Ports HDMI Port Optical/SPDIF Audio Out Port HDMI Ports 3 RCA Audio Out Ports Ethernet Port Note: The images shown here are for illustrative purposes only and may vary, depending on the model. 5
User Manual English
Page 6
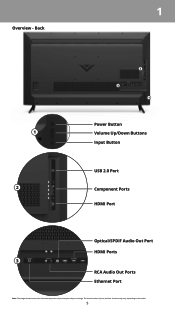
.../decrease the loudness of the E-Series display. Insert a coin and pry open the back cover. 2. To insert/replace the batteries: 1. Be sure to use with the basic remote control. Picture Mode Cycle through the different aspect ratio modes. 1 BASIC REMOTE Overview Use the Basic Remote to control the basic functions of the audio. Power Turn the TV on the batteries and remote. 1 2 6 Input Change the currently displayed input. Channel Up/Down Change the channel.
.../decrease the loudness of the E-Series display. Insert a coin and pry open the back cover. 2. To insert/replace the batteries: 1. Be sure to use with the basic remote control. Picture Mode Cycle through the different aspect ratio modes. 1 BASIC REMOTE Overview Use the Basic Remote to control the basic functions of the audio. Power Turn the TV on the batteries and remote. 1 2 6 Input Change the currently displayed input. Channel Up/Down Change the channel.

User Manual English
Page 8
... app. It works over WiFi, so you can control your VIZIO display from any room, and keep using your device to continue browsing, play games, text or even watch another show, without having to your home. Now let's get you into setup so you experience it will never be controlled by one view, without disrupting what you love doesn't change, but how...
... app. It works over WiFi, so you can control your VIZIO display from any room, and keep using your device to continue browsing, play games, text or even watch another show, without having to your home. Now let's get you into setup so you experience it will never be controlled by one view, without disrupting what you love doesn't change, but how...
User Manual English
Page 13
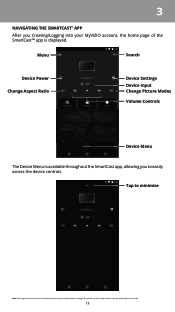
3 NAVIGATING THE SMARTCAST™ APP After you to easily access the device controls. Tap to change. The actual on-screen image and text may be subject to minimize Note: The images shown here are for illustrative purposes only and may vary, depending on the model. 13 Menu Search Device Power Change Aspect Ratio Device Settings Device Input Change Picture Modes Volume Controls Device Menu The Device Menu is available throughout the SmartCast app, allowing you Creating/Logging into your MyVIZIO account, the home page of the SmartCast™ app is displayed.
3 NAVIGATING THE SMARTCAST™ APP After you to easily access the device controls. Tap to change. The actual on-screen image and text may be subject to minimize Note: The images shown here are for illustrative purposes only and may vary, depending on the model. 13 Menu Search Device Power Change Aspect Ratio Device Settings Device Input Change Picture Modes Volume Controls Device Menu The Device Menu is available throughout the SmartCast app, allowing you Creating/Logging into your MyVIZIO account, the home page of the SmartCast™ app is displayed.

User Manual English
Page 18
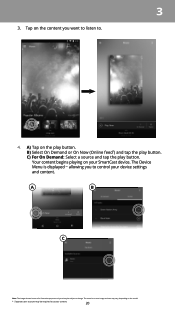
B) Select On Demand or On Now (Online feed*) and tap the play button. C) For On Demand: Select a source and tap the play button. The Device Menu is displayed allowing you want to watch to control your display settings and content. A) Tap on the model. * Separate user account may be subject to access content. 18 Tap on your content from the list or search for illustrative purposes...
B) Select On Demand or On Now (Online feed*) and tap the play button. C) For On Demand: Select a source and tap the play button. The Device Menu is displayed allowing you want to watch to control your display settings and content. A) Tap on the model. * Separate user account may be subject to access content. 18 Tap on your content from the list or search for illustrative purposes...
User Manual English
Page 20
... purposes only and may vary, depending on your device settings and content. C) For On Demand: Select a source and tap the play button. The Device Menu is displayed allowing you want to listen to change. The actual on-screen image and text may be required to control your SmartCast device. 3 3. B) Select On Demand or On Now (Online feed*) and tap the...
... purposes only and may vary, depending on your device settings and content. C) For On Demand: Select a source and tap the play button. The Device Menu is displayed allowing you want to listen to change. The actual on-screen image and text may be required to control your SmartCast device. 3 3. B) Select On Demand or On Now (Online feed*) and tap the...

User Manual English
Page 28
... automatically scans for an Unsupported Device. Select your device manually by tapping Rescan Network or add your device from DirecTV and Dish Network services, with IP-based set up a TV connection to search, discover, and browse live TV channels. Live TV listings compatible with more services to be subject to change. 3 WATCHING LIVE TV* If you have a cable or satellite, you can use the VIZIO SmartCast...
... automatically scans for an Unsupported Device. Select your device manually by tapping Rescan Network or add your device from DirecTV and Dish Network services, with IP-based set up a TV connection to search, discover, and browse live TV channels. Live TV listings compatible with more services to be subject to change. 3 WATCHING LIVE TV* If you have a cable or satellite, you can use the VIZIO SmartCast...
User Manual English
Page 38
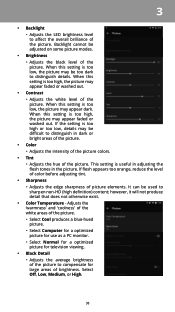
... this setting is too low, the picture may be di cult to distinguish details. Adjusts the 'warmness' and 'coolness' of the white areas of the picture. • Select Cool produces a blue-hued picture. • Select Computer for a optimized picture for use as a PC monitor. • Select Normal for a optimized picture for television viewing. • Black Detail • Adjusts the average brightness of the picture to...
... this setting is too low, the picture may be di cult to distinguish details. Adjusts the 'warmness' and 'coolness' of the white areas of the picture. • Select Cool produces a blue-hued picture. • Select Computer for a optimized picture for use as a PC monitor. • Select Normal for a optimized picture for television viewing. • Black Detail • Adjusts the average brightness of the picture to...
User Manual English
Page 40
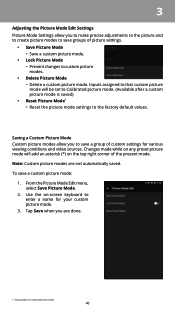
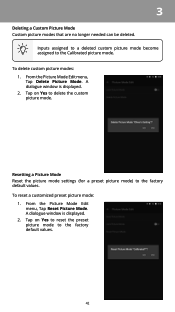
... custom picture mode. 3. Use the on customized preset modes. 40 Note: Custom picture modes are done. * Only available on -screen keyboard to the factory default values. From the Picture Mode Edit menu, select Save Picture Mode. 2. 3 Adjusting the Picture Mode Edit Settings Picture Mode Settings allow you to make precise adjustments to the picture and to create picture modes to save groups of picture settings. • Save Picture Mode • Save a custom picture mode. • Lock Picture Mode • Prevent changes to custom picture modes. • Delete Picture Mode...
... custom picture mode. 3. Use the on customized preset modes. 40 Note: Custom picture modes are done. * Only available on -screen keyboard to the factory default values. From the Picture Mode Edit menu, select Save Picture Mode. 2. 3 Adjusting the Picture Mode Edit Settings Picture Mode Settings allow you to make precise adjustments to the picture and to create picture modes to save groups of picture settings. • Save Picture Mode • Save a custom picture mode. • Lock Picture Mode • Prevent changes to custom picture modes. • Delete Picture Mode...
User Manual English
Page 42
... needed can be deleted. Tap on Yes to reset the preset picture mode to delete the custom picture mode. To reset a customized preset picture mode: 1. Tap on Yes to the factory default values. 42 Inputs assigned to a deleted custom picture mode become assigned to the factory default values. To delete custom picture modes: 1. A dialogue window is displayed. 2. From the Picture Mode Edit menu, Tap Reset Picture Mode. Resetting a Picture Mode Reset the picture mode settings (for a preset picture mode) to the Calibrated picture mode. From the Picture Mode Edit menu...
... needed can be deleted. Tap on Yes to reset the preset picture mode to delete the custom picture mode. To reset a customized preset picture mode: 1. Tap on Yes to the factory default values. 42 Inputs assigned to a deleted custom picture mode become assigned to the factory default values. To delete custom picture modes: 1. A dialogue window is displayed. 2. From the Picture Mode Edit menu, Tap Reset Picture Mode. Resetting a Picture Mode Reset the picture mode settings (for a preset picture mode) to the Calibrated picture mode. From the Picture Mode Edit menu...

User Manual English
Page 43
.... • Reset Color Tuner allows you to reset to color defaults • Calibration Tests allow you to calibrate the image using HSB (Hue, Saturation and Balance), offset, gain and 11 point white balance. ou can also reset the color tuner values and perform calibration tests. To adjust the 11 point white balance: 1. 3 Adjusting the Color Calibration Settings Use the color calibration settings to display SMPTE, Flat, Ramp, and Uniformity Analyzer test patterns. Current Picture Mode Current Color Temperature To access the color calibration settings menu: 1.
.... • Reset Color Tuner allows you to reset to color defaults • Calibration Tests allow you to calibrate the image using HSB (Hue, Saturation and Balance), offset, gain and 11 point white balance. ou can also reset the color tuner values and perform calibration tests. To adjust the 11 point white balance: 1. 3 Adjusting the Color Calibration Settings Use the color calibration settings to display SMPTE, Flat, Ramp, and Uniformity Analyzer test patterns. Current Picture Mode Current Color Temperature To access the color calibration settings menu: 1.

User Manual English
Page 46
Select Auto to have the Display automatically detect if there are controlling the volume with the Display's volume controls, or select Fixed if an external audio device (sound bar or AV receiver) will control the volume. 46 Changes the type of the audio output from the left to disable and right to deliver an immersive surround sound experience from the Display's internal speakers. Sets the volume control properties for digital audio out and HDMI ARC output when connected to a home theater audio system...
Select Auto to have the Display automatically detect if there are controlling the volume with the Display's volume controls, or select Fixed if an external audio device (sound bar or AV receiver) will control the volume. 46 Changes the type of the audio output from the left to disable and right to deliver an immersive surround sound experience from the Display's internal speakers. Sets the volume control properties for digital audio out and HDMI ARC output when connected to a home theater audio system...

User Manual English
Page 57
The Time & Local Settings menu is displayed, set the Display's time zone: 1. Set the time zone. • Daylight Savings Time - Adjusting the CEC Settings The CEC function on , off . 57 turn CEC off , or auto. • Time Format - The ARC setting does not support video devices connected to the audio device (Select Enable to have the Display sync the time online. • Date & Time - Select Disable to turn daylight savings time on your device's user manual for details. Swipe the switch to the...
The Time & Local Settings menu is displayed, set the Display's time zone: 1. Set the time zone. • Daylight Savings Time - Adjusting the CEC Settings The CEC function on , off . 57 turn CEC off , or auto. • Time Format - The ARC setting does not support video devices connected to the audio device (Select Enable to have the Display sync the time online. • Date & Time - Select Disable to turn daylight savings time on your device's user manual for details. Swipe the switch to the...

User Manual English
Page 75
... user data and downloaded applications. Replacement parts may visit www.vizio.com for one (1) year from warranty service, whichever is used normally in connection with unreadable or removed serial numbers; (k) products requiring routine maintenance; Replacement parts and VIZIO's labor are 32 inches or larger will have the right to the procedures described below . What to resolve the issue informally with VIZIO's user guides and manuals. Instead your product, refer to obtain warranty service...
... user data and downloaded applications. Replacement parts may visit www.vizio.com for one (1) year from warranty service, whichever is used normally in connection with unreadable or removed serial numbers; (k) products requiring routine maintenance; Replacement parts and VIZIO's labor are 32 inches or larger will have the right to the procedures described below . What to resolve the issue informally with VIZIO's user guides and manuals. Instead your product, refer to obtain warranty service...
Quickstart Guide English
Page 2
... safety instructions before operating your safety. Never spill liquids on your Display. • Your Display should be replaced when using different voltage than the other components to your outlet, consult an electrician for replacement of electric shock to operate within defined design limits. The manufacturer's warranty does not cover user abuse or improper installations. • The power cord must be maintained between your Display close to...
... safety instructions before operating your safety. Never spill liquids on your Display. • Your Display should be replaced when using different voltage than the other components to your outlet, consult an electrician for replacement of electric shock to operate within defined design limits. The manufacturer's warranty does not cover user abuse or improper installations. • The power cord must be maintained between your Display close to...

Quickstart Guide English
Page 3
Opening or removing the back cover may become accustomed to the sound level, which can damage the remote control or injure the operator. If your Display is dropped and the housing is intended to alert the user to the h presence of ...repair or service your Display yourself. Unplug the power cord immediately and contact your dealer for use your Display if any smoke or odor becomes apparent, unplug the power cord and contact your dealer. iii result in fire or electric shock. • The wall socket should be installed near your Display and easily accessible. • Only power...
Opening or removing the back cover may become accustomed to the sound level, which can damage the remote control or injure the operator. If your Display is dropped and the housing is intended to alert the user to the h presence of ...repair or service your Display yourself. Unplug the power cord immediately and contact your dealer for use your Display if any smoke or odor becomes apparent, unplug the power cord and contact your dealer. iii result in fire or electric shock. • The wall socket should be installed near your Display and easily accessible. • Only power...
Quickstart Guide English
Page 24
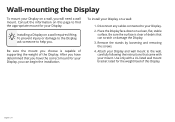
... of supporting the weight of debris that came with a UL-listed wall mount bracket rated for your Display on this Display. Use only with your Display. Be sure the mount you . Remove the stands by loosening and removing the screws. 4. Installing a Display on a clean, flat, stable surface. Disconnect any cables connected to find the appropriate mount for your mount. Place the Display face-down on a wall requires lifting. English - 24 Wall-mounting the Display To mount your Display. 2. Consult...
... of supporting the weight of debris that came with a UL-listed wall mount bracket rated for your Display on this Display. Use only with your Display. Be sure the mount you . Remove the stands by loosening and removing the screws. 4. Installing a Display on a clean, flat, stable surface. Disconnect any cables connected to find the appropriate mount for your mount. Place the Display face-down on a wall requires lifting. English - 24 Wall-mounting the Display To mount your Display. 2. Consult...
Quickstart Guide English
Page 31
... order to protect your product to the original purchaser of user data and downloaded applications is serviced, regardless of the warranty on the terms set forth below for ninety (90) days from warranty service, whichever is used normally in the United States (including Puerto Rico) or Canada. Replacement parts and VIZIO's labor are 6:00AM to 9:00PM Monday through Friday and 7:00AM...
... order to protect your product to the original purchaser of user data and downloaded applications is serviced, regardless of the warranty on the terms set forth below for ninety (90) days from warranty service, whichever is used normally in the United States (including Puerto Rico) or Canada. Replacement parts and VIZIO's labor are 6:00AM to 9:00PM Monday through Friday and 7:00AM...


