
E502AR User Manual
Page 1
USER GUIDE MMODDEELLS // E3D320VX // E3DE45200VX2AR // E3D470VX INSTALLING YOUR new TV CONTROLS & CONNECTIONS CONNECTING YOUR DEVICES USING THE ON-SCREEN MENU USING THE USB MEDIA PLAYER USING VIZIO INTERNET APPS TROUBLESHOOTING & SUPPORT Help, SPECs, warranty & LEGAL
USER GUIDE MMODDEELLS // E3D320VX // E3DE45200VX2AR // E3D470VX INSTALLING YOUR new TV CONTROLS & CONNECTIONS CONNECTING YOUR DEVICES USING THE ON-SCREEN MENU USING THE USB MEDIA PLAYER USING VIZIO INTERNET APPS TROUBLESHOOTING & SUPPORT Help, SPECs, warranty & LEGAL

E502AR User Manual
Page 3
... about accessories and installation services for future reference. When you either: • Register your VIZIO product at (877) 878-4946. Misuse may result in a safe place for replacement of your TV. We recommend that produce heat. • Do not defeat the safety purpose of important ... your outlet, consult an electrician for future reference. • To reduce the risk of your new VIZIO product, read the accompanying helpful tip. Important Safety Instructions Your TV is intended to alert you see this symbol, please read the accompanying important warning or notice. Keep ...
... about accessories and installation services for future reference. When you either: • Register your VIZIO product at (877) 878-4946. Misuse may result in a safe place for replacement of your TV. We recommend that produce heat. • Do not defeat the safety purpose of important ... your outlet, consult an electrician for future reference. • To reduce the risk of your new VIZIO product, read the accompanying helpful tip. Important Safety Instructions Your TV is intended to alert you see this symbol, please read the accompanying important warning or notice. Keep ...
E502AR User Manual
Page 4
...using different voltage than the specified voltage may form in fire or electric shock. • The wall socket should be maintained between your TV from overheating, be used for ventilation. To ensure reliable operation of the cabinet are not blocked or covered. The manufacturer's warranty does... exposed to rain or moisture, does not operate normally or has been dropped. • Unplug the power cord before turning on your TV. with arrowhead symbol within an equilateral triangle is intended to alert the user to the presence of un-isolated, dangerous voltage ...
...using different voltage than the specified voltage may form in fire or electric shock. • The wall socket should be maintained between your TV from overheating, be used for ventilation. To ensure reliable operation of the cabinet are not blocked or covered. The manufacturer's warranty does... exposed to rain or moisture, does not operate normally or has been dropped. • Unplug the power cord before turning on your TV. with arrowhead symbol within an equilateral triangle is intended to alert the user to the presence of un-isolated, dangerous voltage ...
E502AR User Manual
Page 5
...splashing and no objects filled with liquids, such as vases, shall be used as sunshine, fire or the like. • If any abnormality occurs. Your TV is intended to alert the user to the h presence of uninsulated DANGEROUS VOLTAGE within the product's enclosure that the power cord and any way. - If... shall remain readily operable. • CAUTION - Continuous use in this case may result in fire or electric shock. • Do not use your TV if any of the following occurs, contact the dealer: - Do not try to leak which can damage the remote control or injure the operator. If...
...splashing and no objects filled with liquids, such as vases, shall be used as sunshine, fire or the like. • If any abnormality occurs. Your TV is intended to alert the user to the h presence of uninsulated DANGEROUS VOLTAGE within the product's enclosure that the power cord and any way. - If... shall remain readily operable. • CAUTION - Continuous use in this case may result in fire or electric shock. • Do not use your TV if any of the following occurs, contact the dealer: - Do not try to leak which can damage the remote control or injure the operator. If...
E502AR User Manual
Page 6
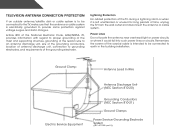
.../satellite dish or cable system is electrically grounded to grounding electrodes, and requirements of the grounding electrode. Remember, the screen of time, unplug the TV from the wall outlet and disconnect the antenna or cable system. Article 810 of the National Electrical Code, ANSI/NFPSA 70, provides information with regard...or power circuits, or where it is left unattended or unused for long periods of the coaxial cable is intended to be connected to the TV, make sure that the antenna or cable system is to be connected to earth in wire to an antenna discharge unit, size of the ...
.../satellite dish or cable system is electrically grounded to grounding electrodes, and requirements of the grounding electrode. Remember, the screen of time, unplug the TV from the wall outlet and disconnect the antenna or cable system. Article 810 of the National Electrical Code, ANSI/NFPSA 70, provides information with regard...or power circuits, or where it is left unattended or unused for long periods of the coaxial cable is intended to be connected to the TV, make sure that the antenna or cable system is to be connected to earth in wire to an antenna discharge unit, size of the ...
E502AR User Manual
Page 7
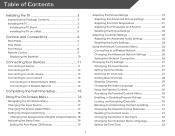
Table of Contents Installing the TV 3 Inspecting the Package Contents 3 Installing the TV 3 Installing the TV Stand 3 Installing the TV on a Wall 5 Controls and Connections 6 Rear Panel 6 Side Panel 7 Front Panel 8 Remote Control 9 Replacing the Batteries 10 Connecting Your Devices 11 ...Network Connection Menu 25 Connecting to a Wireless Network 25 Changing the Advanced Network Settings 26 Testing Your Network Connection 26 Changing the TV Settings 27 Changing the Input Source 27 Setting the Tuner Mode 27 Scanning for Channels 27 Adding New Channels 28 Skipping Channels 29...
Table of Contents Installing the TV 3 Inspecting the Package Contents 3 Installing the TV 3 Installing the TV Stand 3 Installing the TV on a Wall 5 Controls and Connections 6 Rear Panel 6 Side Panel 7 Front Panel 8 Remote Control 9 Replacing the Batteries 10 Connecting Your Devices 11 ...Network Connection Menu 25 Connecting to a Wireless Network 25 Changing the Advanced Network Settings 26 Testing Your Network Connection 26 Changing the TV Settings 27 Changing the Input Source 27 Setting the Tuner Mode 27 Scanning for Channels 27 Adding New Channels 28 Skipping Channels 29...

E502AR User Manual
Page 8
Adjusting the CEC Settings 33 Turning the VIZIO Logo On or Off 34 Using the Help Menu 34 Displaying System Information 35 Resetting the TV Settings 35 Restoring the TV to Factory Default Settings 35 Using Guided Setup 36 Using the Info Window 37 Using the USB Media Player 38 Using the USB... Media Player 38 Connecting a USB Thumb Drive to the TV 38 Playing USB Media 38 Using VIZIO Internet Apps 41 Using the VIA Shortcut Buttons 41 Using the VIA Dock 41 Moving an App on the VIA Dock 41...
Adjusting the CEC Settings 33 Turning the VIZIO Logo On or Off 34 Using the Help Menu 34 Displaying System Information 35 Resetting the TV Settings 35 Restoring the TV to Factory Default Settings 35 Using Guided Setup 36 Using the Info Window 37 Using the USB Media Player 38 Using the USB... Media Player 38 Connecting a USB Thumb Drive to the TV 38 Playing USB Media 38 Using VIZIO Internet Apps 41 Using the VIA Shortcut Buttons 41 Using the VIA Dock 41 Moving an App on the VIA Dock 41...
E502AR User Manual
Page 9
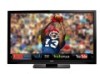
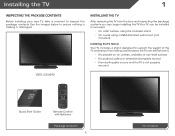
...; It is placed on Stand However, the TV can begin installing the TV. Installing the TV 1 Inspecting the Package Contents Before installing your new TV, take a moment to ensure nothing is not properly secured VIZIO LCD HDTV MODELS n E502AR VIZIO QUICK START GUIDE SMART TV FULL USER MANUAL AVAILABLE AT VIZIO.COM Quick Start Guide Remote Control with Batteries...
...; It is placed on Stand However, the TV can begin installing the TV. Installing the TV 1 Inspecting the Package Contents Before installing your new TV, take a moment to ensure nothing is not properly secured VIZIO LCD HDTV MODELS n E502AR VIZIO QUICK START GUIDE SMART TV FULL USER MANUAL AVAILABLE AT VIZIO.COM Quick Start Guide Remote Control with Batteries...
E502AR User Manual
Page 10
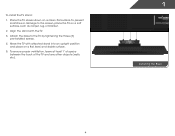
Place the TV screen-down on a flat, level, and stable surface. 5. Move the TV with the TV. 3. To prevent scratches or damage to the TV by tightening the three (3) pre-installed screws. 4. To ensure proper ventilation, leave at least 1" of space between the back of the TV and any other objects (walls, etc). 1 Installing the Base 4 Attach the base to the screen, place the TV on a soft surface, such as carpet, rug, or blanket. 2. Align the stand with attached stand into an upright position and place on a clean, flat surface. To install the TV stand: 1.
Place the TV screen-down on a flat, level, and stable surface. 5. Move the TV with the TV. 3. To prevent scratches or damage to the TV by tightening the three (3) pre-installed screws. 4. To ensure proper ventilation, leave at least 1" of space between the back of the TV and any other objects (walls, etc). 1 Installing the Base 4 Attach the base to the screen, place the TV on a soft surface, such as carpet, rug, or blanket. 2. Align the stand with attached stand into an upright position and place on a clean, flat surface. To install the TV stand: 1.
E502AR User Manual
Page 11
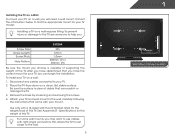
...wall mount bracket rated for your TV, you can scratch or damage the TV. 3. To prevent injury or damage to the TV, ask someone to your TV. 2. Disconnect any cables connected to help you choose is clear of the TV. Place the TV face-down on a wall: 1. E502AR Screw Size: Screw Length: Screw... Pitch: Hole Pattern: M6 12mm 1.0mm 300mm (V) x 300mm (H) Be sure the mount you . Attach your TV and wall mount to the wall. 5 1 Wall Mount Screw...
...wall mount bracket rated for your TV, you can scratch or damage the TV. 3. To prevent injury or damage to the TV, ask someone to your TV. 2. Disconnect any cables connected to help you choose is clear of the TV. Place the TV face-down on a wall: 1. E502AR Screw Size: Screw Length: Screw... Pitch: Hole Pattern: M6 12mm 1.0mm 300mm (V) x 300mm (H) Be sure the mount you . Attach your TV and wall mount to the wall. 5 1 Wall Mount Screw...
E502AR User Manual
Page 13
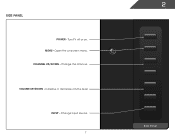
Turn TV off or on -screen menu. Open the on . Change input source. 7 2 Side Panel MENU - CHANNEL UP/DOWN - VOLUME UP/DOWN - Change the channel. Increase or decrease volume level INPUT - Side Panel POWER -
Turn TV off or on -screen menu. Open the on . Change input source. 7 2 Side Panel MENU - CHANNEL UP/DOWN - VOLUME UP/DOWN - Change the channel. Increase or decrease volume level INPUT - Side Panel POWER -
E502AR User Manual
Page 15
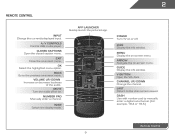
... dock. Volume Up/Down Increase or decrease loudness of the audio. Guide Display the info window. Closed Captions Open the closed caption menu. Power Turn TV on . Number Pad Manually enter a channel.
... dock. Volume Up/Down Increase or decrease loudness of the audio. Guide Display the info window. Closed Captions Open the closed caption menu. Power Turn TV on . Number Pad Manually enter a channel.

E502AR User Manual
Page 17
Verify that your device has a video port that matches an available port on . Turn the TV and your device on the TV (HDMI, Component, etc). 2. Turn the TV and your device off. 3. Set the TV's input to match the connection you used to display output from most devices. 1. Connect the appropriate cable (not ... HDMI CABLE BEST • DIGITAL • HD VIDEO (1080p)* • HD AUDIO * Maximum Resolution 11 CONNECTING A DEVICE Connecting Your Devices 3 Connecting A Device Your TV can be used (HDMI-1, HDMI-2, etc). Cable/Satellite Box DVD/Blu-ray Player Game Console BACK OF...
Verify that your device has a video port that matches an available port on . Turn the TV and your device on the TV (HDMI, Component, etc). 2. Turn the TV and your device off. 3. Set the TV's input to match the connection you used to display output from most devices. 1. Connect the appropriate cable (not ... HDMI CABLE BEST • DIGITAL • HD VIDEO (1080p)* • HD AUDIO * Maximum Resolution 11 CONNECTING A DEVICE Connecting Your Devices 3 Connecting A Device Your TV can be used (HDMI-1, HDMI-2, etc). Cable/Satellite Box DVD/Blu-ray Player Game Console BACK OF...

E502AR User Manual
Page 18
Connect a 3.5mm cable (not included) to match the resolution of your PC and the PC Audio In port on the back of the TV. Set your PC's resolution to your TV. To use your PC and the RGB port on the back of the TV. Connect an RGB cable (not included) to display output from a personal computer. This cable transmits video. 2. Specifications. 3 Personal Computer 3.5mm Cable (For Audio) RGB Cable (For Video) CONNECTING A PC 12 See Appendix B - Connecting A PC Your TV can be used to your TV as a PC display: 1. This cable transmits audio. 3.
Connect a 3.5mm cable (not included) to match the resolution of your PC and the PC Audio In port on the back of the TV. Set your PC's resolution to your TV. To use your PC and the RGB port on the back of the TV. Connect an RGB cable (not included) to display output from a personal computer. This cable transmits video. 2. Specifications. 3 Personal Computer 3.5mm Cable (For Audio) RGB Cable (For Video) CONNECTING A PC 12 See Appendix B - Connecting A PC Your TV can be used to your TV as a PC display: 1. This cable transmits audio. 3.
E502AR User Manual
Page 19
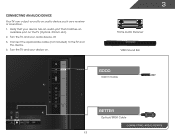
Connect the appropriate cable (not included) to an audio device, such as a receiver or sound bar. 1. Turn the TV and your audio device off. 3. Turn the TV and your device on the TV (Optical, 3.5mm, etc). 2. Verify that your device has an audio port that matches an available port on . 3 Home Audio Receiver VIZIO Sound Bar GOOD 3.5mm Cable BETTER Optical/SPDIF Cable CONNECTING AUDIO DEVICE 13 Connecting an audio device Your TV can output sound to the TV and the device. 4.
Connect the appropriate cable (not included) to an audio device, such as a receiver or sound bar. 1. Turn the TV and your audio device off. 3. Turn the TV and your device on the TV (Optical, 3.5mm, etc). 2. Verify that your device has an audio port that matches an available port on . 3 Home Audio Receiver VIZIO Sound Bar GOOD 3.5mm Cable BETTER Optical/SPDIF Cable CONNECTING AUDIO DEVICE 13 Connecting an audio device Your TV can output sound to the TV and the device. 4.

E502AR User Manual
Page 20
It can be connected to configure the TV. Use the Guided Network Setup to your home network with a Wired or Wireless connection. See below. 2. Connecting to a Wired Network (Best) 1. See Using Guided Setup ... recommended). 2. Ethernet Cable Router / Modem CONNECTING TO A WIRED NETWORK 14 See Using Guided Setup on page 36. Connect an ethernet cable to your network Your TV is internet-ready. Use the Guided Network Setup to the ethernet port on the back of the...
It can be connected to configure the TV. Use the Guided Network Setup to your home network with a Wired or Wireless connection. See below. 2. Connecting to a Wired Network (Best) 1. See Using Guided Setup ... recommended). 2. Ethernet Cable Router / Modem CONNECTING TO A WIRED NETWORK 14 See Using Guided Setup on page 36. Connect an ethernet cable to your network Your TV is internet-ready. Use the Guided Network Setup to the ethernet port on the back of the...
E502AR User Manual
Page 21
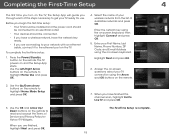
...and press OK. 4. When you are finished, highlight Next and press OK. Enter the network key using the Arrow and OK buttons on the remote. 2. TV Widgets. Highlight Next and press OK. 6. The First-Time Setup is complete. 15 Use the Left/Right Arrow buttons on the remote to read and..., Phone Number, ZIP Code, and E-mail Address using the on-screen keyboard. Completing the First-Time Setup 4 The first time you turn on the TV, the Setup App will guide you have the network key ready. • If you are connecting to your network with an ethernet cable, connect it...
...and press OK. 4. When you are finished, highlight Next and press OK. Enter the network key using the Arrow and OK buttons on the remote. 2. TV Widgets. Highlight Next and press OK. 6. The First-Time Setup is complete. 15 Use the Left/Right Arrow buttons on the remote to read and..., Phone Number, ZIP Code, and E-mail Address using the on-screen keyboard. Completing the First-Time Setup 4 The first time you turn on the TV, the Setup App will guide you have the network key ready. • If you are connecting to your network with an ethernet cable, connect it...
E502AR User Manual
Page 22
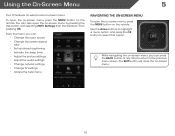
Using the On-Screen Menu 5 Your TV features an easy-to-use on the remote. Use the Arrow buttons to highlight a menu option, and press the OK button to the previous menu ...; Set up closed captioning • Activate the sleep timer • Adjust the picture settings • Adjust the audio settings • Change network settings • Change TV settings • Access the help menu Navigating the On-Screen Menu To open the on-screen menu, press the MENU button on the remote. You...
Using the On-Screen Menu 5 Your TV features an easy-to-use on the remote. Use the Arrow buttons to highlight a menu option, and press the OK button to the previous menu ...; Set up closed captioning • Activate the sleep timer • Adjust the picture settings • Adjust the audio settings • Change network settings • Change TV settings • Access the help menu Navigating the On-Screen Menu To open the on-screen menu, press the MENU button on the remote. You...
E502AR User Manual
Page 23
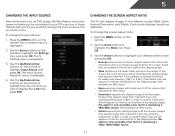
... images with your desired screen mode and press OK: • Normal preserves the content's original aspect ratio. This option is only available when the TV is already formatted for RBG input) • Stretch expands the display image to display. To change the screen aspect ratio: 1. Use the Up...picture is displayed. 3. The Input Source Selection menu is displaying a 720p/1080i/1080p source. 17 Changing the Screen Aspect Ratio The TV can be connected to your TV.To use one of the display image. (Not available for RBG input) • Panoramic expands the display image to fill the ...
... images with your desired screen mode and press OK: • Normal preserves the content's original aspect ratio. This option is only available when the TV is already formatted for RBG input) • Stretch expands the display image to display. To change the screen aspect ratio: 1. Use the Up...picture is displayed. 3. The Input Source Selection menu is displaying a 720p/1080i/1080p source. 17 Changing the Screen Aspect Ratio The TV can be connected to your TV.To use one of the display image. (Not available for RBG input) • Panoramic expands the display image to fill the ...
E502AR User Manual
Page 24
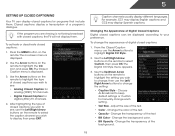
... Left/Right Arrow buttons on the remote to select the caption channel you wish to see : • Analog Closed Caption for analog (NTSC) TV channels. • Digital Closed Caption for programs that include them . The Closed Caption menu is displayed. 2. From the Closed Caption menu, use... the Left/ Right Arrow buttons to change the appearance of Digital Closed Captions Digital closed captions, the TV will not display them . Closed captions display a transcription of the text. • BG Color - The on the remote to highlight the...
... Left/Right Arrow buttons on the remote to select the caption channel you wish to see : • Analog Closed Caption for analog (NTSC) TV channels. • Digital Closed Caption for programs that include them . The Closed Caption menu is displayed. 2. From the Closed Caption menu, use... the Left/ Right Arrow buttons to change the appearance of Digital Closed Captions Digital closed captions, the TV will not display them . Closed captions display a transcription of the text. • BG Color - The on the remote to highlight the...


