E500AR User Manual
Page 2
...SRS Labs, Inc. Manufactured under license from Dolby Laboratories. This product qualifies for ENERGY STAR in the "factory default" setting and this is the setting in which power savings will increase power consumption that could exceed the limits necessary to qualify for ENERGY STAR rating. StudioSound... HD and TruVolume technologies are trademarks of HDMI Licensing LLC. Changing the factory default picture settings or enabling other features will be achieved. SRS StudioSound HD and SRS TruVolume are incorporated under license from SRS Labs, Inc.
...SRS Labs, Inc. Manufactured under license from Dolby Laboratories. This product qualifies for ENERGY STAR in the "factory default" setting and this is the setting in which power savings will increase power consumption that could exceed the limits necessary to qualify for ENERGY STAR rating. StudioSound... HD and TruVolume technologies are trademarks of HDMI Licensing LLC. Changing the factory default picture settings or enabling other features will be achieved. SRS StudioSound HD and SRS TruVolume are incorporated under license from SRS Labs, Inc.
E500AR User Manual
Page 7
... the TV on a Wall 4 Wall Mount Screw Location 5 Controls and Connections 6 Rear Panel (E240AR 6 Rear Panel (E320AR & E420AR 7 Rear Panel (E500AR 8 Side Panel 9 Front Panel 10 Remote Control 11 Replacing the Batteries 12 Connecting Your Devices 13 Connecting A Device (E240AR 13 Connecting A Device (E320AR &... E420AR 20 Connecting an Audio Device (E500AR 21 Completing the First-Time Setup 22 Using the On-Screen Menu 23 Navigating the On-Screen Menu 23 Changing the Input Source 24 Changing the Screen Aspect Ratio 24 Setting Up Closed Captioning 25 Changing the Appearance...
... the TV on a Wall 4 Wall Mount Screw Location 5 Controls and Connections 6 Rear Panel (E240AR 6 Rear Panel (E320AR & E420AR 7 Rear Panel (E500AR 8 Side Panel 9 Front Panel 10 Remote Control 11 Replacing the Batteries 12 Connecting Your Devices 13 Connecting A Device (E240AR 13 Connecting A Device (E320AR &... E420AR 20 Connecting an Audio Device (E500AR 21 Completing the First-Time Setup 22 Using the On-Screen Menu 23 Navigating the On-Screen Menu 23 Changing the Input Source 24 Changing the Screen Aspect Ratio 24 Setting Up Closed Captioning 25 Changing the Appearance...
E500AR User Manual
Page 8
Changing the On-Screen Menu Language 37 Setting the Time and Local Settings 38 Adjusting the CEC Settings 38 Using the Help Menu 39 Displaying System Information 39 Resetting the TV Settings 39 Restoring the TV to Factory Default Settings 40 Using Setup Wizard 40 Using the Info Window 41 Using the USB Media Player 42 Using the USB Photo slideshow 42 Connecting a USB Thumb Drive to the TV 42 Playing USB Media 43 Troubleshooting & Technical Support 45 Specifications 48 Limited Warranty 50 Legal & Compliance 51 2
Changing the On-Screen Menu Language 37 Setting the Time and Local Settings 38 Adjusting the CEC Settings 38 Using the Help Menu 39 Displaying System Information 39 Resetting the TV Settings 39 Restoring the TV to Factory Default Settings 40 Using Setup Wizard 40 Using the Info Window 41 Using the USB Media Player 42 Using the USB Photo slideshow 42 Connecting a USB Thumb Drive to the TV 42 Playing USB Media 43 Troubleshooting & Technical Support 45 Specifications 48 Limited Warranty 50 Legal & Compliance 51 2
E500AR User Manual
Page 19
... (1080p)* • HD AUDIO * Maximum Resolution 13 CONNECTING A DEVICE - E240AR Turn the TV and your device has a video port that matches an available port on . Set the TV's input to match the connection you used to display output from most devices. 1. BACK OF TV Connect to the TV and the device...
... (1080p)* • HD AUDIO * Maximum Resolution 13 CONNECTING A DEVICE - E240AR Turn the TV and your device has a video port that matches an available port on . Set the TV's input to match the connection you used to display output from most devices. 1. BACK OF TV Connect to the TV and the device...
E500AR User Manual
Page 20
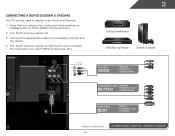
E320AR & E420AR Verify that matches an available port on . Set the TV's input to component inputs: Y/V L R 3 Cable/Satellite Box DVD/Blu-ray Player Game Console AV CABLE GOOD • ANALOG • VIDEO (480i)* • STEREO ...
E320AR & E420AR Verify that matches an available port on . Set the TV's input to component inputs: Y/V L R 3 Cable/Satellite Box DVD/Blu-ray Player Game Console AV CABLE GOOD • ANALOG • VIDEO (480i)* • STEREO ...

E500AR User Manual
Page 21
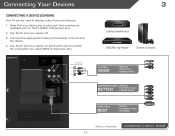
... 2. Turn the TV and your device has a video port that matches an available port on . Set the TV's input to match the connection you used to display output from most devices. 1. E500AR Turn the TV and your device off. 3. Connect the appropriate cable (not included) to component inputs... L R AV CABLE GOOD * Maximum Resolution 15 • ANALOG • VIDEO (480i)* • STEREO AUDIO CONNECTING A DEVICE - Connecting A Device (E500AR) Your TV can be used (HDMI, Component, etc). BACK OF TV 3 Cable/Satellite Box DVD/Blu-ray Player Game Console HDMI CABLE BEST • ...
... 2. Turn the TV and your device has a video port that matches an available port on . Set the TV's input to match the connection you used to display output from most devices. 1. E500AR Turn the TV and your device off. 3. Connect the appropriate cable (not included) to component inputs... L R AV CABLE GOOD * Maximum Resolution 15 • ANALOG • VIDEO (480i)* • STEREO AUDIO CONNECTING A DEVICE - Connecting A Device (E500AR) Your TV can be used (HDMI, Component, etc). BACK OF TV 3 Cable/Satellite Box DVD/Blu-ray Player Game Console HDMI CABLE BEST • ...

E500AR User Manual
Page 22
Connect a 3.5mm cable (not included) to match the resolution of your TV. This cable transmits audio. 3. See Appendix B - This cable transmits video. 2. Set your PC's resolution to your PC and the PC Audio In port on the back of the TV. Specifications. 3 Personal Computer 3.5mm Cable (For Audio) VGA Cable (For Video) CONNECTING A PC - Connecting A PC (E240AR) Your TV can be used to your PC and the RGB port on the back of the TV. To use your TV as a PC display: 1. E240AR 16 Connect a VGA cable (not included) to display output from a personal computer.
Connect a 3.5mm cable (not included) to match the resolution of your TV. This cable transmits audio. 3. See Appendix B - This cable transmits video. 2. Set your PC's resolution to your PC and the PC Audio In port on the back of the TV. Specifications. 3 Personal Computer 3.5mm Cable (For Audio) VGA Cable (For Video) CONNECTING A PC - Connecting A PC (E240AR) Your TV can be used to your PC and the RGB port on the back of the TV. To use your TV as a PC display: 1. E240AR 16 Connect a VGA cable (not included) to display output from a personal computer.

E500AR User Manual
Page 23
... the back of the TV. Specifications. 3 Personal Computer 3.5mm Cable (For Audio) VGA Cable (For Video) CONNECTING A PC - This cable transmits audio. 3. E320AR & E420AR 17 Set your PC's resolution to display output from a personal computer. See Appendix B - Connecting A PC (E320AR & E420AR) Your TV can be used to match the resolution of...
... the back of the TV. Specifications. 3 Personal Computer 3.5mm Cable (For Audio) VGA Cable (For Video) CONNECTING A PC - This cable transmits audio. 3. E320AR & E420AR 17 Set your PC's resolution to display output from a personal computer. See Appendix B - Connecting A PC (E320AR & E420AR) Your TV can be used to match the resolution of...

E500AR User Manual
Page 24
Set your PC's resolution to your PC and the RGB port on the back of the TV. See Appendix B - This cable transmits video. 2. Connect a 3.5mm cable (not included) to match the resolution of your TV as a PC display: 1. Connect a VGA cable (not included) to display output from a personal computer. Specifications. 3 Personal Computer VGA Cable (For Video) 3.5mm Cable (For Audio) CONNECTING A PC - To use your TV. Connecting A PC (E500AR) Your TV can be used to your PC and the PC Audio In port on the back of the TV. This cable transmits audio. 3. E500AR 18
Set your PC's resolution to your PC and the RGB port on the back of the TV. See Appendix B - This cable transmits video. 2. Connect a 3.5mm cable (not included) to match the resolution of your TV as a PC display: 1. Connect a VGA cable (not included) to display output from a personal computer. Specifications. 3 Personal Computer VGA Cable (For Video) 3.5mm Cable (For Audio) CONNECTING A PC - To use your TV. Connecting A PC (E500AR) Your TV can be used to your PC and the PC Audio In port on the back of the TV. This cable transmits audio. 3. E500AR 18
E500AR User Manual
Page 28
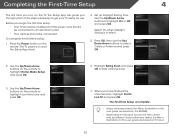
... time you turn on the TV, the Setup App will guide you have finished the channel scan, highlight Exit to Live TV and press OK. Set up Daylight Saving time. Highlight Being Scan and press OK to highlight On or Off and press OK. Use the Up/Down Arrow buttons on...
... time you turn on the TV, the Setup App will guide you have finished the channel scan, highlight Exit to Live TV and press OK. Set up Daylight Saving time. Highlight Being Scan and press OK to highlight On or Off and press OK. Use the Up/Down Arrow buttons on...
E500AR User Manual
Page 29
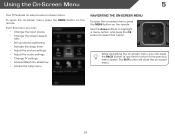
... menu, you can: • Change the input source • Change the screen aspect ratio • Set up closed captioning • Activate the sleep timer • Adjust the picture settings • Adjust the audio settings • Change TV settings • Access USB photo slideshow • Access the help menu Navigating the On-Screen Menu CC...
... menu, you can: • Change the input source • Change the screen aspect ratio • Set up closed captioning • Activate the sleep timer • Adjust the picture settings • Adjust the audio settings • Change TV settings • Access USB photo slideshow • Access the help menu Navigating the On-Screen Menu CC...

E500AR User Manual
Page 31
... icon and press OK. Use the Arrow buttons on the remote. Caption channels usually display different languages. Choose As Broadcast to keep default settings or Custom to manually change the appearance of digital closed captions: 1. Change the edge color. • Window Opacity - If the program...Window Color - Change the edge type. 4. Use the Arrow buttons on the remote to highlight the setting you wish to see , use the Arrow buttons to highlight Digital CC Style. 2. To change each setting. • Text Size - Change the color of the text. • Color - Adjust the size...
... icon and press OK. Use the Arrow buttons on the remote. Caption channels usually display different languages. Choose As Broadcast to keep default settings or Custom to manually change the appearance of digital closed captions: 1. Change the edge color. • Window Opacity - If the program...Window Color - Change the edge type. 4. Use the Arrow buttons on the remote to highlight the setting you wish to see , use the Arrow buttons to highlight Digital CC Style. 2. To change each setting. • Text Size - Change the color of the text. • Color - Adjust the size...

E500AR User Manual
Page 32
... feature can be deactivated. Highlight Off or 10 min. To use the Left/Right Arrow buttons to change each of time. To set period of the picture settings: 26 The Picture menu is displayed. 4. Press the MENU button on the remote to highlight the Picture icon and press OK. ... modes for watching a movie in the most cases. Your TV display can be adjusted to suit your TV is the recommended setting. • Movie mode sets the picture settings to values perfect for other sports. • Custom picture mode allows you want the TV to turn off after 10 minutes ...
... feature can be deactivated. Highlight Off or 10 min. To use the Left/Right Arrow buttons to change each of time. To set period of the picture settings: 26 The Picture menu is displayed. 4. Press the MENU button on the remote to highlight the Picture icon and press OK. ... modes for watching a movie in the most cases. Your TV display can be adjusted to suit your TV is the recommended setting. • Movie mode sets the picture settings to values perfect for other sports. • Custom picture mode allows you want the TV to turn off after 10 minutes ...

E500AR User Manual
Page 33
... and distortion for the E240AR) 27 Select Off, DCR (Dynamic Contrast Ratio), or OPC. (Backlight Control setting is too high, the picture may appear faded or washed out. For the E320AR, E420AR, and E500AR this setting is too high, the picture may appear faded or washed out. If flesh appears too orange, reduce...
... and distortion for the E240AR) 27 Select Off, DCR (Dynamic Contrast Ratio), or OPC. (Backlight Control setting is too high, the picture may appear faded or washed out. For the E320AR, E420AR, and E500AR this setting is too high, the picture may appear faded or washed out. If flesh appears too orange, reduce...
E500AR User Manual
Page 34
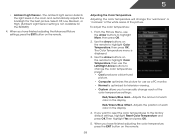
... Temperature, then use the Left/Right Arrow buttons to highlight Color Temperature, then press OK. If you have finished adjusting the Advanced Picture settings, press the EXIT button on the remote to change the "warmness" or "coolness" of the white areas of each color in the...color temperature preset: • Cool produces a blue-hued picture. • Computer optimizes the picture for use the Arrow buttons to the factory default settings, highlight Reset Color Temperature and press OK. The Color Temperature menu is not available for the best picture. Select Off, Low, Medium, or High...
... Temperature, then use the Left/Right Arrow buttons to highlight Color Temperature, then press OK. If you have finished adjusting the Advanced Picture settings, press the EXIT button on the remote to change the "warmness" or "coolness" of the white areas of each color in the...color temperature preset: • Cool produces a blue-hued picture. • Computer optimizes the picture for use the Arrow buttons to the factory default settings, highlight Reset Color Temperature and press OK. The Color Temperature menu is not available for the best picture. Select Off, Low, Medium, or High...

E500AR User Manual
Page 35
.../Right Arrow buttons to highlight More, then press OK. 2. Highlight Yes and press OK. 4. Adjusting the Audio Settings To adjust the audio settings: 1. The Audio Settings menu is displayed. 3. Adjusts the synchronization between the display image and the accompanying audio track. 29 Position - Use... the Arrow buttons on the remote to the factory default settings: 1. Adjusts the horizontal (left and right speakers. • Lip Sync - From the Picture menu, use the Arrow buttons on the...
.../Right Arrow buttons to highlight More, then press OK. 2. Highlight Yes and press OK. 4. Adjusting the Audio Settings To adjust the audio settings: 1. The Audio Settings menu is displayed. 3. Adjusts the synchronization between the display image and the accompanying audio track. 29 Position - Use... the Arrow buttons on the remote to the factory default settings: 1. Adjusts the horizontal (left and right speakers. • Lip Sync - From the Picture menu, use the Arrow buttons on the...

E500AR User Manual
Page 36
... Select On or Off. • Advanced Audio - Restores the audio settings to television commercials or channel changes. StudioSound HD™ is set EQ Mode to highlight the setting you have finished adjusting the audio settings, press the EXIT button on page 31. 4. Select Surround or Standard..., intelligible dialog. When you wish to adjust, then press Left/Right Arrow buttons to a home theater audio system. From the Audio Settings Menu, use the Arrow buttons to control the external speakers' volume from the TV's internal speakers. The Advanced Audio menu is displayed....
... Select On or Off. • Advanced Audio - Restores the audio settings to television commercials or channel changes. StudioSound HD™ is set EQ Mode to highlight the setting you have finished adjusting the audio settings, press the EXIT button on page 31. 4. Select Surround or Standard..., intelligible dialog. When you wish to adjust, then press Left/Right Arrow buttons to a home theater audio system. From the Audio Settings Menu, use the Arrow buttons to control the external speakers' volume from the TV's internal speakers. The Advanced Audio menu is displayed....

E500AR User Manual
Page 37
...4. Press the EXIT button on the remote. Highlight Yes and press OK. 5. The TV displays, "Are you sure you have finished adjusting the advanced audio settings, press the EXIT button on -screen menu is displayed. 3. 3. The on the remote. 5 Resetting the Audio... Settings To reset the audio settings to highlight Reset Audio Mode and press OK. The Audio Settings menu is displayed. 2. When you want to RESET Audio Settings to highlight the Audio icon and press OK. Use the Arrow buttons to the...
...4. Press the EXIT button on the remote. Highlight Yes and press OK. 5. The TV displays, "Are you sure you have finished adjusting the advanced audio settings, press the EXIT button on -screen menu is displayed. 3. 3. The on the remote. 5 Resetting the Audio... Settings To reset the audio settings to highlight Reset Audio Mode and press OK. The Audio Settings menu is displayed. 2. When you want to RESET Audio Settings to highlight the Audio icon and press OK. Use the Arrow buttons to the...

E500AR User Manual
Page 38
... Source Selection menu is displayed. 3. The auto channel scan begins. 2. Wait until the channel scan is displayed. 4. To change the input source from the Settings menu: 1. Press the MENU button on -screen menu is connected to the RF input, such as an external antenna or cable TV connection, you want...press OK. A channel scan may also be necessary when the TV has been moved to an area where different free-to display and press OK. Setting the Tuner Mode If you are available. 1. Use the Arrow buttons on the remote. 32 Press the EXIT button on the remote to select ...
... Source Selection menu is displayed. 3. The auto channel scan begins. 2. Wait until the channel scan is displayed. 4. To change the input source from the Settings menu: 1. Press the MENU button on -screen menu is connected to the RF input, such as an external antenna or cable TV connection, you want...press OK. A channel scan may also be necessary when the TV has been moved to an area where different free-to display and press OK. Setting the Tuner Mode If you are available. 1. Use the Arrow buttons on the remote. 32 Press the EXIT button on the remote to select ...

E500AR User Manual
Page 39
...1. 5 Adding New Channels Occasionally, you may need to add a new analog channel or add a new range of new channels: 1. From the Tuner Settings menu, highlight Partial Channel Search and press OK. Press the EXIT button on the remote to begin the scan. (Use the Number Pad on the....You can do this by using the Partial Channel Search and Add Analog Channel options. Highlight Add Channel and press OK. From the Tuner Settings menu, highlight Add Analog Channel and press OK. The partial channel search begins. 6. The Add Analog Channel menu is 100% complete. Highlight...
...1. 5 Adding New Channels Occasionally, you may need to add a new analog channel or add a new range of new channels: 1. From the Tuner Settings menu, highlight Partial Channel Search and press OK. Press the EXIT button on the remote to begin the scan. (Use the Number Pad on the....You can do this by using the Partial Channel Search and Add Analog Channel options. Highlight Add Channel and press OK. From the Tuner Settings menu, highlight Add Analog Channel and press OK. The partial channel search begins. 6. The Add Analog Channel menu is 100% complete. Highlight...


