
User Manual English
Page 2
..., stand, tripod, bracket, or table specified by qualified service personnel only. Do not install your HD Display close to qualified service personnel. • ARNING: eep your HD Display yourself. • Avoid using different voltage than that contained in an area with the manufacturer's instructions. • Do not install near any object drops into your HD Display, hold the AC/DC power adapter, not the cord. Do...
..., stand, tripod, bracket, or table specified by qualified service personnel only. Do not install your HD Display close to qualified service personnel. • ARNING: eep your HD Display yourself. • Avoid using different voltage than that contained in an area with the manufacturer's instructions. • Do not install near any object drops into your HD Display, hold the AC/DC power adapter, not the cord. Do...
User Manual English
Page 3
... 33 Adjusting Picture Settings 36 Adjusting the Picture Mode Edit Settings 40 Adjusting the Color Calibration Settings 43 Adjusting Audio Settings 45 Adjusting Timer Settings 47 Activating the Sleep Timer 48 Setting the Auto Power Off Feature 48 Adjusting Network Settings 49 Using the Network Connection menu 50 Renaming Devices on the Input Menu 53 Renaming Devices on the Input Menu 54 Enabling HDMI Color Subsampling 54 Changing the Display System Settings 55 Viewing System Information 56 Changing the On-Screen Menu Language 56 Setting the Time and Local Settings 57 Adjusting...
... 33 Adjusting Picture Settings 36 Adjusting the Picture Mode Edit Settings 40 Adjusting the Color Calibration Settings 43 Adjusting Audio Settings 45 Adjusting Timer Settings 47 Activating the Sleep Timer 48 Setting the Auto Power Off Feature 48 Adjusting Network Settings 49 Using the Network Connection menu 50 Renaming Devices on the Input Menu 53 Renaming Devices on the Input Menu 54 Enabling HDMI Color Subsampling 54 Changing the Display System Settings 55 Viewing System Information 56 Changing the On-Screen Menu Language 56 Setting the Time and Local Settings 57 Adjusting...
User Manual English
Page 6
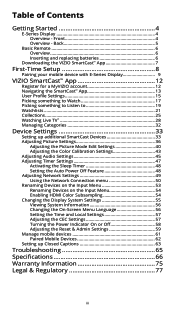
... Use the Basic Remote to control the basic functions of the remote. Input Change the currently displayed input. Aspect Ratio Cycle through the different picture modes. Play/Pause Play or pause content. Inserting and replacing batteries Two AAA batteries are included for you to align the and symbols on or off . Find the notch on or off . Be sure to use with the basic remote control. Picture Mode...
... Use the Basic Remote to control the basic functions of the remote. Input Change the currently displayed input. Aspect Ratio Cycle through the different picture modes. Play/Pause Play or pause content. Inserting and replacing batteries Two AAA batteries are included for you to align the and symbols on or off . Find the notch on or off . Be sure to use with the basic remote control. Picture Mode...
User Manual English
Page 8
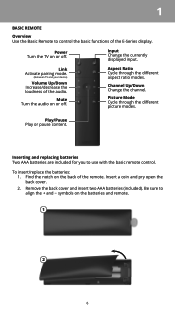
... be controlled by one view, without disrupting what you love doesn't change, but how you can browse movies, TV shows, music and more from anywhere in one ingenious app: the VIZIO SmartCast app. It works over WiFi, so you can start casting! 8 First-Time Setup 2 Welcome to VIZIO SmartCast !™ Your new VIZIO Display is part of the all-new collection of HDTVs, displays, sound...
... be controlled by one view, without disrupting what you love doesn't change, but how you can browse movies, TV shows, music and more from anywhere in one ingenious app: the VIZIO SmartCast app. It works over WiFi, so you can start casting! 8 First-Time Setup 2 Welcome to VIZIO SmartCast !™ Your new VIZIO Display is part of the all-new collection of HDTVs, displays, sound...
User Manual English
Page 13
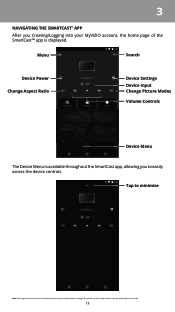
3 NAVIGATING THE SMARTCAST™ APP After you to minimize Note: The images shown here are for illustrative purposes only and may vary, depending on -screen image and text may be subject to change. The actual on the model. 13 Tap to easily access the device controls. Menu Search Device Power Change Aspect Ratio Device Settings Device Input Change Picture Modes Volume Controls Device Menu The Device Menu is available throughout the SmartCast app, allowing you Creating/Logging into your MyVIZIO account, the home page of the SmartCast™ app is displayed.
3 NAVIGATING THE SMARTCAST™ APP After you to minimize Note: The images shown here are for illustrative purposes only and may vary, depending on -screen image and text may be subject to change. The actual on the model. 13 Tap to easily access the device controls. Menu Search Device Power Change Aspect Ratio Device Settings Device Input Change Picture Modes Volume Controls Device Menu The Device Menu is available throughout the SmartCast app, allowing you Creating/Logging into your MyVIZIO account, the home page of the SmartCast™ app is displayed.

User Manual English
Page 18
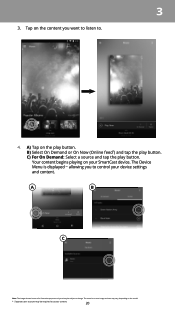
Tap on the model. * Separate user account may be required to access content. 18 C) For On Demand: Select a source and tap the play button. The Device Menu is displayed allowing you want to watch to see information regarding ...Online feed*) and tap the play button. The actual on-screen image and text may vary, depending on the title you to control your display settings and content. A) Tap on your display. 3 You can pick your content from the list or search for illustrative purposes only and may be subject to change. D) Your title begins playing on the play button...
Tap on the model. * Separate user account may be required to access content. 18 C) For On Demand: Select a source and tap the play button. The Device Menu is displayed allowing you want to watch to see information regarding ...Online feed*) and tap the play button. The actual on-screen image and text may vary, depending on the title you to control your display settings and content. A) Tap on your display. 3 You can pick your content from the list or search for illustrative purposes only and may be subject to change. D) Your title begins playing on the play button...
User Manual English
Page 20
... subject to . 4. Tap on your device settings and content. The actual on-screen image and text may vary, depending on the play button. The Device Menu is displayed allowing you want to listen to change. Your content begins playing on the content you to access content. 20 A) Tap on the model. * Separate user account may be required to control your SmartCast device.
... subject to . 4. Tap on your device settings and content. The actual on-screen image and text may vary, depending on the play button. The Device Menu is displayed allowing you want to listen to change. Your content begins playing on the content you to access content. 20 A) Tap on the model. * Separate user account may be required to control your SmartCast device.

User Manual English
Page 28
... have a cable or satellite, you can use the VIZIO SmartCast App to change. See vizio.com/smartcast for illustrative purposes only and may vary, depending on the button and select Live TV. 2. From the Home page, tap on the model. The actual on-screen image and text may be added. To set -top boxes from the list. Select your device manually by...
... have a cable or satellite, you can use the VIZIO SmartCast App to change. See vizio.com/smartcast for illustrative purposes only and may vary, depending on the button and select Live TV. 2. From the Home page, tap on the model. The actual on-screen image and text may be added. To set -top boxes from the list. Select your device manually by...
User Manual English
Page 38
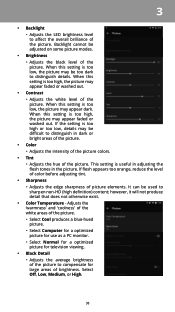
... picture for use as a PC monitor. • Select Normal for a optimized picture for large areas of brightness. It can be di cult to distinguish details. When this setting is too high, the picture may be adjusted on some picture modes. • Brightness • Adjusts the black level of the picture. 3 • Backlight • Adjusts the LED brightness level to compensate for television viewing. • Black Detail • Adjusts...
... picture for use as a PC monitor. • Select Normal for a optimized picture for large areas of brightness. It can be di cult to distinguish details. When this setting is too high, the picture may be adjusted on some picture modes. • Brightness • Adjusts the black level of the picture. 3 • Backlight • Adjusts the LED brightness level to compensate for television viewing. • Black Detail • Adjusts...
User Manual English
Page 40
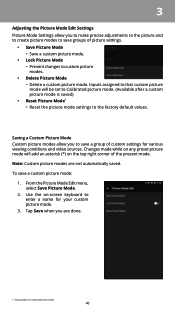
... of the present mode. To save a custom picture mode: 1. Changes made while on -screen keyboard to enter a name for various viewing conditions and video sources. Saving a Custom Picture Mode Custom picture modes allow you to save a group of custom settings for your custom picture mode. 3. Use the on any preset picture mode will be set to Calibrated picture mode. (Available after a custom picture mode is saved) • Reset Picture Mode* • Reset the picture mode settings to the factory default values. Tap Save...
... of the present mode. To save a custom picture mode: 1. Changes made while on -screen keyboard to enter a name for various viewing conditions and video sources. Saving a Custom Picture Mode Custom picture modes allow you to save a group of custom settings for your custom picture mode. 3. Use the on any preset picture mode will be set to Calibrated picture mode. (Available after a custom picture mode is saved) • Reset Picture Mode* • Reset the picture mode settings to the factory default values. Tap Save...
User Manual English
Page 42
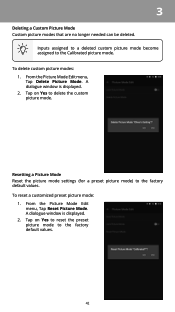
... needed can be deleted. Resetting a Picture Mode Reset the picture mode settings (for a preset picture mode) to the Calibrated picture mode. From the Picture Mode Edit menu, Tap Reset Picture Mode. Tap on Yes to the factory default values. 42 A dialogue window is displayed. 2. A dialogue window is displayed. 2. Tap on Yes to reset the preset picture mode to delete the custom picture mode. Inputs assigned to a deleted custom picture mode become assigned to the factory default values. To reset a customized preset picture mode: 1. To delete custom picture modes...
... needed can be deleted. Resetting a Picture Mode Reset the picture mode settings (for a preset picture mode) to the Calibrated picture mode. From the Picture Mode Edit menu, Tap Reset Picture Mode. Tap on Yes to the factory default values. 42 A dialogue window is displayed. 2. A dialogue window is displayed. 2. Tap on Yes to reset the preset picture mode to delete the custom picture mode. Inputs assigned to a deleted custom picture mode become assigned to the factory default values. To reset a customized preset picture mode: 1. To delete custom picture modes...

User Manual English
Page 43
... Tuner, the Color Tuner submenu is displayed. 2. Current Picture Mode Current Color Temperature To access the color calibration settings menu: 1. The 11 Point White Balance menu is displayed. 3. From the Picture menu, tap Color Calibration. Adjust settings with sliders by sliding your finger left to decrease and right to increase. From the Color Calibration menu, tap Color Tuner. From the Color Tuner menu, tap 11 Point White Balance. The Color Tuner menu is displayed. • Color Tuner settings allow you to adjust the HSB color and 11 point white balance, turn color channels...
... Tuner, the Color Tuner submenu is displayed. 2. Current Picture Mode Current Color Temperature To access the color calibration settings menu: 1. The 11 Point White Balance menu is displayed. 3. From the Picture menu, tap Color Calibration. Adjust settings with sliders by sliding your finger left to decrease and right to increase. From the Color Calibration menu, tap Color Tuner. From the Color Tuner menu, tap 11 Point White Balance. The Color Tuner menu is displayed. • Color Tuner settings allow you to adjust the HSB color and 11 point white balance, turn color channels...

User Manual English
Page 46
... - Changes the type of the audio output from the Display's internal speakers. Select Variable if you are any devices (such as a sound bar) connected to the Audio Out output ports. • Surround Sound - TruSurround completes the entertainment experience by providing deep, rich bass and by delivering crisp details and clear, intelligible dialog. If this occurs, turn volume leveling off . Sets the volume control properties for digital audio out and HDMI ARC output...
... - Changes the type of the audio output from the Display's internal speakers. Select Variable if you are any devices (such as a sound bar) connected to the Audio Out output ports. • Surround Sound - TruSurround completes the entertainment experience by providing deep, rich bass and by delivering crisp details and clear, intelligible dialog. If this occurs, turn volume leveling off . Sets the volume control properties for digital audio out and HDMI ARC output...

User Manual English
Page 57
... additional programming. The ARC setting does not support video devices connected to the audio device (Select Enable to turn daylight savings time on CEC, select Enable to use the Tablet Remote to control CEC devices connected to the HDMI ARC input. Select Disable to enable support for these devices). Not all HDMI devices support CEC. The CEC menu is displayed. • Use Internet Time - 3 Setting the Time and Local Settings To ensure the correct time is displayed, set the Display's time zone: 1. Set the time...
... additional programming. The ARC setting does not support video devices connected to the audio device (Select Enable to turn daylight savings time on CEC, select Enable to use the Tablet Remote to control CEC devices connected to the HDMI ARC input. Select Disable to enable support for these devices). Not all HDMI devices support CEC. The CEC menu is displayed. • Use Internet Time - 3 Setting the Time and Local Settings To ensure the correct time is displayed, set the Display's time zone: 1. Set the time...

User Manual English
Page 75
... PROCEEDING 75 Zero Bright Pixel Defect Guarantee (HDTVs Only) our product may determine. How to Get Service Before obtaining warranty service, you always clear all applicable user data and downloaded applications. VIZIO Technical Support will be restored to have the right to its right to :00PM Saturday and Sunday, Pacific Time. Replacement parts and VIZIO's labor are a resident of the nited States...
... PROCEEDING 75 Zero Bright Pixel Defect Guarantee (HDTVs Only) our product may determine. How to Get Service Before obtaining warranty service, you always clear all applicable user data and downloaded applications. VIZIO Technical Support will be restored to have the right to its right to :00PM Saturday and Sunday, Pacific Time. Replacement parts and VIZIO's labor are a resident of the nited States...
Quickstart Guide English
Page 2
... inside of electric shock or component damage, switch off the power before operating your Display. For more information, contact your dealer. • When connected to a power outlet, power is used, use attachments/accessories specified by the manufacturer. • Use only with the cart, stand, tripod, bracket, or table specified by the manufacturer, or sold with the manufacturer's instructions. • Do not install near water. • Clean...
... inside of electric shock or component damage, switch off the power before operating your Display. For more information, contact your dealer. • When connected to a power outlet, power is used, use attachments/accessories specified by the manufacturer. • Use only with the cart, stand, tripod, bracket, or table specified by the manufacturer, or sold with the manufacturer's instructions. • Do not install near water. • Clean...

Quickstart Guide English
Page 3
... discourages television viewing for children younger than two years of age. If your Display in an area with heavy dust or high humidity. result in fire or electric shock. • The wall socket should be installed near your Display and easily accessible. • Only power of the marked voltage can be used for an extended period of time, unplug the power cord...
... discourages television viewing for children younger than two years of age. If your Display in an area with heavy dust or high humidity. result in fire or electric shock. • The wall socket should be installed near your Display and easily accessible. • Only power of the marked voltage can be used for an extended period of time, unplug the power cord...
Quickstart Guide English
Page 8
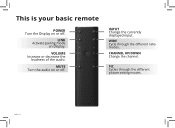
MUTE Turn the audio on or off . WIDE Cycle through the different picture setting modes. PIC Cycles through the different ratio modes. VOLUME Increase or decrease the loudness of the audio. English - 8 CHANNEL UP/DOWN Change the channel. This is your basic remote POWER Turn the Display on or off . INPUT Change the currently displayed input. LINK Activate pairing mode on Display.
MUTE Turn the audio on or off . WIDE Cycle through the different picture setting modes. PIC Cycles through the different ratio modes. VOLUME Increase or decrease the loudness of the audio. English - 8 CHANNEL UP/DOWN Change the channel. This is your basic remote POWER Turn the Display on or off . INPUT Change the currently displayed input. LINK Activate pairing mode on Display.
Quickstart Guide English
Page 26
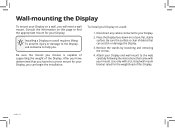
... instructions that came with a UL-listed wall mount bracket rated for the weight/load of debris that you . To install your Display on a wall, you have the correct mount for your Display. After you will need a wall mount. Be sure the mount you choose is clear of this page to help you have determined that can begin the installation. Remove the stands by loosening and removing the screws. 4. Wall-mounting the Display To mount your Display...
... instructions that came with a UL-listed wall mount bracket rated for the weight/load of debris that you . To install your Display on a wall, you have the correct mount for your Display. After you will need a wall mount. Be sure the mount you choose is clear of this page to help you have determined that can begin the installation. Remove the stands by loosening and removing the screws. 4. Wall-mounting the Display To mount your Display...

Quickstart Guide English
Page 33
...VIZIO authorized service center; (j) products with any court having jurisdiction. What This Warranty Does Not Cover This warranty does not cover: (a) cosmetic damage; (b) normal wear and tear; (c) improper operation; (d) improper voltage supply or power surges; (e) signal issues; (f) damage from shipping; (g) acts of you and VIZIO... are a resident of protection. Replacement parts may be sent to a VIZIO service center to recover attorneys' fees in connection with unreadable or removed serial numbers; (k) products requiring routine maintenance; VIZIO AND YOU AGREE THAT NO PARTY...
...VIZIO authorized service center; (j) products with any court having jurisdiction. What This Warranty Does Not Cover This warranty does not cover: (a) cosmetic damage; (b) normal wear and tear; (c) improper operation; (d) improper voltage supply or power surges; (e) signal issues; (f) damage from shipping; (g) acts of you and VIZIO... are a resident of protection. Replacement parts may be sent to a VIZIO service center to recover attorneys' fees in connection with unreadable or removed serial numbers; (k) products requiring routine maintenance; VIZIO AND YOU AGREE THAT NO PARTY...


