
User Manual English
Page 2
... not place your HDTV in fire or electric shock. • Do not use attachments/accessories specified by the manufacturer. • Use only with the cart, stand, tripod, bracket, or table specified by the manufacturer, or sold with the apparatus. For more information, contact your dealer. • When connected to dripping or...
... not place your HDTV in fire or electric shock. • Do not use attachments/accessories specified by the manufacturer. • Use only with the cart, stand, tripod, bracket, or table specified by the manufacturer, or sold with the apparatus. For more information, contact your dealer. • When connected to dripping or...
User Manual English
Page 66
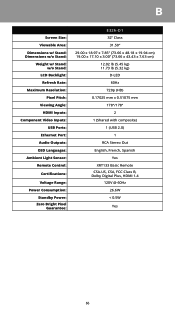
B Screen Size: Viewable Area: Dimensions w/ Stand: Dimensions w/o Stand: Weight w/ Stand: w/o Stand: LCD Backlight: Refresh Rate: Maximum Resolution: Pixel Pitch: Viewing Angle: HDMI Inputs: Component Video Inputs: USB Ports: Ethernet Port: Audio Outputs: OSD Languages: Ambient Light ...
B Screen Size: Viewable Area: Dimensions w/ Stand: Dimensions w/o Stand: Weight w/ Stand: w/o Stand: LCD Backlight: Refresh Rate: Maximum Resolution: Pixel Pitch: Viewing Angle: HDMI Inputs: Component Video Inputs: USB Ports: Ethernet Port: Audio Outputs: OSD Languages: Ambient Light ...

User Manual English
Page 67
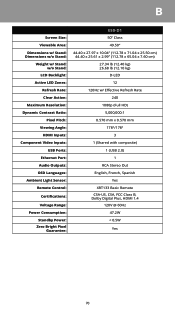
B Screen Size: Viewable Area: Dimensions w/ Stand: Dimensions w/o Stand: Weight w/ Stand: w/o Stand: LCD Backlight: Active LED Zones: Refresh Rate: Clear Action: Maximum Resolution: Dynamic Contrast ...Ratio: Pixel Pitch: Viewing Angle: HDMI Inputs: Component Video Inputs: USB Ports: Ethernet Port: Audio Outputs: OSD Languages: Ambient Light Sensor: Remote Control: Certifications: Voltage Range: Power Consumption: Standby Power: Zero Bright Pixel Guarantee: E40-D0...
B Screen Size: Viewable Area: Dimensions w/ Stand: Dimensions w/o Stand: Weight w/ Stand: w/o Stand: LCD Backlight: Active LED Zones: Refresh Rate: Clear Action: Maximum Resolution: Dynamic Contrast ...Ratio: Pixel Pitch: Viewing Angle: HDMI Inputs: Component Video Inputs: USB Ports: Ethernet Port: Audio Outputs: OSD Languages: Ambient Light Sensor: Remote Control: Certifications: Voltage Range: Power Consumption: Standby Power: Zero Bright Pixel Guarantee: E40-D0...

User Manual English
Page 68
B Screen Size: Viewable Area: Dimensions w/ Stand: Dimensions w/o Stand: Weight w/ Stand: w/o Stand: LCD Backlight: Active LED Zones: Refresh Rate: Clear Action: Maximum Resolution: Dynamic Contrast Ratio: Pixel Pitch: Viewing Angle: HDMI Inputs: Component Video Inputs: USB Ports: ...
B Screen Size: Viewable Area: Dimensions w/ Stand: Dimensions w/o Stand: Weight w/ Stand: w/o Stand: LCD Backlight: Active LED Zones: Refresh Rate: Clear Action: Maximum Resolution: Dynamic Contrast Ratio: Pixel Pitch: Viewing Angle: HDMI Inputs: Component Video Inputs: USB Ports: ...

User Manual English
Page 69
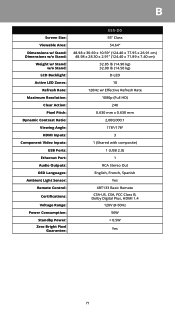
... w/ Stand: Dimensions w/o Stand: Weight w/ Stand: w/o Stand: LCD Backlight: Active LED Zones: Refresh Rate: Maximum Resolution: Dynamic Contrast Ratio: Clear Action: Pixel Pitch: Viewing Angle: HDMI Inputs: Component Video Inputs: USB Ports: Ethernet Port: Audio Outputs: OSD Languages: Ambient Light Sensor: Remote Control: Certifications: Voltage Range: Power Consumption: Standby Power: Zero Bright Pixel Guarantee: E48-D0 48...
... w/ Stand: Dimensions w/o Stand: Weight w/ Stand: w/o Stand: LCD Backlight: Active LED Zones: Refresh Rate: Maximum Resolution: Dynamic Contrast Ratio: Clear Action: Pixel Pitch: Viewing Angle: HDMI Inputs: Component Video Inputs: USB Ports: Ethernet Port: Audio Outputs: OSD Languages: Ambient Light Sensor: Remote Control: Certifications: Voltage Range: Power Consumption: Standby Power: Zero Bright Pixel Guarantee: E48-D0 48...
User Manual English
Page 70
B Screen Size: Viewable Area: Dimensions w/ Stand: Dimensions w/o Stand: Weight w/ Stand: w/o Stand: LCD Backlight: Active LED Zones: Refresh Rate: Clear Action: Maximum Resolution: Dynamic Contrast Ratio: Pixel Pitch: Viewing Angle: HDMI Inputs: Component Video Inputs: USB Ports: ...
B Screen Size: Viewable Area: Dimensions w/ Stand: Dimensions w/o Stand: Weight w/ Stand: w/o Stand: LCD Backlight: Active LED Zones: Refresh Rate: Clear Action: Maximum Resolution: Dynamic Contrast Ratio: Pixel Pitch: Viewing Angle: HDMI Inputs: Component Video Inputs: USB Ports: ...
User Manual English
Page 71
B Screen Size: Viewable Area: Dimensions w/ Stand: Dimensions w/o Stand: Weight w/ Stand: w/o Stand: LCD Backlight: Active LED Zones: Refresh Rate: Maximum Resolution: Clear Action: Pixel Pitch: ...Dynamic Contrast Ratio: Viewing Angle: HDMI Inputs: Component Video Inputs: USB Ports: Ethernet Port: Audio Outputs: OSD Languages: Ambient Light Sensor: Remote Control: Certifications: Voltage Range: Power Consumption: Standby Power: Zero Bright Pixel Guarantee: E55-D0...
B Screen Size: Viewable Area: Dimensions w/ Stand: Dimensions w/o Stand: Weight w/ Stand: w/o Stand: LCD Backlight: Active LED Zones: Refresh Rate: Maximum Resolution: Clear Action: Pixel Pitch: ...Dynamic Contrast Ratio: Viewing Angle: HDMI Inputs: Component Video Inputs: USB Ports: Ethernet Port: Audio Outputs: OSD Languages: Ambient Light Sensor: Remote Control: Certifications: Voltage Range: Power Consumption: Standby Power: Zero Bright Pixel Guarantee: E55-D0...
Quickstart Guide English
Page 2
... blades with one wider than the voltage specified. When a cart is used, use attachments/accessories specified by the manufacturer. • Use only with the cart, stand, tripod, bracket, or table specified by the manufacturer, or sold with the manufacturer's instructions. • Do not install near water. • Clean only with arrowhead...
... blades with one wider than the voltage specified. When a cart is used, use attachments/accessories specified by the manufacturer. • Use only with the cart, stand, tripod, bracket, or table specified by the manufacturer, or sold with the manufacturer's instructions. • Do not install near water. • Clean only with arrowhead...

Quickstart Guide English
Page 4
... replacing batteries 7 Using your smartphone or tablet as a remote 8 Minimum Recommended Requirements 9 Installing the TV stands 10 First-time setup...12 Pairing your mobile device 16 Pairing Via Wi-Fi 17 Getting started with the VIZIO SmartCast app 18 Account Setup 18 Selecting a Cast device 19 Basic TV functions 20 Category Pages...
... replacing batteries 7 Using your smartphone or tablet as a remote 8 Minimum Recommended Requirements 9 Installing the TV stands 10 First-time setup...12 Pairing your mobile device 16 Pairing Via Wi-Fi 17 Getting started with the VIZIO SmartCast app 18 Account Setup 18 Selecting a Cast device 19 Basic TV functions 20 Category Pages...

Quickstart Guide English
Page 10
English - 10 Î P To prevent scratches or damage to avoid damage. Make sure the top and bottom edges of the screen are being supported by the surface to the screen, place the TV on a clean, flat surface. Installing the TV stands 1 It is recommended that two people take part in the stand installation. Remove any sharp edges. Place the TV screen-down on a soft surface such as a carpet, rug, or blanket, and avoid any plastic film from the Home Theater TV and stands.
English - 10 Î P To prevent scratches or damage to avoid damage. Make sure the top and bottom edges of the screen are being supported by the surface to the screen, place the TV on a clean, flat surface. Installing the TV stands 1 It is recommended that two people take part in the stand installation. Remove any sharp edges. Place the TV screen-down on a soft surface such as a carpet, rug, or blanket, and avoid any plastic film from the Home Theater TV and stands.

Quickstart Guide English
Page 11
When you are identical.) Secure each stand to change. The actual number of ports and their locations may be subject to the TV with two (2) Phillips screws (included). 2 Insert the stands into the back of the TV and tighten them using a Phillips screwdriver. Note: The image shown here is for illustrative purposes only and may vary, depending on a stable, level surface. English - 11 Insert the screws into the base of the TV. (The stands are finished, place the TV on the model.
When you are identical.) Secure each stand to change. The actual number of ports and their locations may be subject to the TV with two (2) Phillips screws (included). 2 Insert the stands into the back of the TV and tighten them using a Phillips screwdriver. Note: The image shown here is for illustrative purposes only and may vary, depending on a stable, level surface. English - 11 Insert the screws into the base of the TV. (The stands are finished, place the TV on the model.

Quickstart Guide English
Page 24
.... Consult the information on a clean, flat, stable surface. English - 24 Be sure the mount you . Place the TV face-down on this TV. Remove the stands by loosening and removing the screws. 4. To install your TV.
.... Consult the information on a clean, flat, stable surface. English - 24 Be sure the mount you . Place the TV face-down on this TV. Remove the stands by loosening and removing the screws. 4. To install your TV.
Quickstart Guide English
Page 25
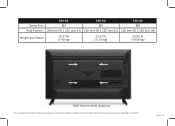
English - 25 Note: The image shown here is for illustrative purposes only and may vary, depending on the model. The actual number of ports and their locations may be subject to change. Screw Size: Hole Pattern: E40-D0 M4 200 mm (V) x 200 mm (H) E48-D0 M6 200 mm (V) x 200 mm (H) E55-D0 M6 200 mm (V) x 200 mm (H) Weight w/o Stand: 16.31 lb (7.40 kg) 25.57 lb (11.60 kg) 32.00 lb (14.50 kg) Wall-mount screw locations.
English - 25 Note: The image shown here is for illustrative purposes only and may vary, depending on the model. The actual number of ports and their locations may be subject to change. Screw Size: Hole Pattern: E40-D0 M4 200 mm (V) x 200 mm (H) E48-D0 M6 200 mm (V) x 200 mm (H) E55-D0 M6 200 mm (V) x 200 mm (H) Weight w/o Stand: 16.31 lb (7.40 kg) 25.57 lb (11.60 kg) 32.00 lb (14.50 kg) Wall-mount screw locations.


