
E472VL User Manual
Page 4
... or component damage. • A distance of at plugs, convenience receptacles, and the point where they exit from being walked on your TV cabinet. The manufacturer's warranty does not cover user abuse or improper installations. • The power cord must be of sufficient magnitude to ...over. • Unplug this apparatus near any object into the apparatus, the apparatus has been eposed E472VL / E552VL to protect it from overheating, be observed for your TV. This is used, use this apparatus during lightning storms or when unused for ventilation. If you ...
... or component damage. • A distance of at plugs, convenience receptacles, and the point where they exit from being walked on your TV cabinet. The manufacturer's warranty does not cover user abuse or improper installations. • The power cord must be of sufficient magnitude to ...over. • Unplug this apparatus near any object into the apparatus, the apparatus has been eposed E472VL / E552VL to protect it from overheating, be observed for your TV. This is used, use this apparatus during lightning storms or when unused for ventilation. If you ...
E472VL User Manual
Page 5
...inside the cord and cause fire or electric shock. Liquid sprays or any other voltage than the specified voltage may expose you are for your TV and easily accessible. • Only power of the following occurs, contact the dealer: - These servicing instructions are qualified to leak which can... within an equilateral triangle is dropped or damaged in fire or electric shock. • The wall socket should be installed near your TV. E472VL / E552VL • Do not overload power strips and extension cords. h The lightning flash with instructions. Operating your...
...inside the cord and cause fire or electric shock. Liquid sprays or any other voltage than the specified voltage may expose you are for your TV and easily accessible. • Only power of the following occurs, contact the dealer: - These servicing instructions are qualified to leak which can... within an equilateral triangle is dropped or damaged in fire or electric shock. • The wall socket should be installed near your TV. E472VL / E552VL • Do not overload power strips and extension cords. h The lightning flash with instructions. Operating your...
E472VL User Manual
Page 6
..., as before to receive low power, Class A or translator television stations and with a built-in tuner capable of time, unplug the TV from the wall outlet and disconnect the antenna or cable system. Power Lines Do not locate the antenna near overhead light or power circuits,... periods of processing digital broadcasts. Ground Clamp Antenna Lead In Wire DTV Transition Advisory The nationwide switch to digital-only broadcasting. E472VL / E552VL Television Antenna Connection Protection If an outside antenna/satellite dish or cable system is to be connected to earth in wire to ...
..., as before to receive low power, Class A or translator television stations and with a built-in tuner capable of time, unplug the TV from the wall outlet and disconnect the antenna or cable system. Power Lines Do not locate the antenna near overhead light or power circuits,... periods of processing digital broadcasts. Ground Clamp Antenna Lead In Wire DTV Transition Advisory The nationwide switch to digital-only broadcasting. E472VL / E552VL Television Antenna Connection Protection If an outside antenna/satellite dish or cable system is to be connected to earth in wire to ...
E472VL User Manual
Page 8
...28 Using the USB Media Player 28 Connecting a USB Thumb Drive to the TV 28 Playing USB Media 28 Using VIZIO Internet Apps 31 Using the VIA Shortcut Buttons 31 Using the VIA Dock 31... Profile 33 Restoring the VIA Dock to the Factory Default Settings 34 Troubleshooting & Technical Support 35 The TV displays "No Signal 35 There is no power 35 The power is on, but there is no... I see "noise" or static on the screen 36 When I change input source, the volume changes 36 E472VL / E552VL When I change input source, the display image changes size 36 Specifications 37 Limited Warranty 39 ON ...
...28 Using the USB Media Player 28 Connecting a USB Thumb Drive to the TV 28 Playing USB Media 28 Using VIZIO Internet Apps 31 Using the VIA Shortcut Buttons 31 Using the VIA Dock 31... Profile 33 Restoring the VIA Dock to the Factory Default Settings 34 Troubleshooting & Technical Support 35 The TV displays "No Signal 35 There is no power 35 The power is on, but there is no... I see "noise" or static on the screen 36 When I change input source, the volume changes 36 E472VL / E552VL When I change input source, the display image changes size 36 Specifications 37 Limited Warranty 39 ON ...
E472VL User Manual
Page 10
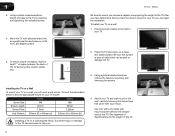
... a philips-head screwdriver, remove the base by inserting and tightening the included screws. 4. To install your mount. E472VL / E552VL Be sure the mount you can scratch or damage the TV. 3. Using a philips-head screwdriver, attach the base to the wall, carefully following the instructions that you have determined that came with a UL...
... a philips-head screwdriver, remove the base by inserting and tightening the included screws. 4. To install your mount. E472VL / E552VL Be sure the mount you can scratch or damage the TV. 3. Using a philips-head screwdriver, attach the base to the wall, carefully following the instructions that you have determined that came with a UL...
E472VL User Manual
Page 12
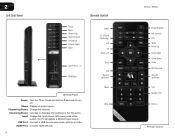
...Down: Change the channel. HDMI Port: Connect HDMI devices. 4 Input CC (Closed Captioning) Exit OK Arrow Left Back VIA Volume Up/Down Mute Wide E472VL / E552VL Power/Standby A/V Controls Info Menu Arrow Up Arrow Right Arrow Down Guide VIA Shortcuts Channel Up/Down Last Number Pad Dash (-) Remote Control 2 ...Power Menu Channel Up Channel Down Volume Up Volume Down Input USB Ports (1, 2) HDMI Port Left Side Panel Power: Turn the TV on -screen menu. With each press of the TVs audio. Press and hold for 3 seconds to play music, photos, or video. Input: Change the input device. Volume Up/...
...Down: Change the channel. HDMI Port: Connect HDMI devices. 4 Input CC (Closed Captioning) Exit OK Arrow Left Back VIA Volume Up/Down Mute Wide E472VL / E552VL Power/Standby A/V Controls Info Menu Arrow Up Arrow Right Arrow Down Guide VIA Shortcuts Channel Up/Down Last Number Pad Dash (-) Remote Control 2 ...Power Menu Channel Up Channel Down Volume Up Volume Down Input USB Ports (1, 2) HDMI Port Left Side Panel Power: Turn the TV on -screen menu. With each press of the TVs audio. Press and hold for 3 seconds to play music, photos, or video. Input: Change the input device. Volume Up/...
E472VL User Manual
Page 13
...on or off . Number Pad: Use the number pad to the channel last viewed. Move/Delete App from children and pets. 5 E472VL / E552VL 2 Power/Standby: Turn the TV on page 28. Menu: Display the on -screen menu options. Back: Go to manually enter a digital sub-channel. (For example...good quality batteries. • Inserting the batteries incorrectly may result in accordance with number pad to the previous on -screen menu. VIA Shortcuts: Control VIZIO Internet Apps. VIA: Start VIA Internet Apps. Remove the battery cover. 2. Channel Up/Down: Change the channel. Dash (-): Use with local ...
...on or off . Number Pad: Use the number pad to the channel last viewed. Move/Delete App from children and pets. 5 E472VL / E552VL 2 Power/Standby: Turn the TV on page 28. Menu: Display the on -screen menu options. Back: Go to manually enter a digital sub-channel. (For example...good quality batteries. • Inserting the batteries incorrectly may result in accordance with number pad to the previous on -screen menu. VIA Shortcuts: Control VIZIO Internet Apps. VIA: Start VIA Internet Apps. Remove the battery cover. 2. Channel Up/Down: Change the channel. Dash (-): Use with local ...
E472VL User Manual
Page 15
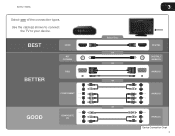
BEST BETTER HDMI RF/ COAXIAL RGB COMPONENT GOOD COMPOSITE AV 3 Select One: OR OR OR OR DIGITAL DIGITAL / ANALOG ANALOG ANALOG ANALOG Device Connection Chart 7 Use the cable(s) shown to connect the TV to your device. E472VL / E552VL Select one of the connection types.
BEST BETTER HDMI RF/ COAXIAL RGB COMPONENT GOOD COMPOSITE AV 3 Select One: OR OR OR OR DIGITAL DIGITAL / ANALOG ANALOG ANALOG ANALOG Device Connection Chart 7 Use the cable(s) shown to connect the TV to your device. E472VL / E552VL Select one of the connection types.

E472VL User Manual
Page 16
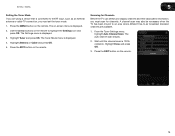
... Using Guided Setup on the back of the TV. 3. Use the Guided Network Setup to a wireless network: 1. Connect your ethernet cable to the router and to the ethernet port on page 26. 8 E472VL / E552VL Ensure you can be connected to your home network in two ways: • Wired, using ...your home wireless network Once you have connected to your home network and the Internet, you have : • An ethernet cable long enough to reach your TV • A router or...
... Using Guided Setup on the back of the TV. 3. Use the Guided Network Setup to a wireless network: 1. Connect your ethernet cable to the router and to the ethernet port on page 26. 8 E472VL / E552VL Ensure you can be connected to your home network in two ways: • Wired, using ...your home wireless network Once you have connected to your home network and the Internet, you have : • An ethernet cable long enough to reach your TV • A router or...
E472VL User Manual
Page 19
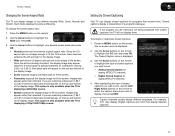
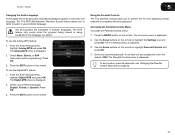
...may appear distorted. Press OK. 3. After highlighting the type of a program's dialogue. Press the MENU button on the remote to fill the TV's screen, black bars are watching widescreen (1.85:1 or 2.35:1) content, black bars will still appear on the top and bottom of the display.... Use the Arrow buttons on the remote. 2. This option is only available when the TV is displayed. 3. Press the MENU button on the remote. E472VL / E552VL 5 Changing the Screen Aspect Ratio The TV can display closed captions for programs that include them . To activate or deactivate closed captions:...
...may appear distorted. Press OK. 3. After highlighting the type of a program's dialogue. Press the MENU button on the remote to fill the TV's screen, black bars are watching widescreen (1.85:1 or 2.35:1) content, black bars will still appear on the top and bottom of the display.... Use the Arrow buttons on the remote. 2. This option is only available when the TV is displayed. 3. Press the MENU button on the remote. E472VL / E552VL 5 Changing the Screen Aspect Ratio The TV can display closed captions for programs that include them . To activate or deactivate closed captions:...
E472VL User Manual
Page 20
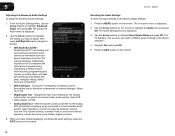
... color. • BG Opacity - Change the edge color. • Window Opacity - Change the edge type. 4. E472VL / E552VL Activating the Sleep Timer When activated, the TV's sleep timer will turn the TV off after which you want the TV to select Custom, then press OK. Press the MENU button on the remote to turn off...
... color. • BG Opacity - Change the edge color. • Window Opacity - Change the edge type. 4. E472VL / E552VL Activating the Sleep Timer When activated, the TV's sleep timer will turn the TV off after which you want the TV to select Custom, then press OK. Press the MENU button on the remote to turn off...
E472VL User Manual
Page 21
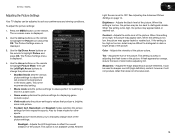
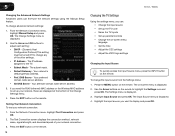
... Picture Settings on the remote. Color - The Picture Settings menu is displayed. 4. Adjusts the white level of the picture colors. To adjust the picture settings: 1. E472VL / E552VL Adjusting the Picture Settings Your TV display can be used to highlight the Picture icon and press OK.
... Picture Settings on the remote. Color - The Picture Settings menu is displayed. 4. Adjusts the white level of the picture colors. To adjust the picture settings: 1. E472VL / E552VL Adjusting the Picture Settings Your TV display can be used to highlight the Picture icon and press OK.
E472VL User Manual
Page 23
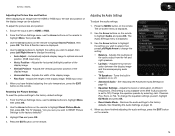
...Advanced Audio Settings on the remote. When you wish to adjust, then press Left/Right Arrow to change the setting: • Auto Adjust - E472VL / E552VL 5 Adjusting the Picture Size and Position When displaying an image from the left /right) position of the display image. • ...optimal size and position. (RGB input only.) • Horiz. Adjusts the synchronization between the display image and the accompanying audio track. • TV Speakers - To change the equalizer settings yourself, highlight EQ Mode and press OK. • Reset Audio Mode - Use the Arrow buttons on page...
...Advanced Audio Settings on the remote. When you wish to adjust, then press Left/Right Arrow to change the setting: • Auto Adjust - E472VL / E552VL 5 Adjusting the Picture Size and Position When displaying an image from the left /right) position of the display image. • ...optimal size and position. (RGB input only.) • Horiz. Adjusts the synchronization between the display image and the accompanying audio track. • TV Speakers - To change the equalizer settings yourself, highlight EQ Mode and press OK. • Reset Audio Mode - Use the Arrow buttons on page...
E472VL User Manual
Page 24
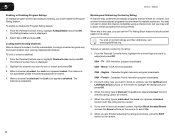
...Use the Arrow buttons to highlight the setting you wish to adjust, then press Left/Right Arrow to the factory default settings: 1. E472VL / E552VL Resetting the Audio Settings To reset the audio settings to change the setting: • SRS StudioSound HD StudioSound HD™...press the EXIT button on -screen menu is a feature-rich surround sound solution which delivers an immersive surround sound experience from the TV's internal speakers. Additionally, StudioSound HD completes the entertainment experience by maintaining a steady volume while watching programming and movies, providing deep,...
...Use the Arrow buttons to highlight the setting you wish to adjust, then press Left/Right Arrow to the factory default settings: 1. E472VL / E552VL Resetting the Audio Settings To reset the audio settings to change the setting: • SRS StudioSound HD StudioSound HD™...press the EXIT button on -screen menu is a feature-rich surround sound solution which delivers an immersive surround sound experience from the TV's internal speakers. Additionally, StudioSound HD completes the entertainment experience by maintaining a steady volume while watching programming and movies, providing deep,...
E472VL User Manual
Page 25
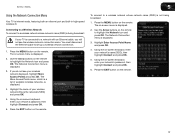
...is internet-ready, featuring both an ethernet port and built-in high-speed wireless-N. Press the EXIT button on the remote. E472VL / E552VL 5 Using the Network Connection Menu Your TV is displayed. 3. Press the EXIT button on the remote. 17 Using the on the remote to set up a wireless... displayed. 2. You must disconnect the Ethernet cable to highlight the Network icon and press OK. Use the Arrow buttons on -screen keyboard, enter your TV is the network's SSID) and press OK. 5. The on -screen menu is not being broadcast: If your network's name (SSID), then highlight ...
...is internet-ready, featuring both an ethernet port and built-in high-speed wireless-N. Press the EXIT button on the remote. E472VL / E552VL 5 Using the Network Connection Menu Your TV is displayed. 3. Press the EXIT button on the remote. 17 Using the on the remote to set up a wireless... displayed. 2. You must disconnect the Ethernet cable to highlight the Network icon and press OK. Use the Arrow buttons on -screen keyboard, enter your TV is the network's SSID) and press OK. 5. The on -screen menu is not being broadcast: If your network's name (SSID), then highlight ...
E472VL User Manual
Page 26
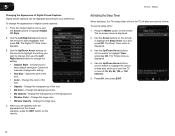
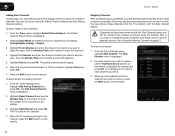
...controls • Change the on-screen menu language • Set the time • Adjust the CEC settings • Adjust the VIZIO logo settings Changing the Input Source To quickly access the Input Source menu, press the INPUT button on the remote. 18 Changing the...: 1. Testing Your Network Connection To test your network connection. 3. The on the remote to the TV. • Subnet Mask - The subnet mask. • Default Gateway - Your alternate domain name server address. 3. 5 E472VL / E552VL Changing the Advanced Network Settings Advanced users can : • Change the input source •...
...controls • Change the on-screen menu language • Set the time • Adjust the CEC settings • Adjust the VIZIO logo settings Changing the Input Source To quickly access the Input Source menu, press the INPUT button on the remote. 18 Changing the...: 1. Testing Your Network Connection To test your network connection. 3. The on the remote to the TV. • Subnet Mask - The subnet mask. • Default Gateway - Your alternate domain name server address. 3. 5 E472VL / E552VL Changing the Advanced Network Settings Advanced users can : • Change the input source •...
E472VL User Manual
Page 27
The Tuner Mode menu is 100% complete. A channel scan may also be necessary when the TV has been moved to an area where different free-to-air broadcast television channels are using a device that is connected to highlight the Settings icon .... Highlight Done and press OK. 3. Wait until the channel scan is displayed. 4. The Settings menu is displayed. 2. Highlight Tuner and press OK. Scanning for channels. E472VL / E552VL 5 Setting the Tuner Mode If you must set the tuner mode. 1. The on-screen menu is displayed. 3. Use the Arrow buttons on the remote...
The Tuner Mode menu is 100% complete. A channel scan may also be necessary when the TV has been moved to an area where different free-to-air broadcast television channels are using a device that is connected to highlight the Settings icon .... Highlight Done and press OK. 3. Wait until the channel scan is displayed. 4. The Settings menu is displayed. 2. Highlight Tuner and press OK. Scanning for channels. E472VL / E552VL 5 Setting the Tuner Mode If you must set the tuner mode. 1. The on-screen menu is displayed. 3. Use the Arrow buttons on the remote...
E472VL User Manual
Page 28
...of the channel you want to the right of channel you select. 3. See Using the Parental Controls on the remote to watch comfortably. 5 E472VL / E552VL Adding New Channels Occasionally, you do this by using the Number Pad. From the Tuner menu, highlight Partial Channel Search. Highlight From... Channel and enter the channel from the TV's memory with the Skip Channel feature can remove these channels from which you are adding: Analog/Digital, Analog, or Digital. 3. Highlight ...
...of the channel you want to the right of channel you select. 3. See Using the Parental Controls on the remote to watch comfortably. 5 E472VL / E552VL Adding New Channels Occasionally, you do this by using the Number Pad. From the Tuner menu, highlight Partial Channel Search. Highlight From... Channel and enter the channel from the TV's memory with the Skip Channel feature can remove these channels from which you are adding: Analog/Digital, Analog, or Digital. 3. Highlight ...
E472VL User Manual
Page 29
E472VL / E552VL 5 Changing the Audio Language Some digital free-to-air and cable...preferred language. Select your parental passcode. To use the Digital MTS feature: 1. The Digital MTS menu is displayed. 3. The TV Settings menu is displayed. 2. To use the Analog MTS feature: 1. Select Mono, Stereo, or SAP (secondary audio programming...Press OK. 3. Use the Arrow buttons on page 23. 21 To set a passcode, enter the default, 0000. The TV's MTS (Multichannel Television Sound) feature allows you to listen to highlight Parental Controls and press OK. 4. Use the Arrow buttons...
E472VL / E552VL 5 Changing the Audio Language Some digital free-to-air and cable...preferred language. Select your parental passcode. To use the Digital MTS feature: 1. The Digital MTS menu is displayed. 3. The TV Settings menu is displayed. 2. To use the Analog MTS feature: 1. Select Mono, Stereo, or SAP (secondary audio programming...Press OK. 3. Use the Arrow buttons on page 23. 21 To set a passcode, enter the default, 0000. The TV's MTS (Multichannel Television Sound) feature allows you to listen to highlight Parental Controls and press OK. 4. Use the Arrow buttons...
E472VL User Manual
Page 30
... the channel you want to adjust and press OK: USA - When this is unlocked, the Lock icon appears unlocked. TV - CAN - Content with this rating can use the TV's Rating Block feature to block content based on the remote to select On. 6. To lock or unlock a channel: ...OK. 3. For a list of content ratings and their definitions, visit www.tvguidelines.org. Content with this rating cannot be inaccessible. 5 E472VL / E552VL Enabling or Disabling Program Ratings To manage program content according to its rating, you may wish to block certain programs from viewing ...
... the channel you want to adjust and press OK: USA - When this is unlocked, the Lock icon appears unlocked. TV - CAN - Content with this rating can use the TV's Rating Block feature to block content based on the remote to select On. 6. To lock or unlock a channel: ...OK. 3. For a list of content ratings and their definitions, visit www.tvguidelines.org. Content with this rating cannot be inaccessible. 5 E472VL / E552VL Enabling or Disabling Program Ratings To manage program content according to its rating, you may wish to block certain programs from viewing ...


