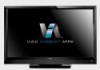
E472VL User Manual
Page 4
...blades and a third grounding prong. When a cart is used, use attachments/accessories specified by the manufacturer. • Use only with the cart, stand, tripod, bracket, or table specified by the manufactuer, or sold with a dry cloth. • Do not block any heat sources such as radiators...may result in the housing. If your outlet does not accommodate the three-pronged, have fallen into the apparatus, the apparatus has been eposed E472VL / E552VL to rain or moisture, does not operate normally or has been dropped. • Unplug the power cord before connecting other apparatus ...
...blades and a third grounding prong. When a cart is used, use attachments/accessories specified by the manufacturer. • Use only with the cart, stand, tripod, bracket, or table specified by the manufactuer, or sold with a dry cloth. • Do not block any heat sources such as radiators...may result in the housing. If your outlet does not accommodate the three-pronged, have fallen into the apparatus, the apparatus has been eposed E472VL / E552VL to rain or moisture, does not operate normally or has been dropped. • Unplug the power cord before connecting other apparatus ...

E472VL User Manual
Page 7
Table of Contents Installing the TV 1 Inspecting the Package Contents 1 Installing the TV 1 Installing the TV Stand 1 Installing the TV on a Wall 2 Controls and Connections 3 Rear Panel 3 Front Panel 3 Remote Control 4 Left Side Panel 4 Replacing the Batteries 5 Connecting Your Devices 6 Before You ... the Names of the Inputs 23 Changing the On-Screen Menu Language 24 Setting the Time Zone 24 Adjusting the CEC Settings 25 Turning the VIZIO Logo On or Off 25 Using the Help Menu 25 Displaying System Information 25 Resetting the TV Settings 25 Restoring the TV to Factory Default...
Table of Contents Installing the TV 1 Inspecting the Package Contents 1 Installing the TV 1 Installing the TV Stand 1 Installing the TV on a Wall 2 Controls and Connections 3 Rear Panel 3 Front Panel 3 Remote Control 4 Left Side Panel 4 Replacing the Batteries 5 Connecting Your Devices 6 Before You ... the Names of the Inputs 23 Changing the On-Screen Menu Language 24 Setting the Time Zone 24 Adjusting the CEC Settings 25 Turning the VIZIO Logo On or Off 25 Using the Help Menu 25 Displaying System Information 25 Resetting the TV Settings 25 Restoring the TV to Factory Default...
E472VL User Manual
Page 9
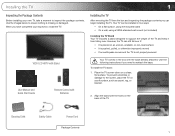
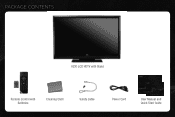
... the box with Batteries Your TV comes in two ways: • On a flat surface, using the included stand • On a wall, using a VESA-standard wall mount (not included) Installing the TV Stand Your TV includes a stand designed to the screen, place the TV on a clean, flat surface. Cleaning Cloth Safety Cable Power Cord... Package Contents 1 Your TV can begin installing the TV. When you have completed your new TV, take a moment to ensure nothing is not properly secured VIZIO LCD HDTV with Stand User Manual and Quick Start Guide Remote Control with the base already attached.
... the box with Batteries Your TV comes in two ways: • On a flat surface, using the included stand • On a wall, using a VESA-standard wall mount (not included) Installing the TV Stand Your TV includes a stand designed to the screen, place the TV on a clean, flat surface. Cleaning Cloth Safety Cable Power Cord... Package Contents 1 Your TV can begin installing the TV. When you have completed your new TV, take a moment to ensure nothing is not properly secured VIZIO LCD HDTV with Stand User Manual and Quick Start Guide Remote Control with the base already attached.
E472VL User Manual
Page 10
... surface is capable of supporting the weight of this TV. 2 Move the TV with your TV model: Screw Size: Screw Length: Screw Pitch: Hole Pattern: E472VL M6 20mm 1.0mm 200mm (V) x 400mm (H) E552VL M8 25mm 1.25mm 200mm (V) x 400mm (H) Installing a TV on a Wall To mount your TV, you .... 4. Consult the information below to the wall, carefully following the instructions that came with attached stand into an upright position and place on a clean, flat, stable surface. Attach your TV and wall mount to find the appropriate mount for your TV...
... surface is capable of supporting the weight of this TV. 2 Move the TV with your TV model: Screw Size: Screw Length: Screw Pitch: Hole Pattern: E472VL M6 20mm 1.0mm 200mm (V) x 400mm (H) E552VL M8 25mm 1.25mm 200mm (V) x 400mm (H) Installing a TV on a Wall To mount your TV, you .... 4. Consult the information below to the wall, carefully following the instructions that came with attached stand into an upright position and place on a clean, flat, stable surface. Attach your TV and wall mount to find the appropriate mount for your TV...
E472VL User Manual
Page 45
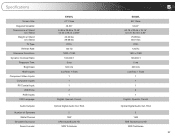
Specifications Screen Size: Diagonal Viewable: Dimensions w/ Stand: w/o Stand: Weight w/ Stand: w/o Stand: TV Type: Refresh Rate: Maximum Resolution: Dynamic Contrast Ratio: Response Time: Brightness: HDMI Inputs: Component Video Inputs: Composite Inputs: RF/Coaxial Input: USB Ports: RGB Inputs: OSD Language: Audio Outputs: Number of Speakers Watts/Channel Simulated Surround: Sound Leveler: E472VL 47" Class 46.96" 44...
Specifications Screen Size: Diagonal Viewable: Dimensions w/ Stand: w/o Stand: Weight w/ Stand: w/o Stand: TV Type: Refresh Rate: Maximum Resolution: Dynamic Contrast Ratio: Response Time: Brightness: HDMI Inputs: Component Video Inputs: Composite Inputs: RF/Coaxial Input: USB Ports: RGB Inputs: OSD Language: Audio Outputs: Number of Speakers Watts/Channel Simulated Surround: Sound Leveler: E472VL 47" Class 46.96" 44...
E472VL Quick Start Guide
Page 2
PACKAGE CONTENTS VIZIO LCD HDTV with Stand 1 Remote Control with Batteries Cleaning Cloth Safety Cable Power Cord User Manual and Quick Start Guide
PACKAGE CONTENTS VIZIO LCD HDTV with Stand 1 Remote Control with Batteries Cleaning Cloth Safety Cable Power Cord User Manual and Quick Start Guide

E472VL Quick Start Guide
Page 4
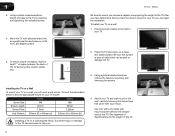
Align the stand with the holes on a soft surface, such as carpet, rug, or blanket. To prevent scratches or damage to the screen, place the TV on the back of the TV. INSTALLING THE BASE 1 2 Place the TV screen-down on a clean, flat surface.
Align the stand with the holes on a soft surface, such as carpet, rug, or blanket. To prevent scratches or damage to the screen, place the TV on the back of the TV. INSTALLING THE BASE 1 2 Place the TV screen-down on a clean, flat surface.

E472VL Quick Start Guide
Page 5
Move the TV with attached stand into an upright position and place on a flat, level, and stable surface. This can help prevent the TV from falling over due to the nearest wall. Use the included security cable to fix the TV to earthquake or accidents. 3 4 Using a philips-head screwdriver, attach the base to the TV by inserting and tightening the included screws.
Move the TV with attached stand into an upright position and place on a flat, level, and stable surface. This can help prevent the TV from falling over due to the nearest wall. Use the included security cable to fix the TV to earthquake or accidents. 3 4 Using a philips-head screwdriver, attach the base to the TV by inserting and tightening the included screws.


