

User Manual English
Page 3
Table of Contents Getting Started 4 Eu-Series Display 4 Basic Remote 6 Downloading the VIZIO SmartCast™ App 7 First-Time Setup 8 VIZIO SmartCast™ App 12 Register for a MyVIZIO account 12 Navigating the SmartCast™ App 13 User Profile Settings 15 Picking ...Timer 48 Setting the Auto Power Off Feature 48 Adjusting Network Settings 49 Using the Network Connection menu 50 Renaming Devices on the Input Menu 53 Renaming Devices on the Input Menu 54 Enabling HDMI Color Subsampling 54 Changing the Display System Settings 55 Viewing System Information 56 Changing...
Table of Contents Getting Started 4 Eu-Series Display 4 Basic Remote 6 Downloading the VIZIO SmartCast™ App 7 First-Time Setup 8 VIZIO SmartCast™ App 12 Register for a MyVIZIO account 12 Navigating the SmartCast™ App 13 User Profile Settings 15 Picking ...Timer 48 Setting the Auto Power Off Feature 48 Adjusting Network Settings 49 Using the Network Connection menu 50 Renaming Devices on the Input Menu 53 Renaming Devices on the Input Menu 54 Enabling HDMI Color Subsampling 54 Changing the Display System Settings 55 Viewing System Information 56 Changing...
User Manual English
Page 13
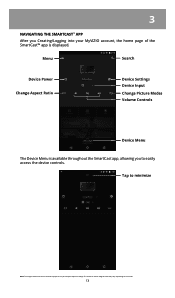
Menu Search Device Power Change Aspect Ratio Device Settings Device Input Change Picture Modes Volume Controls Device Menu The Device Menu is available throughout the SmartCast app, allowing you Creating/Logging into your MyVIZIO account, the home page of the SmartCast™ app is displayed. The actual on-screen image and text may be subject to easily access the device controls. 3 NAVIGATING THE SMARTCAST™ APP After you to change. Tap to minimize Note: The images shown here are for illustrative purposes only and may vary, depending on the model. 13
Menu Search Device Power Change Aspect Ratio Device Settings Device Input Change Picture Modes Volume Controls Device Menu The Device Menu is available throughout the SmartCast app, allowing you Creating/Logging into your MyVIZIO account, the home page of the SmartCast™ app is displayed. The actual on-screen image and text may be subject to easily access the device controls. 3 NAVIGATING THE SMARTCAST™ APP After you to change. Tap to minimize Note: The images shown here are for illustrative purposes only and may vary, depending on the model. 13
User Manual English
Page 15
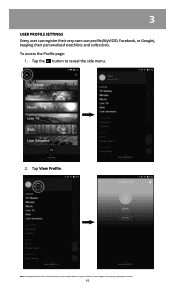
To access the Profile page: 1. Tap the button to change. Note: The images shown here are for illustrative purposes only and may vary, depending on -screen image and text may be subject to reveal the side menu. 2. Tap View Profile. 3 USER PROFILE SETTINGS Every user can register their very own user profile (MyVIZIO, Facebook, or Google), keeping their personalized watchlists and collections. The actual on the model. 15
To access the Profile page: 1. Tap the button to change. Note: The images shown here are for illustrative purposes only and may vary, depending on -screen image and text may be subject to reveal the side menu. 2. Tap View Profile. 3 USER PROFILE SETTINGS Every user can register their very own user profile (MyVIZIO, Facebook, or Google), keeping their personalized watchlists and collections. The actual on the model. 15

User Manual English
Page 18
The Device Menu is displayed − allowing you want to watch to access content. 18 B) Select On Demand or On Now (Online feed*) and tap the play button. A B C D ...
The Device Menu is displayed − allowing you want to watch to access content. 18 B) Select On Demand or On Now (Online feed*) and tap the play button. A B C D ...

User Manual English
Page 20
... (Online feed*) and tap the play button. The actual on-screen image and text may vary, depending on your device settings and content. The Device Menu is displayed − allowing you want to listen to control your SmartCast device. C) For On Demand: Select a source and tap the play button. A) Tap on...
... (Online feed*) and tap the play button. The actual on-screen image and text may vary, depending on your device settings and content. The Device Menu is displayed − allowing you want to listen to control your SmartCast device. C) For On Demand: Select a source and tap the play button. A) Tap on...

User Manual English
Page 22
... illustrative purposes only and may vary, depending on . Note: The images shown here are for the title, alerting when it will be subject to Watchlist menu appears. Tap on -screen image and text may be aired. Alert Types: New Airings Only, Live Airings Only, Unwatched Airings Only, or All Airings. 3 3. The...
... illustrative purposes only and may vary, depending on . Note: The images shown here are for the title, alerting when it will be subject to Watchlist menu appears. Tap on -screen image and text may be aired. Alert Types: New Airings Only, Live Airings Only, Unwatched Airings Only, or All Airings. 3 3. The...

User Manual English
Page 23
Note: The images shown here are for illustrative purposes only and may vary, depending on -screen image and text may be subject to play. The actual on the model. 23 The My Watchlist menu is displayed. Tap on a title, select and source, and the content begins to change. 3 To view, edit, and watch titles from your watchlist: 1. Tap on the button and select My Watchlist. 2.
Note: The images shown here are for illustrative purposes only and may vary, depending on -screen image and text may be subject to play. The actual on the model. 23 The My Watchlist menu is displayed. Tap on a title, select and source, and the content begins to change. 3 To view, edit, and watch titles from your watchlist: 1. Tap on the button and select My Watchlist. 2.

User Manual English
Page 24
From the My Watchlist menu, tap on the alerts or remove it from your watchlist: 1. button on each title to edit Note: The images shown here are for illustrative purposes only and may vary, depending on -screen image and text may be subject to change. 3 To edit alerts and remove a title from the watchlist. The actual on the model. 24
From the My Watchlist menu, tap on the alerts or remove it from your watchlist: 1. button on each title to edit Note: The images shown here are for illustrative purposes only and may vary, depending on -screen image and text may be subject to change. 3 To edit alerts and remove a title from the watchlist. The actual on the model. 24
User Manual English
Page 25
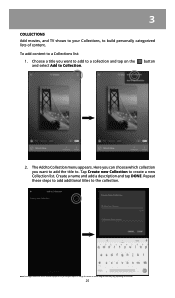
... create a new Collection list. Tap Create new Collection to a Collections list: 1. The Add to the collection. Repeat these steps to add additional titles to Collection menu appears. The actual on-screen image and text may be subject to build personally categorized lists of content. Choose a title you want to add to...
... create a new Collection list. Tap Create new Collection to a Collections list: 1. The Add to the collection. Repeat these steps to add additional titles to Collection menu appears. The actual on-screen image and text may be subject to build personally categorized lists of content. Choose a title you want to add to...

User Manual English
Page 26
3 To view, edit, and watch titles from your Collections: 1. Tap on a title, select and source, and the content begins to change. The Collections menu is displayed. Tap on the model. 26 Note: The images shown here are for illustrative purposes only and may vary, depending on the button and select Collections. 2. The actual on-screen image and text may be subject to play.
3 To view, edit, and watch titles from your Collections: 1. Tap on a title, select and source, and the content begins to change. The Collections menu is displayed. Tap on the model. 26 Note: The images shown here are for illustrative purposes only and may vary, depending on the button and select Collections. 2. The actual on-screen image and text may be subject to play.

User Manual English
Page 27
Tap to change. Note: The images shown here are for illustrative purposes only and may vary, depending on the Collection that contains the title you want to remove. 2. 3 To remove titles from the collection. From the Collections menu, tap on the model. 27 The actual on-screen image and text may be subject to remove the title from your Collection list(s): 1.
Tap to change. Note: The images shown here are for illustrative purposes only and may vary, depending on the Collection that contains the title you want to remove. 2. 3 To remove titles from the collection. From the Collections menu, tap on the model. 27 The actual on-screen image and text may be subject to remove the title from your Collection list(s): 1.
User Manual English
Page 30
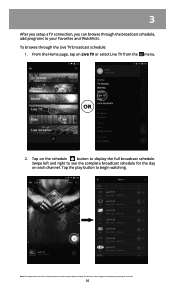
... schedule. Tap on the model. 30 OR 2. Note: The images shown here are for the day on Live TV or select Live TV from the menu. 3 After you setup a TV connection, you can browse through the Live TV broadcast schedule: 1. From the Home page, tap on each channel. Swipe left and...
... schedule. Tap on the model. 30 OR 2. Note: The images shown here are for the day on Live TV or select Live TV from the menu. 3 After you setup a TV connection, you can browse through the Live TV broadcast schedule: 1. From the Home page, tap on each channel. Swipe left and...

User Manual English
Page 33
Device Settings 3 SETTING UP ADDITIONAL SMARTCAST DEVICES To add additional SmartCast devices: 1. The VIZIO Devices menu is displayed. From the Home page, tap on -screen instructions to pair your SmartCast device. 33 Tap ADD NEW DEVICE and follow the on the button and select Device Settings. 2.
Device Settings 3 SETTING UP ADDITIONAL SMARTCAST DEVICES To add additional SmartCast devices: 1. The VIZIO Devices menu is displayed. From the Home page, tap on -screen instructions to pair your SmartCast device. 33 Tap ADD NEW DEVICE and follow the on the button and select Device Settings. 2.

User Manual English
Page 34
See VIZIO SmartCast Display Settings on the button and tap Remove to remove the SmartCast device from the SmartCast App. 3 To remove a SmartCast device: • From the VIZIO Devices menu, tap on page for detailed descriptions of each setting. 34 To modify SmartCast device settings: • From the VIZIO Devices menu, tap on the SmartCast device listed.
See VIZIO SmartCast Display Settings on the button and tap Remove to remove the SmartCast device from the SmartCast App. 3 To remove a SmartCast device: • From the VIZIO Devices menu, tap on page for detailed descriptions of each setting. 34 To modify SmartCast device settings: • From the VIZIO Devices menu, tap on the SmartCast device listed.

User Manual English
Page 35
3 To change your SmartCast device name: • From the Display Settings menu, tap on Device Name and enter a new name. Tap Save when you are done. 35
3 To change your SmartCast device name: • From the Display Settings menu, tap on Device Name and enter a new name. Tap Save when you are done. 35
User Manual English
Page 36
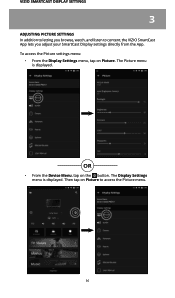
OR • From the Device Menu, tap on Picture to content, the VIZIO SmartCast App lets you adjust your SmartCast Display settings directly from the App. Then tap on the button. The Display Settings menu is displayed. VIZIO SMARTCAST DISPLAY SETTINGS 3 ADJUSTING PICTURE SETTINGS In addition to letting you browse, watch, and listen to access the Picture menu. 36 The Picture menu is displayed. To access the Picture settings menu: • From the Display Settings menu, tap on Picture.
OR • From the Device Menu, tap on Picture to content, the VIZIO SmartCast App lets you adjust your SmartCast Display settings directly from the App. Then tap on the button. The Display Settings menu is displayed. VIZIO SMARTCAST DISPLAY SETTINGS 3 ADJUSTING PICTURE SETTINGS In addition to letting you browse, watch, and listen to access the Picture menu. 36 The Picture menu is displayed. To access the Picture settings menu: • From the Display Settings menu, tap on Picture.

User Manual English
Page 40
...: 1. Inputs assigned to the factory default values. Saving a Custom Picture Mode Custom picture modes allow you are not automatically saved. From the Picture Mode Edit menu, select Save Picture Mode. 2. To save groups of the present mode. Note: Custom picture modes are done. * Only available on the top right corner of...
...: 1. Inputs assigned to the factory default values. Saving a Custom Picture Mode Custom picture modes allow you are not automatically saved. From the Picture Mode Edit menu, select Save Picture Mode. 2. To save groups of the present mode. Note: Custom picture modes are done. * Only available on the top right corner of...

User Manual English
Page 41
... -screen number pad to their settings. You must create a new 4-digit PIN. 41 Re-lock the picture modes, if desired. From the Picture Mode Edit menu, swipe the Lock Picture Mode switch to the right to lock a picture mode. (Swipe left to unlock) 2. To lock all custom picture modes: 1. From ...the Picture Mode Edit menu, swipe the Lock Picture Mode switch to the right to lock a picture mode. (Swipe left to unlock) 2. To unlock all custom picture modes: 1.
... -screen number pad to their settings. You must create a new 4-digit PIN. 41 Re-lock the picture modes, if desired. From the Picture Mode Edit menu, swipe the Lock Picture Mode switch to the right to lock a picture mode. (Swipe left to unlock) 2. To lock all custom picture modes: 1. From ...the Picture Mode Edit menu, swipe the Lock Picture Mode switch to the right to lock a picture mode. (Swipe left to unlock) 2. To unlock all custom picture modes: 1.

User Manual English
Page 42
... modes that are no longer needed can be deleted. To reset a customized preset picture mode: 1. From the Picture Mode Edit menu, Tap Delete Picture Mode. From the Picture Mode Edit menu, Tap Reset Picture Mode. Inputs assigned to a deleted custom picture mode become assigned to delete the custom picture mode. Tap on...
... modes that are no longer needed can be deleted. To reset a customized preset picture mode: 1. From the Picture Mode Edit menu, Tap Delete Picture Mode. From the Picture Mode Edit menu, Tap Reset Picture Mode. Inputs assigned to a deleted custom picture mode become assigned to delete the custom picture mode. Tap on...
User Manual English
Page 43
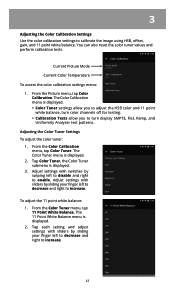
...using HSB, offset, gain, and 11 point white balance. Current Picture Mode Current Color Temperature To access the color calibration settings menu: 1. From the Color Calibration menu, tap Color Tuner. Adjust settings with sliders by swiping left to disable and right to enable. You can also reset the ...and perform calibration tests. Adjust settings with sliders by sliding your finger left to decrease and right to increase. From the Picture menu, tap Color Calibration. Tap each setting and adjust settings with switches by sliding your finger left to decrease and right to increase. 43...
...using HSB, offset, gain, and 11 point white balance. Current Picture Mode Current Color Temperature To access the color calibration settings menu: 1. From the Color Calibration menu, tap Color Tuner. Adjust settings with sliders by swiping left to disable and right to enable. You can also reset the ...and perform calibration tests. Adjust settings with sliders by sliding your finger left to decrease and right to increase. From the Picture menu, tap Color Calibration. Tap each setting and adjust settings with switches by sliding your finger left to decrease and right to increase. 43...


