E422VL User Manual
Page 4
... in a bookcase or cabinet unless proper ventilation is provided. • Never push any object into the apparatus, the apparatus has been eposed E422VL / E472VL / E552VL to rain or moisture, does not operate normally or has been dropped. • Unplug the power cord before connecting ...or objects have an electrician install the correct outlet, or use attachments/accessories specified by the manufacturer. • Use only with the cart, stand, tripod, bracket, or table specified by the manufactuer, or sold with a third grounding pin). If you are provided for future reference....
... in a bookcase or cabinet unless proper ventilation is provided. • Never push any object into the apparatus, the apparatus has been eposed E422VL / E472VL / E552VL to rain or moisture, does not operate normally or has been dropped. • Unplug the power cord before connecting ...or objects have an electrician install the correct outlet, or use attachments/accessories specified by the manufacturer. • Use only with the cart, stand, tripod, bracket, or table specified by the manufactuer, or sold with a third grounding pin). If you are provided for future reference....
E422VL User Manual
Page 7
... Only 6 VIA Shortcut Buttons 6 Replacing the Batteries (Models E472VL / E552VL Only 6 Replacing the Batteries (Model E422VL Only 6 Connecting Your Devices 7 Before You Begin 7 Connecting Your Devices 7 Setting Up Your Network Connection 9 ... 24 Changing the Names of Contents Installing the TV 1 Inspecting the Package Contents 1 Installing the TV 1 Installing the TV Stand 1 Installing the TV on a Wall 2 Controls and Connections 3 Rear Panel 3 Front Panel 4 Left Side Panel 4 Remote... Adjusting the CEC Settings 26 Turning the VIZIO Logo On or Off 26 Using the Help Menu 26
... Only 6 VIA Shortcut Buttons 6 Replacing the Batteries (Models E472VL / E552VL Only 6 Replacing the Batteries (Model E422VL Only 6 Connecting Your Devices 7 Before You Begin 7 Connecting Your Devices 7 Setting Up Your Network Connection 9 ... 24 Changing the Names of Contents Installing the TV 1 Inspecting the Package Contents 1 Installing the TV 1 Installing the TV Stand 1 Installing the TV on a Wall 2 Controls and Connections 3 Rear Panel 3 Front Panel 4 Left Side Panel 4 Remote... Adjusting the CEC Settings 26 Turning the VIZIO Logo On or Off 26 Using the Help Menu 26
E422VL User Manual
Page 9
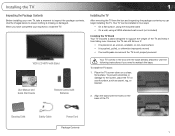
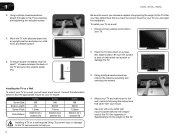
... Contents 1 When you have completed your new TV, take a moment to the screen, place the TV on a clean, flat surface. To install the TV stand: 1. Align the stand with the holes on an uneven, unstable, or non-level surface • It is pushed, pulled, or otherwise improperly moved • If an earthquake... the back of the TV and keep it from the box and inspecting the package contents you need to ensure nothing is not properly secured VIZIO LCD HDTV with Stand User Manual and Quick Start Guide Remote Control with the base already attached.
... Contents 1 When you have completed your new TV, take a moment to the screen, place the TV on a clean, flat surface. To install the TV stand: 1. Align the stand with the holes on an uneven, unstable, or non-level surface • It is pushed, pulled, or otherwise improperly moved • If an earthquake... the back of the TV and keep it from the box and inspecting the package contents you need to ensure nothing is not properly secured VIZIO LCD HDTV with Stand User Manual and Quick Start Guide Remote Control with the base already attached.
E422VL User Manual
Page 10
Move the TV with attached stand into an upright position and place on a wall: 1. Disconnect any other objects (walls, ...to find the appropriate mount for the weight/ load of the TV. See Appendix A Specifications for your mount. E422VL / E472VL / E552VL Be sure the mount you can scratch or damage the TV. 3. Be sure the ..., level, and stable surface. Installing the TV on a Wall To mount your TV model: Screw Size: Screw Length: Screw Pitch: Hole Pattern: E422VL M6 20 1.0mm 200mm (V) x 200mm (H) E472VL M6 20mm 1.0mm 200mm (V) x 400mm (H) E552VL M8 25mm 1.25mm 200mm (V) x 400mm (H)...
Move the TV with attached stand into an upright position and place on a wall: 1. Disconnect any other objects (walls, ...to find the appropriate mount for the weight/ load of the TV. See Appendix A Specifications for your mount. E422VL / E472VL / E552VL Be sure the mount you can scratch or damage the TV. 3. Be sure the ..., level, and stable surface. Installing the TV on a Wall To mount your TV model: Screw Size: Screw Length: Screw Pitch: Hole Pattern: E422VL M6 20 1.0mm 200mm (V) x 200mm (H) E472VL M6 20mm 1.0mm 200mm (V) x 400mm (H) E552VL M8 25mm 1.25mm 200mm (V) x 400mm (H)...
E422VL User Manual
Page 46
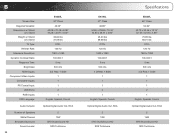
B Screen Size: Diagonal Viewable: Dimensions w/ Stand: w/o Stand: Weight w/ Stand: w/o Stand: TV Type: Refresh Rate: Maximum Resolution: Dynamic Contrast Ratio: Response Time: Brightness: HDMI Inputs: Component Video Inputs: Composite Inputs: RF/Coaxial Input: USB Ports: RGB Inputs: OSD Language: Audio Outputs: Number of Speakers Watts/Channel Simulated Surround: Sound Leveler: 38 E422VL 42" Class 42.02" 40...
B Screen Size: Diagonal Viewable: Dimensions w/ Stand: w/o Stand: Weight w/ Stand: w/o Stand: TV Type: Refresh Rate: Maximum Resolution: Dynamic Contrast Ratio: Response Time: Brightness: HDMI Inputs: Component Video Inputs: Composite Inputs: RF/Coaxial Input: USB Ports: RGB Inputs: OSD Language: Audio Outputs: Number of Speakers Watts/Channel Simulated Surround: Sound Leveler: 38 E422VL 42" Class 42.02" 40...
E422VL Quick Start Guide
Page 2
... is required, contact your dealer and refer all servicing to smoke. Continued use attachments/accessories specified by the manufacturer. • Use only with the cart, stand, tripod, bracket, or table specified by qualified service personnel only. Install in accordance with the manufacturer's instructions. • Do not install near water. • Clean...
... is required, contact your dealer and refer all servicing to smoke. Continued use attachments/accessories specified by the manufacturer. • Use only with the cart, stand, tripod, bracket, or table specified by qualified service personnel only. Install in accordance with the manufacturer's instructions. • Do not install near water. • Clean...

E422VL Quick Start Guide
Page 4
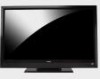
DOWNLOAD THE FULL USER MANUAL AT VIZIO.COM/SUPPORT PACKAGE CONTENTS VIZIO LCD HDTV with Stand Cleaning Cloth Power Cord Remote Control with Batteries Safety Cable This Quick Start Guide HELP VIZIO REDUCE PAPER WASTE.
DOWNLOAD THE FULL USER MANUAL AT VIZIO.COM/SUPPORT PACKAGE CONTENTS VIZIO LCD HDTV with Stand Cleaning Cloth Power Cord Remote Control with Batteries Safety Cable This Quick Start Guide HELP VIZIO REDUCE PAPER WASTE.
E422VL Quick Start Guide
Page 6
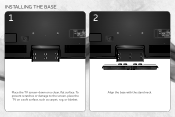
To prevent scratches or damage to the screen, place the TV on a clean, flat surface. INSTALLING THE BASE 1 2 ETHERNET Place the TV screen-down on a soft surface, such as carpet, rug, or blanket. Align the base with the stand neck.
To prevent scratches or damage to the screen, place the TV on a clean, flat surface. INSTALLING THE BASE 1 2 ETHERNET Place the TV screen-down on a soft surface, such as carpet, rug, or blanket. Align the base with the stand neck.


