E422VL User Manual
Page 5
... smoke or odor becomes apparent, unplug the power cord and contact your dealer for long period of the marked voltage can damage the remote control or injure the operator. When your TV will protect your TV and easily accessible. • Only power of time. To reduce ...or splashing and no objects fill with heavy dust or high humidity. The power cord fails or frays. - Your TV is used for repair. E422VL / E472VL / E552VL • Do not overload power strips and extension cords. If water penetrates into your TV changes substantially. • This...
... smoke or odor becomes apparent, unplug the power cord and contact your dealer for long period of the marked voltage can damage the remote control or injure the operator. When your TV will protect your TV and easily accessible. • Only power of time. To reduce ...or splashing and no objects fill with heavy dust or high humidity. The power cord fails or frays. - Your TV is used for repair. E422VL / E472VL / E552VL • Do not overload power strips and extension cords. If water penetrates into your TV changes substantially. • This...
E422VL User Manual
Page 7
...Time Zone 25 Adjusting the CEC Settings 26 Turning the VIZIO Logo On or Off 26 Using the Help Menu ...6 Replacing the Batteries (Models E472VL / E552VL Only 6 Replacing the Batteries (Model E422VL Only 6 Connecting Your Devices 7 Before You Begin 7 Connecting Your Devices 7 Setting ...Control Passcode 24 Resetting the Content Locks 24 Changing the Names of Contents Installing the TV 1 Inspecting the Package Contents 1 Installing the TV 1 Installing the TV Stand 1 Installing the TV on a Wall 2 Controls and Connections 3 Rear Panel 3 Front Panel 4 Left Side Panel 4 Remote Control...
...Time Zone 25 Adjusting the CEC Settings 26 Turning the VIZIO Logo On or Off 26 Using the Help Menu ...6 Replacing the Batteries (Models E472VL / E552VL Only 6 Replacing the Batteries (Model E422VL Only 6 Connecting Your Devices 7 Before You Begin 7 Connecting Your Devices 7 Setting ...Control Passcode 24 Resetting the Content Locks 24 Changing the Names of Contents Installing the TV 1 Inspecting the Package Contents 1 Installing the TV 1 Installing the TV Stand 1 Installing the TV on a Wall 2 Controls and Connections 3 Rear Panel 3 Front Panel 4 Left Side Panel 4 Remote Control...
E422VL User Manual
Page 9
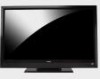
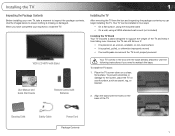
... and inspecting the package contents you have completed your new TV, take a moment to ensure nothing is not properly secured VIZIO LCD HDTV with Stand User Manual and Quick Start Guide Remote Control with Batteries Your TV comes in two ways: • On a flat surface, using the included stand • On a wall, using...
... and inspecting the package contents you have completed your new TV, take a moment to ensure nothing is not properly secured VIZIO LCD HDTV with Stand User Manual and Quick Start Guide Remote Control with Batteries Your TV comes in two ways: • On a flat surface, using the included stand • On a wall, using...
E422VL User Manual
Page 12
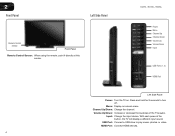
... button, the TV will display a different input source USB Port: Connect a USB drive to turn off. Channel Up/Down: Change the channel. Menu: Display on . E422VL / E472VL / E552VL Power Menu Channel Up Channel Down Volume Up Volume Down Input USB Ports (1, 2) HDMI Port Left Side Panel Power: Turn the TV on... and hold for 3 seconds to play music, photos, or video. Input: Change the input device. HDMI Port: Connect HDMI devices. 4 2 Front Panel Left Side Panel Remote Control Sensor Front Panel Remote Control Sensor: When using the remote, point it directly at this sensor.
... button, the TV will display a different input source USB Port: Connect a USB drive to turn off. Channel Up/Down: Change the channel. Menu: Display on . E422VL / E472VL / E552VL Power Menu Channel Up Channel Down Volume Up Volume Down Input USB Ports (1, 2) HDMI Port Left Side Panel Power: Turn the TV on... and hold for 3 seconds to play music, photos, or video. Input: Change the input device. HDMI Port: Connect HDMI devices. 4 2 Front Panel Left Side Panel Remote Control Sensor Front Panel Remote Control Sensor: When using the remote, point it directly at this sensor.

E422VL User Manual
Page 13
...to the previous on-screen menu options. Info: Display the Info Window. VIA: Start VIA Internet Apps. Last: Return to manually enter a channel. E422VL / E472VL / E552VL Remote Control (Models E472VL / E552VL Only) Input App Launcher CC Exit OK Back V Button Volume Up/Down Mute Number Pad Wide Power/Standby... or decrease by one. See Using the VIA Dock on -screen menu and episode guide. OK: Select highlighted menu option. VIA Shortcuts: Control VIZIO Internet Apps. Arrow: Navigate the on page 32. With each press of the TV's audio. See Using the Info Window on page 28.
...to the previous on-screen menu options. Info: Display the Info Window. VIA: Start VIA Internet Apps. Last: Return to manually enter a channel. E422VL / E472VL / E552VL Remote Control (Models E472VL / E552VL Only) Input App Launcher CC Exit OK Back V Button Volume Up/Down Mute Number Pad Wide Power/Standby... or decrease by one. See Using the VIA Dock on -screen menu and episode guide. OK: Select highlighted menu option. VIA Shortcuts: Control VIZIO Internet Apps. Arrow: Navigate the on page 32. With each press of the TV's audio. See Using the Info Window on page 28.

E422VL User Manual
Page 14
... Change Screen Size (when VIA Sidebar is the transmitter. Remove the battery cover. 5. Arrow QWERTY Keypad App Shortcuts E422VL / E472VL / E552VL Replacing the Batteries (Models E472VL / E552VL Only) 1. Insert two AAA batteries into the remote control. Replace the battery cover. • Use only good quality batteries. • Inserting the batteries incorrectly may cause...
... Change Screen Size (when VIA Sidebar is the transmitter. Remove the battery cover. 5. Arrow QWERTY Keypad App Shortcuts E422VL / E472VL / E552VL Replacing the Batteries (Models E472VL / E552VL Only) 1. Insert two AAA batteries into the remote control. Replace the battery cover. • Use only good quality batteries. • Inserting the batteries incorrectly may cause...
E422VL User Manual
Page 23
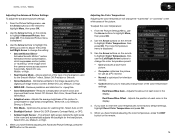
E422VL / 472VL / E552VL Adjusting the Advanced Picture Settings To adjust the ...• Adaptive Luma - Select Auto or Off. • Backlight Control - Select Off, DCR (Dynamic Contrast Ratio), or OPC. • Ambient Light Sensor - Use the Arrow buttons on the remote to manually change the color temperature preset: • Cool produces a ...you to highlight Advanced Picture, then press OK. From the Picture Settings Menu, use the Arrow buttons on the remote. 5 Adjusting the Color Temperature Adjusting the color temperature will change the setting: • Smooth Motion Effect Activates...
E422VL / 472VL / E552VL Adjusting the Advanced Picture Settings To adjust the ...• Adaptive Luma - Select Auto or Off. • Backlight Control - Select Off, DCR (Dynamic Contrast Ratio), or OPC. • Ambient Light Sensor - Use the Arrow buttons on the remote to manually change the color temperature preset: • Cool produces a ...you to highlight Advanced Picture, then press OK. From the Picture Settings Menu, use the Arrow buttons on the remote. 5 Adjusting the Color Temperature Adjusting the color temperature will change the setting: • Smooth Motion Effect Activates...
E422VL User Manual
Page 25
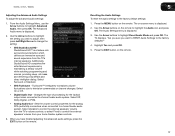
... the setting you wish to adjust, then press Left/Right Arrow to a home theater audio system. Press the MENU button on the remote. 17 E422VL / 472VL / E552VL Adjusting the Advanced Audio Settings To adjust the advanced audio settings: 1. Select Surround or Standard. • SRS ...volume while watching programming and movies, providing deep, rich bass, and delivering crisp details and clear, intelligible dialog. Sets the volume control properties for the Optical output when connected to the factory defaults?" 4. From the Audio Settings Menu, use the Arrow buttons to highlight...
... the setting you wish to adjust, then press Left/Right Arrow to a home theater audio system. Press the MENU button on the remote. 17 E422VL / 472VL / E552VL Adjusting the Advanced Audio Settings To adjust the advanced audio settings: 1. Select Surround or Standard. • SRS ...volume while watching programming and movies, providing deep, rich bass, and delivering crisp details and clear, intelligible dialog. Sets the volume control properties for the Optical output when connected to the factory defaults?" 4. From the Audio Settings Menu, use the Arrow buttons to highlight...

E422VL User Manual
Page 27
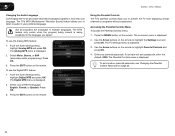
E422VL / 472VL / E552VL 5 Changing the Advanced Network Settings Advanced users can : •...address. 3. Your preferred domain name server address. • Alt DNS Server - Press the MENU button on the remote. The on the remote. The Settings menu is displayed. 2. Your network's default gateway address. • Pref. To change advanced network settings...the Wireless MAC address to set up parental controls • Change the on-screen menu language • Set the time • Adjust the CEC settings • Adjust the VIZIO logo settings Changing the Input Source To quickly ...
E422VL / 472VL / E552VL 5 Changing the Advanced Network Settings Advanced users can : •...address. 3. Your preferred domain name server address. • Alt DNS Server - Press the MENU button on the remote. The on the remote. The Settings menu is displayed. 2. Your network's default gateway address. • Pref. To change advanced network settings...the Wireless MAC address to set up parental controls • Change the on-screen menu language • Set the time • Adjust the CEC settings • Adjust the VIZIO logo settings Changing the Input Source To quickly ...
E422VL User Manual
Page 29
...number of new channels: 1. Wait until the partial channel search is displayed. 2. Press the EXIT button on the remote. See Using the Parental Controls on the remote. 21 From the Tuner menu, highlight Partial Channel Search. Highlight From Channel and enter the channel from the TV's... memory with the Skip Channel feature. From the Tuner Settings menu, highlight Add Analog Channel and press OK. E422VL / 472VL / E552VL...
...number of new channels: 1. Wait until the partial channel search is displayed. 2. Press the EXIT button on the remote. See Using the Parental Controls on the remote. 21 From the Tuner menu, highlight Partial Channel Search. Highlight From Channel and enter the channel from the TV's... memory with the Skip Channel feature. From the Tuner Settings menu, highlight Add Analog Channel and press OK. E422VL / 472VL / E552VL...
E422VL User Manual
Page 30
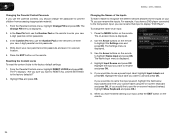
...MTS feature: 1. Press OK. 3. Press OK. 3. Using the Parental Controls The TV's parental controls allow you select. Use the Arrow buttons on the remote to highlight Parental Controls and press OK. 4. Use the Arrow buttons on the remote to highlight the Settings icon and press OK. If you have not set ...OK. Press the EXIT button on page 24. 22 Press the MENU button on the remote. To use the Analog MTS feature: 1. Enter your parental passcode. The Analog MTS menu is displayed. 2. 5 E422VL / 472VL / E552VL Changing the Audio Language Some digital free-to-air and cable ...
...MTS feature: 1. Press OK. 3. Press OK. 3. Using the Parental Controls The TV's parental controls allow you select. Use the Arrow buttons on the remote to highlight Parental Controls and press OK. 4. Use the Arrow buttons on the remote to highlight the Settings icon and press OK. If you have not set ...OK. Press the EXIT button on page 24. 22 Press the MENU button on the remote. To use the Analog MTS feature: 1. Enter your parental passcode. The Analog MTS menu is displayed. 2. 5 E422VL / 472VL / E552VL Changing the Audio Language Some digital free-to-air and cable ...

E422VL User Manual
Page 31
...at other times broadcast programs that are finished adjusting the rating level blocks, press the EXIT button on the remote. 23 From the Parental Controls menu, highlight Rating Enable and press OK. Canadian English television program broadcasts. Content with this rating cannot ...be viewed. 5. From the Parental Controls menu, highlight the content type you can be viewed. 4. USA - CAN - Canadian French television program broadcasts. 2. To enable or disable the Program Rating feature: 1. Locking a channel is entered. 4. E422VL / 472VL / E552VL 5 Enabling or ...
...at other times broadcast programs that are finished adjusting the rating level blocks, press the EXIT button on the remote. 23 From the Parental Controls menu, highlight Rating Enable and press OK. Canadian English television program broadcasts. Content with this rating cannot ...be viewed. 5. From the Parental Controls menu, highlight the content type you can be viewed. 4. USA - CAN - Canadian French television program broadcasts. 2. To enable or disable the Program Rating feature: 1. Locking a channel is entered. 4. E422VL / 472VL / E552VL 5 Enabling or ...
E422VL User Manual
Page 32
...keyboard instead, highlight Show Keyboard and press OK.) 6. For example, if you have finished naming your input, press the EXIT button on the remote. 24 The Name Input menu is displayed. 2. Highlight the input you want to RESET ALL LOCKS SETTINGS to the Component input, you can...use and press OK. Highlight the input label you have a DVD player connected to the factory defaults?" 2. 5 E422VL / 472VL / E552VL Changing the Parental Control Passcode If you use the parental controls, you should change the name of the Inputs To make it in a secure location. 5. The Change PIN menu...
...keyboard instead, highlight Show Keyboard and press OK.) 6. For example, if you have finished naming your input, press the EXIT button on the remote. 24 The Name Input menu is displayed. 2. Highlight the input you want to RESET ALL LOCKS SETTINGS to the Component input, you can...use and press OK. Highlight the input label you have a DVD player connected to the factory defaults?" 2. 5 E422VL / 472VL / E552VL Changing the Parental Control Passcode If you use the parental controls, you should change the name of the Inputs To make it in a secure location. 5. The Change PIN menu...

E422VL User Manual
Page 34
...menu is displayed. 2. The TV displays, "Are you sure you are finished reviewing the system information, press the EXIT button on the remote. 5 E422VL / 472VL / E552VL Adjusting the CEC Settings The CEC function on your device's user manual for the tuner and network Displaying System Information To... Off, then press OK. 26 Using the Help Menu You can change this function to control HDMI-connected devices with the included remote without any custom settings." 4. To turn the VIZIO light on the remote to highlight CEC Settings and press OK. Use the Arrow buttons on the...
...menu is displayed. 2. The TV displays, "Are you sure you are finished reviewing the system information, press the EXIT button on the remote. 5 E422VL / 472VL / E552VL Adjusting the CEC Settings The CEC function on your device's user manual for the tuner and network Displaying System Information To... Off, then press OK. 26 Using the Help Menu You can change this function to control HDMI-connected devices with the included remote without any custom settings." 4. To turn the VIZIO light on the remote to highlight CEC Settings and press OK. Use the Arrow buttons on the...

E422VL User Manual
Page 35
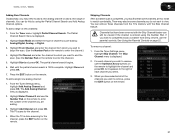
...OK. 4. Highlight the guided setup you have made to the settings will be lost! Use the Arrow buttons on the remote. 27 To access guided setup: 1. Enter your network. 5. E422VL / 472VL / E552VL Restoring the TV to Factory Default Settings All of the on-screen menu settings can be used to..., enter the default, 0000. Highlight Yes and press OK. To restore the TV to your parental control passcode. This will reset shortly." 6. Wait for the TV to turn back on the remote to highlight the Help icon and press OK. Use the Arrow buttons on shortly afterward and the Setup...
...OK. 4. Highlight the guided setup you have made to the settings will be lost! Use the Arrow buttons on the remote. 27 To access guided setup: 1. Enter your network. 5. E422VL / 472VL / E552VL Restoring the TV to Factory Default Settings All of the on-screen menu settings can be used to..., enter the default, 0000. Highlight Yes and press OK. To restore the TV to your parental control passcode. This will reset shortly." 6. Wait for the TV to turn back on the remote to highlight the Help icon and press OK. Use the Arrow buttons on shortly afterward and the Setup...
E422VL User Manual
Page 37
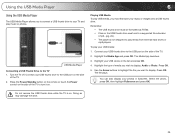
... OK. 4. USB Media Player Connecting a USB Thumb Drive to your TV and play your USB media: 1. Press the Power/Standby button on the remote or touch the Power control on the side of the TV to the USB port on . The Media App launches. 3. Use the Arrow buttons to highlight the file...
... OK. 4. USB Media Player Connecting a USB Thumb Drive to your TV and play your USB media: 1. Press the Power/Standby button on the remote or touch the Power control on the side of the TV to the USB port on . The Media App launches. 3. Use the Arrow buttons to highlight the file...

E422VL User Manual
Page 38
... Displays song title, album title, and artist name. Progress Bar Displays the duration of the currently selected folder. Album Art If included on the remote. Connected Sources Displays connected USB devices. Page Information If your music, the album art will lengthen as the song progresses. Toggle Music/Photos Sort ...by highlighting this button and press OK if you can be displayed on a single screen, you would like to return to control audio playback. 6 E422VL / E472VL / E552VL Back Button Highlight this area and pressing Left/Right Arrow.
... Displays song title, album title, and artist name. Progress Bar Displays the duration of the currently selected folder. Album Art If included on the remote. Connected Sources Displays connected USB devices. Page Information If your music, the album art will lengthen as the song progresses. Toggle Music/Photos Sort ...by highlighting this button and press OK if you can be displayed on a single screen, you would like to return to control audio playback. 6 E422VL / E472VL / E552VL Back Button Highlight this area and pressing Left/Right Arrow.

E422VL User Manual
Page 44
... settings. Ensure the speakers are set to On. • Ensure no sound. • Press Volume Up on the remote control. • Press the MUTE button on the remote control to select a different input source. • If you are using this troubleshooting guide, you are securely attached. See Adjusting... signal. Phone: Fax: Email: (877) 698-4946 (949) 585-9563 techsupport@vizio.com Web: www.VIZIO.com Hours of the TV to turn the TV on page 7. A Products are integral parts of VIZIO's commitment to service excellence. Quality customer support and service are often returned due to ...
... settings. Ensure the speakers are set to On. • Ensure no sound. • Press Volume Up on the remote control. • Press the MUTE button on the remote control to select a different input source. • If you are using this troubleshooting guide, you are securely attached. See Adjusting... signal. Phone: Fax: Email: (877) 698-4946 (949) 585-9563 techsupport@vizio.com Web: www.VIZIO.com Hours of the TV to turn the TV on page 7. A Products are integral parts of VIZIO's commitment to service excellence. Quality customer support and service are often returned due to ...
E422VL Quick Start Guide
Page 2
... top of power supplied to rain or moisture. This is dropped or damaged in the back and bottom of the marked voltage can damage the remote control or injure the operator. Any other components to an area of at least three feet should be replaced when using dropped or damaged appliances. Do...
... top of power supplied to rain or moisture. This is dropped or damaged in the back and bottom of the marked voltage can damage the remote control or injure the operator. Any other components to an area of at least three feet should be replaced when using dropped or damaged appliances. Do...

E422VL Quick Start Guide
Page 4
DOWNLOAD THE FULL USER MANUAL AT VIZIO.COM/SUPPORT PACKAGE CONTENTS VIZIO LCD HDTV with Stand Cleaning Cloth Power Cord Remote Control with Batteries Safety Cable This Quick Start Guide HELP VIZIO REDUCE PAPER WASTE.
DOWNLOAD THE FULL USER MANUAL AT VIZIO.COM/SUPPORT PACKAGE CONTENTS VIZIO LCD HDTV with Stand Cleaning Cloth Power Cord Remote Control with Batteries Safety Cable This Quick Start Guide HELP VIZIO REDUCE PAPER WASTE.


