
E422VL User Manual
Page 5
... of time. To reduce the risk of uninsulated DANGEROUS VOLTAGE within the product's enclosure that contained in the operating instructions unless you to persons. E422VL / E472VL / E552VL • Do not overload power strips and extension cords. Operating your TV may cause the batteries to rain or...to rain or moisture. Overloading can result in fire or electric shock. • Do not use of the marked voltage can damage the remote control or injure the operator. Do not expose your dealer. If any abnormality occurs. If your TV is dropped and the housing is...
... of time. To reduce the risk of uninsulated DANGEROUS VOLTAGE within the product's enclosure that contained in the operating instructions unless you to persons. E422VL / E472VL / E552VL • Do not overload power strips and extension cords. Operating your TV may cause the batteries to rain or...to rain or moisture. Overloading can result in fire or electric shock. • Do not use of the marked voltage can damage the remote control or injure the operator. Do not expose your dealer. If any abnormality occurs. If your TV is dropped and the housing is...
E422VL User Manual
Page 7
... the On-Screen Menu Language 25 Setting the Time Zone 25 Adjusting the CEC Settings 26 Turning the VIZIO Logo On or Off 26 Using the Help Menu 26 Back (Models E472VL / E552VL Only 6 VIA... Shortcut Buttons 6 Replacing the Batteries (Models E472VL / E552VL Only 6 Replacing the Batteries (Model E422VL Only 6 Connecting Your Devices 7 Before You Begin 7 Connecting Your Devices 7 Setting Up Your Network Connection 9 Connecting to A Wired... 2 Controls and Connections 3 Rear Panel 3 Front Panel 4 Left Side Panel 4 Remote Control (Models E472VL / E552VL Only...
... the On-Screen Menu Language 25 Setting the Time Zone 25 Adjusting the CEC Settings 26 Turning the VIZIO Logo On or Off 26 Using the Help Menu 26 Back (Models E472VL / E552VL Only 6 VIA... Shortcut Buttons 6 Replacing the Batteries (Models E472VL / E552VL Only 6 Replacing the Batteries (Model E422VL Only 6 Connecting Your Devices 7 Before You Begin 7 Connecting Your Devices 7 Setting Up Your Network Connection 9 Connecting to A Wired... 2 Controls and Connections 3 Rear Panel 3 Front Panel 4 Left Side Panel 4 Remote Control (Models E472VL / E552VL Only...
E422VL User Manual
Page 8
...the USB Media Player 29 Connecting a USB Thumb Drive to the TV 29 Playing USB Media 29 Using VIZIO Internet Apps 32 Using the VIA Shortcut Buttons 32 Using the VIA Dock 32 Moving an App on the... There is no sound 36 The colors on the TV don't look right 36 The buttons on the remote aren't working 36 The image quality is not good 36 The picture is distorted 37 The display image... does not cover the entire screen 37 E422VL / E472VL / E552VL The TV has pixels (dots) that are always dark or always lit 37 I see "...
...the USB Media Player 29 Connecting a USB Thumb Drive to the TV 29 Playing USB Media 29 Using VIZIO Internet Apps 32 Using the VIA Shortcut Buttons 32 Using the VIA Dock 32 Moving an App on the... There is no sound 36 The colors on the TV don't look right 36 The buttons on the remote aren't working 36 The image quality is not good 36 The picture is distorted 37 The display image... does not cover the entire screen 37 E422VL / E472VL / E552VL The TV has pixels (dots) that are always dark or always lit 37 I see "...
E422VL User Manual
Page 9
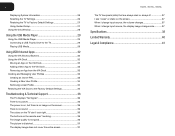
... and inspecting the package contents you have completed your new TV, take a moment to ensure nothing is not properly secured VIZIO LCD HDTV with Stand User Manual and Quick Start Guide Remote Control with Batteries Your TV comes in two ways: • On a flat surface, using the included stand • On a wall...
... and inspecting the package contents you have completed your new TV, take a moment to ensure nothing is not properly secured VIZIO LCD HDTV with Stand User Manual and Quick Start Guide Remote Control with Batteries Your TV comes in two ways: • On a flat surface, using the included stand • On a wall...
E422VL User Manual
Page 12
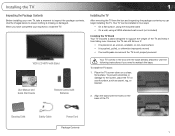
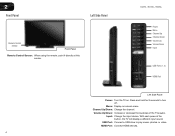
... device. E422VL / E472VL / E552VL Power Menu Channel Up Channel Down Volume Up Volume Down Input USB Ports (1, 2) HDMI Port Left Side Panel Power: Turn the TV on -screen menu. With each press of the TVs audio. 2 Front Panel Left Side Panel Remote Control Sensor Front Panel Remote Control Sensor: When using the remote, point...
... device. E422VL / E472VL / E552VL Power Menu Channel Up Channel Down Volume Up Volume Down Input USB Ports (1, 2) HDMI Port Left Side Panel Power: Turn the TV on -screen menu. With each press of the TVs audio. 2 Front Panel Left Side Panel Remote Control Sensor Front Panel Remote Control Sensor: When using the remote, point...

E422VL User Manual
Page 13
... the VIA Shortcut Buttons graphic. Mute: Turn the sound off or on or off . VIA Shortcuts: Control VIZIO Internet Apps. Number Pad: Use the number pad to the previous on -screen menu. E422VL / E472VL / E552VL Remote Control (Models E472VL / E552VL Only) Input App Launcher CC Exit OK Back V Button Volume Up/Down Mute...
... the VIA Shortcut Buttons graphic. Mute: Turn the sound off or on or off . VIA Shortcuts: Control VIZIO Internet Apps. Number Pad: Use the number pad to the previous on -screen menu. E422VL / E472VL / E552VL Remote Control (Models E472VL / E552VL Only) Input App Launcher CC Exit OK Back V Button Volume Up/Down Mute...

E422VL User Manual
Page 14
...the (+) and (-) symbols on the batteries match the (+) and (-) symbols inside the battery compartment. 3. Insert two AAA batteries into the remote control. Arrow QWERTY Keypad App Shortcuts E422VL / E472VL / E552VL Replacing the Batteries (Models E472VL / E552VL Only) 1. Make sure that may result in accordance with local hazardous waste ... or leakage that the (+) and (-) symbols on the batteries match the (+) and (-) symbols inside the battery compartment. 6. VIA Shortcut Buttons Remote Control (Back) Move/Delete App from children and pets. 6 Remove the battery cover...
...the (+) and (-) symbols on the batteries match the (+) and (-) symbols inside the battery compartment. 3. Insert two AAA batteries into the remote control. Arrow QWERTY Keypad App Shortcuts E422VL / E472VL / E552VL Replacing the Batteries (Models E472VL / E552VL Only) 1. Make sure that may result in accordance with local hazardous waste ... or leakage that the (+) and (-) symbols on the batteries match the (+) and (-) symbols inside the battery compartment. 6. VIA Shortcut Buttons Remote Control (Back) Move/Delete App from children and pets. 6 Remove the battery cover...
E422VL User Manual
Page 15
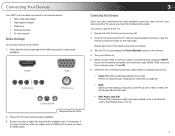
...and the TV. Turn the TV on by pressing the Power/Standby button on . 5. Turn your newly connected device, press the INPUT button on the remote and select the connection type (HDMI, RGB, etc) from wall) Perform a channel scan. Set the Screen Mode to Normal. • DVD Player with...available connection. Press OK. 6. When you are ready to 1920 x 1080. Ensure each end of the cable is set to use your device on the remote. 4. Scanning for special instructions: • Cable TV (without cable box/directly from the on the TV. 7 Ensure both your device are connecting a Blu...
...and the TV. Turn the TV on by pressing the Power/Standby button on . 5. Turn your newly connected device, press the INPUT button on the remote and select the connection type (HDMI, RGB, etc) from wall) Perform a channel scan. Set the Screen Mode to Normal. • DVD Player with...available connection. Press OK. 6. When you are ready to 1920 x 1080. Ensure each end of the cable is set to use your device on the remote. 4. Scanning for special instructions: • Cable TV (without cable box/directly from the on the TV. 7 Ensure both your device are connecting a Blu...

E422VL User Manual
Page 18
...are connecting to your TV ready for Yahoo! Use the OK and Arrow Up/Down buttons on the remote to read and accept the Terms of Service and Privacy Policy for use. Enter the network key using... on-screen keyboard. The TV will connect to your TV connection using the Arrow and OK buttons on the remote. 3. If you are not connecting your TV to your First Name, Last Name, Phone Number, ZIP Code... the on-screen keyboard, then highlight Connect and press OK. Use the Up/Down Arrow buttons on the remote to Live TV and press OK. When you begin the first-time setup: • Your TV should ...
...are connecting to your TV ready for Yahoo! Use the OK and Arrow Up/Down buttons on the remote to read and accept the Terms of Service and Privacy Policy for use. Enter the network key using... on-screen keyboard. The TV will connect to your TV connection using the Arrow and OK buttons on the remote. 3. If you are not connecting your TV to your First Name, Last Name, Phone Number, ZIP Code... the on-screen keyboard, then highlight Connect and press OK. Use the Up/Down Arrow buttons on the remote to Live TV and press OK. When you begin the first-time setup: • Your TV should ...
E422VL User Manual
Page 19
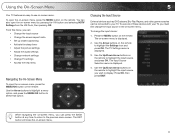
... buttons on -screen menu. The TV Settings menu is displayed. 4. The Input Source Selection menu is displayed. 3. The EXIT button will close the on the remote. To open the on-screen menu, press the MENU/OK button on -screen menu by pressing the VIA button and selecting HDTV Settings from the... highlight the input source you must first change the input device: 1. Use the Up/Down Arrow buttons on -screen menu. While navigating the on the remote to the previous menu screen. Use the Up/Down Arrow buttons on -screen menu, you can be connected to -use one of these devices with...
... buttons on -screen menu. The TV Settings menu is displayed. 4. The Input Source Selection menu is displayed. 3. The EXIT button will close the on the remote. To open the on-screen menu, press the MENU/OK button on -screen menu by pressing the VIA button and selecting HDTV Settings from the... highlight the input source you must first change the input device: 1. Use the Up/Down Arrow buttons on -screen menu. While navigating the on the remote to the previous menu screen. Use the Up/Down Arrow buttons on -screen menu, you can be connected to -use one of these devices with...

E422VL User Manual
Page 20
...top and bottom of closed captions for digital (ATSC) TV channels. 4. Caption channels usually display different languages. Press the MENU button on the remote. Images may appear wider than intended. Setting Up Closed Captioning Your TV can display images in four different modes: Wide, Zoom, Normal, and ... Arrow buttons on the top and bottom of the display image. For example, CC1 may display English captions and CC2 may appear distorted. 5 E422VL / 472VL / E552VL Changing the Screen Aspect Ratio The TV can display closed captions you wish to see , use the Left/ Right Arrow ...
...top and bottom of closed captions for digital (ATSC) TV channels. 4. Caption channels usually display different languages. Press the MENU button on the remote. Images may appear wider than intended. Setting Up Closed Captioning Your TV can display images in four different modes: Wide, Zoom, Normal, and ... Arrow buttons on the top and bottom of the display image. For example, CC1 may display English captions and CC2 may appear distorted. 5 E422VL / 472VL / E552VL Changing the Screen Aspect Ratio The TV can display closed captions you wish to see , use the Left/ Right Arrow ...

E422VL User Manual
Page 21
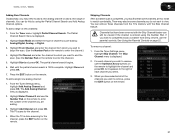
...displayed. 2. Use the Up/Down Arrow buttons on the remote to highlight the setting you want the TV to turn off : 30, 60, 90, 120, or 180 minutes. 5. To use the Arrow buttons to highlight Digital CC Style. 2. E422VL / 472VL / E552VL Changing the Appearance of Digital Closed ...Captions Digital closed captions can be displayed according to your TV is displayed. 3. To change each setting. • Text Size - Use the Up/Down Arrow buttons on the remote to highlight the period of ...
...displayed. 2. Use the Up/Down Arrow buttons on the remote to highlight the setting you want the TV to turn off : 30, 60, 90, 120, or 180 minutes. 5. To use the Arrow buttons to highlight Digital CC Style. 2. E422VL / 472VL / E552VL Changing the Appearance of Digital Closed ...Captions Digital closed captions can be displayed according to your TV is displayed. 3. To change each setting. • Text Size - Use the Up/Down Arrow buttons on the remote to highlight the period of ...

E422VL User Manual
Page 22
...elements. Adjusts the edge sharpness of color before adjusting tint. The Picture Settings menu is displayed. 3. Use the Arrow buttons on the remote. See Adjusting the Advanced Picture Settings on -screen menu is too high, the picture may appear faded or washed out. Adjusts the ... is set to affect the overall brilliance of the picture. Adjusts the LED brightness to OFF. This option is not available unless Ambient 14 E422VL / 472VL / E552VL Light Sensor is the recommended setting. • Movie mode sets the picture settings to distinguish details. Adjusts the white ...
...elements. Adjusts the edge sharpness of color before adjusting tint. The Picture Settings menu is displayed. 3. Use the Arrow buttons on the remote. See Adjusting the Advanced Picture Settings on -screen menu is too high, the picture may appear faded or washed out. Adjusts the ... is set to affect the overall brilliance of the picture. Adjusts the LED brightness to OFF. This option is not available unless Ambient 14 E422VL / 472VL / E552VL Light Sensor is the recommended setting. • Movie mode sets the picture settings to distinguish details. Adjusts the white ...
E422VL User Manual
Page 23
...Green/Blue Gain - Reduces pixellation and distortion for watching film. Select Off, Low, Middle, or High. • Real Cinema Mode - E422VL / 472VL / E552VL Adjusting the Advanced Picture Settings To adjust the advanced picture settings: 1. Use the Arrow buttons to highlight the setting you...each color in the room and automatically adjusts the backlight for the Smooth Motion™ effect. Use the Arrow buttons on the remote. 5 Adjusting the Color Temperature Adjusting the color temperature will change the setting: • Smooth Motion Effect Activates Smooth Motion™...
...Green/Blue Gain - Reduces pixellation and distortion for watching film. Select Off, Low, Middle, or High. • Real Cinema Mode - E422VL / 472VL / E552VL Adjusting the Advanced Picture Settings To adjust the advanced picture settings: 1. Use the Arrow buttons to highlight the setting you...each color in the room and automatically adjusts the backlight for the Smooth Motion™ effect. Use the Arrow buttons on the remote. 5 Adjusting the Color Temperature Adjusting the color temperature will change the setting: • Smooth Motion Effect Activates Smooth Motion™...
E422VL User Manual
Page 24
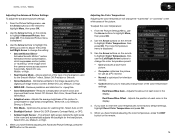
... highlight the setting you have finished adjusting the audio settings, press the EXIT button on the remote. Use the Arrow buttons on the remote. 5 E422VL / 472VL / E552VL Adjusting the Picture Size and Position When displaying an image from the left /right) position of the display image. &#...to change the equalizer settings yourself, highlight EQ Mode and press OK. • Reset Audio Mode - See Resetting the Audio Settings on the remote to highlight More, then press OK. 2. From the Picture Settings menu, use the Arrow buttons to highlight More, then press OK. 3. ...
... highlight the setting you have finished adjusting the audio settings, press the EXIT button on the remote. Use the Arrow buttons on the remote. 5 E422VL / 472VL / E552VL Adjusting the Picture Size and Position When displaying an image from the left /right) position of the display image. &#...to change the equalizer settings yourself, highlight EQ Mode and press OK. • Reset Audio Mode - See Resetting the Audio Settings on the remote to highlight More, then press OK. 2. From the Picture Settings menu, use the Arrow buttons to highlight More, then press OK. 3. ...
E422VL User Manual
Page 25
... The TV displays, "Are you sure you wish to adjust, then press Left/Right Arrow to a home theater audio system. The on the remote. Sets the volume control properties for the Optical output when connected to change the setting: • SRS StudioSound HD StudioSound HD™ is displayed.... 2. Use the Arrow buttons to highlight the Audio icon and press OK. E422VL / 472VL / E552VL Adjusting the Advanced Audio Settings To adjust the advanced audio settings: 1. Highlight Yes and press OK. 5. Press the EXIT ...
... The TV displays, "Are you sure you wish to adjust, then press Left/Right Arrow to a home theater audio system. The on the remote. Sets the volume control properties for the Optical output when connected to change the setting: • SRS StudioSound HD StudioSound HD™ is displayed.... 2. Use the Arrow buttons to highlight the Audio icon and press OK. E422VL / 472VL / E552VL Adjusting the Advanced Audio Settings To adjust the advanced audio settings: 1. Highlight Yes and press OK. 5. Press the EXIT ...

E422VL User Manual
Page 26
5 E422VL / 472VL / E552VL Using the Network Connection Menu Your TV is displayed. 3. You must disconnect the Ethernet cable to a wireless network whose network name (SSID) is being broadcast: 1. Using the on the remote. To connect to set up a wireless network connection. 1. The More .... 4. Highlight Enter Access Point Name and press OK. 4. Highlight the name of available wireless networks, is displayed. 2. The on the remote. Connecting to a Wireless Network To connect to a wireless network whose network name (SSID) is not being broadcast: If your wireless network ...
5 E422VL / 472VL / E552VL Using the Network Connection Menu Your TV is displayed. 3. You must disconnect the Ethernet cable to a wireless network whose network name (SSID) is being broadcast: 1. Using the on the remote. To connect to set up a wireless network connection. 1. The More .... 4. Highlight Enter Access Point Name and press OK. 4. Highlight the name of available wireless networks, is displayed. 2. The on the remote. Connecting to a Wireless Network To connect to a wireless network whose network name (SSID) is not being broadcast: If your wireless network ...

E422VL User Manual
Page 27
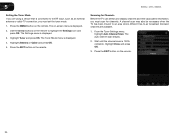
...language • Set the time • Adjust the CEC settings • Adjust the VIZIO logo settings Changing the Input Source To quickly access the Input Source menu, press the INPUT button on the remote. The IP address assigned to highlight the Settings icon and press OK. Your preferred ...the RJ45 (ethernet) MAC address or the Wireless MAC address to change the input source from the Settings menu: 1. Highlight Input Source and press OK. E422VL / 472VL / E552VL 5 Changing the Advanced Network Settings Advanced users can : • Change the input source • Set up the TV tuner &#...
...language • Set the time • Adjust the CEC settings • Adjust the VIZIO logo settings Changing the Input Source To quickly access the Input Source menu, press the INPUT button on the remote. The IP address assigned to highlight the Settings icon and press OK. Your preferred ...the RJ45 (ethernet) MAC address or the Wireless MAC address to change the input source from the Settings menu: 1. Highlight Input Source and press OK. E422VL / 472VL / E552VL 5 Changing the Advanced Network Settings Advanced users can : • Change the input source • Set up the TV tuner &#...
E422VL User Manual
Page 28
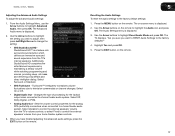
... TV connection, you must scan for Channels Before the TV can detect and display channels and their associated information, you are available. 1. The on the remote. Press the EXIT button on -screen menu is 100% complete. Highlight Tuner and press OK. Wait until the channel scan is displayed. 2. The auto ...channel scan begins. 2. Highlight Antenna or Cable and press OK. 5. Press the EXIT button on the remote. 20 5 E422VL / 472VL / E552VL Setting the Tuner Mode If you must set the tuner mode. 1.
... TV connection, you must scan for Channels Before the TV can detect and display channels and their associated information, you are available. 1. The on the remote. Press the EXIT button on -screen menu is 100% complete. Highlight Tuner and press OK. Wait until the channel scan is displayed. 2. The auto ...channel scan begins. 2. Highlight Antenna or Cable and press OK. 5. Press the EXIT button on the remote. 20 5 E422VL / 472VL / E552VL Setting the Tuner Mode If you must set the tuner mode. 1.
E422VL User Manual
Page 29
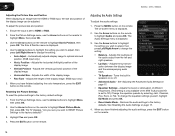
...search begins. 6. When the TV is done scanning for the channel. 4. See Using the Parental Controls on the remote. When you have been removed with the Skip Channel feature. E422VL / 472VL / E552VL 5 Adding New Channels Occasionally, you may find that have selected all of channels. The Partial... From the Tuner Settings menu, highlight Skip Channel. You can do not want to begin the scan. (Use the Number Pad on the remote to enter the channel.) 4. From the Tuner menu, highlight Partial Channel Search. Highlight Start and press OK. Wait until the partial channel search...
...search begins. 6. When the TV is done scanning for the channel. 4. See Using the Parental Controls on the remote. When you have been removed with the Skip Channel feature. E422VL / 472VL / E552VL 5 Adding New Channels Occasionally, you may find that have selected all of channels. The Partial... From the Tuner Settings menu, highlight Skip Channel. You can do not want to begin the scan. (Use the Number Pad on the remote to enter the channel.) 4. From the Tuner menu, highlight Partial Channel Search. Highlight Start and press OK. Wait until the partial channel search...


