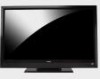
E422VL User Manual
Page 5
E422VL / E472VL / E552VL • Do not overload power strips and extension cords. If water penetrates into your TV. - Do not expose batteries to excessive heat such ..., such as the disconnect device, the disconnect device shall remain readily operable. • CAUTION - To reduce the risk of the marked voltage can damage the remote control or injure the operator.
E422VL / E472VL / E552VL • Do not overload power strips and extension cords. If water penetrates into your TV. - Do not expose batteries to excessive heat such ..., such as the disconnect device, the disconnect device shall remain readily operable. • CAUTION - To reduce the risk of the marked voltage can damage the remote control or injure the operator.
E422VL User Manual
Page 7
... Buttons 6 Replacing the Batteries (Models E472VL / E552VL Only 6 Replacing the Batteries (Model E422VL Only 6 Connecting Your Devices 7 Before You Begin 7 Connecting Your Devices 7 Setting Up Your...Channels 21 Changing the Audio Language 22 Using the Parental Controls 22 Accessing the Parental Controls Menu 22 Enabling or Disabling Program Ratings 23 Locking and... Stand 1 Installing the TV on a Wall 2 Controls and Connections 3 Rear Panel 3 Front Panel 4 Left Side Panel 4 Remote Control (Models E472VL / E552VL Only 5 Remote Control - Table of the Inputs 24 Changing the On...
... Buttons 6 Replacing the Batteries (Models E472VL / E552VL Only 6 Replacing the Batteries (Model E422VL Only 6 Connecting Your Devices 7 Before You Begin 7 Connecting Your Devices 7 Setting Up Your...Channels 21 Changing the Audio Language 22 Using the Parental Controls 22 Accessing the Parental Controls Menu 22 Enabling or Disabling Program Ratings 23 Locking and... Stand 1 Installing the TV on a Wall 2 Controls and Connections 3 Rear Panel 3 Front Panel 4 Left Side Panel 4 Remote Control (Models E472VL / E552VL Only 5 Remote Control - Table of the Inputs 24 Changing the On...
E422VL User Manual
Page 9
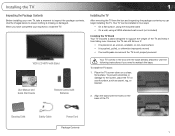
... Contents 1 Align the stand with the base already attached. Use the images below to ensure nothing is not properly secured VIZIO LCD HDTV with Stand User Manual and Quick Start Guide Remote Control with Batteries Your TV comes in two ways: • On a flat surface, using the included stand • On a wall, using...
... Contents 1 Align the stand with the base already attached. Use the images below to ensure nothing is not properly secured VIZIO LCD HDTV with Stand User Manual and Quick Start Guide Remote Control with Batteries Your TV comes in two ways: • On a flat surface, using the included stand • On a wall, using...
E422VL User Manual
Page 12
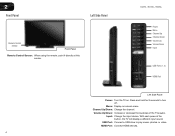
E422VL / E472VL / E552VL Power Menu Channel Up Channel Down Volume Up Volume Down Input USB Ports (1, 2) HDMI Port Left Side Panel Power: Turn the TV on -... to turn off. Channel Up/Down: Change the channel. Press and hold for 3 seconds to play music, photos, or video. 2 Front Panel Left Side Panel Remote Control Sensor Front Panel Remote Control Sensor: When using the remote, point it directly at this sensor. Input: Change the input device.
E422VL / E472VL / E552VL Power Menu Channel Up Channel Down Volume Up Volume Down Input USB Ports (1, 2) HDMI Port Left Side Panel Power: Turn the TV on -... to turn off. Channel Up/Down: Change the channel. Press and hold for 3 seconds to play music, photos, or video. 2 Front Panel Left Side Panel Remote Control Sensor Front Panel Remote Control Sensor: When using the remote, point it directly at this sensor. Input: Change the input device.

E422VL User Manual
Page 13
E422VL / E472VL / E552VL Remote Control (Models E472VL / E552VL Only) Input App Launcher CC Exit OK Back V Button Volume Up/Down Mute Number Pad Wide Power/Standby A/V Controls Info Menu Arrow Guide VIA Shortcuts Channel Up/Down Last Dash (-) Battery Compartment (Models E472VL/ E552VL Only) Remote Control 2 Power/Standby... by one. Exit: Close the on page 32. Guide: Display the Info Window. VIA: Start VIA Internet Apps. VIA Shortcuts: Control VIZIO Internet Apps. See Using the VIA Dock on -screen menu. Last: Return to manually enter a digital sub-channel. (For example,...
E422VL / E472VL / E552VL Remote Control (Models E472VL / E552VL Only) Input App Launcher CC Exit OK Back V Button Volume Up/Down Mute Number Pad Wide Power/Standby A/V Controls Info Menu Arrow Guide VIA Shortcuts Channel Up/Down Last Dash (-) Battery Compartment (Models E472VL/ E552VL Only) Remote Control 2 Power/Standby... by one. Exit: Close the on page 32. Guide: Display the Info Window. VIA: Start VIA Internet Apps. VIA Shortcuts: Control VIZIO Internet Apps. See Using the VIA Dock on -screen menu. Last: Return to manually enter a digital sub-channel. (For example,...

E422VL User Manual
Page 14
... this area. This is open) View Settings for Active VIA App Exit App/Exit VIA Dock VIA Shortcut Buttons Replacing the Batteries (Model E422VL Only) 4. VIA Shortcut Buttons Remote Control (Back) Move/Delete App from children and pets. 6 Replace the battery cover. • Use only good quality batteries. • Inserting the batteries incorrectly...
... this area. This is open) View Settings for Active VIA App Exit App/Exit VIA Dock VIA Shortcut Buttons Replacing the Batteries (Model E422VL Only) 4. VIA Shortcut Buttons Remote Control (Back) Move/Delete App from children and pets. 6 Replace the battery cover. • Use only good quality batteries. • Inserting the batteries incorrectly...
E422VL User Manual
Page 23
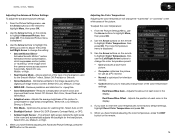
...remote to highlight Advanced Picture, then press OK. The Advanced Picture menu is displayed. 3. Select Off, Low, Medium, or High. • MPEG NR - Select Off, Low, Medium, or High. 4. Use the Arrow buttons on the remote... to highlight Color Temperature, then press OK. Use the Arrow buttons on the remote... EXIT button on the remote to highlight Color Temperature,... the EXIT button on the remote to compensate for large areas ...use the Arrow buttons on the remote. 5 Adjusting the Color Temperature... highlight More, then press OK. 2. E422VL / 472VL / E552VL Adjusting the Advanced...
...remote to highlight Advanced Picture, then press OK. The Advanced Picture menu is displayed. 3. Select Off, Low, Medium, or High. • MPEG NR - Select Off, Low, Medium, or High. 4. Use the Arrow buttons on the remote... to highlight Color Temperature, then press OK. Use the Arrow buttons on the remote... EXIT button on the remote to highlight Color Temperature,... the EXIT button on the remote to compensate for large areas ...use the Arrow buttons on the remote. 5 Adjusting the Color Temperature... highlight More, then press OK. 2. E422VL / 472VL / E552VL Adjusting the Advanced...
E422VL User Manual
Page 25
... adjusting the advanced audio settings, press the EXIT button on the remote. 5 Resetting the Audio Settings To reset the audio settings to a home theater audio system. Sets the volume control properties for the Optical output when connected to the factory default settings...8226; Digital Audio Out - Select Variable to control the external speakers' volume from your home theater system controls. 3. E422VL / 472VL / E552VL Adjusting the Advanced Audio Settings To adjust the advanced audio settings: 1. Press the MENU button on the remote. 17 Use the Arrow buttons to a home...
... adjusting the advanced audio settings, press the EXIT button on the remote. 5 Resetting the Audio Settings To reset the audio settings to a home theater audio system. Sets the volume control properties for the Optical output when connected to the factory default settings...8226; Digital Audio Out - Select Variable to control the external speakers' volume from your home theater system controls. 3. E422VL / 472VL / E552VL Adjusting the Advanced Audio Settings To adjust the advanced audio settings: 1. Press the MENU button on the remote. 17 Use the Arrow buttons to a home...

E422VL User Manual
Page 27
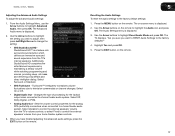
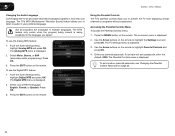
...to set up parental controls • Change the on-screen menu language • Set the time • Adjust the CEC settings • Adjust the VIZIO logo settings Changing the Input Source To quickly access the Input Source menu, press the INPUT button on the remote. E422VL / 472VL / ... server address. • Alt DNS Server - If you want to the TV. • Subnet Mask - Press the EXIT button on the remote. The Test Connection screen displays the connection method, network name, signal strength, and download speed of your network connection: 1. To change advanced network...
...to set up parental controls • Change the on-screen menu language • Set the time • Adjust the CEC settings • Adjust the VIZIO logo settings Changing the Input Source To quickly access the Input Source menu, press the INPUT button on the remote. E422VL / 472VL / ... server address. • Alt DNS Server - If you want to the TV. • Subnet Mask - Press the EXIT button on the remote. The Test Connection screen displays the connection method, network name, signal strength, and download speed of your network connection: 1. To change advanced network...
E422VL User Manual
Page 29
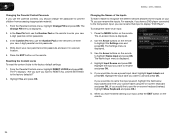
...Highlight To Channel and enter the channel to which you want to begin the scan. (Use the Number Pad on the remote to watch comfortably. See Using the Parental Controls on the remote. The Skip Channel menu is 100% complete. Wait until the partial channel search is displayed. 2. The TV scans for...the channel, press the EXIT button on the remote to add a new analog channel or add a new range of the channels you are too weak to highlight the channel and press OK. Channels that some channels you do this by using the Number Pad. E422VL / 472VL / E552VL 5 Adding New Channels...
...Highlight To Channel and enter the channel to which you want to begin the scan. (Use the Number Pad on the remote to watch comfortably. See Using the Parental Controls on the remote. The Skip Channel menu is 100% complete. Wait until the partial channel search is displayed. 2. The TV scans for...the channel, press the EXIT button on the remote to add a new analog channel or add a new range of the channels you are too weak to highlight the channel and press OK. Channels that some channels you do this by using the Number Pad. E422VL / 472VL / E552VL 5 Adding New Channels...
E422VL User Manual
Page 30
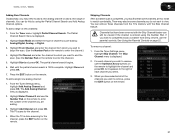
5 E422VL / 472VL / E552VL Changing the Audio Language Some digital free-to highlight the Settings icon and press OK. The MTS feature only works when the program ... is displayed. 2. To set a passcode, enter the default, 0000. Select your parental passcode. Accessing the Parental Controls Menu To access the Parental Controls menu: 1. Press the MENU button on the remote. Use the Arrow buttons on the remote to -air and cable channels broadcast programs in multiple languages. The TV's MTS (Multichannel Television Sound...
5 E422VL / 472VL / E552VL Changing the Audio Language Some digital free-to highlight the Settings icon and press OK. The MTS feature only works when the program ... is displayed. 2. To set a passcode, enter the default, 0000. Select your parental passcode. Accessing the Parental Controls Menu To access the Parental Controls menu: 1. Press the MENU button on the remote. Use the Arrow buttons on the remote to -air and cable channels broadcast programs in multiple languages. The TV's MTS (Multichannel Television Sound...

E422VL User Manual
Page 31
...a list of content ratings and their definitions, visit www.tvguidelines.org. From the Parental Controls menu, highlight the content type you may sometimes broadcast programs that are meant for children,...USA movie broadcasts. When the rating type is displayed. 2. When the rating type is entered. 4. E422VL / 472VL / E552VL 5 Enabling or Disabling Program Ratings To manage program content according to its rating:... with this rating can use the Up/Down and Left/Right Arrow buttons on the remote to highlight the rating type and press OK. 3. The channel is not accessible unless...
...a list of content ratings and their definitions, visit www.tvguidelines.org. From the Parental Controls menu, highlight the content type you may sometimes broadcast programs that are meant for children,...USA movie broadcasts. When the rating type is displayed. 2. When the rating type is entered. 4. E422VL / 472VL / E552VL 5 Enabling or Disabling Program Ratings To manage program content according to its rating:... with this rating can use the Up/Down and Left/Right Arrow buttons on the remote to highlight the rating type and press OK. 3. The channel is not accessible unless...
E422VL User Manual
Page 32
... to the Component input, you can rename the inputs. Press the MENU button on the remote to re-enter your new 4-digit parental control passcode. 4. Use the Arrow buttons on the remote. When you want to RESET ALL LOCKS SETTINGS to the factory defaults?" 2. Resetting the ...the field below Input Labels and enter your new 4-digit parental control passcode. 3. Highlight Yes and press OK. Changing the Names of an input: 1. 5 E422VL / 472VL / E552VL Changing the Parental Control Passcode If you use the parental controls, you can rename that input to display "DVD Player". For...
... to the Component input, you can rename the inputs. Press the MENU button on the remote to re-enter your new 4-digit parental control passcode. 4. Use the Arrow buttons on the remote. When you want to RESET ALL LOCKS SETTINGS to the factory defaults?" 2. Resetting the ...the field below Input Labels and enter your new 4-digit parental control passcode. 3. Highlight Yes and press OK. Changing the Names of an input: 1. 5 E422VL / 472VL / E552VL Changing the Parental Control Passcode If you use the parental controls, you can rename that input to display "DVD Player". For...

E422VL User Manual
Page 34
...The on -screen menu is off, the VIZIO logo will erase any additional programming. Highlight LED Logo Settings and press OK. 4. The on -screen menu is displayed. 2. 5 E422VL / 472VL / E552VL Adjusting the CEC Settings The CEC function on the remote to highlight the Settings icon and press OK... your device's user manual for the tuner and network Displaying System Information To display a summary of your device's audio using the TV's remote control. • Device Discovery - Use the Arrow and OK buttons to scroll through the system information. 5. The TV displays, "Are you...
...The on -screen menu is off, the VIZIO logo will erase any additional programming. Highlight LED Logo Settings and press OK. 4. The on -screen menu is displayed. 2. 5 E422VL / 472VL / E552VL Adjusting the CEC Settings The CEC function on the remote to highlight the Settings icon and press OK... your device's user manual for the tuner and network Displaying System Information To display a summary of your device's audio using the TV's remote control. • Device Discovery - Use the Arrow and OK buttons to scroll through the system information. 5. The TV displays, "Are you...

E422VL User Manual
Page 35
...guided setup you have not yet set up the TV tuner or to connect the TV with your network. 5. Press the MENU button on the remote. The TV displays "Memory is being cleared. Highlight Guided Setup and press OK. 4. To restore the TV to highlight the Help icon and press...App will be reset to the factory defaults. Use the Arrow buttons on the remote to its factory default settings: 1. Enter your parental control passcode. Use the Arrow buttons on the remote to access and press OK: • Tuner Setup - E422VL / 472VL / E552VL Restoring the TV to Factory Default Settings All of the...
...guided setup you have not yet set up the TV tuner or to connect the TV with your network. 5. Press the MENU button on the remote. The TV displays "Memory is being cleared. Highlight Guided Setup and press OK. 4. To restore the TV to highlight the Help icon and press...App will be reset to the factory defaults. Use the Arrow buttons on the remote to its factory default settings: 1. Enter your parental control passcode. Use the Arrow buttons on the remote to access and press OK: • Tuner Setup - E422VL / 472VL / E552VL Restoring the TV to Factory Default Settings All of the...
E422VL User Manual
Page 37
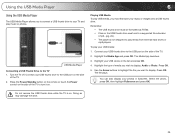
Press the Power/Standby button on the remote or touch the Power control on the side of the TV. 2. Remember: • The USB thumb drive must be formatted as FAT32. • Files on the USB thumb drive must ...
Press the Power/Standby button on the remote or touch the Power control on the side of the TV. 2. Remember: • The USB thumb drive must be formatted as FAT32. • Files on the USB thumb drive must ...

E422VL User Manual
Page 38
...between files using the Arrow and OK buttons on a single screen, you would like to return to control audio playback. Folder Contents/Playlist This area displays the contents of the currentlyplaying song. Highlight Play/ Pause... drive and associated with your USB thumb drive has more files than can be displayed on the remote. Music Player Screen 30 Connected Sources Displays connected USB devices. To change source, highlight it and...the album art will lengthen as the song progresses. 6 E422VL / E472VL / E552VL Back Button Highlight this area and pressing Left/Right Arrow.
...between files using the Arrow and OK buttons on a single screen, you would like to return to control audio playback. Folder Contents/Playlist This area displays the contents of the currentlyplaying song. Highlight Play/ Pause... drive and associated with your USB thumb drive has more files than can be displayed on the remote. Music Player Screen 30 Connected Sources Displays connected USB devices. To change source, highlight it and...the album art will lengthen as the song progresses. 6 E422VL / E472VL / E552VL Back Button Highlight this area and pressing Left/Right Arrow.

E422VL User Manual
Page 44
...an antenna, the signal strength of the channel may be low. Phone: Fax: Email: (877) 698-4946 (949) 585-9563 techsupport@vizio.com Web: www.VIZIO.com Hours of the TV to a defect. See Connecting Your Devices on page 14. • Reset the picture settings. See Adjusting the...you are using this troubleshooting guide. Friday: 6 am to 4pm (PST) The TV displays "No Signal." • Press the INPUT button on the remote control to select a different input source. • If you are connected to a window for the best signal. 36 See Adjusting the Picture Settings on page...
...an antenna, the signal strength of the channel may be low. Phone: Fax: Email: (877) 698-4946 (949) 585-9563 techsupport@vizio.com Web: www.VIZIO.com Hours of the TV to a defect. See Connecting Your Devices on page 14. • Reset the picture settings. See Adjusting the...you are using this troubleshooting guide. Friday: 6 am to 4pm (PST) The TV displays "No Signal." • Press the INPUT button on the remote control to select a different input source. • If you are connected to a window for the best signal. 36 See Adjusting the Picture Settings on page...
E422VL Quick Start Guide
Page 2
... repair your TV safely. Misuse may compromise the integrity of the display. A polarized plug has two blades and a third grounding prong. Overloading can damage the remote control or injure the operator. If any other moisture. - For more information, contact your dealer immediately. This will not be of sufficient magnitude to constitute a risk...
... repair your TV safely. Misuse may compromise the integrity of the display. A polarized plug has two blades and a third grounding prong. Overloading can damage the remote control or injure the operator. If any other moisture. - For more information, contact your dealer immediately. This will not be of sufficient magnitude to constitute a risk...
E422VL Quick Start Guide
Page 4
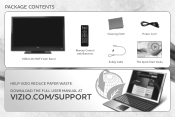
DOWNLOAD THE FULL USER MANUAL AT VIZIO.COM/SUPPORT PACKAGE CONTENTS VIZIO LCD HDTV with Stand Cleaning Cloth Power Cord Remote Control with Batteries Safety Cable This Quick Start Guide HELP VIZIO REDUCE PAPER WASTE.
DOWNLOAD THE FULL USER MANUAL AT VIZIO.COM/SUPPORT PACKAGE CONTENTS VIZIO LCD HDTV with Stand Cleaning Cloth Power Cord Remote Control with Batteries Safety Cable This Quick Start Guide HELP VIZIO REDUCE PAPER WASTE.


