

E500i-A1 User Manual
Page 2
... under license from SRS Labs, Inc. SRS StudioSound HD and SRS TruVolume are trademarks of Dolby Laboratories. Changing the factory default picture settings or enabling other features will be achieved. Dolby and the double-D symbol are trademarks of HDMI Licensing LLC. This product qualifies ...for ENERGY STAR in the "factory default" setting and this is the setting in which power savings will increase power consumption that could exceed the limits necessary to qualify for ENERGY STAR rating.
... under license from SRS Labs, Inc. SRS StudioSound HD and SRS TruVolume are trademarks of Dolby Laboratories. Changing the factory default picture settings or enabling other features will be achieved. Dolby and the double-D symbol are trademarks of HDMI Licensing LLC. This product qualifies ...for ENERGY STAR in the "factory default" setting and this is the setting in which power savings will increase power consumption that could exceed the limits necessary to qualify for ENERGY STAR rating.
E500i-A1 User Manual
Page 7
...the TV 3 Inspecting the Package Contents 3 Installing the TV 3 Installing the TV Stand 3 Base Installation (E420i 4 Base Installation Continued (E420i 5 Base Installation (E500i 6 Base Installation Continued (E500i 7 Installing the TV on a Wall 8 Controls...Setting the Auto Power Off Feature 22 Adjusting the Picture Settings 22 Adjusting the Advanced Picture Settings 23 Adjusting the Color Temperature 24 Adjusting the Picture Size and Position 25 Resetting the Picture Settings 26 Adjusting the Audio Settings 26 Adjusting the Advanced Audio Settings 27 Resetting the Audio Settings...
...the TV 3 Inspecting the Package Contents 3 Installing the TV 3 Installing the TV Stand 3 Base Installation (E420i 4 Base Installation Continued (E420i 5 Base Installation (E500i 6 Base Installation Continued (E500i 7 Installing the TV on a Wall 8 Controls...Setting the Auto Power Off Feature 22 Adjusting the Picture Settings 22 Adjusting the Advanced Picture Settings 23 Adjusting the Color Temperature 24 Adjusting the Picture Size and Position 25 Resetting the Picture Settings 26 Adjusting the Audio Settings 26 Adjusting the Advanced Audio Settings 27 Resetting the Audio Settings...
E500i-A1 User Manual
Page 25
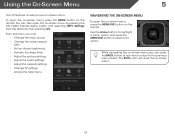
...VIZIO Internet Apps) button and selecting HDTV Settings from the VIA Dock, then pressing OK. You can : • Change the input source • Change the screen aspect ratio • Set up closed captioning • Activate the sleep timer • Adjust the picture settings • Adjust the audio settings... • Adjust the network settings • Change TV settings • Access the help menu Navigating the On-...
...VIZIO Internet Apps) button and selecting HDTV Settings from the VIA Dock, then pressing OK. You can : • Change the input source • Change the screen aspect ratio • Set up closed captioning • Activate the sleep timer • Adjust the picture settings • Adjust the audio settings... • Adjust the network settings • Change TV settings • Access the help menu Navigating the On-...
E500i-A1 User Manual
Page 28
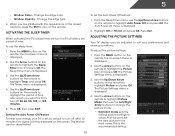
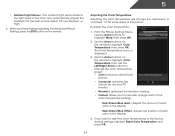
... save energy, your preferences and viewing conditions. This feature can be deactivated. The Auto Power-Off menu is displayed. 3. Adjusting the Picture Settings Your TV display can be adjusted to suit your TV is being displayed on the remote. The on the remote to turn the TV... and press OK. To use the Left/Right Arrow buttons to change the picture mode: • Standard mode sets the various picture settings to highlight Picture Mode, then use the sleep timer: 1. To set period of the closed captions, press the EXIT button on the remote to values that will turn...
... save energy, your preferences and viewing conditions. This feature can be deactivated. The Auto Power-Off menu is displayed. 3. Adjusting the Picture Settings Your TV display can be adjusted to suit your TV is being displayed on the remote. The on the remote to turn the TV... and press OK. To use the Left/Right Arrow buttons to change the picture mode: • Standard mode sets the various picture settings to highlight Picture Mode, then use the sleep timer: 1. To set period of the closed captions, press the EXIT button on the remote to values that will turn...
E500i-A1 User Manual
Page 29
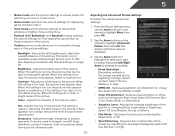
...of color before adjusting tint. 5 • Movie mode sets the picture settings to values perfect for watching a movie in a dark room. • Game mode optimizes the picture settings for displaying game console output. • Vivid mode sets the picture settings to highlight More, then press OK. 2. Also try...sports. Brightness - If flesh appears too orange, reduce the level of the screen by the digitizing of the picture settings: Backlight - From the Picture Settings menu, use the Arrow buttons on the remote to values that does not otherwise exist. Use the Arrow buttons ...
...of color before adjusting tint. 5 • Movie mode sets the picture settings to values perfect for watching a movie in a dark room. • Game mode optimizes the picture settings for displaying game console output. • Vivid mode sets the picture settings to highlight More, then press OK. 2. Also try...sports. Brightness - If flesh appears too orange, reduce the level of the screen by the digitizing of the picture settings: Backlight - From the Picture Settings menu, use the Arrow buttons on the remote to values that does not otherwise exist. Use the Arrow buttons ...
E500i-A1 User Manual
Page 30
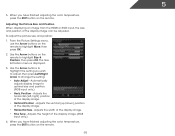
Red/Green/Blue Offset - Select Off, Low, Medium, or High. 4. From the Picture Settings Menu, use as a PC monitor. • Normal is displayed. 3. Adjusts the amount of the picture. When you have finished adjusting the Advanced Picture Settings, press the EXIT button on the remote to highlight Color Temperature, then press OK. The Color Temperature menu...
Red/Green/Blue Offset - Select Off, Low, Medium, or High. 4. From the Picture Settings Menu, use as a PC monitor. • Normal is displayed. 3. Adjusts the amount of the picture. When you have finished adjusting the Advanced Picture Settings, press the EXIT button on the remote to highlight Color Temperature, then press OK. The Color Temperature menu...
E500i-A1 User Manual
Page 31
... on the remote to highlight Size & Position, then press OK. Use the Arrow buttons on the remote. Automatically adjusts display image to change the setting: • Auto Adjust - Adjusts the height of the display image can be adjusted. Position - The Size & Position menu is displayed. 3. ...Arrow to optimal size and position. (RGB input only.) • Horiz. From the Picture Settings menu, use the Arrow buttons on the remote. 25 To adjust the picture size and position: 1. Adjusting the Picture Size and Position When displaying an image from the HDMI or RGB input, the size ...
... on the remote to highlight Size & Position, then press OK. Use the Arrow buttons on the remote. Automatically adjusts display image to change the setting: • Auto Adjust - Adjusts the height of the display image can be adjusted. Position - The Size & Position menu is displayed. 3. ...Arrow to optimal size and position. (RGB input only.) • Horiz. From the Picture Settings menu, use the Arrow buttons on the remote. 25 To adjust the picture size and position: 1. Adjusting the Picture Size and Position When displaying an image from the HDMI or RGB input, the size ...

E500i-A1 User Manual
Page 32
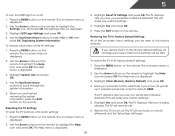
..., providing deep, rich bass, and delivering crisp details and clear, intelligible dialog. TruVolume® intelligently normalizes volume fluctuations due to the factory default settings: 1. From the Picture Settings menu, use the Arrow buttons to the factory defaults?" 3. The TV displays, "Are you sure you wish to adjust, then press Left/Right... Standard. • SRS TruVolume - Highlight Yes and press OK. 4. Press the MENU button on the remote. Use the Arrow buttons to highlight the setting you want to RESET Picture Settings to highlight More, then press OK. 2. Adjusting the Audio...
..., providing deep, rich bass, and delivering crisp details and clear, intelligible dialog. TruVolume® intelligently normalizes volume fluctuations due to the factory default settings: 1. From the Picture Settings menu, use the Arrow buttons to the factory defaults?" 3. The TV displays, "Are you sure you wish to adjust, then press Left/Right... Standard. • SRS TruVolume - Highlight Yes and press OK. 4. Press the MENU button on the remote. Use the Arrow buttons to highlight the setting you want to RESET Picture Settings to highlight More, then press OK. 2. Adjusting the Audio...
E500i-A1 User Manual
Page 44
... begin. 2. Displaying System Information To display a summary of the on the remote to highlight the Settings icon and press OK. Resetting the TV Settings To reset the TV's picture and audio settings: 1. Highlight Yes and press OK. 5. To restore the TV to select On or Off, then press OK. The...lost! Highlight System Info and press OK. 4. Restoring the TV to Factory Default Settings All of the TV settings: 1. The Settings menu is displayed. 2. Use the Arrow buttons on or off . 5 To turn the VIZIO light on the remote to highlight the Help icon and press OK. Press the MENU...
... begin. 2. Displaying System Information To display a summary of the on the remote to highlight the Settings icon and press OK. Resetting the TV Settings To reset the TV's picture and audio settings: 1. Highlight Yes and press OK. 5. To restore the TV to select On or Off, then press OK. The...lost! Highlight System Info and press OK. 4. Restoring the TV to Factory Default Settings All of the TV settings: 1. The Settings menu is displayed. 2. Use the Arrow buttons on or off . 5 To turn the VIZIO light on the remote to highlight the Help icon and press OK. Press the MENU...
E500i-A1 User Manual
Page 54
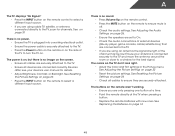
... the TV when pressing a button. • Replace the remote batteries with new ones. See Adjusting the Picture Settings on the TV don't look right. • Adust the Color and Tint settings in the Picture menu. The buttons on the remote aren't working electrical outlet. • Ensure the power cable is securely...the side of the TV to ensure mute is no image on the screen. • Ensure all devices are securely attached. See Resetting the Picture Settings on page 26 • Press the INPUT button on the remote to the TV, scan for channels. Ensure your device's user manual for the...
... the TV when pressing a button. • Replace the remote batteries with new ones. See Adjusting the Picture Settings on the TV don't look right. • Adust the Color and Tint settings in the Picture menu. The buttons on the remote aren't working electrical outlet. • Ensure the power cable is securely...the side of the TV to ensure mute is no image on the screen. • Ensure all devices are securely attached. See Resetting the Picture Settings on page 26 • Press the INPUT button on the remote to the TV, scan for channels. Ensure your device's user manual for the...
E500i-A1 User Manual
Page 55
... close to adjust the volume. When I change input source, the volume changes. • The TV remembers the volume level on -screen menu are set correctly. • If you are securely attached. These types of occurences are using an antenna, the signal strength of the channel may be low. ..., or Component with the TV. This up -converted (improved) to change the screen mode. If the volume level on each input source. The picture is connected securely to the TV and move the antenna around the room or close to this type of product and do not constitute a defective...
... close to adjust the volume. When I change input source, the volume changes. • The TV remembers the volume level on -screen menu are set correctly. • If you are securely attached. These types of occurences are using an antenna, the signal strength of the channel may be low. ..., or Component with the TV. This up -converted (improved) to change the screen mode. If the volume level on each input source. The picture is connected securely to the TV and move the antenna around the room or close to this type of product and do not constitute a defective...

E420i-A1 Quick Start Guide
Page 18
Be sure mute is set to ON. It is the responsibilities of the following two conditions: (1) this device may not cause harmful ...guarantee that is properly grounded. USA: UL Germany: VDE Japan: Electric Appliance Control Act Canada: CSA UK: BASE/BS There is a picture, but no sound. • Press the Volume Up button on the remote or on the side of the TV. • Press... electrical outlet. • Press the Power button on the remote or on the top/bottom/sides of the picture. • Select MENU > Wide, then select Wide or Zoom. • Be aware that some TV channels add black bars...
Be sure mute is set to ON. It is the responsibilities of the following two conditions: (1) this device may not cause harmful ...guarantee that is properly grounded. USA: UL Germany: VDE Japan: Electric Appliance Control Act Canada: CSA UK: BASE/BS There is a picture, but no sound. • Press the Volume Up button on the remote or on the side of the TV. • Press... electrical outlet. • Press the Power button on the remote or on the top/bottom/sides of the picture. • Select MENU > Wide, then select Wide or Zoom. • Be aware that some TV channels add black bars...


