User Manual (English)
Page 4
.... To avoid electric shock, avoid handling the power cord during electrical storms. • Unplug your TV during lightning. • Use only with the cart, stand, tripod, bracket, or table specified by the manufacturer, or sold with arrowhead symbol within an equilateral triangle is intended to alert the user to the...
.... To avoid electric shock, avoid handling the power cord during electrical storms. • Unplug your TV during lightning. • Use only with the cart, stand, tripod, bracket, or table specified by the manufacturer, or sold with arrowhead symbol within an equilateral triangle is intended to alert the user to the...
User Manual (English)
Page 7
... 46 Setting Up Closed Captioning 47 Changing the Appearance of Contents Installing the TV 9 Inspecting the Package Contents 9 Installing the TV 10 Installing the TV Stands 10 Installing the TV on a Wall 12 Front Panel 13 Rear Panel 14 Remote Control Front 15 Connecting Your Devices 17 Connecting A Device 17 Connecting...
... 46 Setting Up Closed Captioning 47 Changing the Appearance of Contents Installing the TV 9 Inspecting the Package Contents 9 Installing the TV 10 Installing the TV Stands 10 Installing the TV on a Wall 12 Front Panel 13 Rear Panel 14 Remote Control Front 15 Connecting Your Devices 17 Connecting A Device 17 Connecting...

User Manual (English)
Page 9
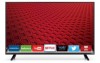
VIZIO LED HDTV Remote Control with Batteries 2 x Quick Start Guides (1 x English, 1 x French/Spanish) TV Stands Power Cord 9 4 x Phillips Screws PACKAGE CONTENTS Installing the TV 1 INSPECTING THE PACKAGE CONTENTS Before installing your new TV, take a moment to ensure nothing is missing or damaged. Use the images below to inspect the package contents.
VIZIO LED HDTV Remote Control with Batteries 2 x Quick Start Guides (1 x English, 1 x French/Spanish) TV Stands Power Cord 9 4 x Phillips Screws PACKAGE CONTENTS Installing the TV 1 INSPECTING THE PACKAGE CONTENTS Before installing your new TV, take a moment to ensure nothing is missing or damaged. Use the images below to inspect the package contents.
User Manual (English)
Page 10
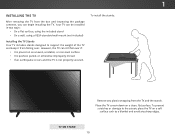
...scratches or damage to support the weight of the TV and keep it from the TV and the stands. Place the TV screen-down on a clean, flat surface. TV ON STAND 10 To install the stands: Remove any sharp edges. Your TV can begin installing the TV. 1 INSTALLING THE TV After ...package contents, you can be installed in two ways: • On a flat surface, using the included stand • On a wall, using a VESA-standard wall mount (not included) Installing the TV Stands Your TV includes stands designed to the screen, place the TV on an uneven, unstable, or non-level surface • It...
...scratches or damage to support the weight of the TV and keep it from the TV and the stands. Place the TV screen-down on a clean, flat surface. TV ON STAND 10 To install the stands: Remove any sharp edges. Your TV can begin installing the TV. 1 INSTALLING THE TV After ...package contents, you can be installed in two ways: • On a flat surface, using the included stand • On a wall, using a VESA-standard wall mount (not included) Installing the TV Stands Your TV includes stands designed to the screen, place the TV on an uneven, unstable, or non-level surface • It...
User Manual (English)
Page 11
1 Insert the left and right stands into the back of the TV. (The stands are finished, place the TV on a stable, level surface. 11 Insert the screws into the base of the TV and tighten them using a Phillips screwdriver. When you are identical.) Secure each stand to the TV with two Phillips screws (included).
1 Insert the left and right stands into the back of the TV. (The stands are finished, place the TV on a stable, level surface. 11 Insert the screws into the base of the TV and tighten them using a Phillips screwdriver. When you are identical.) Secure each stand to the TV with two Phillips screws (included).

User Manual (English)
Page 12
... on a wall requires lifting. Consult the information below to the wall, carefully following the instructions that can begin the installation. E40-C2 E40x-C2 E43-C2 E48-C2 E55-C2 E65x-C2 Screw Size: M6 Hole Pattern: Weight w/o Stand: 200 mm (V) x 200 mm (H) 15.87 lbs M6 200 mm (V) x 200 mm (H) 15.43 lbs M6 200 mm (V) x 200...
... on a wall requires lifting. Consult the information below to the wall, carefully following the instructions that can begin the installation. E40-C2 E40x-C2 E43-C2 E48-C2 E55-C2 E65x-C2 Screw Size: M6 Hole Pattern: Weight w/o Stand: 200 mm (V) x 200 mm (H) 15.87 lbs M6 200 mm (V) x 200 mm (H) 15.43 lbs M6 200 mm (V) x 200...

User Manual (English)
Page 72
Specifications B Screen Size: E40-C2 40" Class E40x-C2 40" Class E43-C2 43" Class E48-C2 48" Class E55-C2 55" Class E65x-C2 65" Class Viewable Area: 40.00" 39.50" 43.00" 48.00" 55.00" 65.00" Dimensions w/ Stand: w/o Stand: 36.06" x 23.40" x 8.27" 36.06" x 21.24" x 2.60" 35.71" x 22.73" x 8.27" 35..." x 25.01" x 2.68" 48.82" x 28.45" x 9.84" 48.82" x 30.81" x 2.68" 57.42" x 35.77" x 10.24" 57.42" x 33.21" x 2.99" Weight w/ Stand: w/o Stand: 16.53 lbs 15.87 lbs 16.09 lbs 15.43 lbs 18.30 lbs 17.64 lbs 24.03 lbs 23.15 lbs 31...
Specifications B Screen Size: E40-C2 40" Class E40x-C2 40" Class E43-C2 43" Class E48-C2 48" Class E55-C2 55" Class E65x-C2 65" Class Viewable Area: 40.00" 39.50" 43.00" 48.00" 55.00" 65.00" Dimensions w/ Stand: w/o Stand: 36.06" x 23.40" x 8.27" 36.06" x 21.24" x 2.60" 35.71" x 22.73" x 8.27" 35..." x 25.01" x 2.68" 48.82" x 28.45" x 9.84" 48.82" x 30.81" x 2.68" 57.42" x 35.77" x 10.24" 57.42" x 33.21" x 2.99" Weight w/ Stand: w/o Stand: 16.53 lbs 15.87 lbs 16.09 lbs 15.43 lbs 18.30 lbs 17.64 lbs 24.03 lbs 23.15 lbs 31...

Quickstart Guide (English)
Page 2
... or grounding-type plug. Operating your TV in which can be used , use attachments/accessories specified by the manufacturer. • Use only with the cart, stand, tripod, bracket, or table specified by qualified service personnel only. To reduce the risk of electric shock or component damage, switch off the power before...
... or grounding-type plug. Operating your TV in which can be used , use attachments/accessories specified by the manufacturer. • Use only with the cart, stand, tripod, bracket, or table specified by qualified service personnel only. To reduce the risk of electric shock or component damage, switch off the power before...

Quickstart Guide (English)
Page 6
PACKAGE CONTENTS VIZIO LED HDTV TV Stands Remote Control with Batteries This Quick Start Guide Power Cable 4 x M4 25 mm Phillips Screws
PACKAGE CONTENTS VIZIO LED HDTV TV Stands Remote Control with Batteries This Quick Start Guide Power Cable 4 x M4 25 mm Phillips Screws

Quickstart Guide (English)
Page 8
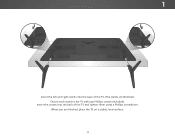
To prevent scratches or damage to the screen, place the TV on a clean, flat surface. Place the TV screen-down on a soft surface such as a carpet, rug, or blanket, and avoid any plastic wrapping from the TV and stand. Remove any sharp edges. INSTALLING THE BASE 1 It is recommended that two people take part in the stand installation.
To prevent scratches or damage to the screen, place the TV on a clean, flat surface. Place the TV screen-down on a soft surface such as a carpet, rug, or blanket, and avoid any plastic wrapping from the TV and stand. Remove any sharp edges. INSTALLING THE BASE 1 It is recommended that two people take part in the stand installation.

Quickstart Guide (English)
Page 9
When you are identical.) Secure each stand to the TV with two (2) M4 25 mm Phillips screws (included). 2 Insert stands into the back of the TV. (The stands are finished, place the TV on a stable, level surface. Insert the screws into the base of the TV and tighten them using a Phillips screwdriver.
When you are identical.) Secure each stand to the TV with two (2) M4 25 mm Phillips screws (included). 2 Insert stands into the back of the TV. (The stands are finished, place the TV on a stable, level surface. Insert the screws into the base of the TV and tighten them using a Phillips screwdriver.


