E3D420VX User Manual
Page 8
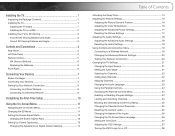
...Viewing Distance and Angle 3 Controls and Connections 4 Rear Panel 4 Left Side Panel 4 Remote Control 5 VIA Shortcut Buttons 6 Replacing the Batteries 6 Front Panel 6 Connecting Your Devices 7 Before You Begin 7 Connecting Your Devices 7 Setting Up Your Network Connection...First-Time Setup 10 Using the On-Screen Menu 11 Navigating the On-Screen Menu 11 Changing the 3D Mode 11 Setting the Screen Aspect Ratio 12 Changing the Screen Aspect Ratio 13 Setting Up Closed ... 26 Changing the On-Screen Menu Language 26 Setting the Time Zone 27 Adjusting the CEC Settings 27 Turning...
...Viewing Distance and Angle 3 Controls and Connections 4 Rear Panel 4 Left Side Panel 4 Remote Control 5 VIA Shortcut Buttons 6 Replacing the Batteries 6 Front Panel 6 Connecting Your Devices 7 Before You Begin 7 Connecting Your Devices 7 Setting Up Your Network Connection...First-Time Setup 10 Using the On-Screen Menu 11 Navigating the On-Screen Menu 11 Changing the 3D Mode 11 Setting the Screen Aspect Ratio 12 Changing the Screen Aspect Ratio 13 Setting Up Closed ... 26 Changing the On-Screen Menu Language 26 Setting the Time Zone 27 Adjusting the CEC Settings 27 Turning...
E3D420VX User Manual
Page 15
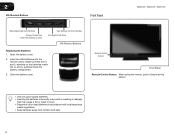
... hazardous waste regulations. • Keep batteries away from VIA Dock Change Screen Size (when VIA Sidebar is open) View Settings for Active VIA App Exit App/Exit VIA Dock VIA Shortcut Buttons Replacing the Batteries 1. 2 VIA Shortcut Buttons Front Panel E3D320VX / E3D420VX / E3D470VX Move/Delete App from children and pets. 6 Open the battery...
... hazardous waste regulations. • Keep batteries away from VIA Dock Change Screen Size (when VIA Sidebar is open) View Settings for Active VIA App Exit App/Exit VIA Dock VIA Shortcut Buttons Replacing the Batteries 1. 2 VIA Shortcut Buttons Front Panel E3D320VX / E3D420VX / E3D470VX Move/Delete App from children and pets. 6 Open the battery...
E3D420VX User Manual
Page 49
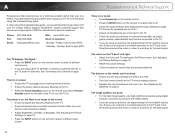
...quality, view high-definition programs using this troubleshooting guide. See Adjusting the Picture Settings on the screen. • Ensure all cables are securely attached to the TV. • Ensure all cables...securely attached. Phone: Fax: Email: (877) 698-4946 (949) 585-9563 techsupport@vizio.com Web: www.VIZIO.com Hours of the TV to a window for the best signal. 40 The buttons ...at a time. • Point the remote directly at the TV when pressing a button. • Replace the remote batteries with HDMI cables. • If you are using cable TV, satellite, or antenna ...
...quality, view high-definition programs using this troubleshooting guide. See Adjusting the Picture Settings on the screen. • Ensure all cables are securely attached to the TV. • Ensure all cables...securely attached. Phone: Fax: Email: (877) 698-4946 (949) 585-9563 techsupport@vizio.com Web: www.VIZIO.com Hours of the TV to a window for the best signal. 40 The buttons ...at a time. • Point the remote directly at the TV when pressing a button. • Replace the remote batteries with HDMI cables. • If you are using cable TV, satellite, or antenna ...
User Guide
Page 8
...Network 16 Completing the First-Time Setup 17 Using the On-Screen Menu 18 Changing the 3D Mode 18 Navigating the On-Screen Menu 19 Changing the Input Source 19 Changing the Screen Aspect Ratio 20 Setting Up Closed Captioning 20 Changing the ... Wall 4 Controls and Connections 5 Rear Panel (Model E3D320VX 5 Rear Panel (Models e3D420VX, E3d470VX 6 Side Panel 7 Front Panel 8 Remote Control (Model E3D320VX 9 Remote Control - Back (Models e3D420VX, E3d470VX)..... 11 Replacing the Batteries 12 Connecting Your Devices 13 Connecting A Device 13 Connecting A PC 14 Connecting an ...
...Network 16 Completing the First-Time Setup 17 Using the On-Screen Menu 18 Changing the 3D Mode 18 Navigating the On-Screen Menu 19 Changing the Input Source 19 Changing the Screen Aspect Ratio 20 Setting Up Closed Captioning 20 Changing the ... Wall 4 Controls and Connections 5 Rear Panel (Model E3D320VX 5 Rear Panel (Models e3D420VX, E3d470VX 6 Side Panel 7 Front Panel 8 Remote Control (Model E3D320VX 9 Remote Control - Back (Models e3D420VX, E3d470VX)..... 11 Replacing the Batteries 12 Connecting Your Devices 13 Connecting A Device 13 Connecting A PC 14 Connecting an ...
User Guide
Page 57
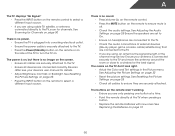
... • Check all devices are only pressing one button at a time. • Point the remote directly at the TV when pressing a button. • Replace the remote batteries with new ones. Ensure your device's user manual for details. • Adjust Brightness, Contrast, or Backlight. The colors on the remote to... button on the TV don't look right. • Adust the Color and Tint settings in the Picture menu. There is no image on the screen. • Ensure all cables are securely attached to the TV. • Ensure all cables to ensure they are securely attached. See Adjusting the ...
... • Check all devices are only pressing one button at a time. • Point the remote directly at the TV when pressing a button. • Replace the remote batteries with new ones. Ensure your device's user manual for details. • Adjust Brightness, Contrast, or Backlight. The colors on the remote to... button on the TV don't look right. • Adust the Color and Tint settings in the Picture menu. There is no image on the screen. • Ensure all cables are securely attached to the TV. • Ensure all cables to ensure they are securely attached. See Adjusting the ...


