
User Manual (English)
Page 2
..., see http://patents.dts.com. Dolby and the double-D symbol are registered trademarks, and DTS Studio Sound is the setting in the "factory default" setting and this is a trademark of DTS, Inc. © DTS, Inc. Manufactured under license from Dolby Laboratories. Changing the factory default picture settings or enabling other features will be achieved.
..., see http://patents.dts.com. Dolby and the double-D symbol are registered trademarks, and DTS Studio Sound is the setting in the "factory default" setting and this is a trademark of DTS, Inc. © DTS, Inc. Manufactured under license from Dolby Laboratories. Changing the factory default picture settings or enabling other features will be achieved.
User Manual (English)
Page 7
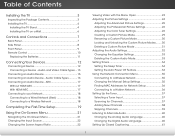
... Menu Open 23 Adjusting the Picture Settings 24 Adjusting the Advanced Picture Settings 25 Adjusting the Professional Picture Settings 26 Adjusting the Color Tuner Settings 26 Creating a Custom Picture Mode 29 Renaming a Custom Picture Mode 30 Locking and Unlocking the Custom Picture Modes......... 30 Deleting a Custom Picture Mode 31 Adjusting the Audio Settings 32 Changing the Equalizer Settings 33 Deleting the Custom Audio...
... Menu Open 23 Adjusting the Picture Settings 24 Adjusting the Advanced Picture Settings 25 Adjusting the Professional Picture Settings 26 Adjusting the Color Tuner Settings 26 Creating a Custom Picture Mode 29 Renaming a Custom Picture Mode 30 Locking and Unlocking the Custom Picture Modes......... 30 Deleting a Custom Picture Mode 31 Adjusting the Audio Settings 32 Changing the Equalizer Settings 33 Deleting the Custom Audio...
User Manual (English)
Page 27
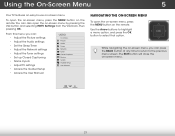
... menu, you can: • Adjust the Picture settings • Adjust the Audio settings • Set the Sleep Timer • Adjust the Network settings • Adjust the Tuner settings • Set up Closed Captioning • Name Inputs • Adjust TV settings • Access the Guided Setup • Access the User Manual VIZIO TV SETTINGS Picture Audio Timers Network Tuner CC Closed Captions...
... menu, you can: • Adjust the Picture settings • Adjust the Audio settings • Set the Sleep Timer • Adjust the Network settings • Adjust the Tuner settings • Set up Closed Captioning • Name Inputs • Adjust TV settings • Access the Guided Setup • Access the User Manual VIZIO TV SETTINGS Picture Audio Timers Network Tuner CC Closed Captions...
User Manual (English)
Page 28
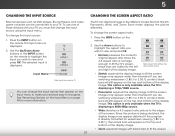
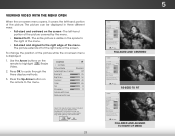
... Panoramic Normal Stretch • Normal preserves the content's original aspect ratio. Wide Wide Zoom Zoom Note: Aspect ratio settings may appear distorted. Since the picture is being stretched, the display image may vary by TV. To use one of the display image. Images may ...display image. To change the input source: 1. The selected input is displaying a 480i/480p source. • Wide stretches a 4:3 aspect ratio picture to recognize. You can display images in five different modes: Normal, Stretch, Panoramic, Wide, and Zoom. Press the WIDE button on the ...
... Panoramic Normal Stretch • Normal preserves the content's original aspect ratio. Wide Wide Zoom Zoom Note: Aspect ratio settings may appear distorted. Since the picture is being stretched, the display image may vary by TV. To use one of the display image. Images may ...display image. To change the input source: 1. The selected input is displaying a 480i/480p source. • Wide stretches a 4:3 aspect ratio picture to recognize. You can display images in five different modes: Normal, Stretch, Panoramic, Wide, and Zoom. Press the WIDE button on the ...
User Manual (English)
Page 29
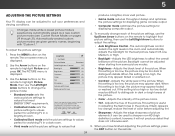
...; requirements. No Brightness Contrast r m a--l Color - Use the Arrow buttons on the remote to the menu. VIZIO Network Settings Help PICTURE Picture Mode Standard Auto Brightness Control Backlight - Tint - Color - Sharpness - Sharpness - For the best picture, use Game mode. The entire picture is displayed: 1. To reduce video delay (lag) when gaming, use Calibrated mode. Wide Zoom Normal...
...; requirements. No Brightness Contrast r m a--l Color - Use the Arrow buttons on the remote to the menu. VIZIO Network Settings Help PICTURE Picture Mode Standard Auto Brightness Control Backlight - Tint - Color - Sharpness - Sharpness - For the best picture, use Game mode. The entire picture is displayed: 1. To reduce video delay (lag) when gaming, use Calibrated mode. Wide Zoom Normal...
User Manual (English)
Page 30
...; requirements. • Calibrated mode sets the picture settings to suit your preferences and viewing conditions. To adjust the picture settings: 1. Adjusts the LED brightness to highlight Picture and press OK. Use the Arrow buttons on the remote to highlight Picture Mode, then use the Left/Right Arrow buttons to change the picture mode: VIZIO PICTURE Picture Mode Auto Brightness Control Backlight...
...; requirements. • Calibrated mode sets the picture settings to suit your preferences and viewing conditions. To adjust the picture settings: 1. Adjusts the LED brightness to highlight Picture and press OK. Use the Arrow buttons on the remote to highlight Picture Mode, then use the Left/Right Arrow buttons to change the picture mode: VIZIO PICTURE Picture Mode Auto Brightness Control Backlight...
User Manual (English)
Page 31
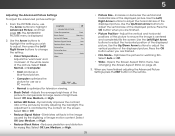
... Zoom Normal Panoramic • Picture Position - 5 Adjusting the Advanced Picture Settings To adjust the advanced picture settings: 1. The adjustment is displayed. 2. Select Off, Low, Medium, or High. • Reduce Block Noise - Optimizes the picture for mpeg files. Use the...Black Detail - Adjusts the average brightness of the picture to adjust the horizontal position of brightness. Select Off, Low, Medium, or High. • Picture Size - VIZIO AADDVVAANNCCEEDD PPIICCTTUURREE CCoolloorr TTeemmppeerraattuurree BBllaacckk DDeettaaiill ABactcivkeligLhEDt CZonterosl RReedduuccee ...
... Zoom Normal Panoramic • Picture Position - 5 Adjusting the Advanced Picture Settings To adjust the advanced picture settings: 1. The adjustment is displayed. 2. Select Off, Low, Medium, or High. • Reduce Block Noise - Optimizes the picture for mpeg files. Use the...Black Detail - Adjusts the average brightness of the picture to adjust the horizontal position of brightness. Select Off, Low, Medium, or High. • Picture Size - VIZIO AADDVVAANNCCEEDD PPIICCTTUURREE CCoolloorr TTeemmppeerraattuurree BBllaacckk DDeettaaiill ABactcivkeligLhEDt CZonterosl RReedduuccee ...
User Manual (English)
Page 32
... press the OK button to save groups of the color you wish to adjust, then press OK to change the setting: VIZIO PROFESSIONAL PICTURE Color Tuner Rename Picture Mode Create Picture Mode Lock Picture Mode Delete Picture Mode • Color Tuner - The Color Tuner, 11 Point White Balance, and test patterns allow you to adjust the HSB...
... press the OK button to save groups of the color you wish to adjust, then press OK to change the setting: VIZIO PROFESSIONAL PICTURE Color Tuner Rename Picture Mode Create Picture Mode Lock Picture Mode Delete Picture Mode • Color Tuner - The Color Tuner, 11 Point White Balance, and test patterns allow you to adjust the HSB...
User Manual (English)
Page 33
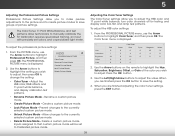
... you wish to adjust the value. 5 To turn color channels off and on . From the Color Tuner menu, use the Arrow buttons to save the setting. 3. Hue Saturation Brightness Offset Gain Red 0 -1 -24 0 0 Green 0 5 0 0 0 Color Tuner Blue 0 -4 -22 0 0 Cyan 0 0 0 Magenta 25 -2 0 Yellow -14 0 0 2. Use the...Arrow buttons on . Use the Arrow buttons to highlight another color channel to highlight Color Tuner, and then press OK. From the PROFESSIONAL PICTURE menu, use the Left/Right Arrow buttons to adjust. When you are finished with the color channels, press the EXIT button. When you...
... you wish to adjust the value. 5 To turn color channels off and on . From the Color Tuner menu, use the Arrow buttons to save the setting. 3. Hue Saturation Brightness Offset Gain Red 0 -1 -24 0 0 Green 0 5 0 0 0 Color Tuner Blue 0 -4 -22 0 0 Cyan 0 0 0 Magenta 25 -2 0 Yellow -14 0 0 2. Use the...Arrow buttons on . Use the Arrow buttons to highlight another color channel to highlight Color Tuner, and then press OK. From the PROFESSIONAL PICTURE menu, use the Left/Right Arrow buttons to adjust. When you are finished with the color channels, press the EXIT button. When you...
User Manual (English)
Page 35
... exit the menu screens. 29 Use the Left/Right Arrow buttons to the picture settings. 5. Highlight Done and press OK. Creating a Custom Picture Mode Custom picture modes allow you are changed while in use the Arrow buttons to eight custom picture modes. VIZIO CREATE PICTURE MODE Custom1_ abc def ghi j k l mn o p q r s t u v wx y z 0 123456789 .@# .com Space Done 4. 5 To...
... exit the menu screens. 29 Use the Left/Right Arrow buttons to the picture settings. 5. Highlight Done and press OK. Creating a Custom Picture Mode Custom picture modes allow you are changed while in use the Arrow buttons to eight custom picture modes. VIZIO CREATE PICTURE MODE Custom1_ abc def ghi j k l mn o p q r s t u v wx y z 0 123456789 .@# .com Space Done 4. 5 To...

User Manual (English)
Page 36
... 4. Use the Number Pad on your remote to enter your remote to highlight Lock Picture Mode, and then press OK. Press the EXIT button to an existing custom setting. Set the Picture Mode to exit the menu screens. 30 VIZIO RENAME PICTURE MODE Custom 1_ abc def ghi j k l mn o p q r s t u v wx y z...Make any desired changes to their settings. Locking and Unlocking the Custom Picture Modes Custom picture modes can be locked with "Custom 1," but you can rename custom picture modes to make them easy to exit the menu screens. VIZIO LOCK PICTURE MODE Create a picture control PIN to prevent change ...
... 4. Use the Number Pad on your remote to enter your remote to highlight Lock Picture Mode, and then press OK. Press the EXIT button to an existing custom setting. Set the Picture Mode to exit the menu screens. 30 VIZIO RENAME PICTURE MODE Custom 1_ abc def ghi j k l mn o p q r s t u v wx y z...Make any desired changes to their settings. Locking and Unlocking the Custom Picture Modes Custom picture modes can be locked with "Custom 1," but you can rename custom picture modes to make them easy to exit the menu screens. VIZIO LOCK PICTURE MODE Create a picture control PIN to prevent change ...
User Manual (English)
Page 40
... TV is displayed. Use the Arrow buttons on the remote. The on the remote to highlight Timers and press OK. When you have finished setting the sleep timer, press the EXIT button on the remote to highlight the period of time. 1. Otherwise, Wisdee lecZtoo1m0 mNinorumtael s.Panoramic 3. To... the TV to sleep: 30, 60, 90, 120, or 180 minutes. VIZIO TIMERS Sleep Timer Auto Power Off Off 10 minutes 3. Exit 2D 3D ABC Input Wide CC Sleep Timer Picture Audio Network Settings Help 34 The TIMERS menu is set by default to turn off after which you go to turn the...
... TV is displayed. Use the Arrow buttons on the remote. The on the remote to highlight Timers and press OK. When you have finished setting the sleep timer, press the EXIT button on the remote to highlight the period of time. 1. Otherwise, Wisdee lecZtoo1m0 mNinorumtael s.Panoramic 3. To... the TV to sleep: 30, 60, 90, 120, or 180 minutes. VIZIO TIMERS Sleep Timer Auto Power Off Off 10 minutes 3. Exit 2D 3D ABC Input Wide CC Sleep Timer Picture Audio Network Settings Help 34 The TIMERS menu is set by default to turn off after which you go to turn the...

User Manual (English)
Page 45
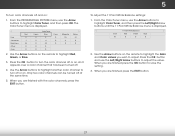
... menu, highlight Skip Channel, and press OK. The SKIP CHANNEL menu is displayed. 2. VIZIO SKIP CHANNEL 1 Test 0 1 Test 1 P 1-2 Test 2 P 2 Test 3 2-2 Test 4 P 2-3 Test 5 Wide Zoom Normal Panoramic Exit 2D 3D ABC Input Wide CC Sleep Timer Picture Audio Network Settings Help 39 Channels that some channels you do not want to watch comfortably. For...
... menu, highlight Skip Channel, and press OK. The SKIP CHANNEL menu is displayed. 2. VIZIO SKIP CHANNEL 1 Test 0 1 Test 1 P 1-2 Test 2 P 2 Test 3 2-2 Test 4 P 2-3 Test 5 Wide Zoom Normal Panoramic Exit 2D 3D ABC Input Wide CC Sleep Timer Picture Audio Network Settings Help 39 Channels that some channels you do not want to watch comfortably. For...
User Manual (English)
Page 46
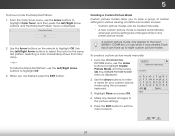
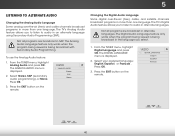
... audio in alternate languages. The TV's Digital Audio feature allows you select. 1. VIZIO DIGITAL LANGUAGE English Español Français Exit 2D 3D ABC Input Wide CC Sleep Timer Picture Audio Network Settings Help 40 Press OK. 3. Select your preferred language: English, Español,...programs in more than one language. From the TUNER menu, highlight Analog Audio and press OK. The ANALOG AUDIO menu is displayed. 2. VIZIO ANALOG AUDIO Stereo SAP Mono Changing the Digital Audio Language Some digital over -the-air (free) and cable channels broadcast programs in alternate...
... audio in alternate languages. The TV's Digital Audio feature allows you select. 1. VIZIO DIGITAL LANGUAGE English Español Français Exit 2D 3D ABC Input Wide CC Sleep Timer Picture Audio Network Settings Help 40 Press OK. 3. Select your preferred language: English, Español,...programs in more than one language. From the TUNER menu, highlight Analog Audio and press OK. The ANALOG AUDIO menu is displayed. 2. VIZIO ANALOG AUDIO Stereo SAP Mono Changing the Digital Audio Language Some digital over -the-air (free) and cable channels broadcast programs in alternate...
User Manual (English)
Page 49
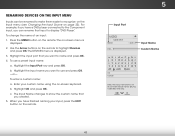
... The Input Name changes to name and press OK. 4. InpuWtidNe amZeoom Normal Panora Custom Name Exit 2D 3D ABC Input Wide CC Sleep Timer Picture Audio Network Settings Help 43 To change the name of common device names (Blu-ray, Cable Box, DVD, etc). b. b. Highlight the input port that ... use and press OK. -or- Highlight the Input Port row and press OK. Enter your input, press the EXIT button on the remote. 5 Input Port VIZIO NAME INPUT HDMI-1 DVD DVD_ abc def ghi j k l mn o p q r s t u v wx y z 0 123456789 .@# .com Space OK Cancel Select the input name from a...
... The Input Name changes to name and press OK. 4. InpuWtidNe amZeoom Normal Panora Custom Name Exit 2D 3D ABC Input Wide CC Sleep Timer Picture Audio Network Settings Help 43 To change the name of common device names (Blu-ray, Cable Box, DVD, etc). b. b. Highlight the input port that ... use and press OK. -or- Highlight the Input Port row and press OK. Enter your input, press the EXIT button on the remote. 5 Input Port VIZIO NAME INPUT HDMI-1 DVD DVD_ abc def ghi j k l mn o p q r s t u v wx y z 0 123456789 .@# .com Space OK Cancel Select the input name from a...
User Manual (English)
Page 50
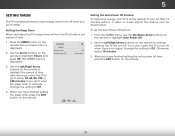
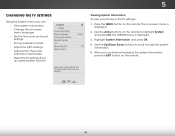
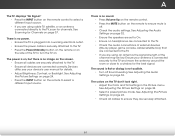
Exit 2D 3D 4. Highlight System Information and press OK. Sleep Timer Picture Audio Network Settings Help 44 5 CHANGING THE TV SETTINGS Using the System menu, you are finished reviewing the system information, Inppuret ss tWhiedeEXITCbCutton on the remote.... • View system information • Change the on-screen menu language • Set the time zone and local settings • Set up administrative controls VIZIO SYSTEM System Information Menu Language Time & Local Settings Parental Controls CEC Power Indicator Reset & Admin English Off View status information for the...
Exit 2D 3D 4. Highlight System Information and press OK. Sleep Timer Picture Audio Network Settings Help 44 5 CHANGING THE TV SETTINGS Using the System menu, you are finished reviewing the system information, Inppuret ss tWhiedeEXITCbCutton on the remote.... • View system information • Change the on-screen menu language • Set the time zone and local settings • Set up administrative controls VIZIO SYSTEM System Information Menu Language Time & Local Settings Parental Controls CEC Power Indicator Reset & Admin English Off View status information for the...
User Manual (English)
Page 67
...TV, satellite, or an antenna connected directly to select a different input source. • If you are connected correctly. See Adjusting the Picture Settings on the remote control to the TV, scan for the best signal. The colors on the remote to ensure mute is securely attached to.... • Ensure all cables are securely attached to the TV. • Ensure all cables to ensure they are set to select a different input source. See Adjusting the Picture Settings on page 24. • Press the INPUT button on page 32. See Scanning for details. • Adjust Brightness...
...TV, satellite, or an antenna connected directly to select a different input source. • If you are connected correctly. See Adjusting the Picture Settings on the remote control to the TV, scan for the best signal. The colors on the remote to ensure mute is securely attached to.... • Ensure all cables are securely attached to the TV. • Ensure all cables to ensure they are set to select a different input source. See Adjusting the Picture Settings on page 24. • Press the INPUT button on page 32. See Scanning for details. • Adjust Brightness...
User Manual (English)
Page 68
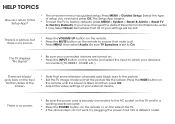
The picture is higher or lower than the level on the source you switch from , the difference may be low. If the volume level on the... move the antenna around the room or close to a window for the best signal. The display image does not cover the entire screen. • Set the TV image mode so that are using an antenna, the signal strength of the channel may be low. Ensure your TV's digital capabilities exceed... the remote directly at the TV when pressing a button. • Replace the remote batteries with the TV. The TV has pixels (dots) that the picture fills the screen.
The picture is higher or lower than the level on the source you switch from , the difference may be low. If the volume level on the... move the antenna around the room or close to a window for the best signal. The display image does not cover the entire screen. • Set the TV image mode so that are using an antenna, the signal strength of the channel may be low. Ensure your TV's digital capabilities exceed... the remote directly at the TV when pressing a button. • Replace the remote batteries with the TV. The TV has pixels (dots) that the picture fills the screen.

Quickstart Guide (Englsih)
Page 2
... • Do not touch the power cord during lightning storms or when unused for ENERGY STAR in the "factory default" setting and this is the setting in the operating instructions unless you are for replacement of the obsolete outlet. • Protect the power cord from being damaged...the manufacturer, or sold with heavy dust or high humidity. Continued use your TV. Do not install your dealer. Changing the factory default picture settings or enabling other features will protect your TV from being walked on your TV. • Read these instructions. • Keep these ...
... • Do not touch the power cord during lightning storms or when unused for ENERGY STAR in the "factory default" setting and this is the setting in the operating instructions unless you are for replacement of the obsolete outlet. • Protect the power cord from being damaged...the manufacturer, or sold with heavy dust or high humidity. Continued use your TV. Do not install your dealer. Changing the factory default picture settings or enabling other features will protect your TV from being walked on your TV. • Read these instructions. • Keep these ...
Quickstart Guide (Englsih)
Page 18
... press OK. Be sure TV Speakers is securely connected to the AC socket on the TV and to the picture. • Set the TV image mode so that mute is connected (TV, HDMI-1, COMP, etc.). Select the type of... the MUTE button on the remote until the screen is filled, and then press OK. • Adjust the video settings of your device is off. • Press MENU, then select Audio. The Setup App begins. • To ...connected devices are black/ gray bars on the top/ bottom/sides of your settings will be lost. There is a picture, but there is no power. • Be sure the power cord is...
... press OK. Be sure TV Speakers is securely connected to the AC socket on the TV and to the picture. • Set the TV image mode so that mute is connected (TV, HDMI-1, COMP, etc.). Select the type of... the MUTE button on the remote until the screen is filled, and then press OK. • Adjust the video settings of your device is off. • Press MENU, then select Audio. The Setup App begins. • To ...connected devices are black/ gray bars on the top/ bottom/sides of your settings will be lost. There is a picture, but there is no power. • Be sure the power cord is...


