
E321VA User Manual
Page 1
... 6. This User Manual covers E320VA, E321VA, E370VA and E420VA 60HZ series models, for any adjustments, and retain them for your HDTV Purchase Date VIZIO is the setting in . For maximum benefit of enjoyment from your new VIZIO HDTV. Manufactured under license from Dolby Laboratories....the models please refer to the specification sheets in the "factory default (Home Use)" setting and this is a registered trademark of VIZIO, Inc. Changing the factory default picture setting or enabling other features will increase power consumption that could exceed the limits necessary to ...
... 6. This User Manual covers E320VA, E321VA, E370VA and E420VA 60HZ series models, for any adjustments, and retain them for your HDTV Purchase Date VIZIO is the setting in . For maximum benefit of enjoyment from your new VIZIO HDTV. Manufactured under license from Dolby Laboratories....the models please refer to the specification sheets in the "factory default (Home Use)" setting and this is a registered trademark of VIZIO, Inc. Changing the factory default picture setting or enabling other features will increase power consumption that could exceed the limits necessary to ...
E321VA User Manual
Page 4
After the switch, analog-only television sets that the antenna or cable system is electrically grounded to provide some protection against voltage surges and static charges. Power Lines Do not locate the ...
After the switch, analog-only television sets that the antenna or cable system is electrically grounded to provide some protection against voltage surges and static charges. Power Lines Do not locate the ...
E321VA User Manual
Page 5
... ...50 Telephone & Technical Support ...52 Compliance ...52 FCC Class B Radio Interference Statement...53 Chapter 6 Specifications ...54 Glossary - VIZIO 60HZ E SERIES User Manual Table of Contents Important Safety Instructions...2 HDTV Accessories and Services ...6 Chapter 1 Setting Up Your HDTV ...7 Attaching the TV Stand ...7 Wall Mounting Your HDTV ...8 Chapter 2 Basic Controls and Connections ...10 Front...
... ...50 Telephone & Technical Support ...52 Compliance ...52 FCC Class B Radio Interference Statement...53 Chapter 6 Specifications ...54 Glossary - VIZIO 60HZ E SERIES User Manual Table of Contents Important Safety Instructions...2 HDTV Accessories and Services ...6 Chapter 1 Setting Up Your HDTV ...7 Attaching the TV Stand ...7 Wall Mounting Your HDTV ...8 Chapter 2 Basic Controls and Connections ...10 Front...
E321VA User Manual
Page 7
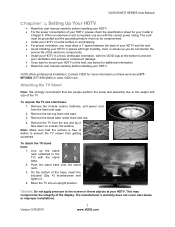
...required, use one with the correct power rating. Push the stand base onto the stand neck. 3. Move the TV into an upright position. Contact VIZIO for more information on these services at your HDTV. Remove the remote control, batteries, and power cord from the box and lay it . 4....high humidity, dust, or smoke so you want to the screen or throw objects at 877MYVIZIO (877-698-4946) or www.VIZIO.com. VIZIO 60HZ E SERIES User Manual Chapter 1 Setting Up Your HDTV • Read this user manual carefully before installing your HDTV. • For the power consumption of the ...
...required, use one with the correct power rating. Push the stand base onto the stand neck. 3. Move the TV into an upright position. Contact VIZIO for more information on these services at your HDTV. Remove the remote control, batteries, and power cord from the box and lay it . 4....high humidity, dust, or smoke so you want to the screen or throw objects at 877MYVIZIO (877-698-4946) or www.VIZIO.com. VIZIO 60HZ E SERIES User Manual Chapter 1 Setting Up Your HDTV • Read this user manual carefully before installing your HDTV. • For the power consumption of the ...
E321VA User Manual
Page 12
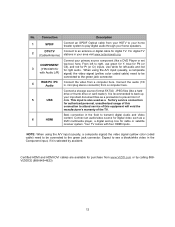
...to be connected to play digital audio through your home speakers. Connect a storage source (format FAT32) JPEG files (like a DVD Player or set -top box for authorized personal, unauthorized usage of this equipment will void the manufacturer's warranty of 5 USB data. Best connection in the ...hard drive or thumb drive or card reader). mini plug stereo connector) from www.VIZIO.com or by accident. For digital TV 2 (Cable/Antenna) stations in . It is also used as a DVD multimedia player, a digital set COMPONENT top box) here. Expect to right, use green for Y, blue for Pb...
...to be connected to play digital audio through your home speakers. Connect a storage source (format FAT32) JPEG files (like a DVD Player or set -top box for authorized personal, unauthorized usage of this equipment will void the manufacturer's warranty of 5 USB data. Best connection in the ...hard drive or thumb drive or card reader). mini plug stereo connector) from www.VIZIO.com or by accident. For digital TV 2 (Cable/Antenna) stations in . It is also used as a DVD multimedia player, a digital set COMPONENT top box) here. Expect to right, use green for Y, blue for Pb...
E321VA User Manual
Page 13
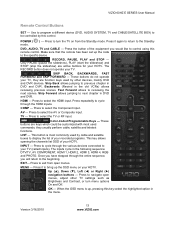
...Only PAUSE (pause the slideshow), PLAY (start the slideshow) and STOP (stop the slideshow) are keys which could be controlled by other TV settings such as Brightness and Contrast, or turn the TV on your TV, they are function keys used commands, they usually perform cable, satellite and...through the entire sequence, you would like to your TV. Press to the Standby DVD, AUDIO, TV and CABLE - VIZIO 60HZ E SERIES User Manual Remote Control Buttons SET - Press it to select the TV or RF input. Press to the beginning. Once you have stepped through the various...
...Only PAUSE (pause the slideshow), PLAY (start the slideshow) and STOP (stop the slideshow) are keys which could be controlled by other TV settings such as Brightness and Contrast, or turn the TV on your TV, they are function keys used commands, they usually perform cable, satellite and...through the entire sequence, you would like to your TV. Press to the Standby DVD, AUDIO, TV and CABLE - VIZIO 60HZ E SERIES User Manual Remote Control Buttons SET - Press it to select the TV or RF input. Press to the beginning. Once you have stepped through the various...

E321VA User Manual
Page 14
...be selected by the button sequence 2, 8, DASH, 2. Try different keys to control different devices: DVD players, Audio Players, TV and Set-Top Boxes. Press and release PLAY key, the indicator goes OFF during pressing and comes ON after trying all of the sound. Press ...OK key to see programming information. This button does not function with your accessory or equipment responds properly. Searching Automatically for VIZIO preferred accessories and equipment systems. The following procedure is not the case and other codes are applicable, please try to use with...
...be selected by the button sequence 2, 8, DASH, 2. Try different keys to control different devices: DVD players, Audio Players, TV and Set-Top Boxes. Press and release PLAY key, the indicator goes OFF during pressing and comes ON after trying all of the sound. Press ...OK key to see programming information. This button does not function with your accessory or equipment responds properly. Searching Automatically for VIZIO preferred accessories and equipment systems. The following procedure is not the case and other codes are applicable, please try to use with...
E321VA User Manual
Page 16
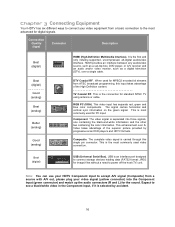
... for PC input. USB is selected by progressive scan DVD players and HDTV formats. HDMI provides an interface between any audio/video source, such as a set-top box, DVD player, or A/V receiver and an audio and/or video monitor, such as a digital television (DTV), over SVideo takes advantage of the High...
... for PC input. USB is selected by progressive scan DVD players and HDTV formats. HDMI provides an interface between any audio/video source, such as a set-top box, DVD player, or A/V receiver and an audio and/or video monitor, such as a digital television (DTV), over SVideo takes advantage of the High...
E321VA User Manual
Page 17
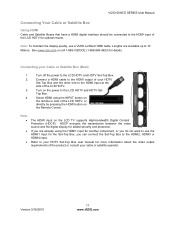
...HDMI4 input. Connecting your cable or satellite operator. Turn off the power to the LCD HDTV and HDTV Set- Top Box. 4. Note: • • • The HDMI input on the remote or side...Box (Best) 1. Turn on the Remote Control. Version 3/16/2010 17 www.VIZIO.com If you can connect the Set-Top Box to 10 Meters. Note: To maintain the display quality, use the HDMI1... input for optimal results. Select HDMI using the HDMI1 input for another component, or you do not want to use a VIZIO...
...HDMI4 input. Connecting your cable or satellite operator. Turn off the power to the LCD HDTV and HDTV Set- Top Box. 4. Note: • • • The HDMI input on the remote or side...Box (Best) 1. Turn on the Remote Control. Version 3/16/2010 17 www.VIZIO.com If you can connect the Set-Top Box to 10 Meters. Note: To maintain the display quality, use the HDMI1... input for optimal results. Select HDMI using the HDMI1 input for another component, or you do not want to use a VIZIO...
E321VA User Manual
Page 18
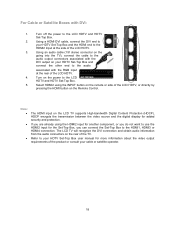
...you are already using the INPUT button on your cable or satellite operator. 18 Using a HDMI-DVI cable, connect the DVI end to your HDTV Set-Top Box and the HDMI end to the audio output connectors associated with the DVI output on the remote or side of the TV. Using... an audio cable (1/8' stereo connector on the LCD TV supports High-bandwidth Digital Content Protection (HDCP). Refer to your HDTV Set-Top Box user manual for added security and protection. Note: • • • The HDMI input on the going into the TV), connect the ...
...you are already using the INPUT button on your cable or satellite operator. 18 Using a HDMI-DVI cable, connect the DVI end to your HDTV Set-Top Box and the HDMI end to the audio output connectors associated with the DVI output on the remote or side of the TV. Using... an audio cable (1/8' stereo connector on the LCD TV supports High-bandwidth Digital Content Protection (HDCP). Refer to your HDTV Set-Top Box user manual for added security and protection. Note: • • • The HDMI input on the going into the TV), connect the ...

E321VA User Manual
Page 19
...Component input at the rear of the product or consult your Cable or Satellite Box (Better) VIZIO 60HZ E SERIES User Manual 1. Version 3/16/2010 19 www.VIZIO.com Turn off the power to your HDTV Set-Top Box user manual for more information about the video output requirements of the LCD HDTV. ...5. Note: • Refer to the LCD HDTV and HDTV Set-Top Box. 2. Connect the PrCr (red color) ...
...Component input at the rear of the product or consult your Cable or Satellite Box (Better) VIZIO 60HZ E SERIES User Manual 1. Version 3/16/2010 19 www.VIZIO.com Turn off the power to your HDTV Set-Top Box user manual for more information about the video output requirements of the LCD HDTV. ...5. Note: • Refer to the LCD HDTV and HDTV Set-Top Box. 2. Connect the PrCr (red color) ...

E321VA User Manual
Page 22
... Input at the rear of the product. 22 Note: • • If you can connect the DVD player to the LCD HDTV and your HDTV Set-Top Box and connect the other end to the LCD HDTV and DVD player. 2. For DVD Players with the DVI output on the power to...
... Input at the rear of the product. 22 Note: • • If you can connect the DVD player to the LCD HDTV and your HDTV Set-Top Box and connect the other end to the LCD HDTV and DVD player. 2. For DVD Players with the DVI output on the power to...

E321VA User Manual
Page 26
... other end to the LCD HDTV and Computer. 5. Note: • • • For a better picture quality when connecting a personal computer through RGB PC, set your personal computer user manual for more information about the video output requirements of the LCD HDTV. Turn on the remote or side of the...the rear of the LCD HDTV. 3. A RGB (VGA) cable and stereo mini jack cable are not included and can be purchased at 60Hz (E321VA, E370VA and E420VA model) . Using a 1/8" stereo cable, connect the Audio Out on your personal computer to your computer timing mode to the LCD HDTV and ...
... other end to the LCD HDTV and Computer. 5. Note: • • • For a better picture quality when connecting a personal computer through RGB PC, set your personal computer user manual for more information about the video output requirements of the LCD HDTV. Turn on the remote or side of the...the rear of the LCD HDTV. 3. A RGB (VGA) cable and stereo mini jack cable are not included and can be purchased at 60Hz (E321VA, E370VA and E420VA model) . Using a 1/8" stereo cable, connect the Audio Out on your personal computer to your computer timing mode to the LCD HDTV and ...
E321VA User Manual
Page 27
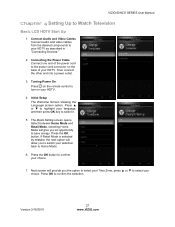
... Mode, selecting Home Mode will allow you an opportunity to confirm your choice. 7. Press the OK button to save energy. VIZIO 60HZ E SERIES User Manual Chapter 4 Setting Up to your HDTV as described in "Connecting Devices." 2. Connect Audio and Video Cables Connect audio and video cables from the... desired components to Watch Television Basic LCD HDTV Start Up 1. Version 3/16/2010 27 www.VIZIO.com Press the OK button. The Mode Setting screen opens. Connecting the Power Cable Connect one end of your selection back to the power cord connector on the...
... Mode, selecting Home Mode will allow you an opportunity to confirm your choice. 7. Press the OK button to save energy. VIZIO 60HZ E SERIES User Manual Chapter 4 Setting Up to your HDTV as described in "Connecting Devices." 2. Connect Audio and Video Cables Connect audio and video cables from the... desired components to Watch Television Basic LCD HDTV Start Up 1. Version 3/16/2010 27 www.VIZIO.com Press the OK button. The Mode Setting screen opens. Connecting the Power Cable Connect one end of your selection back to the power cord connector on the...
E321VA User Manual
Page 28
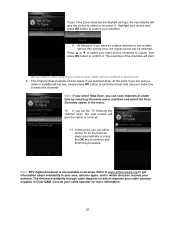
... two steps automatically or press the OK key to continue and finish this process and use a cable service (No set -top box. 9. At this point if you are using a cable or satellite set-top box, please press OK button to exit this procedure. Note: If you select Stop Scan, you have an... give the option to continue. 11. At this point, you selected Scan. Highlight your choice and press OK button to confirm your cable service without a set -top box), the signal source can scan channels at a later time by selecting Channels menu, and then and select the Scan Channels option in all...
... two steps automatically or press the OK key to continue and finish this process and use a cable service (No set -top box. 9. At this point if you are using a cable or satellite set-top box, please press OK button to exit this procedure. Note: If you select Stop Scan, you have an... give the option to continue. 11. At this point, you selected Scan. Highlight your choice and press OK button to confirm your cable service without a set -top box), the signal source can scan channels at a later time by selecting Channels menu, and then and select the Scan Channels option in all...

E321VA User Manual
Page 30
... Picture, and then press the OK key. The Custom menu opens. If More is also available in this submenu, it . 6. Press OK key to Picture Settings. 30 Exit the entire OSD by pressing EXIT or return to previous screen menu by either pressing the LAST button on the remote control or... desired changes and exit the menu by selecting the ◄ on top left hand side next to select it allows the modified values to be set to adjust the balance or intensity of Red, Green and Blue colors, Color Enhancement, Adaptive Luma and DCR (Dynamic Contrast Ratio) are switchable options...
... Picture, and then press the OK key. The Custom menu opens. If More is also available in this submenu, it . 6. Press OK key to Picture Settings. 30 Exit the entire OSD by pressing EXIT or return to previous screen menu by either pressing the LAST button on the remote control or... desired changes and exit the menu by selecting the ◄ on top left hand side next to select it allows the modified values to be set to adjust the balance or intensity of Red, Green and Blue colors, Color Enhancement, Adaptive Luma and DCR (Dynamic Contrast Ratio) are switchable options...
E321VA User Manual
Page 32
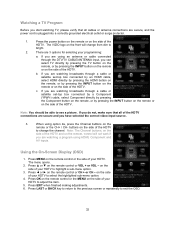
The VIZIO logo on the side of the HDTV. If you are using an antenna or cable ...and you start watching TV, please verify that all cables or antenna connections are watching broadcasts through a cable or satellite set -top box connected by an HDMI cable, select HDMI directly by pressing the HDMI button on the remote, or by... a TV Program Before you have selected the correct video input source. 3. If you are watching broadcasts through a cable or satellite set -top box connected by a Component (YPbPr) cable, select Component directly by pressing the Component button on the remote, or by ...
The VIZIO logo on the side of the HDTV. If you are using an antenna or cable ...and you start watching TV, please verify that all cables or antenna connections are watching broadcasts through a cable or satellite set -top box connected by an HDMI cable, select HDMI directly by pressing the HDMI button on the remote, or by... a TV Program Before you have selected the correct video input source. 3. If you are watching broadcasts through a cable or satellite set -top box connected by a Component (YPbPr) cable, select Component directly by pressing the Component button on the remote, or by ...
E321VA User Manual
Page 33
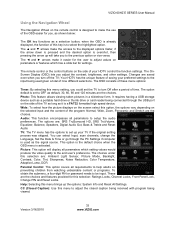
... the unique feature of saving your HDTV control the function settings. The option default is set up your TV if the original setting process was skipped. Photo: This feature allows viewing taken pictures in a slideshow form. VIZIO 60HZ E SERIES User Manual Using the Navigation Wheel The ...drive or thumb drive or card reader being viewed. Picture: This option will take you adjust the contrast, brightness, and other settings. Version 3/16/2010 33 www.VIZIO.com The options are: SRS TruSurround HD, SRS TruVolume, Equalizer, Balance, Speakers, Digital Audio Out, Bass & Treble and ...
... the unique feature of saving your HDTV control the function settings. The option default is set up your TV if the original setting process was skipped. Photo: This feature allows viewing taken pictures in a slideshow form. VIZIO 60HZ E SERIES User Manual Using the Navigation Wheel The ...drive or thumb drive or card reader being viewed. Picture: This option will take you adjust the contrast, brightness, and other settings. Version 3/16/2010 33 www.VIZIO.com The options are: SRS TruSurround HD, SRS TruVolume, Equalizer, Balance, Speakers, Digital Audio Out, Bass & Treble and ...
E321VA User Manual
Page 34
... feature allows using the remote control to turn on the side of these channels which pictures to show and how to show them using Picture Settings from main menu), View Slideshow (select to start your password, this option will become inactive (nonfunctional) until this menu, the User Control Lock is needed... prevent the loss of data or important files, it is selected, the control buttons on the TV and going back to preferred names or labels). 3. VIZIO cannot be displayed in the Parental Control menu.
... feature allows using the remote control to turn on the side of these channels which pictures to show and how to show them using Picture Settings from main menu), View Slideshow (select to start your password, this option will become inactive (nonfunctional) until this menu, the User Control Lock is needed... prevent the loss of data or important files, it is selected, the control buttons on the TV and going back to preferred names or labels). 3. VIZIO cannot be displayed in the Parental Control menu.
E321VA User Manual
Page 35
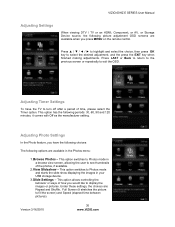
... the Photo feature, you press MENU on the remote control. Under these settings, the choices are: Repeat and Shuffle, Full Screen (it comes with Off as the manufacturer setting. VIZIO 60HZ E SERIES User Manual Adjusting Settings When viewing DTV / TV or an HDMI, Component, or AV, or Storage Device source...option allows controlling the behavior or ways of how you would like to fill the screen) and Speed (elapsed time between pictures). Adjusting Timer Settings To have the following choices: The following periods: 30, 60, 90 and 120 minutes, it stretches the picture to display the images ...
... the Photo feature, you press MENU on the remote control. Under these settings, the choices are: Repeat and Shuffle, Full Screen (it comes with Off as the manufacturer setting. VIZIO 60HZ E SERIES User Manual Adjusting Settings When viewing DTV / TV or an HDMI, Component, or AV, or Storage Device source...option allows controlling the behavior or ways of how you would like to fill the screen) and Speed (elapsed time between pictures). Adjusting Timer Settings To have the following choices: The following periods: 30, 60, 90 and 120 minutes, it stretches the picture to display the images ...


