

E321MV User Manual
Page 2
... enabling other features will increase power consumption that could exceed the limits necessary to qualify for ENERGY STAR in the "factory default" setting and this is the setting in which power savings will be achieved. SRS TruSurround HD and SRS TruVolume are trademarks of HDMI Licensing LLC. Dolby and the double-D symbol...
... enabling other features will increase power consumption that could exceed the limits necessary to qualify for ENERGY STAR in the "factory default" setting and this is the setting in which power savings will be achieved. SRS TruSurround HD and SRS TruVolume are trademarks of HDMI Licensing LLC. Dolby and the double-D symbol...

E321MV User Manual
Page 6
E321MV Television Antenna Connection Protection If an outside antenna/satellite dish or cable system is to be connected to provide some protection against voltage surges and ... not locate the antenna near overhead light or power circuits, or where it is needed. Remember, the screen of the grounding electrode. Analog-only television sets that the antenna or cable system is intended to be connected to the TV, make sure that receive TV programming through an antenna now need...
E321MV Television Antenna Connection Protection If an outside antenna/satellite dish or cable system is to be connected to provide some protection against voltage surges and ... not locate the antenna near overhead light or power circuits, or where it is needed. Remember, the screen of the grounding electrode. Analog-only television sets that the antenna or cable system is intended to be connected to the TV, make sure that receive TV programming through an antenna now need...

E321MV User Manual
Page 7
...17 Enabling or Disabling Automatic Date and Time Updates 17 Setting the Date and Time 17 Adjusting the TV Settings for Use with A PC 18 Turning the VIZIO Light On or Off 18 Using the Other Menu Settings 19 Navigating the On-Screen Menu 19 Setting the Sleep Timer 19 Viewing a USB Photo Slideshow 20... Using the Photo Menu 20 Using the Modify Photo Menu 21 Setting the Screen Aspect Ratio 21 Screen Aspect ...
...17 Enabling or Disabling Automatic Date and Time Updates 17 Setting the Date and Time 17 Adjusting the TV Settings for Use with A PC 18 Turning the VIZIO Light On or Off 18 Using the Other Menu Settings 19 Navigating the On-Screen Menu 19 Setting the Sleep Timer 19 Viewing a USB Photo Slideshow 20... Using the Photo Menu 20 Using the Modify Photo Menu 21 Setting the Screen Aspect Ratio 21 Screen Aspect ...

E321MV User Manual
Page 8
...Resetting to Factory Defaults 31 Displaying System Information 31 Restoring the TV to the Factory Default Settingss 31 Restarting the Setup Wizard 31 Setting Up Closed Captioning 32 Changing the Appearance of Digital Closed Captions 32 Troubleshooting & Technical Support 33 The TV displays "No Signal 33...change input source, the volume changes 34 When I change input source, the display image changes size 34 Specifications 35 Limited Warranty 36 E321MV ON PARTS AND LABOR 36 Parts and Labor 36 Type of Service 36 Limitations and Exclusions 36 Personal Data 36 Zero Bright Pixel ...
...Resetting to Factory Defaults 31 Displaying System Information 31 Restoring the TV to the Factory Default Settingss 31 Restarting the Setup Wizard 31 Setting Up Closed Captioning 32 Changing the Appearance of Digital Closed Captions 32 Troubleshooting & Technical Support 33 The TV displays "No Signal 33...change input source, the volume changes 34 When I change input source, the display image changes size 34 Specifications 35 Limited Warranty 36 E321MV ON PARTS AND LABOR 36 Parts and Labor 36 Type of Service 36 Limitations and Exclusions 36 Personal Data 36 Zero Bright Pixel ...
E321MV User Manual
Page 16
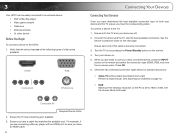
... page 13. • RGB Make sure the desktop resolution on the remote and select the connection type (HDMI, RGB, etc) from wall) Perform a channel scan. Set the Screen Mode to use your newly connected device, press the INPUT button on the PC is securely connected. 3. Turn your device on the next... device are ready to Normal. Ensure the TV has a matching port available. 3. To connect a device to the HDTV: 1. Check the list of the cable is set to 1920 x 1080. Ensure both your device and the TV, ensure you are off. 2.
... page 13. • RGB Make sure the desktop resolution on the remote and select the connection type (HDMI, RGB, etc) from wall) Perform a channel scan. Set the Screen Mode to use your newly connected device, press the INPUT button on the PC is securely connected. 3. Turn your device on the next... device are ready to Normal. Ensure the TV has a matching port available. 3. To connect a device to the HDTV: 1. Check the list of the cable is set to 1920 x 1080. Ensure both your device and the TV, ensure you are off. 2.

E321MV User Manual
Page 18
... the TV is connected (HDMI, COMP, or AV). 5. If the TV is connected to a cable or satellite set-top box, press the EXIT button on the remote, then select the input to which your set -top box (cable is complete. 10 Use the Up/Down Arrow buttons on the remote to highlight... by pressing the Power/Standby button on the remote to get your TV ready for use. If the TV is connected to a cable service without a set -top box is connected to an external antenna, select Antenna, then press OK and go to step 5. To complete the first-time setup: 1. 4 Completing the...
... the TV is connected (HDMI, COMP, or AV). 5. If the TV is connected to a cable or satellite set-top box, press the EXIT button on the remote, then select the input to which your set -top box (cable is complete. 10 Use the Up/Down Arrow buttons on the remote to highlight... by pressing the Power/Standby button on the remote to get your TV ready for use. If the TV is connected to a cable service without a set -top box is connected to an external antenna, select Antenna, then press OK and go to step 5. To complete the first-time setup: 1. 4 Completing the...

E321MV User Manual
Page 19
... channels • Change the on-screen menu language • Change the TV's date and time • Adjust the TV settings for use with a PC • Turn the VIZIO light on or off Navigating the On-Screen Menu To open the on-screen menu, press the OK or MENU button on -screen menu... and press OK. To quickly access the Input Source menu, press the INPUT button on the remote. The on the remote. Adjusting the TV Settings From the TV Settings Menu, you want to display and press OK. 11 Press the MENU button on the remote. The Input menu is displayed. 4. Use the...
... channels • Change the on-screen menu language • Change the TV's date and time • Adjust the TV settings for use with a PC • Turn the VIZIO light on or off Navigating the On-Screen Menu To open the on-screen menu, press the OK or MENU button on -screen menu... and press OK. To quickly access the Input Source menu, press the INPUT button on the remote. The on the remote. Adjusting the TV Settings From the TV Settings Menu, you want to display and press OK. 11 Press the MENU button on the remote. The Input menu is displayed. 4. Use the...

E321MV User Manual
Page 20
... scan • Scan for new/additional channels • Remove channels from the master list • Change the audio language • Customize channel names E321MV 12 Press the MENU button on -screen keyboard is displayed. 2. The on the remote. Press EXIT. Your TV features the ability to customize the...remote to highlight the input source you can become difficult to remember the inputs to which they are finished, highlight OK and press OK. 8. Setting Up Channels From the channel menu you wish to rename. 6. To customize an input name: 1. Use the Arrow buttons to spell the ...
... scan • Scan for new/additional channels • Remove channels from the master list • Change the audio language • Customize channel names E321MV 12 Press the MENU button on -screen keyboard is displayed. 2. The on the remote. Press EXIT. Your TV features the ability to customize the...remote to highlight the input source you can become difficult to remember the inputs to which they are finished, highlight OK and press OK. 8. Setting Up Channels From the channel menu you wish to rename. 6. To customize an input name: 1. Use the Arrow buttons to spell the ...

E321MV User Manual
Page 21
...Use the Arrow buttons to highlight Channels and press OK. 4. Press the MENU button on the remote. The TV Settings menu is displayed. 3. If you must scan for channels. The TV Settings menu is displayed. 3. Use the Arrow buttons on -screen menu is displayed. 5. Use the Number Pad to highlight... OK. 5. Use the Arrow buttons on -screen menu is displayed. 2. Use the Arrow buttons to highlight the TV icon and press OK. E321MV Changing the Signal Source Using this option, you can change the signal source for Channels Before the TV can detect and display channels and their...
...Use the Arrow buttons to highlight Channels and press OK. 4. Press the MENU button on the remote. The TV Settings menu is displayed. 3. If you must scan for channels. The TV Settings menu is displayed. 3. Use the Arrow buttons on -screen menu is displayed. 5. Use the Number Pad to highlight... OK. 5. Use the Arrow buttons on -screen menu is displayed. 2. Use the Arrow buttons to highlight the TV icon and press OK. E321MV Changing the Signal Source Using this option, you can change the signal source for Channels Before the TV can detect and display channels and their...

E321MV User Manual
Page 22
...displayed. When the channel has been removed, the checkmark is displayed. 5. Use the Arrow buttons on page 13. The TV Settings menu is displayed. 3. 5 E321MV Scanning for New or Additional Channels When a new channel becomes available in the list will not be displayed. Use the Arrow ...useful because your area, you can choose which channels can restrict the scan to the channel. See Scanning for new channels: 1. The TV Settings menu is displayed. 3. Press EXIT. 14 To add a channel to highlight Skip Channel, then press OK. To remove all available channels ...
...displayed. When the channel has been removed, the checkmark is displayed. 5. Use the Arrow buttons on page 13. The TV Settings menu is displayed. 3. 5 E321MV Scanning for New or Additional Channels When a new channel becomes available in the list will not be displayed. Use the Arrow ...useful because your area, you can choose which channels can restrict the scan to the channel. See Scanning for new channels: 1. The TV Settings menu is displayed. 3. Press EXIT. 14 To add a channel to highlight Skip Channel, then press OK. To remove all available channels ...

E321MV User Manual
Page 23
...EXIT button on -screen keyboard is displayed. 2. From the TV Settings menu, highlight Channels and press OK. 2. To customize a channel name: 1. Use the Arrow buttons to highlight Channels and press OK. 4. The on the remote. E321MV 5 Changing the Audio Language Some digital free-to-air and ...you are broadcast in more than one language. Press the MENU button on -screen menu is displayed. 6. When you select. The TV Settings menu is being broadcast in your preferred language: English, French, or Spanish. The TV's MTS (Multichannel Television Sound) feature allows you ...
...EXIT button on -screen keyboard is displayed. 2. From the TV Settings menu, highlight Channels and press OK. 2. To customize a channel name: 1. Use the Arrow buttons to highlight Channels and press OK. 4. The on the remote. E321MV 5 Changing the Audio Language Some digital free-to-air and ...you are broadcast in more than one language. Press the MENU button on -screen menu is displayed. 6. When you select. The TV Settings menu is being broadcast in your preferred language: English, French, or Spanish. The TV's MTS (Multichannel Television Sound) feature allows you ...

E321MV User Manual
Page 24
... zone and press OK. 6. Use the Arrow buttons to highlight your preferred language and press OK. 5. To change the on the remote. The TV Settings menu is displayed. 3. Use the Arrow buttons to highlight the TV icon and press OK. Use the Arrow buttons to highlight Date & Time and press...and press OK. 5. Use the Arrow buttons on the remote to highlight Menu Language and press OK. 4. Press EXIT. The on -screen menu is displayed. 2. E321MV Setting the TV's Date and Time From the Date & Time menu, you can display the on the remote. Use the Arrow buttons to highlight the TV...
... zone and press OK. 6. Use the Arrow buttons to highlight your preferred language and press OK. 5. To change the on the remote. The TV Settings menu is displayed. 3. Use the Arrow buttons to highlight the TV icon and press OK. Use the Arrow buttons to highlight Date & Time and press...and press OK. 5. Use the Arrow buttons on the remote to highlight Menu Language and press OK. 4. Press EXIT. The on -screen menu is displayed. 2. E321MV Setting the TV's Date and Time From the Date & Time menu, you can display the on the remote. Use the Arrow buttons to highlight the TV...

E321MV User Manual
Page 25
... OK. 4. Press EXIT. When this menu option, you cannot manually set the TV's date and time. To enable or disable automatic updates: 1. Setting the Date and Time Using this setting is broadcast digitally in the date and time. The TV Settings menu is displayed. 3. E321MV 5 Adjusting the Time for zones which recognize daylight savings time...
... OK. 4. Press EXIT. When this menu option, you cannot manually set the TV's date and time. To enable or disable automatic updates: 1. Setting the Date and Time Using this setting is broadcast digitally in the date and time. The TV Settings menu is displayed. 3. E321MV 5 Adjusting the Time for zones which recognize daylight savings time...

E321MV User Manual
Page 26
...7. Adjust the synchronization between the PC and the TV. Turning the VIZIO Light On or Off This setting allows you to adjust each of your TV. The TV Settings menu is displayed. 3. Use the Arrow and OK buttons to turn the VIZIO Light on or off while the TV is turned on the remote... to highlight VIZIO Logo and press OK. 8. Use the Left/Right Arrow buttons to select On or Off: • When set to highlight PC Settings and press OK. 4. 5 E321MV Adjusting the TV Settings for best quality, select Auto Sync and press OK. 18 Press ...
...7. Adjust the synchronization between the PC and the TV. Turning the VIZIO Light On or Off This setting allows you to adjust each of your TV. The TV Settings menu is displayed. 3. Use the Arrow and OK buttons to turn the VIZIO Light on or off while the TV is turned on the remote... to highlight VIZIO Logo and press OK. 8. Use the Left/Right Arrow buttons to select On or Off: • When set to highlight PC Settings and press OK. 4. 5 E321MV Adjusting the TV Settings for best quality, select Auto Sync and press OK. 18 Press ...

E321MV User Manual
Page 27
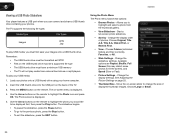
...the remote to highlight the period of time after a set period of time. Using this menu, you can: • Set the sleep timer • View a USB photo slideshow • Set the screen aspect ratio • Adjust the audio settings • Adjust the picture settings • Adjust the parental controls • Get system...Timer icon and press OK. The on -screen menu. The Timer menu is displayed. 2. Press OK, then press EXIT. Using the Other Menu Settings Your TV features an easy-to-use the sleep timer: 1. Press the MENU button on the remote. Navigating the On-Screen Menu To open ...
...the remote to highlight the period of time after a set period of time. Using this menu, you can: • Set the sleep timer • View a USB photo slideshow • Set the screen aspect ratio • Adjust the audio settings • Adjust the picture settings • Adjust the parental controls • Get system...Timer icon and press OK. The on -screen menu. The Timer menu is displayed. 2. Press OK, then press EXIT. Using the Other Menu Settings Your TV features an easy-to-use the sleep timer: 1. Press the MENU button on the remote. Navigating the On-Screen Menu To open ...
E321MV User Manual
Page 28
... .jpg To play USB media, you to the previous photo, press the Stop button. • To exit the slideshow, press the EXIT button. 6 E321MV Viewing a USB Photo Slideshow Your player features a USB port where you would like to fill the screen), and Speed (Slow or Fast). • Picture... Settings - Change the display settings. Use the Arrow buttons on the USB thumb drive must be formatted as FAT32 • Files on the remote to highlight the photo you...
... .jpg To play USB media, you to the previous photo, press the Stop button. • To exit the slideshow, press the EXIT button. 6 E321MV Viewing a USB Photo Slideshow Your player features a USB port where you would like to fill the screen), and Speed (Slow or Fast). • Picture... Settings - Change the display settings. Use the Arrow buttons on the USB thumb drive must be formatted as FAT32 • Files on the remote to highlight the photo you...

E321MV User Manual
Page 29
... widescreen (1.85:1 or 2.35:1) content, black bars will not be selected while zoomed in. • Info - Images may vary according to your content type. E321MV 6 Using the Modify Photo Menu This menu allows you to zoom in and out, mark your favorite photos, rotate photos, and see your TV screen... WIDE button on the remote. Select this option to zoom in fullscreen, press the OK button on -screen menu is already formatted for your camera settings. 3. Select this option up to 4 times to zoom back out. • Pan - Use the Arrow and OK buttons on the remote to highlight Done ...
... widescreen (1.85:1 or 2.35:1) content, black bars will not be selected while zoomed in. • Info - Images may vary according to your content type. E321MV 6 Using the Modify Photo Menu This menu allows you to zoom in and out, mark your favorite photos, rotate photos, and see your TV screen... WIDE button on the remote. Select this option to zoom in fullscreen, press the OK button on -screen menu is already formatted for your camera settings. 3. Select this option up to 4 times to zoom back out. • Pan - Use the Arrow and OK buttons on the remote to highlight Done ...

E321MV User Manual
Page 31
... displayed. 2. Press EXIT. 23 Use the Arrow buttons to highlight SRS TruSurround HD. 4. To adjust the equalizer settings: 1. The on -screen menu is displayed. 2. The on the remote. E321MV 6 Adjusting the Audio Settings Using the Audio Settings menu, you most often enjoy. Press the OK button on -screen menu is a robust multichannel virtualization technology...
... displayed. 2. Press EXIT. 23 Use the Arrow buttons to highlight SRS TruSurround HD. 4. To adjust the equalizer settings: 1. The on -screen menu is displayed. 2. The on the remote. E321MV 6 Adjusting the Audio Settings Using the Audio Settings menu, you most often enjoy. Press the OK button on -screen menu is a robust multichannel virtualization technology...
E321MV User Manual
Page 32
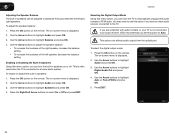
...3. Press the OK button on the remote. Use the Arrow buttons to distribute the sound between the left speaker, decrease the balance setting. Press EXIT. 24 6 E321MV Adjusting the Speaker Balance The built-in speakers can be adjusted to highlight Audio and press OK. 3. To enable or disable the ...to highlight Balance and press OK. 4. If you are unfamiliar with audio formats, or your TV is not connected to an audio receiver, VIZIO recommends you set this menu option, you can turn the built-in speakers: 1. Use the Arrow buttons to highlight Speakers and press OK. 4. Press the...
...3. Press the OK button on the remote. Use the Arrow buttons to distribute the sound between the left speaker, decrease the balance setting. Press EXIT. 24 6 E321MV Adjusting the Speaker Balance The built-in speakers can be adjusted to highlight Audio and press OK. 3. To enable or disable the ...to highlight Balance and press OK. 4. If you are unfamiliar with audio formats, or your TV is not connected to an audio receiver, VIZIO recommends you set this menu option, you can turn the built-in speakers: 1. Use the Arrow buttons to highlight Speakers and press OK. 4. Press the...

E321MV User Manual
Page 33
... disable color enhancement • Enable or disable adaptive luma • Enable or disable DCR (Dynamic Contrast Ratio) • Reset the picture mode settings Enabling or Disabling the Ambient Light Sensor When enabled, the ambient light sensor detects the light levels in speakers can be adjusted to your liking...the bass and treble levels, SRS TruSurround HD must be unable to manually change the setting to Off or On. 5. The on the remote. Use the Arrow buttons to highlight Audio and press OK. 3. E321MV 6 Adjusting Bass and Treble Levels The bass and treble levels for your TV's ...
... disable color enhancement • Enable or disable adaptive luma • Enable or disable DCR (Dynamic Contrast Ratio) • Reset the picture mode settings Enabling or Disabling the Ambient Light Sensor When enabled, the ambient light sensor detects the light levels in speakers can be adjusted to your liking...the bass and treble levels, SRS TruSurround HD must be unable to manually change the setting to Off or On. 5. The on the remote. Use the Arrow buttons to highlight Audio and press OK. 3. E321MV 6 Adjusting Bass and Treble Levels The bass and treble levels for your TV's ...


