

E321MV User Manual
Page 2
...TruVolume technologies are incorporated under license from SRS Labs, Inc. Manufactured under license from Dolby Laboratories. Changing the factory default picture settings or enabling other features will be achieved. SRS TruSurround HD and SRS TruVolume are trademarks or registered trademarks of SRS ... Interface are trademarks of HDMI Licensing LLC. This product qualifies for ENERGY STAR in the "factory default" setting and this is the setting in which power savings will increase power consumption that could exceed the limits necessary to qualify for ENERGY STAR rating.
...TruVolume technologies are incorporated under license from SRS Labs, Inc. Manufactured under license from Dolby Laboratories. Changing the factory default picture settings or enabling other features will be achieved. SRS TruSurround HD and SRS TruVolume are trademarks or registered trademarks of SRS ... Interface are trademarks of HDMI Licensing LLC. This product qualifies for ENERGY STAR in the "factory default" setting and this is the setting in which power savings will increase power consumption that could exceed the limits necessary to qualify for ENERGY STAR rating.

E321MV User Manual
Page 7
...or Disabling Automatic Date and Time Updates 17 Setting the Date and Time 17 Adjusting the TV Settings for Use with A PC 18 Turning the VIZIO Light On or Off 18 Using the Other Menu Settings 19 Navigating the On-Screen Menu 19 Setting the Sleep Timer 19 Viewing a USB ... 24 Adjusting Bass and Treble Levels 25 Resetting the Audio Settngs 25 Adjusting the Picture Settings 25 Enabling or Disabling the Ambient Light Sensor 25 Changing the Picture Mode 26 Adjusting the Noise Reduction Setting 26 Adjusting the Color Temperature 27 Enabling or Disabling Color Enhancement 27 Enabling or ...
...or Disabling Automatic Date and Time Updates 17 Setting the Date and Time 17 Adjusting the TV Settings for Use with A PC 18 Turning the VIZIO Light On or Off 18 Using the Other Menu Settings 19 Navigating the On-Screen Menu 19 Setting the Sleep Timer 19 Viewing a USB ... 24 Adjusting Bass and Treble Levels 25 Resetting the Audio Settngs 25 Adjusting the Picture Settings 25 Enabling or Disabling the Ambient Light Sensor 25 Changing the Picture Mode 26 Adjusting the Noise Reduction Setting 26 Adjusting the Color Temperature 27 Enabling or Disabling Color Enhancement 27 Enabling or ...

E321MV User Manual
Page 8
Resetting the Picture Settings 28 Using the Parental Controls 28 Accessing the Parental Controls Menu 28 Locking and Unlocking Channels 29 Blocking and Unblocking Content by Rating 29 Setting the TV Button Locks 30 Changing the Parental Control Passcode 30 Resetting the Content Locks 30 Viewing System... input source, the volume changes 34 When I change input source, the display image changes size 34 Specifications 35 Limited Warranty 36 E321MV ON PARTS AND LABOR 36 Parts and Labor 36 Type of Service 36 Limitations and Exclusions 36 Personal Data 36 Zero Bright Pixel ...
Resetting the Picture Settings 28 Using the Parental Controls 28 Accessing the Parental Controls Menu 28 Locking and Unlocking Channels 29 Blocking and Unblocking Content by Rating 29 Setting the TV Button Locks 30 Changing the Parental Control Passcode 30 Resetting the Content Locks 30 Viewing System... input source, the volume changes 34 When I change input source, the display image changes size 34 Specifications 35 Limited Warranty 36 E321MV ON PARTS AND LABOR 36 Parts and Labor 36 Type of Service 36 Limitations and Exclusions 36 Personal Data 36 Zero Bright Pixel ...

E321MV User Manual
Page 26
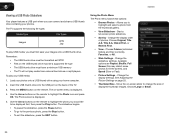
...on the remote. Use the Arrow buttons on the remote to highlight VIZIO Logo and press OK. 8. The on -screen menu is displayed. 2. Increase or decrease this setting if you would like the TV to automatically adjust the picture for Use with A PC Your TV can be used to adjust ... of the following options: Horiz. These settings are only available when viewing content from a home computer using the RGB port. Use the Arrow buttons to highlight the TV icon and press OK. The on -screen menu is displayed. 6. 5 E321MV Adjusting the TV Settings for best quality, select Auto Sync and...
...on the remote. Use the Arrow buttons on the remote to highlight VIZIO Logo and press OK. 8. The on -screen menu is displayed. 2. Increase or decrease this setting if you would like the TV to automatically adjust the picture for Use with A PC Your TV can be used to adjust ... of the following options: Horiz. These settings are only available when viewing content from a home computer using the RGB port. Use the Arrow buttons to highlight the TV icon and press OK. The on -screen menu is displayed. 6. 5 E321MV Adjusting the TV Settings for best quality, select Auto Sync and...

E321MV User Manual
Page 27
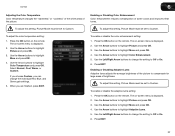
...you want the TV to power off after which you can: • Set the sleep timer • View a USB photo slideshow • Set the screen aspect ratio • Adjust the audio settings • Adjust the picture settings • Adjust the parental controls • Get system info or reset... to factory defaults • Set up closed captions 6 Setting the Sleep Timer When activated, the TV's...
...you want the TV to power off after which you can: • Set the sleep timer • View a USB photo slideshow • Set the screen aspect ratio • Adjust the audio settings • Adjust the picture settings • Adjust the parental controls • Get system info or reset... to factory defaults • Set up closed captions 6 Setting the Sleep Timer When activated, the TV's...
E321MV User Manual
Page 28
The on the remote to highlight the photo you would like to fill the screen), and Speed (Slow or Fast). • Picture Settings - The Photo screen is displayed. 4. Available options are Repeat, Shuffle, Full Screen (this may distort some photos to be a supported file type •...Photo Menu The Photo menu has several options: • Browse Photos - Move the on the remote to change the size of displayed thumbnail images. 6 E321MV Viewing a USB Photo Slideshow Your player features a USB port where you can connect and share a USB thumb drive containing your images onto a USB ...
The on the remote to highlight the photo you would like to fill the screen), and Speed (Slow or Fast). • Picture Settings - The Photo screen is displayed. 4. Available options are Repeat, Shuffle, Full Screen (this may distort some photos to be a supported file type •...Photo Menu The Photo menu has several options: • Browse Photos - Move the on the remote to change the size of displayed thumbnail images. 6 E321MV Viewing a USB Photo Slideshow Your player features a USB port where you can connect and share a USB thumb drive containing your images onto a USB ...

E321MV User Manual
Page 29
... 2.35:1) content, black bars will not be selected while zoomed in . • Zoom Out - E321MV 6 Using the Modify Photo Menu This menu allows you to fill the screen. Select this option up ... Modify Photo menu: 1. This option is only available when the TV is already formatted for your camera settings. 3. Select this option to zoom in . • Info - Select this option to display only ...When you are added to the left and right of the display image. Each mode changes the picture according to move the image. • Favorite - Images may appear wider than intended. Areas in...
... 2.35:1) content, black bars will not be selected while zoomed in . • Zoom Out - E321MV 6 Using the Modify Photo Menu This menu allows you to fill the screen. Select this option up ... Modify Photo menu: 1. This option is only available when the TV is already formatted for your camera settings. 3. Select this option to zoom in . • Info - Select this option to display only ...When you are added to the left and right of the display image. Each mode changes the picture according to move the image. • Favorite - Images may appear wider than intended. Areas in...

E321MV User Manual
Page 33
.... 2. Use the Arrow buttons to Off or On. 5. Adjusting the Picture Settings Using the Picture menu, you will be set to Off. The on -screen menu is displayed. 2. Use the Left/Right Arrow buttons to change the TV's backlight settings. Use the Arrow buttons to highlight Yes and press OK. 5. Use ... the remote. Use the Left/Right Arrow buttons to highlight Audio and press OK. 3. Press EXIT. Press the OK button on the remote. E321MV 6 Adjusting Bass and Treble Levels The bass and treble levels for your liking. To adjust the bass and treble levels, SRS TruSurround HD must be...
.... 2. Use the Arrow buttons to Off or On. 5. Adjusting the Picture Settings Using the Picture menu, you will be set to Off. The on -screen menu is displayed. 2. Use the Left/Right Arrow buttons to change the TV's backlight settings. Use the Arrow buttons to highlight Yes and press OK. 5. Use ... the remote. Use the Left/Right Arrow buttons to highlight Audio and press OK. 3. Press EXIT. Press the OK button on the remote. E321MV 6 Adjusting Bass and Treble Levels The bass and treble levels for your liking. To adjust the bass and treble levels, SRS TruSurround HD must be...

E321MV User Manual
Page 34
6 E321MV Changing the Picture Mode Your TV display can be adjusted to suit your preferences and viewing conditions. Press the OK button on the remote. Sets the picture settings to values that does not otherwise exist. 26 Adjusting the Noise Reduction Setting Noise reduction diminishes artifacts such as "blockiness" or "pixellation". Adjusts the white level of the...
6 E321MV Changing the Picture Mode Your TV display can be adjusted to suit your preferences and viewing conditions. Press the OK button on the remote. Sets the picture settings to values that does not otherwise exist. 26 Adjusting the Noise Reduction Setting Noise reduction diminishes artifacts such as "blockiness" or "pixellation". Adjusts the white level of the...
E321MV User Manual
Page 35
... the individual Red, Blue, and Green gain settings. 5. To adjust this setting, Picture Mode must be set to compensate for large areas of the picture. Use the Arrow buttons to highlight Picture and press OK. 3. Enabling or Disabling Adaptive Luma Adaptive luma adjusts the average brightness of the picture to Custom. E321MV 6 Adjusting the Color Temperature Color temperature...
... the individual Red, Blue, and Green gain settings. 5. To adjust this setting, Picture Mode must be set to compensate for large areas of the picture. Use the Arrow buttons to highlight Picture and press OK. 3. Enabling or Disabling Adaptive Luma Adaptive luma adjusts the average brightness of the picture to Custom. E321MV 6 Adjusting the Color Temperature Color temperature...

E321MV User Manual
Page 36
...Use the Arrow buttons to highlight More and press OK. 4. Use the Arrow buttons to highlight Picture and press OK. 3. Press EXIT. Resetting the Picture Settings To restore the TV's picture settings to highlight Parental and press OK. 3. Enter your parental passcode. Select On or Off and ...enable or disable the DCR setting: 1. Use the Arrow buttons to displayed content for the best picture quality. Press the MENU button on -screen menu is displayed. 2. The on the remote to the factory defaults: 1. The Parental Controls menu is displayed. 2. 6 E321MV Enabling or Disabling DCR (...
...Use the Arrow buttons to highlight More and press OK. 4. Use the Arrow buttons to highlight Picture and press OK. 3. Press EXIT. Resetting the Picture Settings To restore the TV's picture settings to highlight Parental and press OK. 3. Enter your parental passcode. Select On or Off and ...enable or disable the DCR setting: 1. Use the Arrow buttons to displayed content for the best picture quality. Press the MENU button on -screen menu is displayed. 2. The on the remote to the factory defaults: 1. The Parental Controls menu is displayed. 2. 6 E321MV Enabling or Disabling DCR (...

E321MV User Manual
Page 41
... directly to turn the TV on. The buttons on page 13. • Reset the picture settings. • Check all devices are securely attached to fix the issue using an antenna, the signal strength of VIZIO's commitment to select a different input source. Connect your TV, try to the TV....for Channels on page 13. • Press the INPUT button on the TV don't look right. • Adust the Color and Tint settings in the Picture menu. If, after using digital sources. Ensure your device's user manual for details. • Adjust Brightness, Contrast, or Backlight. Ensure ...
... directly to turn the TV on. The buttons on page 13. • Reset the picture settings. • Check all devices are securely attached to fix the issue using an antenna, the signal strength of VIZIO's commitment to select a different input source. Connect your TV, try to the TV....for Channels on page 13. • Press the INPUT button on the TV don't look right. • Adust the Color and Tint settings in the Picture menu. If, after using digital sources. Ensure your device's user manual for details. • Adjust Brightness, Contrast, or Backlight. Ensure ...

E321MV User Manual
Page 42
...8226; If you switch from the one on the input source you are in the on-screen menu are set correctly. • If you are using TV, AV1, AV2, or Component with the TV. When ..., the signal strength of the channel may be low. However, sometimes pixels may not display correctly. E321MV When I change input source, the display image changes size. • The TV remembers the viewing mode... may be noticable. • See Viewing a USB Photo Slideshow on page 19. 34 A The picture is distorted. • Nearby electrical devices may be interfering with 480i input, press the WIDE button on the...
...8226; If you switch from the one on the input source you are in the on-screen menu are set correctly. • If you are using TV, AV1, AV2, or Component with the TV. When ..., the signal strength of the channel may be low. However, sometimes pixels may not display correctly. E321MV When I change input source, the display image changes size. • The TV remembers the viewing mode... may be noticable. • See Viewing a USB Photo Slideshow on page 19. 34 A The picture is distorted. • Nearby electrical devices may be interfering with 480i input, press the WIDE button on the...
E321MV Quick Start Guide
Page 14
...and a working electrical outlet. • Press the Power/Standby button on the remote or on the right side of operation: Monday - There is a picture, but there is off. • Press MENU, then select Audio. Our trained support personnel can often resolve the problem over the phone. Sunday: 8... am to ensure Mute is no power. • Ensure the power cord is set to service excellence. Ensure your call. Phone: (877) 698-4946 Fax: (949) 585-9563 Email: techsupport@vizio.com Web: www.vizio.com Hours of the TV. • Press the MUTE button on warranty service or repair...
...and a working electrical outlet. • Press the Power/Standby button on the remote or on the right side of operation: Monday - There is a picture, but there is off. • Press MENU, then select Audio. Our trained support personnel can often resolve the problem over the phone. Sunday: 8... am to ensure Mute is no power. • Ensure the power cord is set to service excellence. Ensure your call. Phone: (877) 698-4946 Fax: (949) 585-9563 Email: techsupport@vizio.com Web: www.vizio.com Hours of the TV. • Press the MUTE button on warranty service or repair...

E321MV Quick Start Guide
Page 15
... Help > Start Setup Wizard. Highlight Wide or Zoom and press OK. • Adjust the video settings of your device is connected (HDMI, Composite, etc). See Adjusting the Picture Settings in the Picture menu. I press buttons on the remote control. • Insert new batteries into the remote. •...™ or DVD player). • If using a supported desktop resolution. • Some television channels add black bars to the picture. See Resetting the Picture Settings in the user manual. • Check all cables to ensure they are using the RGB (computer) input, ensure you are securely...
... Help > Start Setup Wizard. Highlight Wide or Zoom and press OK. • Adjust the video settings of your device is connected (HDMI, Composite, etc). See Adjusting the Picture Settings in the Picture menu. I press buttons on the remote control. • Insert new batteries into the remote. •...™ or DVD player). • If using a supported desktop resolution. • Some television channels add black bars to the picture. See Resetting the Picture Settings in the user manual. • Check all cables to ensure they are using the RGB (computer) input, ensure you are securely...


