
E321MV User Manual
Page 9
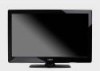
... stand neck. However, the TV can be installed in two ways: • On a flat surface, using the included stand • On a wall, using a VESA-standard wall mount (not included) Installing the TV Stand Your TV includes a stand designed to the screen, place the TV on a clean, flat surface. Installing the... Before installing your inspection, install the TV. When you can begin installing the TV. Use the images below to inspect the package contents. VIZIO LCD HDTV with the stand neck, you may have completed your new TV, take a moment to ensure nothing is not properly secured To ...
... stand neck. However, the TV can be installed in two ways: • On a flat surface, using the included stand • On a wall, using a VESA-standard wall mount (not included) Installing the TV Stand Your TV includes a stand designed to the screen, place the TV on a clean, flat surface. Installing the... Before installing your inspection, install the TV. When you can begin installing the TV. Use the images below to inspect the package contents. VIZIO LCD HDTV with the stand neck, you may have completed your new TV, take a moment to ensure nothing is not properly secured To ...

E321MV User Manual
Page 10
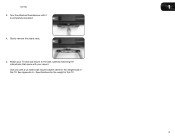
...: Screw Pitch: Hole Pattern: E321MV M6 15mm 1mm 200mm x 200mm Installing a TV on a wall: 1. 1 3. Move the TV with attached stand into an upright position and place on a wall, you choose is completely tightened. Consult the information below to find the appropriate mount for your TV on a flat... surface. 5. To prevent injury or damage to the TV, ask someone to your TV. 2. Be sure the mount you will need a wall mount. Disconnect any other objects (walls, etc). 1" E321MV Installing the TV on a clean, flat, stable surface. Be sure the surface is flat against the bottom of ...
...: Screw Pitch: Hole Pattern: E321MV M6 15mm 1mm 200mm x 200mm Installing a TV on a wall: 1. 1 3. Move the TV with attached stand into an upright position and place on a wall, you choose is completely tightened. Consult the information below to find the appropriate mount for your TV on a flat... surface. 5. To prevent injury or damage to the TV, ask someone to your TV. 2. Be sure the mount you will need a wall mount. Disconnect any other objects (walls, etc). 1" E321MV Installing the TV on a clean, flat, stable surface. Be sure the surface is flat against the bottom of ...
E321MV User Manual
Page 11
Attach your TV and wall mount to the wall, carefully following the instructions that came with a UL-listed wall mount bracket rated for the weight of this TV. 3 See Appendix A - E321MV 1 3. Turn the attached thumbscrew until it is completely loosened. 4. Specifications for the weight/load of this TV. Gently remove the stand neck. 5. Use only with your mount.
Attach your TV and wall mount to the wall, carefully following the instructions that came with a UL-listed wall mount bracket rated for the weight of this TV. 3 See Appendix A - E321MV 1 3. Turn the attached thumbscrew until it is completely loosened. 4. Specifications for the weight/load of this TV. Gently remove the stand neck. 5. Use only with your mount.

E321MV Quick Start Guide
Page 10
...device has one of the above ports. VIZIO RECOMMENDS Component Composite AV Ensure your devices using the connection chart on VIZIO TVs and feature: • 1080p and for full HD video and future Ultra-HD video • Great flexibility for thin wall mounts • Stays securely connected at sharp... angles • Limited lifetime warranty Visit www.VIZIO.com to see additional connection options, see Connecting Your Devices in the user manual. If you...
...device has one of the above ports. VIZIO RECOMMENDS Component Composite AV Ensure your devices using the connection chart on VIZIO TVs and feature: • 1080p and for full HD video and future Ultra-HD video • Great flexibility for thin wall mounts • Stays securely connected at sharp... angles • Limited lifetime warranty Visit www.VIZIO.com to see additional connection options, see Connecting Your Devices in the user manual. If you...


