
User Manual English
Page 2
.... • Do not install your HDTV in electric shock or fire. Unplug the power cord immediately and contact your safety. E-SERIES HDTV Your HDTV is damaged, the internal components may result in an area with liquids, such as power-supply cord or plug is provided. • Never push any of the following safety instructions before turning on the top of the HDTV. Safety Information IMPORTANT...
.... • Do not install your HDTV in electric shock or fire. Unplug the power cord immediately and contact your safety. E-SERIES HDTV Your HDTV is damaged, the internal components may result in an area with liquids, such as power-supply cord or plug is provided. • Never push any of the following safety instructions before turning on the top of the HDTV. Safety Information IMPORTANT...

User Manual English
Page 3
... learn about your body. Stop using your Tablet Remote, NEVER type or read the User Manual available directly through an application in serious injury or even death. Do not remove, install, or charge batteries to think you are often, but if using your Tablet Remote until the glass is replaced by the FCC visit www.vizio.com. Areas with other reason...
... learn about your body. Stop using your Tablet Remote, NEVER type or read the User Manual available directly through an application in serious injury or even death. Do not remove, install, or charge batteries to think you are often, but if using your Tablet Remote until the glass is replaced by the FCC visit www.vizio.com. Areas with other reason...
User Manual English
Page 4
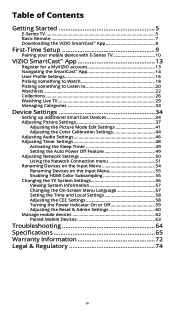
... 34 Adjusting Picture Settings 37 Adjusting the Picture Mode Edit Settings 41 Adjusting the Color Calibration Settings 44 Adjusting Audio Settings 46 Adjusting Timer Settings 48 Activating the Sleep Timer 49 Setting the Auto Power Off Feature 49 Adjusting Network Settings 50 Using the Network Connection menu 51 Renaming Devices on the Input Menu 54 Renaming Devices on the Input Menu 55 Enabling HDMI Color Subsampling 55 Changing the TV System Settings 56 Viewing System Information 57 Changing the On-Screen Menu Language 57 Setting the Time and Local Settings 58 Adjusting the...
... 34 Adjusting Picture Settings 37 Adjusting the Picture Mode Edit Settings 41 Adjusting the Color Calibration Settings 44 Adjusting Audio Settings 46 Adjusting Timer Settings 48 Activating the Sleep Timer 49 Setting the Auto Power Off Feature 49 Adjusting Network Settings 50 Using the Network Connection menu 51 Renaming Devices on the Input Menu 54 Renaming Devices on the Input Menu 55 Enabling HDMI Color Subsampling 55 Changing the TV System Settings 56 Viewing System Information 57 Changing the On-Screen Menu Language 57 Setting the Time and Local Settings 58 Adjusting the...
User Manual English
Page 7
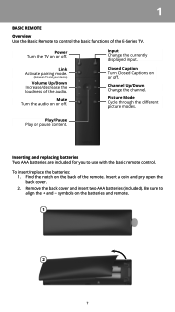
... picture modes. Find the notch on or off . Input Change the currently displayed input. Link Activate pairing mode. (Between TV and your device) Volume Up/Down Increase/decrease the loudness of the audio. Insert a coin and pry open the back cover. 2. Be sure to use with the basic remote control. Mute Turn the audio on the back of the E-Series TV. Channel Up/Down Change the channel. Play/Pause Play...
... picture modes. Find the notch on or off . Input Change the currently displayed input. Link Activate pairing mode. (Between TV and your device) Volume Up/Down Increase/decrease the loudness of the audio. Insert a coin and pry open the back cover. 2. Be sure to use with the basic remote control. Mute Turn the audio on the back of the E-Series TV. Channel Up/Down Change the channel. Play/Pause Play...
User Manual English
Page 19
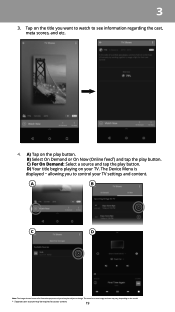
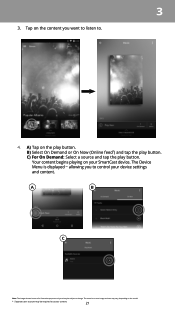
... Now (Online feed*) and tap the play button. C) For On Demand: Select a source and tap the play button. Tap on the play button. The Device Menu is displayed − allowing you want to watch to control your TV. A B C D Note: The images shown here are for illustrative purposes only and may be required to change. 3 3. D) Your title begins playing on the model. * Separate user account may...
... Now (Online feed*) and tap the play button. C) For On Demand: Select a source and tap the play button. Tap on the play button. The Device Menu is displayed − allowing you want to watch to control your TV. A B C D Note: The images shown here are for illustrative purposes only and may be required to change. 3 3. D) Your title begins playing on the model. * Separate user account may...
User Manual English
Page 21
... Menu is displayed − allowing you want to listen to change. The actual on-screen image and text may vary, depending on the play button. C) For On Demand: Select a source and tap the play button. A B C Note: The images shown here are for illustrative purposes only and may be subject to . 4. A) Tap on the model. * Separate user account may be required to control...
... Menu is displayed − allowing you want to listen to change. The actual on-screen image and text may vary, depending on the play button. C) For On Demand: Select a source and tap the play button. A B C Note: The images shown here are for illustrative purposes only and may be subject to . 4. A) Tap on the model. * Separate user account may be required to control...
User Manual English
Page 29
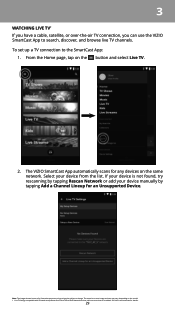
... the button and select Live TV. 2. Select your device manually by tapping Rescan Network or add your device from DirecTV and Dish Network services, with IP-based set up a TV connection to search, discover, and browse live TV channels. The VIZIO SmartCast App automatically scans for illustrative purposes only and may vary, depending on the model. * Live TV listings compatible with more services to change. If...
... the button and select Live TV. 2. Select your device manually by tapping Rescan Network or add your device from DirecTV and Dish Network services, with IP-based set up a TV connection to search, discover, and browse live TV channels. The VIZIO SmartCast App automatically scans for illustrative purposes only and may vary, depending on the model. * Live TV listings compatible with more services to change. If...

User Manual English
Page 39
... When this setting is too high, the picture may be difficult to compensate for large areas of picture elements. Adjusts the 'warmness' and 'coolness' of the white areas of the picture. • Select Cool produces a blue-hued picture. • Select Computer for a optimized picture for use as a PC monitor. • Select Normal for a optimized picture for television viewing. • Black Detail • Adjusts the average...
... When this setting is too high, the picture may be difficult to compensate for large areas of picture elements. Adjusts the 'warmness' and 'coolness' of the white areas of the picture. • Select Cool produces a blue-hued picture. • Select Computer for a optimized picture for use as a PC monitor. • Select Normal for a optimized picture for television viewing. • Black Detail • Adjusts the average...
User Manual English
Page 41
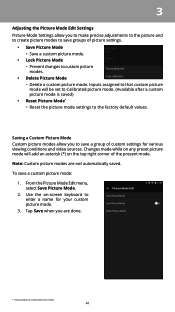
... Picture Mode. 2. Changes made while on any preset picture mode will be set to Calibrated picture mode. (Available after a custom picture mode is saved) • Reset Picture Mode* • Reset the picture mode settings to save a custom picture mode: 1. Tap Save when you are not automatically saved. Use the on-screen keyboard to custom picture modes. • Delete Picture Mode • Delete a custom picture mode. To save a group of the present mode. 3 Adjusting the Picture Mode Edit Settings Picture Mode Settings allow you to the factory default values. Inputs...
... Picture Mode. 2. Changes made while on any preset picture mode will be set to Calibrated picture mode. (Available after a custom picture mode is saved) • Reset Picture Mode* • Reset the picture mode settings to save a custom picture mode: 1. Tap Save when you are not automatically saved. Use the on-screen keyboard to custom picture modes. • Delete Picture Mode • Delete a custom picture mode. To save a group of the present mode. 3 Adjusting the Picture Mode Edit Settings Picture Mode Settings allow you to the factory default values. Inputs...

User Manual English
Page 43
... Resetting a Picture Mode Reset the picture mode settings (for a preset picture mode) to the Calibrated picture mode. From the Picture Mode Edit menu, Tap Delete Picture Mode. To delete custom picture modes: 1. From the Picture Mode Edit menu, Tap Reset Picture Mode. To reset a customized preset picture mode: 1. A dialogue window is displayed. 2. Tap on Yes to the factory default values. 43 Tap on Yes to reset the preset picture mode to delete the custom picture mode. 3 Deleting a Custom Picture Mode Custom picture modes that are no longer needed can be deleted. Inputs...
... Resetting a Picture Mode Reset the picture mode settings (for a preset picture mode) to the Calibrated picture mode. From the Picture Mode Edit menu, Tap Delete Picture Mode. To delete custom picture modes: 1. From the Picture Mode Edit menu, Tap Reset Picture Mode. To reset a customized preset picture mode: 1. A dialogue window is displayed. 2. Tap on Yes to the factory default values. 43 Tap on Yes to reset the preset picture mode to delete the custom picture mode. 3 Deleting a Custom Picture Mode Custom picture modes that are no longer needed can be deleted. Inputs...
User Manual English
Page 44
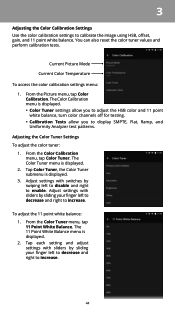
... the Color Calibration menu, tap Color Tuner. Adjusting the Color Tuner Settings To adjust the color tuner: 1. The 11 Point White Balance menu is displayed. • Color Tuner settings allow you to adjust the HSB color and 11 point white balance, turn color channels off for testing. • Calibration Tests allow you to display SMPTE, Flat, Ramp, and Uniformity Analyzer test patterns. Current Picture Mode Current Color Temperature To access the color calibration settings menu: 1. From the Color Tuner menu, tap 11 Point White Balance. You can also reset the color tuner values...
... the Color Calibration menu, tap Color Tuner. Adjusting the Color Tuner Settings To adjust the color tuner: 1. The 11 Point White Balance menu is displayed. • Color Tuner settings allow you to adjust the HSB color and 11 point white balance, turn color channels off for testing. • Calibration Tests allow you to display SMPTE, Flat, Ramp, and Uniformity Analyzer test patterns. Current Picture Mode Current Color Temperature To access the color calibration settings menu: 1. From the Color Tuner menu, tap 11 Point White Balance. You can also reset the color tuner values...

User Manual English
Page 47
.... • Analog Audio Out - Sets the volume control properties for digital audio out and HDMI ARC output when connected to the Audio Out output ports. • Surround Sound - Mute all audio from the TV. * Turning Surround Sound off . • Balance - Changes the type of the audio output from the TV's internal speakers. Turns the built-in speakers on or off. Swipe the switch left to disable and right to enable. • Volume Leveling - Swipe the switch left to disable and...
.... • Analog Audio Out - Sets the volume control properties for digital audio out and HDMI ARC output when connected to the Audio Out output ports. • Surround Sound - Mute all audio from the TV. * Turning Surround Sound off . • Balance - Changes the type of the audio output from the TV's internal speakers. Turns the built-in speakers on or off. Swipe the switch left to disable and right to enable. • Volume Leveling - Swipe the switch left to disable and...

User Manual English
Page 58
...'s user manual for details. See your TV enables you to control HDMI-connected devices with the included Tablet Remote without any additional programming. Tap on , off . 58 The ARC setting does not support video devices connected to the audio device (Select Enable to HDMI. Set time format to the HDMI ARC input. Select ARC Only for these devices). turn CEC off , or auto. • Time Format - Not all HDMI devices support CEC. The CEC menu is displayed. • Use Internet Time - Swipe...
...'s user manual for details. See your TV enables you to control HDMI-connected devices with the included Tablet Remote without any additional programming. Tap on , off . 58 The ARC setting does not support video devices connected to the audio device (Select Enable to HDMI. Set time format to the HDMI ARC input. Select ARC Only for these devices). turn CEC off , or auto. • Time Format - Not all HDMI devices support CEC. The CEC menu is displayed. • Use Internet Time - Swipe...
User Manual English
Page 72
... administrative fees and expenses. How Long This Warranty Lasts For non-commercial use , VIZIO warrants this warranty, you may visit www.vizio.com for parts or labor during the warranty period. The VIZIO Technical Support hours are 32 inches or larger will include no charge for additional help and troubleshooting. When you return a product to a VIZIO service center, you may attempt to show that...
... administrative fees and expenses. How Long This Warranty Lasts For non-commercial use , VIZIO warrants this warranty, you may visit www.vizio.com for parts or labor during the warranty period. The VIZIO Technical Support hours are 32 inches or larger will include no charge for additional help and troubleshooting. When you return a product to a VIZIO service center, you may attempt to show that...
User Manual English
Page 74
... customs and export control laws in which include technology and software, are registered trademarks, and DTS Studio Sound is a trademark of separately from DTS Licensing Limited. Changing the factory default settings or enabling other factors may be updated from time to time, and is available to view at http://www.vizio.com/privacy. Internet Connectivity Network conditions, environmental and other features will increase power consumption that...
... customs and export control laws in which include technology and software, are registered trademarks, and DTS Studio Sound is a trademark of separately from DTS Licensing Limited. Changing the factory default settings or enabling other factors may be updated from time to time, and is available to view at http://www.vizio.com/privacy. Internet Connectivity Network conditions, environmental and other features will increase power consumption that...

Quickstart Guide English
Page 2
... manufacturer's warranty does not cover user abuse or improper installations. • The power cord must be operated only from overheating, be of sufficient magnitude to constitute a risk of electric shock to avoid causing fire, electric shock, or component damage. • A distance of at plugs, convenience receptacles, and the point where they exit from an area of power source indicated on...
... manufacturer's warranty does not cover user abuse or improper installations. • The power cord must be operated only from overheating, be of sufficient magnitude to constitute a risk of electric shock to avoid causing fire, electric shock, or component damage. • A distance of at plugs, convenience receptacles, and the point where they exit from an area of power source indicated on...
Quickstart Guide English
Page 3
...Ensure that the power cord and any noticeable discomfort. • Install the TV where it will not be used for moving your TV. • When unplugging your TV, hold the AC/DC power adapter, not the cord. iii Do not expose your TV to repair or service your TV ...servicing other voltage than two years of the marked voltage can damage the remote control or injure the operator. Operating your TV in environments with heavy dust or high humidity may expose you are for an extended period of time, unplug the power cord. • To reduce risk of time. Pulling on the power cord...
...Ensure that the power cord and any noticeable discomfort. • Install the TV where it will not be used for moving your TV. • When unplugging your TV, hold the AC/DC power adapter, not the cord. iii Do not expose your TV to repair or service your TV ...servicing other voltage than two years of the marked voltage can damage the remote control or injure the operator. Operating your TV in environments with heavy dust or high humidity may expose you are for an extended period of time, unplug the power cord. • To reduce risk of time. Pulling on the power cord...

Quickstart Guide English
Page 6
LINK Activate linking mode on or off . MUTE Turn the audio on TV. PIC Cycles through the different picture setting modes. CHANNEL UP/DOWN Change the channel. English - 6 CLOSED CAPTION Turn closed caption On and Off. This is your basic remote POWER Turn the TV on or off . VOLUME Increase or decrease the loudness of the audio. INPUT Change the currently displayed input.
LINK Activate linking mode on or off . MUTE Turn the audio on TV. PIC Cycles through the different picture setting modes. CHANNEL UP/DOWN Change the channel. English - 6 CLOSED CAPTION Turn closed caption On and Off. This is your basic remote POWER Turn the TV on or off . VOLUME Increase or decrease the loudness of the audio. INPUT Change the currently displayed input.
Quickstart Guide English
Page 24
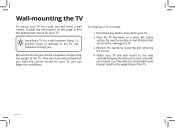
... surface is capable of supporting the weight of debris that can begin the installation. Wall-mounting the TV To mount your TV on a wall: 1. After you have determined that came with a UL-listed wall mount bracket rated for the weight/load of this page to your mount. Remove the stands by loosening and removing the screws. 4. Be sure the mount you . English - 24 Disconnect any cables connected to find the...
... surface is capable of supporting the weight of debris that can begin the installation. Wall-mounting the TV To mount your TV on a wall: 1. After you have determined that came with a UL-listed wall mount bracket rated for the weight/load of this page to your mount. Remove the stands by loosening and removing the screws. 4. Be sure the mount you . English - 24 Disconnect any cables connected to find the...
Quickstart Guide English
Page 32
.... Replacement parts may attempt to availability. Types of the servicer. or (l) products sold "AS IS", "CLEARANCE", "FACTORY RECERTIFIED", or by law, this warranty. Limited Warranty UNITED STATES AND CANADA BY USING YOUR VIZIO PRODUCT YOU AGREE TO BE BOUND BY ALL THE TERMS OF THIS WARRANTY. In-home service requires complete and easy access to the product and does not include de-installation...
.... Replacement parts may attempt to availability. Types of the servicer. or (l) products sold "AS IS", "CLEARANCE", "FACTORY RECERTIFIED", or by law, this warranty. Limited Warranty UNITED STATES AND CANADA BY USING YOUR VIZIO PRODUCT YOU AGREE TO BE BOUND BY ALL THE TERMS OF THIS WARRANTY. In-home service requires complete and easy access to the product and does not include de-installation...


