
E190VA User Manual
Page 3
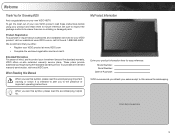
... it Extended Warranties For peace of mind, and to protect your investment beyond the standard warranty, VIZIO offers on your new VIZIO HDTV. We recommend that you see this Manual When you to this symbol, please read the accompanying helpful tip. These plans provide additional coverage... the presence of important operating instructions. To purchase an extended warranty service plan, visit www.VIZIO.com. Be sure to inspect the package contents to alert you see this manual for future reference. When you either: • Register your product and retain them for safekeeping...
... it Extended Warranties For peace of mind, and to protect your investment beyond the standard warranty, VIZIO offers on your new VIZIO HDTV. We recommend that you see this Manual When you to this symbol, please read the accompanying helpful tip. These plans provide additional coverage... the presence of important operating instructions. To purchase an extended warranty service plan, visit www.VIZIO.com. Be sure to inspect the package contents to alert you see this manual for future reference. When you either: • Register your product and retain them for safekeeping...
E190VA User Manual
Page 9
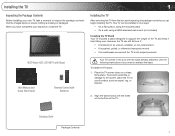
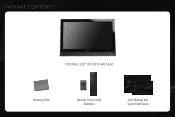
... 1 Inspecting the Package Contents Before installing your inspection, install the TV. Use the images below to ensure nothing is not properly secured VIZIO Razor LED LCD HDTV with Stand User Manual and Quick Start Guide Remote Control with Batteries Your TV comes in two ways: • On a flat surface, using the included...
... 1 Inspecting the Package Contents Before installing your inspection, install the TV. Use the images below to ensure nothing is not properly secured VIZIO Razor LED LCD HDTV with Stand User Manual and Quick Start Guide Remote Control with Batteries Your TV comes in two ways: • On a flat surface, using the included...
E190VA User Manual
Page 13
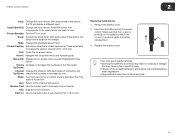
...the TV's audio is turned off or on the batteries match the (+) and (-) symbols inside the battery compartment. 3. Last: Return to manually enter a channel. Replacing the Batteries 1. Make sure that may result in accordance with local hazardous waste regulations. • Keep batteries away ...Close the on -screen menu and episode guide. Input (Specific): Change the input device. Info: Display the Info Window. E190VA / E220VA / E260VA 2 Input: Change the input device. With each press of the button, the Up/Down: channel will display a different input. With each press...
...the TV's audio is turned off or on the batteries match the (+) and (-) symbols inside the battery compartment. 3. Last: Return to manually enter a channel. Replacing the Batteries 1. Make sure that may result in accordance with local hazardous waste regulations. • Keep batteries away ...Close the on -screen menu and episode guide. Input (Specific): Change the input device. Info: Display the Info Window. E190VA / E220VA / E260VA 2 Input: Change the input device. With each press of the button, the Up/Down: channel will display a different input. With each press...

E190VA User Manual
Page 22
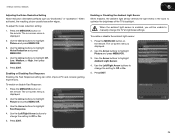
... press MENU/OK. 4. The TV Settings menu is enabled, you can automatically set the time and date using this menu option, you cannot manually set the date and time. Use the Arrow buttons to highlight Daylight Saving. 5. The on -screen menu is displayed. 2. Use the Arrow... buttons to highlight Auto Update. 5. Use the Arrow buttons on the remote. 5 E190VA / E220VA / E260VA Adjusting the Time for Daylight Savings This setting will automatically adjust the time for zones which recognize daylight savings time. The on -screen menu is...
... press MENU/OK. 4. The TV Settings menu is enabled, you can automatically set the time and date using this menu option, you cannot manually set the date and time. Use the Arrow buttons to highlight Daylight Saving. 5. The on -screen menu is displayed. 2. Use the Arrow... buttons to highlight Auto Update. 5. Use the Arrow buttons on the remote. 5 E190VA / E220VA / E260VA Adjusting the Time for Daylight Savings This setting will automatically adjust the time for zones which recognize daylight savings time. The on -screen menu is...
E190VA User Manual
Page 32
...contrast according to displayed content for displaying game console output. • Movie - 6 Adjusting the Picture Settings Using the Picture menu, you to manually change the picture mode: 1. To change each of the picture. Use the Arrow buttons to OFF. Use the Arrow buttons to values that ...will not produce detail that produce a brighter, 24 E190VA / E220VA / E260VA more natural. • Custom - Sets the various picture settings to highlight Picture Mode and press MENU/OK. 4. This is too high, the ...
...contrast according to displayed content for displaying game console output. • Movie - 6 Adjusting the Picture Settings Using the Picture menu, you to manually change the picture mode: 1. To change each of the picture. Use the Arrow buttons to OFF. Use the Arrow buttons to values that ...will not produce detail that produce a brighter, 24 E190VA / E220VA / E260VA more natural. • Custom - Sets the various picture settings to highlight Picture Mode and press MENU/OK. 4. This is too high, the ...
E190VA User Manual
Page 33
E190VA / E220VA / E260VA 6 Adjusting the Noise Reduction Setting Noise reduction diminishes artifacts such as "blockiness" or "pixellation". When activated, the resulting picture usually has softer edges. To adjust ... button on -screen menu is enabled, you will be unable to Off or On. 5. Use the Left/Right Arrow buttons to change the setting to manually change the setting to optimize the brightness of the TV's backlight. Use the Arrow buttons to highlight Picture and press MENU/OK. 3.
E190VA / E220VA / E260VA 6 Adjusting the Noise Reduction Setting Noise reduction diminishes artifacts such as "blockiness" or "pixellation". When activated, the resulting picture usually has softer edges. To adjust ... button on -screen menu is enabled, you will be unable to Off or On. 5. Use the Left/Right Arrow buttons to change the setting to manually change the setting to optimize the brightness of the TV's backlight. Use the Arrow buttons to highlight Picture and press MENU/OK. 3.
E190VA User Manual
Page 38
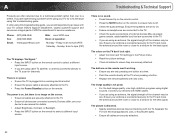
... differ; The image quality is plugged into a working . • Ensure you are still experiencing an issue with your device's user manual for the best signal. Connect your devices with HDMI cables. • If you are using this troubleshooting guide, you are experiencing ...they are using cable TV, satellite, or antenna connected directly to the TV, scan for the best signal. A Products are integral parts of VIZIO's commitment to service excellence. Quality customer support and service are often returned due to a technical problem rather than due to select a different ...
... differ; The image quality is plugged into a working . • Ensure you are still experiencing an issue with your device's user manual for the best signal. Connect your devices with HDMI cables. • If you are using this troubleshooting guide, you are experiencing ...they are using cable TV, satellite, or antenna connected directly to the TV, scan for the best signal. A Products are integral parts of VIZIO's commitment to service excellence. Quality customer support and service are often returned due to a technical problem rather than due to select a different ...
E190VA Quick Start Guide
Page 2
PACKAGE CONTENTS VIZIO Razor LED™ LCD HDTV with Stand Cleaning Cloth Remote Control with Batteries User Manual and Quick Start Guide
PACKAGE CONTENTS VIZIO Razor LED™ LCD HDTV with Stand Cleaning Cloth Remote Control with Batteries User Manual and Quick Start Guide

E190VA Quick Start Guide
Page 3
... button that corresponds to the input device you wish to the channel last viewed. Power/Standby: Turn the TV on or off . Press repeatedly to manually enter a sub-channel (18-1, 18-2, etc). When mute is activated, the TV's audio is turned off . Volume Up/Down: Increase or decrease the loudness of... to change . Input (Specific): Change the input device. Menu/OK: Display the on -screen menu and episode guide. Number Pad: Use the number pad to manually enter a channel.
... button that corresponds to the input device you wish to the channel last viewed. Power/Standby: Turn the TV on or off . Press repeatedly to manually enter a sub-channel (18-1, 18-2, etc). When mute is activated, the TV's audio is turned off . Volume Up/Down: Increase or decrease the loudness of... to change . Input (Specific): Change the input device. Menu/OK: Display the on -screen menu and episode guide. Number Pad: Use the number pad to manually enter a channel.
E190VA Quick Start Guide
Page 8
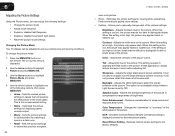
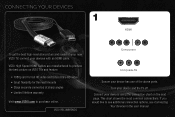
... produce the best picture on the next page. If you would like to see additional connection options, see Connecting Your Devices in the user manual. VIZIO RECOMMENDS Component Composite AV Ensure your device and the TV off. CONNECTING YOUR DEVICES 1 HDMI To get the best high-resolution picture and sound... on your new VIZIO TV, connect your devices using the connection chart on VIZIO TVs and feature: • 1080p and for full HD video and future Ultra-HD video • Great flexibility for...
... produce the best picture on the next page. If you would like to see additional connection options, see Connecting Your Devices in the user manual. VIZIO RECOMMENDS Component Composite AV Ensure your device and the TV off. CONNECTING YOUR DEVICES 1 HDMI To get the best high-resolution picture and sound... on your new VIZIO TV, connect your devices using the connection chart on VIZIO TVs and feature: • 1080p and for full HD video and future Ultra-HD video • Great flexibility for...

