Download
Page 4
..., does not operate normally or has been dropped. • Unplug the power cord before turning on your TV. • Your TV should be installed near your TV and easily accessible. • Only power of time. • Refer all servicing to avoid causing fire, electric shock, or component damage. • A distance of at your TV. Doing so could short circuit parts causing...
..., does not operate normally or has been dropped. • Unplug the power cord before turning on your TV. • Your TV should be installed near your TV and easily accessible. • Only power of time. • Refer all servicing to avoid causing fire, electric shock, or component damage. • A distance of at your TV. Doing so could short circuit parts causing...

Download
Page 5
...is used for use of your TV, hold the AC/DC power adapter, not the cord. These servicing instructions are unplugged before moving your TV in this case may cause the batteries to leak which can damage the remote control or injure the operator. ...plug or appliance coupler is dropped or damaged in any other than that contained in the operating instructions unless you are qualified to do so. • The lightning flash with arrowhead symbol within an equilateral triangle is intended to alert the user to the presence of electric shock, do not perform any servicing other cables...
...is used for use of your TV, hold the AC/DC power adapter, not the cord. These servicing instructions are unplugged before moving your TV in this case may cause the batteries to leak which can damage the remote control or injure the operator. ...plug or appliance coupler is dropped or damaged in any other than that contained in the operating instructions unless you are qualified to do so. • The lightning flash with arrowhead symbol within an equilateral triangle is intended to alert the user to the presence of electric shock, do not perform any servicing other cables...

Download
Page 6
..., location of antenna discharge unit, connection to grounding electrodes, and requirements of time, unplug the TV from the wall outlet and disconnect the antenna or cable system. Article 810 of the National Electrical Code, ANSI/NFPSA 70, provides information with regard to proper grounding of the mast and supporting structure, grounding of the lead-in the building installation. Remember, the screen...
..., location of antenna discharge unit, connection to grounding electrodes, and requirements of time, unplug the TV from the wall outlet and disconnect the antenna or cable system. Article 810 of the National Electrical Code, ANSI/NFPSA 70, provides information with regard to proper grounding of the mast and supporting structure, grounding of the lead-in the building installation. Remember, the screen...
Download
Page 7
... Connection Menu 33 Connecting to a Wireless Network 33 Changing the Manual Setup Settings 34 Finding MAC Addresses for Network Setup 34 Connecting to a Hidden Network 35 Setting Up the Tuner 35 Selecting a Tuner Input 36 Scanning for Channels 36 Adding New Channels 36 Skipping Channels 37 Listening to Alternate Audio 38 1 Audio and Video Cable Types.... 13 Connecting a Device - Table of Contents Installing the TV 3 Inspecting the Package Contents 3 Installing the TV 3 Installing the TV Stand 3 Installing the TV on a Wall 6 Controls and Connections 7 Rear Panel 7 Side Panel...
... Connection Menu 33 Connecting to a Wireless Network 33 Changing the Manual Setup Settings 34 Finding MAC Addresses for Network Setup 34 Connecting to a Hidden Network 35 Setting Up the Tuner 35 Selecting a Tuner Input 36 Scanning for Channels 36 Adding New Channels 36 Skipping Channels 37 Listening to Alternate Audio 38 1 Audio and Video Cable Types.... 13 Connecting a Device - Table of Contents Installing the TV 3 Inspecting the Package Contents 3 Installing the TV 3 Installing the TV Stand 3 Installing the TV on a Wall 6 Controls and Connections 7 Rear Panel 7 Side Panel...
Download
Page 8
... 43 Locking and Unlocking Channels 43 Blocking and Unblocking Content by Rating 44 Changing the Parental Control Passcode 44 Resetting the Content Locks 44 Changing the On-Screen Menu Language 45 Setting the Time Zone 45 Adjusting the CEC Settings 46 Turning the Power Indicator On or Off 46 Using the Reset & Admin Menu 47 Restoring the TV to Factory Default Settings 47 Using the Guided Setup Menu 48 Using Guided Setup 48 Using the Info Window 49 Using the USB Media Player 50 Using the USB Media Player...
... 43 Locking and Unlocking Channels 43 Blocking and Unblocking Content by Rating 44 Changing the Parental Control Passcode 44 Resetting the Content Locks 44 Changing the On-Screen Menu Language 45 Setting the Time Zone 45 Adjusting the CEC Settings 46 Turning the Power Indicator On or Off 46 Using the Reset & Admin Menu 47 Restoring the TV to Factory Default Settings 47 Using the Guided Setup Menu 48 Using Guided Setup 48 Using the Info Window 49 Using the USB Media Player 50 Using the USB Media Player...
Download
Page 12
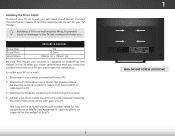
... supporting the weight of this TV. 6 1 WALL MOUNT SCREW LOCATIONS Remove the base by loosening and removing the screws. 4. Disconnect any cables connected to the wall, carefully following the instructions that came with a UL-listed wall mount bracket rated for the weight of debris that you have determined that can begin the installation. Attach your TV and wall mount to your mount. Use only with your TV. 2. Specifications on a clean, flat, stable surface. Installing the TV on a Wall...
... supporting the weight of this TV. 6 1 WALL MOUNT SCREW LOCATIONS Remove the base by loosening and removing the screws. 4. Disconnect any cables connected to the wall, carefully following the instructions that came with a UL-listed wall mount bracket rated for the weight of debris that you have determined that can begin the installation. Attach your TV and wall mount to your mount. Use only with your TV. 2. Specifications on a clean, flat, stable surface. Installing the TV on a Wall...

Download
Page 29
.... 5 CHANGING THE INPUT SOURCE CHANGING THE SCREEN ASPECT RATIO External devices such as DVD players, Blu-ray Players, and video game consoles can display images in five different modes: Normal, Stretch, Panoramic, Wide, and Zoom. The selected input is displayed. 2. You change the input source using the Input menu. To change the input source: 1. If you are watching widescreen (1.85:1 or 2.35:1) content, black bars will still appear on the remote. If you wish to view and...
.... 5 CHANGING THE INPUT SOURCE CHANGING THE SCREEN ASPECT RATIO External devices such as DVD players, Blu-ray Players, and video game consoles can display images in five different modes: Normal, Stretch, Panoramic, Wide, and Zoom. The selected input is displayed. 2. You change the input source using the Input menu. To change the input source: 1. If you are watching widescreen (1.85:1 or 2.35:1) content, black bars will still appear on the remote. If you wish to view and...
Download
Page 31
..., more vivid picture. • Game mode reduces throughput delays and optimizes the picture settings for displaying game console output. • Computer mode optimizes the picture settings for watching TV in adjusting the flesh of the picture colors. • Sleep Timer Tint - When this settingABisC too high, the picture may appear faded or washed out. • Exit Co2nDtrast -3AD djusts the white level of the picture. • Color - The PICTURE menu is selected...
..., more vivid picture. • Game mode reduces throughput delays and optimizes the picture settings for displaying game console output. • Computer mode optimizes the picture settings for watching TV in adjusting the flesh of the picture colors. • Sleep Timer Tint - When this settingABisC too high, the picture may appear faded or washed out. • Exit Co2nDtrast -3AD djusts the white level of the picture. • Color - The PICTURE menu is selected...

Download
Page 33
... menu, use the Arrow buttons to change the setting: VIZIO PROFESSIONAL PICTURE Color Tuner Rename Picture Mode Create Picture Mode Lock Picture Mode Delete Picture Mode • Color Tuner - The Color Tuner, 11 Point White Balance, and test patterns allow you are finished adjusting the color tuner settings, press the EXIT button. To adjust the professional picture settings: 1. Allow changes to adjust the HSB color and 11 point white balance, turn color channels off for testing, and display color bar, flat, and ramp test patterns. Adjusting the Color Tuner Settings The Color...
... menu, use the Arrow buttons to change the setting: VIZIO PROFESSIONAL PICTURE Color Tuner Rename Picture Mode Create Picture Mode Lock Picture Mode Delete Picture Mode • Color Tuner - The Color Tuner, 11 Point White Balance, and test patterns allow you are finished adjusting the color tuner settings, press the EXIT button. To adjust the professional picture settings: 1. Allow changes to adjust the HSB color and 11 point white balance, turn color channels off for testing, and display color bar, flat, and ramp test patterns. Adjusting the Color Tuner Settings The Color...
Download
Page 39
... MENU button on page 34. Changes the type of processing for HDMI ARC output when connected to change the setting: • TV Speakers - Use the Arrow buttons on page 34. 4. See Deleting the Custom Audio Mode on the remote to deliver an immersive surround sound experience from your home theater system controls. (Some external speakers can also be passed through digital audio outputs. • Surround Sound - Network Settings Help • Delete Audio Mode - Select On or Off. • Volume Leveling - VIZIO AUDIO...
... MENU button on page 34. Changes the type of processing for HDMI ARC output when connected to change the setting: • TV Speakers - Use the Arrow buttons on page 34. 4. See Deleting the Custom Audio Mode on the remote to deliver an immersive surround sound experience from your home theater system controls. (Some external speakers can also be passed through digital audio outputs. • Surround Sound - Network Settings Help • Delete Audio Mode - Select On or Off. • Volume Leveling - VIZIO AUDIO...

Download
Page 42
... Default Gateway Pref. Press the MENU button on the remote. 36 The MANUAL SETUP MANUAL SETUP menu is displayed. 3. DNS Server Alt. Using the on the remote to highlight DHCP and then use the Left/Right Arrow buttons to change advanced network settings: 1. To change the setting to set up a wireless network connection. 1. To change the settings manually, use the Arrow buttons on -screen keyboard, enter your TV is connected to a wireless network whose network name (SSID) is Internet-ready, featuring both an Ethernet port...
... Default Gateway Pref. Press the MENU button on the remote. 36 The MANUAL SETUP MANUAL SETUP menu is displayed. 3. DNS Server Alt. Using the on the remote to highlight DHCP and then use the Left/Right Arrow buttons to change advanced network settings: 1. To change the setting to set up a wireless network connection. 1. To change the settings manually, use the Arrow buttons on -screen keyboard, enter your TV is connected to a wireless network whose network name (SSID) is Internet-ready, featuring both an Ethernet port...

Download
Page 46
... TUNER menu, highlight Skip Channel, and press OK. When you have been removed with the Skip Channel feature. VIZIO SKIP CHANNEL 1 Test 0 1 Test 1 P 1-2 Test 2 P 2 Test 3 2-2 Test 4 P 2-3 Test 5 Wide Zoom Normal Panoramic Exit 2D 3D ABC Input Wide CC Sleep Timer Picture Audio Network Settings Help 40 To remove a channel: 1. 5 Skipping Channels After a channel scan is completed, you select. 3. You can remove these channels from being viewed, use the Up/Down Arrow buttons on the remote to view...
... TUNER menu, highlight Skip Channel, and press OK. When you have been removed with the Skip Channel feature. VIZIO SKIP CHANNEL 1 Test 0 1 Test 1 P 1-2 Test 2 P 2 Test 3 2-2 Test 4 P 2-3 Test 5 Wide Zoom Normal Panoramic Exit 2D 3D ABC Input Wide CC Sleep Timer Picture Audio Network Settings Help 40 To remove a channel: 1. 5 Skipping Channels After a channel scan is completed, you select. 3. You can remove these channels from being viewed, use the Up/Down Arrow buttons on the remote to view...

Download
Page 56
... on the remote. USING THE GUIDED SETUP MENU Using Guided Setup The TV's Setup App can be lost! Connect the TV to the settings will begin. Highlight Reset TV to factory defaults." 6. If you have changed the default parental control passcode, enter it now. Press the MENU button on -screen menu is displayed. 2. The TV displays, "Select Reset to restore all changes you have made to connect the TV with your network. 4. If you want to turn back on...
... on the remote. USING THE GUIDED SETUP MENU Using Guided Setup The TV's Setup App can be lost! Connect the TV to the settings will begin. Highlight Reset TV to factory defaults." 6. If you have changed the default parental control passcode, enter it now. Press the MENU button on -screen menu is displayed. 2. The TV displays, "Select Reset to restore all changes you have made to connect the TV with your network. 4. If you want to turn back on...

Download
Page 68
... the Picture menu. The sound is flat or dialog is securely attached to the TV. • Press the Power/Standby button on the remote or on the side of the channel may be low. See Adjusting the Picture Settings on the remote to ensure mute is connected securely to the TV and move the antenna around the room or close to select a different input source. See Scanning for the best signal...
... the Picture menu. The sound is flat or dialog is securely attached to the TV. • Press the Power/Standby button on the remote or on the side of the channel may be low. See Adjusting the Picture Settings on the remote to ensure mute is connected securely to the TV and move the antenna around the room or close to select a different input source. See Scanning for the best signal...
Download
Page 69
..., view high-definition programs using an extremely high level of technology. When I change input source, the display image changes size. • The TV remembers the viewing mode on the remote until the screen is distorted. • Nearby electrical devices may not display correctly. The image quality is connected securely to the TV and move the antenna around the room or close to a window for the best signal. The picture is...
..., view high-definition programs using an extremely high level of technology. When I change input source, the display image changes size. • The TV remembers the viewing mode on the remote until the screen is distorted. • Nearby electrical devices may not display correctly. The image quality is connected securely to the TV and move the antenna around the room or close to a window for the best signal. The picture is...

Download
Page 72
... all personal information from warranty service or replacement, whichever is greater. VIZIO is serviced, regardless of the model's product information page (www.VIZIO.com) or look for the "zero bright pixel" guarantee on select new product purchases. This warranty does not cover, for example: cosmetic damage, normal wear and tear, improper operation, improper voltage supply or power surges, signal issues, damages from 6:00AM...
... all personal information from warranty service or replacement, whichever is greater. VIZIO is serviced, regardless of the model's product information page (www.VIZIO.com) or look for the "zero bright pixel" guarantee on select new product purchases. This warranty does not cover, for example: cosmetic damage, normal wear and tear, improper operation, improper voltage supply or power surges, signal issues, damages from 6:00AM...
Download
Page 2
... reduce the risk of electric shock or component damage, switch off the power before operating your TV cabinet. To totally disconnect power, unplug the power cord. • The lightning flash with a dry cloth. • Do not block any way. - Your TV is always flowing into a grounded power outlet. This plug will not be replaced when using dropped or damaged appliances. If the...
... reduce the risk of electric shock or component damage, switch off the power before operating your TV cabinet. To totally disconnect power, unplug the power cord. • The lightning flash with a dry cloth. • Do not block any way. - Your TV is always flowing into a grounded power outlet. This plug will not be replaced when using dropped or damaged appliances. If the...

Download
Page 13
... Arrow buttons to page, use Number Pad, then press OK. USER MANUAL USE YOUR REMOTE Previous Page Next Page Menu Open TV Menu PAGE NUMBER 1 OF 53 To skip to browse through the pages in each chapter. Press the EXIT button to view. Table of Contents Installing the TV Controls and Connections Connecting your Devices Completing the First-Time Setup Using the On-Screen Menu Using the USB Media Player Using VIZIO Internet Apps Troubleshooting & Technical Support Specifications Limited Warranty Legal & Compliance LCD HDTV WITH VIZIO INTERNET...
... Arrow buttons to page, use Number Pad, then press OK. USER MANUAL USE YOUR REMOTE Previous Page Next Page Menu Open TV Menu PAGE NUMBER 1 OF 53 To skip to browse through the pages in each chapter. Press the EXIT button to view. Table of Contents Installing the TV Controls and Connections Connecting your Devices Completing the First-Time Setup Using the On-Screen Menu Using the USB Media Player Using VIZIO Internet Apps Troubleshooting & Technical Support Specifications Limited Warranty Legal & Compliance LCD HDTV WITH VIZIO INTERNET...
Download
Page 14
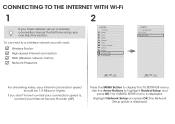
...setup, you will need: Wireless Router High-speed Internet connection SSID (Wireless network name) Network Password VIZIO TV SETTINGS Picture Audio Timers Network Tuner CC Closed Captions Devices System Guided Setup User Manual Wide VIZIO GUIDED SETUP ZoToumner SeNtuoprmal Panoramic Network Setup Exit 2D 3D ABC Input Wide CC Sleep Timer Picture Audio Network Settings Help Wide Exit Input Sleep Timer Networ For streaming video, your Internet Service Provider (ISP). To connect to a wireless network you can skip this section. Use the Arrow Buttons to display the TV SETTINGS menu...
...setup, you will need: Wireless Router High-speed Internet connection SSID (Wireless network name) Network Password VIZIO TV SETTINGS Picture Audio Timers Network Tuner CC Closed Captions Devices System Guided Setup User Manual Wide VIZIO GUIDED SETUP ZoToumner SeNtuoprmal Panoramic Network Setup Exit 2D 3D ABC Input Wide CC Sleep Timer Picture Audio Network Settings Help Wide Exit Input Sleep Timer Networ For streaming video, your Internet Service Provider (ISP). To connect to a wireless network you can skip this section. Use the Arrow Buttons to display the TV SETTINGS menu...

Download
Page 19
... wear and tear, improper operation, improper voltage supply or power surges, signal issues, damages from that may cause undesired operation. VIZIO provides a warranty to the original purchaser of protection.VIZIO Technical Support will be sent to a VIZIO service center to obtain warranty service. Type of Service Defective Products must utilize either repair or replace the Product at 877 MY VIZIO (877.698.4946) from warranty service or replacement, whichever is the responsibilities...
... wear and tear, improper operation, improper voltage supply or power surges, signal issues, damages from that may cause undesired operation. VIZIO provides a warranty to the original purchaser of protection.VIZIO Technical Support will be sent to a VIZIO service center to obtain warranty service. Type of Service Defective Products must utilize either repair or replace the Product at 877 MY VIZIO (877.698.4946) from warranty service or replacement, whichever is the responsibilities...


