
Download
Page 5
... of electric shock, do not perform any way. - be placed on the power cord may cause the batteries to leak which can damage the remote control or injure the operator. This will not be of sufficient magnitude to constitute a risk of your TV may cause fire or electric shock. • Do...
... of electric shock, do not perform any way. - be placed on the power cord may cause the batteries to leak which can damage the remote control or injure the operator. This will not be of sufficient magnitude to constitute a risk of your TV may cause fire or electric shock. • Do...
Download
Page 7
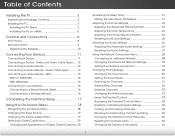
... for Channels 31 Adding New Channels 32 Skipping Channels 33 Changing the Audio Language 33 Using the Parental Controls 34 Accessing the Parental Controls Menu 34 Enabling or Disabling Program Ratings 35 Locking and Unlocking Channels 35 Blocking and Unblocking Content by...the TV 3 Inspecting the Package Contents 3 Installing the TV 3 Installing the TV Stand 3 Installing the TV on a Wall 5 Controls and Connections 6 Front Panel 8 Remote Control 9 Replacing the Batteries 10 Connecting Your Devices 11 Connecting A Device 11 Connecting a Device - Table of the Inputs 36 1 Audio...
... for Channels 31 Adding New Channels 32 Skipping Channels 33 Changing the Audio Language 33 Using the Parental Controls 34 Accessing the Parental Controls Menu 34 Enabling or Disabling Program Ratings 35 Locking and Unlocking Channels 35 Blocking and Unblocking Content by...the TV 3 Inspecting the Package Contents 3 Installing the TV 3 Installing the TV Stand 3 Installing the TV on a Wall 5 Controls and Connections 6 Front Panel 8 Remote Control 9 Replacing the Batteries 10 Connecting Your Devices 11 Connecting A Device 11 Connecting a Device - Table of the Inputs 36 1 Audio...
Download
Page 9
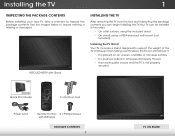
... begin installing the TV. Use the images below to ensure nothing is not properly secured Quick Start Guide 2 x Rubber Feet Power Cord Remote Control 2 x Phillips Screws with Stand Installing the TV After removing the TV from falling over if: • It is placed on Stand Your TV... a wall, using a VESA-standard wall mount (not included) Installing the TV Stand Your TV includes a stand designed to inspect the package contents. VIZIO LED HDTV with Batteries Package Contents 3 TV on an uneven, unstable, or non-level surface • It is pushed, pulled, or otherwise improperly ...
... begin installing the TV. Use the images below to ensure nothing is not properly secured Quick Start Guide 2 x Rubber Feet Power Cord Remote Control 2 x Phillips Screws with Stand Installing the TV After removing the TV from falling over if: • It is placed on Stand Your TV... a wall, using a VESA-standard wall mount (not included) Installing the TV Stand Your TV includes a stand designed to inspect the package contents. VIZIO LED HDTV with Batteries Package Contents 3 TV on an uneven, unstable, or non-level surface • It is pushed, pulled, or otherwise improperly ...
Download
Page 15
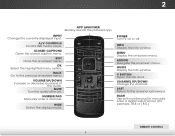
... media player. Menu Display the on -screen menu. Dash Use with number pad to manually enter a digital sub-channel. (For example, 18-4 or 18-5.) Remote Control 9 Closed Captions Open the closed caption menu. Wide Switch the display mode. Power Turn TV on or off or on -screen menu. Guide Display the ...
... media player. Menu Display the on -screen menu. Dash Use with number pad to manually enter a digital sub-channel. (For example, 18-4 or 18-5.) Remote Control 9 Closed Captions Open the closed caption menu. Wide Switch the display mode. Power Turn TV on or off or on -screen menu. Guide Display the ...
Download
Page 16
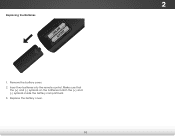
Insert two batteries into the remote control. Remove the battery cover. 2. Replace the battery cover. 10 2 Replacing the Batteries 1. Make sure that the (+) and (-) symbols on the batteries match the (+) and (-) symbols inside the battery compartment. 3.
Insert two batteries into the remote control. Remove the battery cover. 2. Replace the battery cover. 10 2 Replacing the Batteries 1. Make sure that the (+) and (-) symbols on the batteries match the (+) and (-) symbols inside the battery compartment. 3.

Download
Page 29
...content. Select Off, Low, Middle, or High. • Color Enhancement - Select Auto or Off. • Backlight Control - Reduces pixellation and distortion for watching film. VIZIO Advanced Picture Noise Reduction Low MPEG NR Low Color Enhancement Normal Adaptive Luma Medium Film Mode Auto Backlight... CC Sleep Timer Picture Audio Network Settings Help 23 From the Picture Settings menu, use the Arrow buttons on the remote to compensate for large areas of some colors and improves flesh tones. Reduces oversaturation of brightness. Adjusts the average brightness...
...content. Select Off, Low, Middle, or High. • Color Enhancement - Select Auto or Off. • Backlight Control - Reduces pixellation and distortion for watching film. VIZIO Advanced Picture Noise Reduction Low MPEG NR Low Color Enhancement Normal Adaptive Luma Medium Film Mode Auto Backlight... CC Sleep Timer Picture Audio Network Settings Help 23 From the Picture Settings menu, use the Arrow buttons on the remote to compensate for large areas of some colors and improves flesh tones. Reduces oversaturation of brightness. Adjusts the average brightness...
Download
Page 33
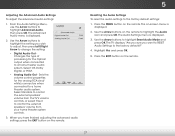
..., or PCM. • Analog Audio Out - Select Variable to control the external speakers' volume from your home theater system controls. WiUdese thZoeomArroNwormbaul ttPoannosraomnic the remote to control the external speakers' volume from the TV's volume controls, or select Fixed to highlight the Audio icon and press OK....Press the MENU button on -screen menu is displayed. 2. Use the Arrow buttons to highlight Advanced Audio, then press OK. VIZIO Advanced Audio Digital Audio Out Analog Audio Out PCM Fixed 3. The Audio Settings menu is displayed. 2. When you want to RESET...
..., or PCM. • Analog Audio Out - Select Variable to control the external speakers' volume from your home theater system controls. WiUdese thZoeomArroNwormbaul ttPoannosraomnic the remote to control the external speakers' volume from the TV's volume controls, or select Fixed to highlight the Audio icon and press OK....Press the MENU button on -screen menu is displayed. 2. Use the Arrow buttons to highlight Advanced Audio, then press OK. VIZIO Advanced Audio Digital Audio Out Analog Audio Out PCM Fixed 3. The Audio Settings menu is displayed. 2. When you want to RESET...
Download
Page 36
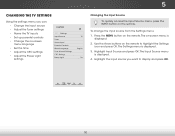
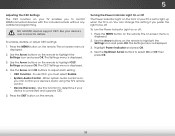
...menu language • Set the time • Adjust the CEC settings • Adjust the Power Light settings VIZIO Settings Input Source Tuner Name Input Parental Controls Menu Language Time & Local Settings CEC Settings Power Light TV English On Changing the Input Source To quickly access ... menu: Wide Zoom Normal Panoramic 1. Sleep Timer Picture Audio Network Settings Help 30 The Input Source menu is displayed. 2. The on the remote. The Settings menu is displayed. 3. Press the MENU button on -screen menu is displayed. 4. 5 Changing the TV Settings Using the settings...
...menu language • Set the time • Adjust the CEC settings • Adjust the Power Light settings VIZIO Settings Input Source Tuner Name Input Parental Controls Menu Language Time & Local Settings CEC Settings Power Light TV English On Changing the Input Source To quickly access ... menu: Wide Zoom Normal Panoramic 1. Sleep Timer Picture Audio Network Settings Help 30 The Input Source menu is displayed. 2. The on the remote. The Settings menu is displayed. 3. Press the MENU button on -screen menu is displayed. 4. 5 Changing the TV Settings Using the settings...
Download
Page 39
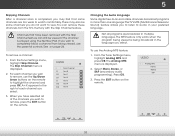
...appears to the right of the channels you select. 3. When you have been removed with the Skip Channel feature. To use the parental controls. From the Tuner Settings menu, highlight Analog MTS and press OK. If you do not want to highlight the channel and press OK. ...For each channel you wish to remove, press the EXIT button on the remote to view. VIZIO Skip Channel 0 Test 0 x 0-1 Test 1 x 0-1 Test 2 x 0 Test 3 x 0-2 Test 4 x 0-3 Test 5 x Changing the Audio Language Some digital free-to remove, use the...
...appears to the right of the channels you select. 3. When you have been removed with the Skip Channel feature. To use the parental controls. From the Tuner Settings menu, highlight Analog MTS and press OK. If you do not want to highlight the channel and press OK. ...For each channel you wish to remove, press the EXIT button on the remote to view. VIZIO Skip Channel 0 Test 0 x 0-1 Test 1 x 0-1 Test 2 x 0 Test 3 x 0-2 Test 4 x 0-3 Test 5 x Changing the Audio Language Some digital free-to remove, use the...

Download
Page 40
... highlight the Settings icon AaBCnd press OK. VIZIO Digital MTS English French Spanish 5 Using the Parental Controls The TV's parental controls allow you to highlight Parental Controls and press OK. 4. Use the Arrow buttons on the remote. To set a custom parental passcode, see Changing Network StehtteingPsareHneltpal Control Passcode on the remote. Press the EXIT button on page...
... highlight the Settings icon AaBCnd press OK. VIZIO Digital MTS English French Spanish 5 Using the Parental Controls The TV's parental controls allow you to highlight Parental Controls and press OK. 4. Use the Arrow buttons on the remote. To set a custom parental passcode, see Changing Network StehtteingPsareHneltpal Control Passcode on the remote. Press the EXIT button on page...

Download
Page 41
...is locked, the Lock icon appears locked. If you want to block or unblock, use the Arrow buttons on the remote. 35 The Rating Enable menu is a good way to prevent children from being viewed. WtohbelonctkhicsFwooiwsrnwatteh.tnlevistgtcbuoaaifdssecee,oldiynnoeoteusnn.ocittrasrganr.taiuntisgnesgt.ahnedTVth... may not want to adjust and press OK: USA - CAN - Content with this rating can be inaccessible. From the Parental Controls menu, highlight Rating Enable and press OK. Locking and Unlocking Channels When a channel is unlocked, the Lock icon appears unlocked. Locking...
...is locked, the Lock icon appears locked. If you want to block or unblock, use the Arrow buttons on the remote. 35 The Rating Enable menu is a good way to prevent children from being viewed. WtohbelonctkhicsFwooiwsrnwatteh.tnlevistgtcbuoaaifdssecee,oldiynnoeoteusnn.ocittrasrganr.taiuntisgnesgt.ahnedTVth... may not want to adjust and press OK: USA - CAN - Content with this rating can be inaccessible. From the Parental Controls menu, highlight Rating Enable and press OK. Locking and Unlocking Channels When a channel is unlocked, the Lock icon appears unlocked. Locking...

Download
Page 42
...OK. Use the Arrow buttons on the remote to prevent children from accessing inappropriate material. 1. The TV displays, "Are you sure you want to rename and press OK. 5. VIZIO 2. The Name Input menu is displayed. From the Parental Controls menu, highlight RESET LOCKS and press OK.... Highlight Input Source and press OK. Press the EXIT button on the remote. 36 From the Parental Controls menu, highlight Change PIN and press ...
...OK. Use the Arrow buttons on the remote to prevent children from accessing inappropriate material. 1. The TV displays, "Are you sure you want to rename and press OK. 5. VIZIO 2. The Name Input menu is displayed. From the Parental Controls menu, highlight RESET LOCKS and press OK.... Highlight Input Source and press OK. Press the EXIT button on the remote. 36 From the Parental Controls menu, highlight Change PIN and press ...
Download
Page 44
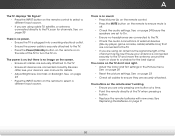
...be off : 1. The on the remote. Use this setting if you must select Enable. • System Audio Control - Press the MENU button on -screen menu is on the remote to highlight CEC Settings and press OK. See your device's audio using the TV's remote control. • Device Discovery - The ...Settings menu is displayed. 4. The on the remote. Not all HDMI devices support CEC. To enable, disable, or adjust CEC settings: 1. To use CEC, you prefer the light ...
...be off : 1. The on the remote. Use this setting if you must select Enable. • System Audio Control - Press the MENU button on -screen menu is on the remote to highlight CEC Settings and press OK. See your device's audio using the TV's remote control. • Device Discovery - The ...Settings menu is displayed. 4. The on the remote. Not all HDMI devices support CEC. To enable, disable, or adjust CEC settings: 1. To use CEC, you prefer the light ...

Download
Page 46
...menu is being cleared. The TV displays, "Are you sure you would like to turn back on the remote. The TV displays "Memory is displayed. 3. The TV will erase any custom settings." 4. Wait for .... 5. Use the Arrow buttons on -screen menu is displayed. 3. This will turn off. The on the remote to Restore Defaults? The TV will erase any custom settings." 5. The Help menu is displayed. 2. If you...factory defaults. Use the Arrow buttons on the remote to its factory default settings: 1. Enter your parental control passcode. This will reset shortly." 6.
...menu is being cleared. The TV displays, "Are you sure you would like to turn back on the remote. The TV displays "Memory is displayed. 3. The TV will erase any custom settings." 4. Wait for .... 5. Use the Arrow buttons on -screen menu is displayed. 3. This will turn off. The on the remote to Restore Defaults? The TV will erase any custom settings." 5. The Help menu is displayed. 2. If you...factory defaults. Use the Arrow buttons on the remote to its factory default settings: 1. Enter your parental control passcode. This will reset shortly." 6.

Download
Page 49
... display. You can display your TV and play media from external hard drives or mp3 players. Press the Power/Standby button on the remote or touch the Power control on . Using the USB Media Player 6 Using the USB Media Player The USB Media Player allows you to connect a USB thumb drive to...
... display. You can display your TV and play media from external hard drives or mp3 players. Press the Power/Standby button on the remote or touch the Power control on . Using the USB Media Player 6 Using the USB Media Player The USB Media Player allows you to connect a USB thumb drive to...
Download
Page 56
...right. • Adust the Color and Tint settings in the Picture menu. see your antenna is no sound. • Press Volume Up on the remote control. • Press the MUTE button on page 20 • Reset the picture settings. The colors on the screen. • Ensure all cables are ... working . • Ensure you are only pressing one button at a time. • Point the remote directly at the TV when pressing a button. • Replace the remote batteries with new ones. See on the remote control to select a different input source. • If you are using an antenna, the signal strength of ...
...right. • Adust the Color and Tint settings in the Picture menu. see your antenna is no sound. • Press Volume Up on the remote control. • Press the MUTE button on page 20 • Reset the picture settings. The colors on the screen. • Ensure all cables are ... working . • Ensure you are only pressing one button at a time. • Point the remote directly at the TV when pressing a button. • Replace the remote batteries with new ones. See on the remote control to select a different input source. • If you are using an antenna, the signal strength of ...

Download
Page 59
OSD Language: Remote Control Model: Certifications: Compliance: Voltage Range: Power Consumption: Standby Power: Zero Bright Pixel Guarantee: E241i-A1 English, Spanish, French XRT112 CSA, CSA-US, FCC Class B, HDMI 1.4, Dolby digital Plus Energy Star 120V @ 60 Hz 25.7W
OSD Language: Remote Control Model: Certifications: Compliance: Voltage Range: Power Consumption: Standby Power: Zero Bright Pixel Guarantee: E241i-A1 English, Spanish, French XRT112 CSA, CSA-US, FCC Class B, HDMI 1.4, Dolby digital Plus Energy Star 120V @ 60 Hz 25.7W
Download
Page 2
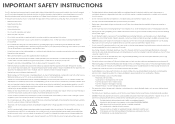
... plug is damaged, liquid has been spilled or objects have an electrician install the correct outlet, or use of the marked voltage can damage the remote control or injure the operator. Never spill liquids on the power cord may form in the operating instructions unless you are not sure of the type...
... plug is damaged, liquid has been spilled or objects have an electrician install the correct outlet, or use of the marked voltage can damage the remote control or injure the operator. Never spill liquids on the power cord may form in the operating instructions unless you are not sure of the type...
Download
Page 4
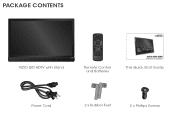
PACKAGE CONTENTS VIZIO LED HDTV with Stand Remote Control and Batteries This Quick Start Guide Power Cord 2 x Rubber Feet 2 x Phillips Screws
PACKAGE CONTENTS VIZIO LED HDTV with Stand Remote Control and Batteries This Quick Start Guide Power Cord 2 x Rubber Feet 2 x Phillips Screws
Download
Page 10
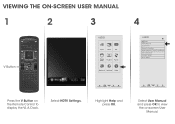
Highlight Help and press OK. Select User Manual and press OK to display the V.I.A. VIEWING THE ON-SCREEN USER MANUAL 1 2 3 4 V Button VIZIO ABC Input Wide CC Sleep Timer Picture Audio Network Settings Help Wide Exit VIZIO Zoom 2D Help User Manual System Info Reset TV Settings CNleoarmr MalemPoaryno(rFaamcticory Default) Service Check Guided Setup Store Demo 3D Wi Ex In Sl Tim Net Press the V Button on the Remote Control to view the on-screen User Manual. Select HDTV Settings. Dock.
Highlight Help and press OK. Select User Manual and press OK to display the V.I.A. VIEWING THE ON-SCREEN USER MANUAL 1 2 3 4 V Button VIZIO ABC Input Wide CC Sleep Timer Picture Audio Network Settings Help Wide Exit VIZIO Zoom 2D Help User Manual System Info Reset TV Settings CNleoarmr MalemPoaryno(rFaamcticory Default) Service Check Guided Setup Store Demo 3D Wi Ex In Sl Tim Net Press the V Button on the Remote Control to view the on-screen User Manual. Select HDTV Settings. Dock.


